Go Back
- 1 cup graham cracker crumbs - 1/4 cup unsalted butter, melted - 1/3 cup granulated sugar - 1/2 cup creamy peanut butter - 1 cup cream cheese, softened - 1 cup powdered sugar - 1 teaspoon vanilla extract - 1/2 cup whipped topping (or whipped cream) - 1/3 cup caramel sauce (store-bought or homemade) - Crushed peanuts for garnish Gathering the right ingredients is key to making these pie cups delightful. Start with graham cracker crumbs for a tasty base. Melt the unsalted butter and mix it with sugar. This creates a crust that holds well. Next, you need creamy peanut butter, which gives the filling its rich flavor. Softened cream cheese adds creaminess. The powdered sugar balances the sweetness. A splash of vanilla extract enhances the taste. For a light texture, whipped topping is perfect. The caramel sauce adds a sweet drizzle, and crushed peanuts on top give a nice crunch. - Muffin tin - Cupcake liners - Mixing bowls - Whisk or electric mixer You will need a muffin tin to shape the cups. Cupcake liners help remove them easily. Mixing bowls are crucial for combining ingredients. A whisk or electric mixer makes beating the cream cheese smooth and quick. These tools will help you create the perfect No-Bake Caramel Peanut Butter Pie Cups. With the right ingredients and tools, you're ready to make this fun dessert. 1. In a mixing bowl, combine 1 cup of graham cracker crumbs, 1/4 cup of melted unsalted butter, and 1/3 cup of granulated sugar. Mix well until it looks like wet sand. 2. Line a muffin tin with cupcake liners. Press the crumb mixture into the bottom of each liner. Make sure it is firm and even. 1. In another bowl, beat 1 cup of softened cream cheese until smooth. This will be your base. 2. Next, mix in 1/2 cup of creamy peanut butter, 1 cup of powdered sugar, and 1 teaspoon of vanilla extract. Stir until it is fluffy and well combined. 3. Now gently fold in 1/2 cup of whipped topping. This creates a light and creamy filling. 1. Spoon the peanut butter filling over the crusts in the muffin liners. Smooth the tops for a nice finish. 2. Drizzle 1/3 cup of caramel sauce generously over each cup. Let it flow down the sides for a beautiful look. 3. Place the pie cups in the refrigerator. Let them set for at least 2 hours or until they are firm. To make the best crust, ensure your graham cracker mixture has the right feel. It should look like wet sand. If it is too dry, add a bit more melted butter. For a flavor boost, mix in a pinch of cinnamon or a dash of cocoa powder. This adds a nice layer to your crust. When beating cream cheese, make sure it is very soft. This helps it mix well with the peanut butter. Use a whisk or electric mixer for smoothness. You can swap creamy peanut butter for crunchy if you prefer. This change adds texture and fun to your pie cups. Garnishing is key! Sprinkle crushed peanuts on top for a crunchy finish. They not only look great but also add a nice bite. Pair your pie cups with a cold glass of milk or hot coffee. These drinks balance the sweet and salty flavors. {{image_2}} You can easily change the flavors in these pie cups. Try adding chocolate layers. Melt some chocolate and pour it over the filling before the caramel. You can also add white chocolate for a sweeter touch. Using different nut butters is another fun way to mix it up. Almond or cashew butter can give a unique taste. Each nut butter adds its own flavor twist that you might love. If you want gluten-free pie cups, swap the graham crackers for gluten-free crumbs. You can find these at many stores. For a vegan option, use coconut cream instead of cream cheese. You can replace the whipped topping with coconut whipped cream. These easy changes let everyone enjoy these tasty treats. How you serve these pie cups can add to the fun! Try using mason jars instead of muffin liners. This gives a cute look and is great for parties. You can also make mini versions with a smaller muffin tin. These bite-sized treats are perfect for sharing and look delightful on any table. After you assemble your No-Bake Caramel Peanut Butter Pie Cups, store them in the fridge. Use an airtight container to keep them fresh. These cups can last up to five days in the refrigerator. Make sure they are covered well to avoid drying out. Yes, you can freeze No-Bake Caramel Peanut Butter Pie Cups! They freeze well for up to three months. To freeze, place the cups in a single layer in a freezer-safe container. Separate layers with parchment paper to prevent sticking. When you’re ready to enjoy them, move the cups to the fridge to thaw overnight. This keeps the texture smooth and creamy. How long do these pie cups need to set? These pie cups need to set for at least 2 hours in the fridge. This time helps the filling firm up, making it easier to enjoy. Can I use natural peanut butter instead of creamy peanut butter? Yes, you can use natural peanut butter. However, it may change the texture slightly. Natural peanut butter can be more oily and less creamy. What's the best way to drizzle caramel sauce? To drizzle caramel sauce, use a spoon or a squeeze bottle. This way, you can control the amount and create a beautiful pattern on each cup. Why is my filling not set? If your filling does not set, check if you used enough cream cheese or whipped topping. Also ensure you chilled the pie cups long enough in the fridge. How to fix a crumbly crust? If your crust is crumbly, add a bit more melted butter to the mixture. This helps bind the crumbs together for a firmer base. How many servings does this recipe yield? This recipe yields 12 servings. Each muffin liner holds a delightful cup of pie. Can I adjust the recipe for fewer servings? Yes, you can adjust the recipe. Simply halve the ingredients for 6 servings or even quarter them for 3 servings. You learned how to make delicious No-Bake Caramel Peanut Butter Pie Cups. We covered the key ingredients, tools needed, and each step from crust to filling. I shared tips for a perfect crust and creamy filling. You can even customize the flavors to suit your taste. These dessert cups are easy to make and fun to share. With the right storage, they will stay fresh. I hope you enjoy making this sweet treat as much as I do!

No-Bake Caramel Peanut Butter Pie Cups

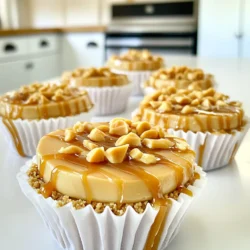
Indulge in these No-Bake Caramel Peanut Butter Pie Cups, a perfect treat for any occasion! With a buttery graham cracker crust, creamy peanut butter filling, and luscious caramel drizzle, these cups are irresistible and easy to make. Ready in just 20 minutes plus chilling time, they’ll wow your family and friends. Click through to discover the full recipe and elevate your dessert game today! #NoBakeDesserts #PeanutButterLovers #DessertGoals #SweetTreats

Ingredients
  

1 cup graham cracker crumbs

1/4 cup unsalted butter, melted

1/3 cup granulated sugar

1/2 cup creamy peanut butter

1 cup cream cheese, softened

1 cup powdered sugar

1 teaspoon vanilla extract

1/2 cup whipped topping (or whipped cream)

1/3 cup caramel sauce (store-bought or homemade)

Crushed peanuts for garnish

Instructions
 

In a mixing bowl, combine the graham cracker crumbs, melted butter, and granulated sugar. Mix well until the crumbs are fully coated and the mixture resembles wet sand.

    Line a muffin tin with cupcake liners and evenly distribute the graham cracker mixture into the bottom of each liner, pressing firmly to form a base. Set aside.

      In another bowl, beat the softened cream cheese until smooth. Add in the creamy peanut butter, powdered sugar, and vanilla extract, mixing until well combined and fluffy.

        Gently fold in the whipped topping until fully incorporated, creating a light and creamy filling.

          Spoon the peanut butter mixture on top of the graham cracker crusts in the muffin liners, smoothing the tops.

            Drizzle caramel sauce generously over each cup, allowing it to flow down the sides.

              Place the pie cups in the refrigerator to set for at least 2 hours or until firm.

                Once set, remove the muffin tin from the refrigerator, and carefully peel away the cupcake liners.

                  Before serving, sprinkle crushed peanuts over the top for added texture and garnish.

                    Prep Time: 20 minutes | Total Time: 2 hours 20 minutes | Servings: 12