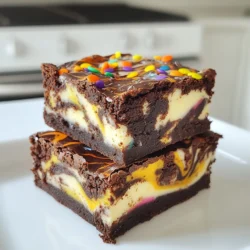
Halloween Cream Cheese Swirl Brownies
Deliciously rich brownies with a creamy cream cheese swirl, perfect for Halloween festivities.
Ingredients
- 1 cup unsalted butter, melted
- 2 cups granulated sugar
- 1 teaspoon vanilla extract
- 4 large eggs
- 1 cup all-purpose flour
- 1 cup unsweetened cocoa powder
- 1 2 baking powder
- 1 4 salt
- 1 cup semi-sweet chocolate chips
- 8 oz cream cheese, softened
- 1 2 powdered sugar
- 1 teaspoon orange zest
- 1 tablespoon Halloween-themed sprinkles
Instructions
- Preheat the oven to 350°F (175°C) and line a 9x13 inch baking pan with parchment paper, leaving some overhang for easy removal.
- In a large mixing bowl, combine the melted butter and granulated sugar. Mix until smooth and creamy.
- Add the vanilla extract and eggs to the butter mixture, one at a time, mixing until fully incorporated after each addition.
- In a separate bowl, whisk together the flour, cocoa powder, baking powder, and salt. Gradually fold this dry mixture into the wet ingredients until just combined.
- Stir in the semi-sweet chocolate chips until evenly distributed throughout the batter.
- In another bowl, beat the softened cream cheese until smooth. Add the powdered sugar and orange zest, mixing until well combined.
- Pour half of the brownie batter into the prepared baking pan and spread evenly. Then dollop the cream cheese mixture over this layer, using a spoon to create swirls like a marble effect.
- Pour the remaining brownie batter on top, reserving some for decoration if desired. Use a toothpick or knife to create a marbled effect by swirling it through the top layer.
- Bake in the preheated oven for 30-35 minutes or until a toothpick inserted in the center comes out mostly clean.
- Allow the brownies to cool in the pan for at least 10 minutes before using the parchment paper to lift them out and cool completely on a wire rack.
- Once cooled, cut into squares and sprinkle with Halloween-themed sprinkles for an extra festive touch.
Notes
Serve on a spooky-themed platter and add mini chocolate pumpkins or ghosts for decoration.