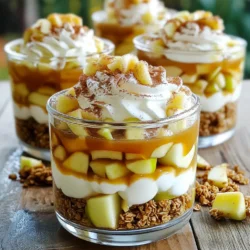
Caramel Apple Trifle Cups
Indulge in these delicious Caramel Apple Trifle Cups that combine the sweetness of apples and creamy delight in each bite. Perfect for gatherings or a cozy dessert at home, this easy recipe features layers of caramelized apples, whipped cream, and granola, all topped with rich caramel sauce. Ready in just 50 minutes, these stunning cups will impress your guests. Click to explore this simple recipe and treat yourself today!