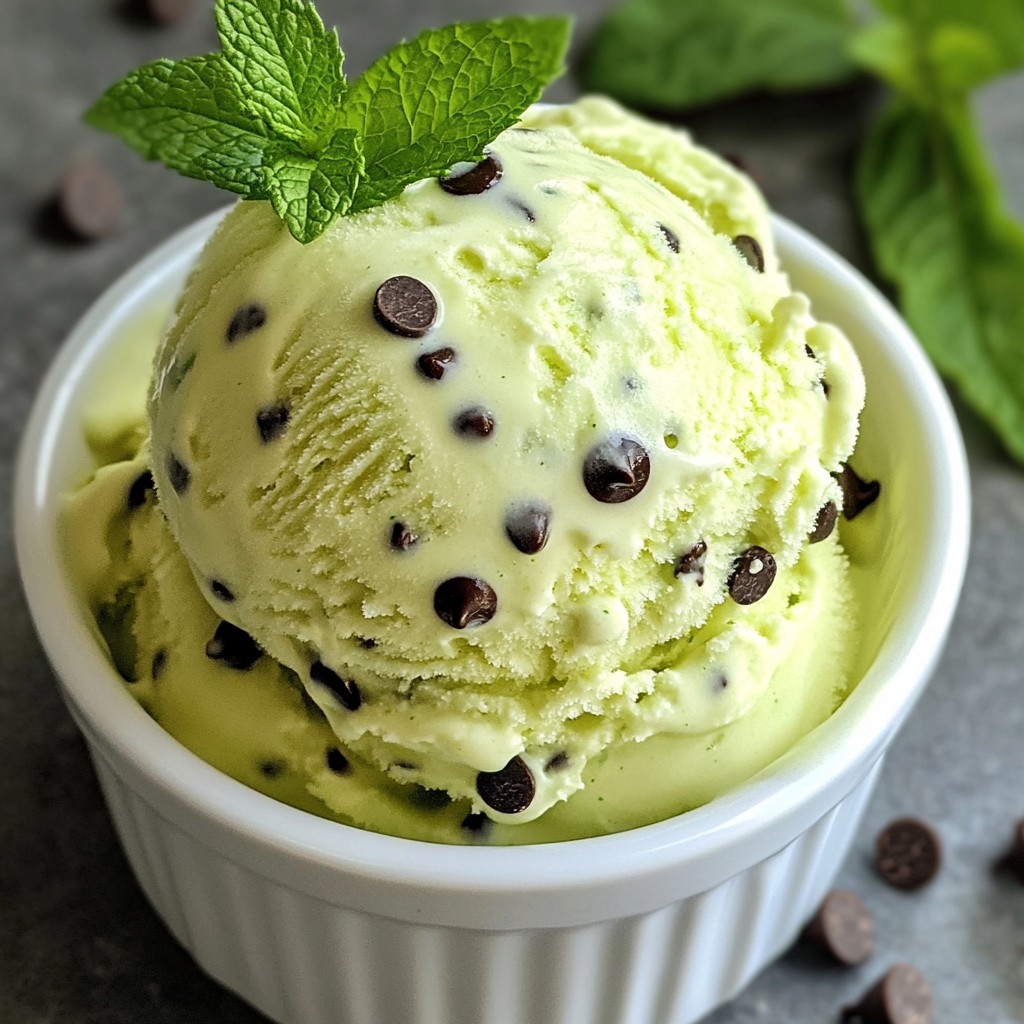
Craving a sweet treat that's both easy and delicious? Let me introduce you to my No-Churn Mint Chocolate Chip Ice Cream Delight! This simple recipe requires no fancy equipment or skills, just a few yummy ingredients. You can whip it up in no time and enjoy creamy minty goodness at home. Ready to dive into a world of minty bliss? Let’s get started!
Why I Love This Recipe
- Easy to Make: This no-churn recipe means you don’t need an ice cream maker, making it accessible for everyone.
- Refreshing Flavor: The combination of mint and chocolate creates a delightful contrast that’s perfect for warm days.
- Customizable: You can adjust the mint flavor and chocolate chip quantity to suit your taste preferences.
- Perfect for Sharing: This recipe yields a generous amount, making it ideal for gatherings and celebrations.
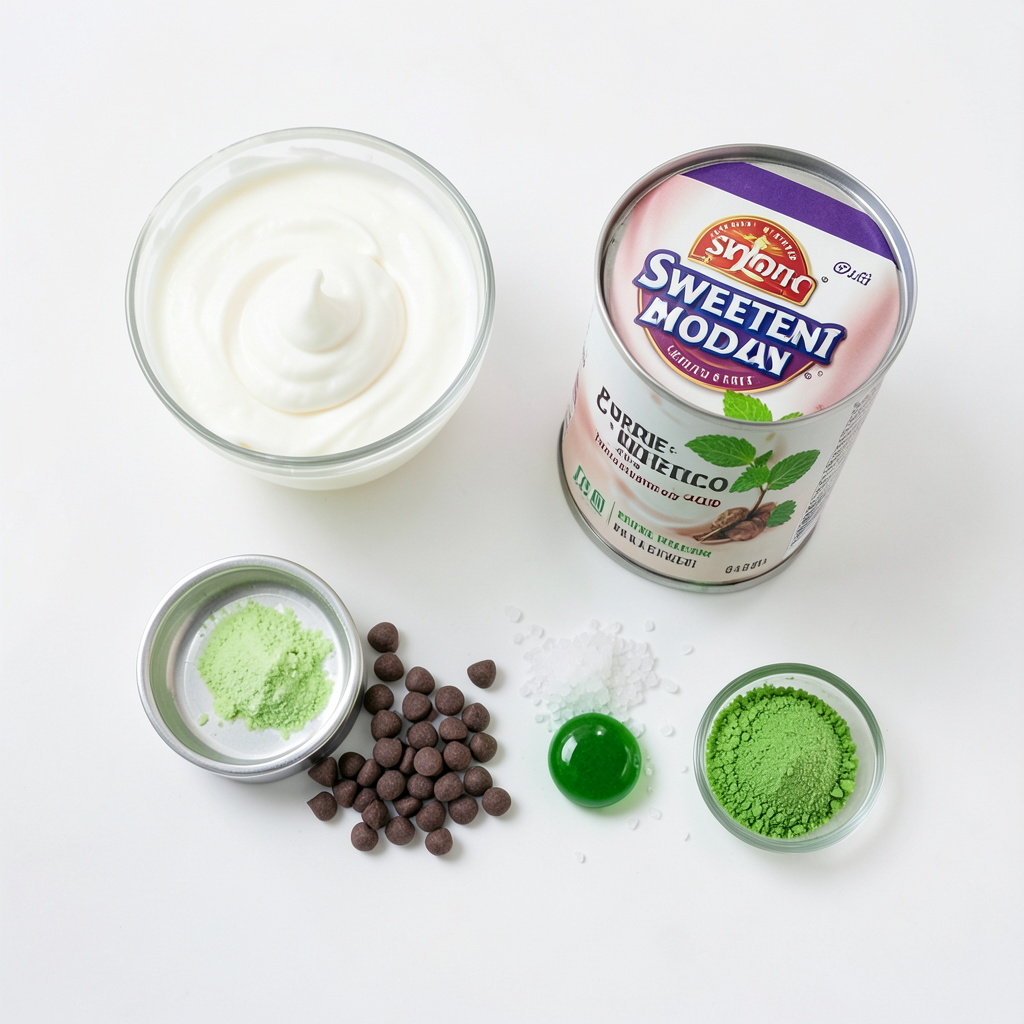
Ingredients
Complete list of ingredients
- 2 cups heavy whipping cream
- 1 can (14 oz) sweetened condensed milk
- 1 teaspoon pure mint extract
- 1 cup mini chocolate chips
- 2-3 drops green food coloring (optional)
- A pinch of sea salt
Ingredient substitutions
You can swap heavy whipping cream with coconut cream for a dairy-free version. Use almond milk or oat milk as a lighter option instead of sweetened condensed milk. If you prefer, use dark chocolate chips instead of mini ones for a richer taste. Mint extract can be replaced with peppermint extract for a stronger mint flavor.
Explanation of key ingredients' roles
- Heavy whipping cream: This creates a light and fluffy base. When whipped, it adds volume and creaminess to the ice cream.
- Sweetened condensed milk: This sweetens the mix and gives a rich texture. It helps bind the ingredients for a smooth ice cream.
- Mint extract: This adds the fresh mint flavor that makes this ice cream special. Use pure extract for the best taste.
- Mini chocolate chips: These provide a delightful crunch and chocolatey bites in each scoop.
- Green food coloring: This is optional, but it makes the ice cream look more fun and festive!
- Sea salt: This enhances the flavors and balances the sweetness of the ice cream.
Each ingredient plays a vital role in creating a tasty, no-churn mint chocolate chip ice cream that you will love.
Step-by-Step Instructions
Detailed preparation steps
1. Start with a large mixing bowl. Pour in 2 cups of heavy whipping cream.
2. Use an electric mixer on medium speed. Whip the cream for 3-5 minutes. Look for stiff peaks.
3. Take a separate bowl. Mix together 14 oz of sweetened condensed milk, 1 teaspoon of mint extract, and a pinch of sea salt. Stir well.
4. If you want that fun mint green color, add 2-3 drops of green food coloring. Mix until the color is even.
5. Now, gently fold the whipped cream into the condensed milk mixture. Use a spatula and be careful. You want to keep it fluffy.
6. Add in 1 cup of mini chocolate chips. Fold them in evenly throughout the mixture.
7. Grab a loaf pan. Transfer the mixture into the pan, smoothing the top with your spatula.
8. Cover the pan with plastic wrap or a lid. Place it in the freezer.
9. Let it freeze for at least 4-6 hours. Wait until it is fully set.
Visual guide
Consider taking pictures at each step. Show the whipped cream and the final mix for fun! You could also create a short video. This makes it easy for others to follow along.
Cooking timeline and tips to keep track of time
- Prep Time: 10 minutes
- Freezing Time: 4-6 hours
- Total Time: 6 hours
Set a timer when you start freezing. This helps you remember when to check your ice cream. Enjoy making this cool treat!
Tips & Tricks
Best practices for whipping cream
Whipping cream makes your ice cream fluffy and rich. Use cold cream for the best results. Chill your mixing bowl and beaters in the fridge for 15 minutes. This keeps the cream cold during whipping. Start at medium speed, then increase to high. Watch for stiff peaks, which should take about 3-5 minutes.
How to achieve the perfect consistency
Mixing the whipped cream into the condensed milk is key. Use a spatula and fold gently. This keeps the air in the whipped cream. Avoid stirring too hard, or it will lose its fluffiness. The final mixture should be light and airy. If it feels too heavy, you might need to whip the cream more.
Troubleshooting common issues
If your ice cream is too icy, it means air was lost. Make sure to fold gently next time. For a too-soft ice cream, you may not have frozen it long enough. Try freezing for a longer time, at least 6 hours. If the cream doesn’t whip well, check if it’s cold enough. If all else fails, try again with fresh cream.
Pro Tips
- Choose the Right Cream: Use heavy whipping cream with a high fat content to ensure your ice cream is rich and creamy.
- Mint Extract Quality Matters: Opt for pure mint extract over artificial flavoring for a more authentic mint flavor.
- Customize Your Chocolate: Experiment with different types of chocolate chips, like dark or white chocolate, to add a unique twist to your ice cream.
- Serving Suggestions: For an elegant presentation, serve the ice cream with a drizzle of chocolate sauce or crushed cookies on top.
Variations
Alternative flavor options
You can switch up the mint in this ice cream. Try adding chocolate mint extract instead of pure mint extract. This gives a rich, deep flavor. You could also use coffee extract for a bold twist. The coffee adds a nice contrast to the sweetness.
Add-ins and toppings
Get creative with add-ins! You can mix in fudge chunks for extra chocolatey goodness. Nuts like walnuts or almonds add a nice crunch. Fresh fruits, such as strawberries or raspberries, bring a bright flavor. Just remember to fold them in gently.
Dairy-free or vegan adaptations
If you want a dairy-free version, use coconut cream instead of heavy cream. Replace sweetened condensed milk with a vegan option made from coconut or almond milk. This keeps the creaminess while being plant-based. Also, check your chocolate chips for dairy-free options.
Storage Info
How to properly store no-churn ice cream
To keep your no-churn mint chocolate chip ice cream fresh, store it in an airtight container. A loaf pan works great, but you can use any freezer-safe container. Make sure to press plastic wrap directly onto the surface of the ice cream before sealing. This prevents ice crystals from forming and keeps the texture smooth.
Shelf life and freezing tips
Your ice cream will stay fresh for about two weeks in the freezer. After that, it may lose flavor and texture. To avoid freezer burn, keep the ice cream away from the door. The door experiences temperature changes every time you open it. For best results, freeze the ice cream for at least 4-6 hours before serving, allowing it to set properly.
Refreezing advice and how to revive softened ice cream
If your ice cream softens, you can refreeze it. However, make sure to mix it well before refreezing. This helps restore some of its original texture. If it becomes too hard, let it sit at room temperature for about 10-15 minutes. This will soften it enough to scoop. Enjoy your creamy treat!
FAQs
How long does it take to make no-churn ice cream?
You can make no-churn ice cream in just 10 minutes. Then, freeze it for at least 4-6 hours. This gives it time to set properly.
Can I use a different extract?
Yes, you can swap mint extract for other flavors like vanilla or almond. Each will give your ice cream a unique taste. Just be sure to use the same amount.
What should I do if my ice cream is too hard?
If your ice cream is too hard, let it sit at room temperature for about 10 minutes. This will soften it up. You can also scoop it with warm water on the scoop.
Can I use an ice cream maker for this recipe?
This recipe is designed for no-churn ice cream. However, you can use an ice cream maker if you want. Just use the same steps but churn it in your machine instead of freezing it directly.
You learned about making no-churn ice cream. We covered the key ingredients, how they work, and possible swaps. You got step-by-step instructions and tips for perfecting your ice cream. I shared fun variations to explore and storage tips to keep it fresh. If you follow these points, you'll enjoy rich, creamy treats. Making no-churn ice cream is easy and fun. Enjoy your delicious creations!