Looking for a fun and tasty treat? Chocolate Covered Strawberry Pops are easy to make and perfect for any occasion! With just a few fresh ingredients and simple steps, you'll create a delicious dessert that impresses everyone. Whether it’s for a party, a gift, or just a treat for yourself, these pops are sure to satisfy your sweet tooth. Let’s dive into this simple recipe and make your own delightful chocolate-covered creations!
Why I Love This Recipe
- Deliciously Decadent: These chocolate-covered strawberry pops combine the rich taste of dark chocolate with the freshness of strawberries, making for a delightful treat.
- Customizable Toppings: You can easily personalize these pops with your favorite toppings, such as nuts or shredded coconut, to suit your taste.
- Perfect for Any Occasion: Whether it’s a party, a romantic date, or just a fun afternoon snack, these pops are a hit with both kids and adults.
- Easy to Make: With just a few simple steps, you can whip up these delightful treats in no time, making them a great option for last-minute desserts.
Ingredients
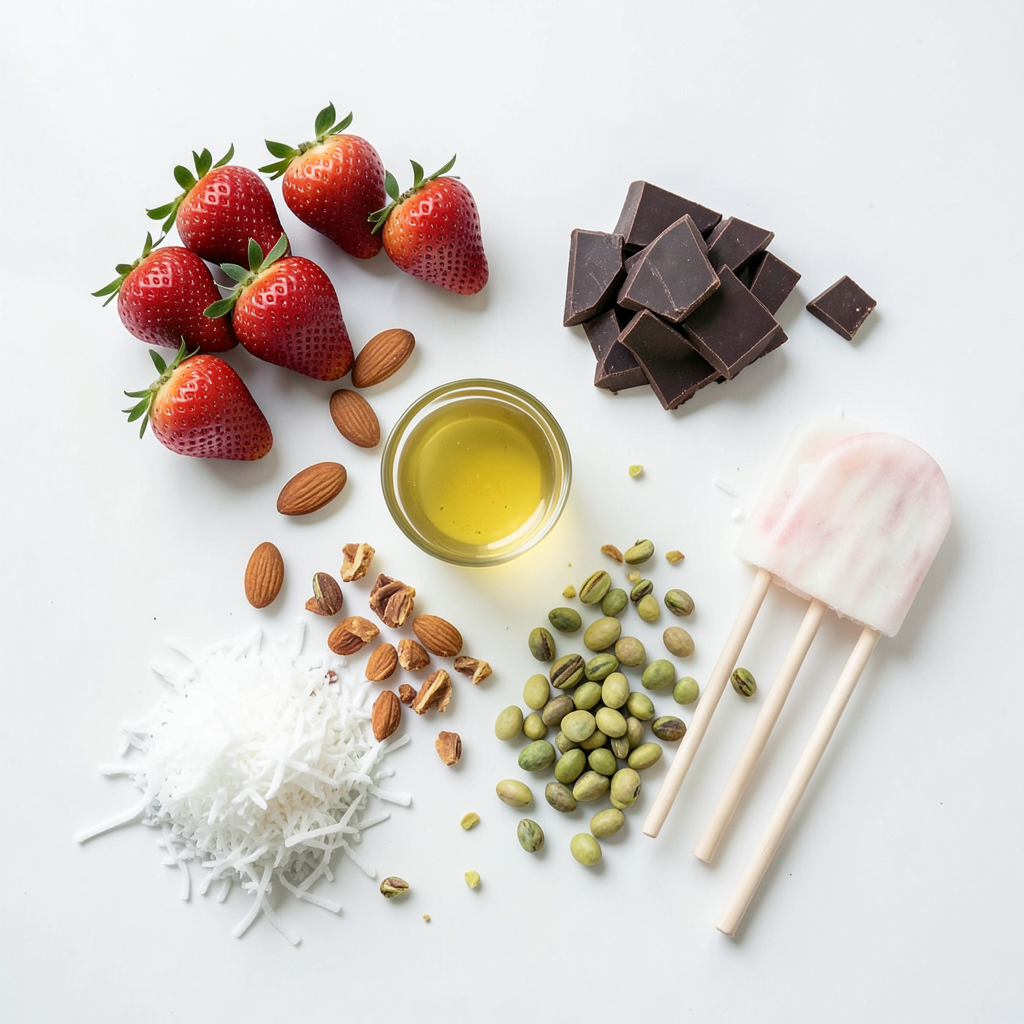
Fresh Ingredients
- 1 pound fresh strawberries, washed and dried
- 8 ounces dark chocolate, chopped
- 2 tablespoons coconut oil (or unsalted butter)
Topping Options
- 1/2 cup crushed nuts (almonds or pistachios)
- 1/2 cup shredded coconut
- Additional topping ideas (sprinkles, sea salt, etc.)
Equipment Needed
- Lollipop sticks or wooden skewers
- Microwave-safe bowl
- Parchment-lined baking sheet
Gathering the right ingredients makes this treat easy and fun. Fresh strawberries are the star here. Choose ones that are bright and firm for the best taste. The dark chocolate brings a rich flavor. I like to add coconut oil. It helps the chocolate melt smoothly and coat the strawberries well.
You can customize your toppings to make these pops your own. Crushed nuts add a nice crunch. Shredded coconut gives a tropical twist. You can also try colorful sprinkles or a sprinkle of sea salt for contrast.
To make these pops, you need a few simple tools. Lollipop sticks or wooden skewers are key for dipping the berries. A microwave-safe bowl is perfect for melting the chocolate. Don’t forget a parchment-lined baking sheet to cool your pops on. This setup makes it all easier and more fun!
Step-by-Step Instructions
Preparing the Strawberries
Start by washing and drying your strawberries. Choose firm, ripe ones for the best taste. Next, take your lollipop sticks and insert them into the top of each strawberry. Push the sticks about halfway down. This helps them stay balanced when you dip them in chocolate. Once you have all the sticks in place, set the strawberries aside on a parchment-lined baking sheet. This will catch any drips and keep your workspace clean.
Melting the Chocolate
Now, it’s time to melt the chocolate. Chop up the dark chocolate into small pieces. Place the chocolate in a microwave-safe bowl. Add two tablespoons of coconut oil. This gives your chocolate a nice shine and smoothness. Heat the bowl in the microwave in 30-second intervals. Stir the mixture well between each interval. This helps avoid burning the chocolate. Keep heating until the chocolate is fully melted and smooth.
Dipping and Decorating
Hold each strawberry by the stick. Dip it into the melted chocolate, swirling it around to coat it completely. Let any extra chocolate drip off. Before the chocolate sets, roll or sprinkle the strawberries in your choice of toppings. You can use crushed nuts or shredded coconut for a tasty crunch. Once decorated, place the chocolate-covered strawberries back on the parchment-lined baking sheet. Repeat this process until all strawberries are coated. For the final touch, chill the baking sheet in the refrigerator for about 30 minutes. This makes the chocolate set firmly. Enjoy your delicious chocolate-covered strawberry pops!
Tips & Tricks
Best Practices for Chocolate Dipping
To avoid chocolate clumping, make sure to chop the chocolate into small pieces. This helps it melt evenly. Add the coconut oil to the chocolate. This will give it a nice shine and keep it smooth. Use a microwave-safe bowl and heat the mixture in short bursts. Stir after each burst to keep the heat even.
For an even coat, hold the strawberry by the stick. Dip it straight down into the chocolate. Swirl it around for a full coat. Let excess chocolate drip back into the bowl. This way, you won’t have thick clumps.
Presentation Ideas
For creative serving, arrange the pops in a tall glass. This makes them look fun and easy to grab. You can also place them on a colorful platter. Add fresh mint leaves around the pops for a pop of color. Drizzle extra melted chocolate over the pops for an elegant touch.
Try using cupcake liners to hold each pop. This adds a cute look and makes them easy to serve.
Common Mistakes to Avoid
One common mistake is not letting the chocolate set. If the chocolate does not harden, the pops may get messy. Ensure you chill them in the fridge for about 30 minutes.
Another issue is chocolate that does not stick well. This can happen if the strawberries are too wet. Make sure to dry them well after washing. Always dip the strawberries right after inserting the sticks. This keeps them fresh and ready for chocolate.
Pro Tips
- Use Quality Chocolate: Select high-quality dark chocolate for the best flavor and smooth texture. Avoid chocolate chips, as they contain stabilizers that can affect melting.
- Chill the Strawberries: Make sure your strawberries are completely dry and chilled before dipping. This helps the chocolate adhere better and prevents it from sliding off.
- Customize Your Toppings: Feel free to experiment with different toppings such as crushed cookies, sprinkles, or sea salt for a unique twist on these pops.
- Store Properly: Keep the chocolate-covered strawberry pops in an airtight container in the refrigerator for up to 3 days to maintain freshness and flavor.
Variations
Different Chocolate Options
You can choose different types of chocolate for your pops. Milk chocolate is sweet and creamy. Dark chocolate has a rich flavor but is less sweet. White chocolate adds a nice touch, too. You can also use yogurt for a lighter option. Each choice gives a unique taste and look to your pops.
Flavor Infusions
Want to mix things up? You can add extracts or flavorings. Vanilla gives a warm touch. Mint adds a fresh kick. Just a few drops can change the whole pop. This way, you can make each bite special and fun.
Seasonal Variations
You don’t have to stick to strawberries only! Try bananas or pears for a twist. Each fruit brings its own flavor. You can also decorate your pops for holidays. Use colored sprinkles or themed designs to celebrate. This makes your treats even more fun and festive!
Storage Info
Best Practices for Storage
Store your chocolate-covered strawberry pops in an airtight container. This keeps them fresh and safe from air. Layer the pops between sheets of parchment paper. This helps avoid sticking. Keep them in the fridge for up to three days. You want to serve them when the chocolate is still firm.
Freezing Options
Yes, you can freeze chocolate-covered strawberries! To freeze them, place the pops on a baking sheet in a single layer. Freeze them for about one hour until firm. Then, transfer them to a freezer-safe bag. They can last up to three months in the freezer. When you’re ready to enjoy them, let them thaw in the fridge for a few hours.
Serving Tips
Serve your pops as soon as you can for the best taste. The chocolate tastes best when fresh. Homemade pops are usually better than pre-made ones. You control the quality and taste. If you make them at home, you can pick the best chocolate and toppings!
FAQs
How do I make sure the chocolate is smooth?
To keep chocolate smooth, use a microwave-safe bowl. Combine the chopped dark chocolate and coconut oil. Heat it in the microwave for 30-second bursts. Stir it after each burst until it melts completely. Avoid heating it too long, as chocolate can burn and get grainy. If that happens, add a bit more coconut oil and stir well. This will help bring back the smooth texture.
Can I use different types of fruit?
Yes, you can use many types of fruit! Bananas, apples, and pineapples work well. Just make sure the fruit is firm and fresh. You can also try using dried fruits like apricots or figs. Each fruit gives a unique taste and look to your pops. Experimenting with different fruits can add fun to your treats!
Where can I buy chocolate-covered strawberry pops?
You can find chocolate-covered strawberry pops at local bakeries and specialty shops. Online, many stores sell them, such as Amazon or gourmet food sites. If you want to make them at home, follow this easy recipe. It’s simple and fun, and you can enjoy them fresh!
Making chocolate-covered strawberries is easy and fun. You learned about fresh ingredients, toppings, and the right equipment. We also explored step-by-step instructions, tips for perfecting your technique, and variations to try. Remember to store them properly for the best taste and freshness.
Get creative with flavors and presentations to impress your friends. With a few simple steps, you can make tasty treats that everyone will love! Enjoy your chocolate-covered strawberry pops and make memories while sharing them.