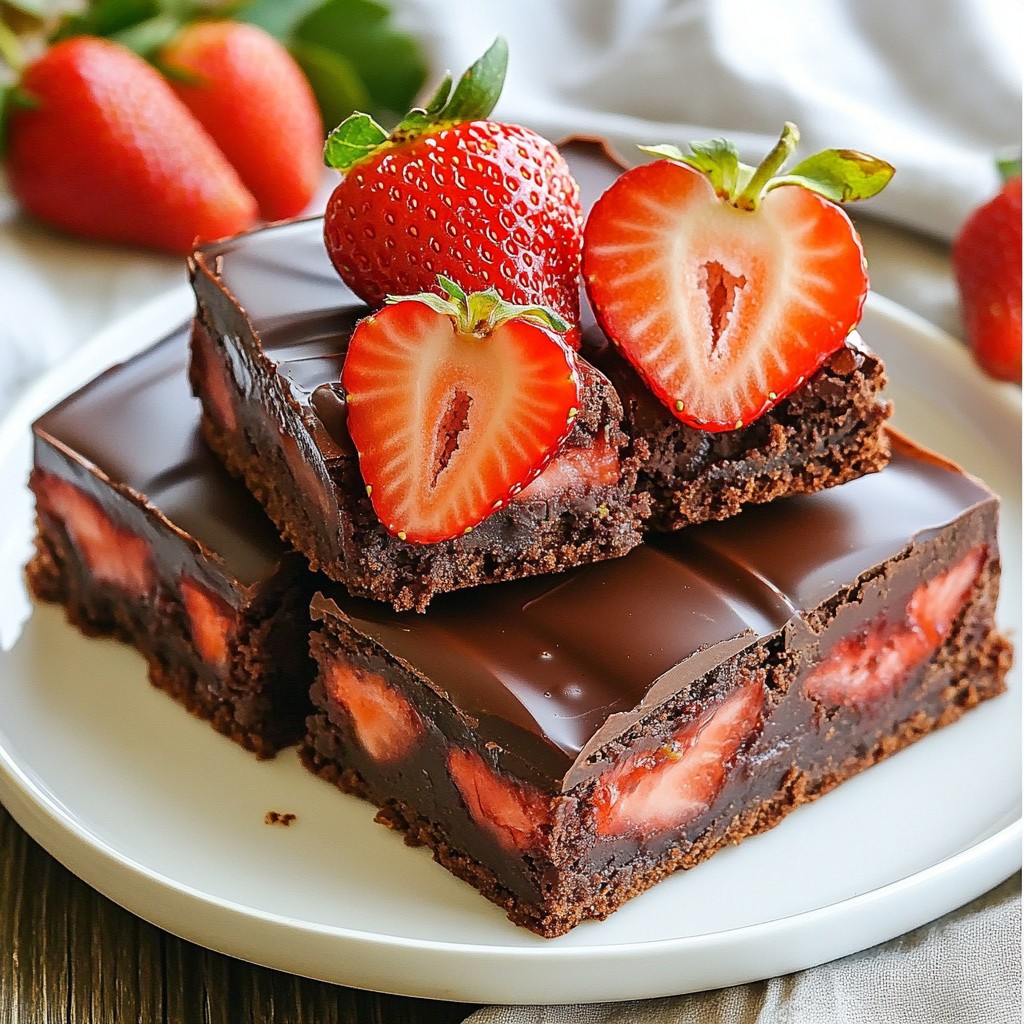
Indulge in the rich flavor of Chocolate Covered Strawberry Brownies, a treat that combines sweetness and decadence. This delightful dessert brings together soft brownies topped with juicy strawberries and a luscious chocolate layer. In this article, I’ll share easy steps to craft these delicious bites, along with helpful tips and variations. Let’s turn your kitchen into a dessert paradise that anyone would love!
Why I Love This Recipe
- Decadent Flavor: The rich chocolate base combined with fresh strawberries creates a delightful treat that satisfies any sweet tooth.
- Easy to Make: This recipe is straightforward and doesn't require any complicated techniques, making it perfect for bakers of all levels.
- Impressive Presentation: The glossy chocolate coating and vibrant strawberries make these brownies not only delicious but also visually stunning for any occasion.
- Perfect for Sharing: With 12 servings, these brownies are great for gatherings, parties, or simply to enjoy with family and friends.
Ingredients
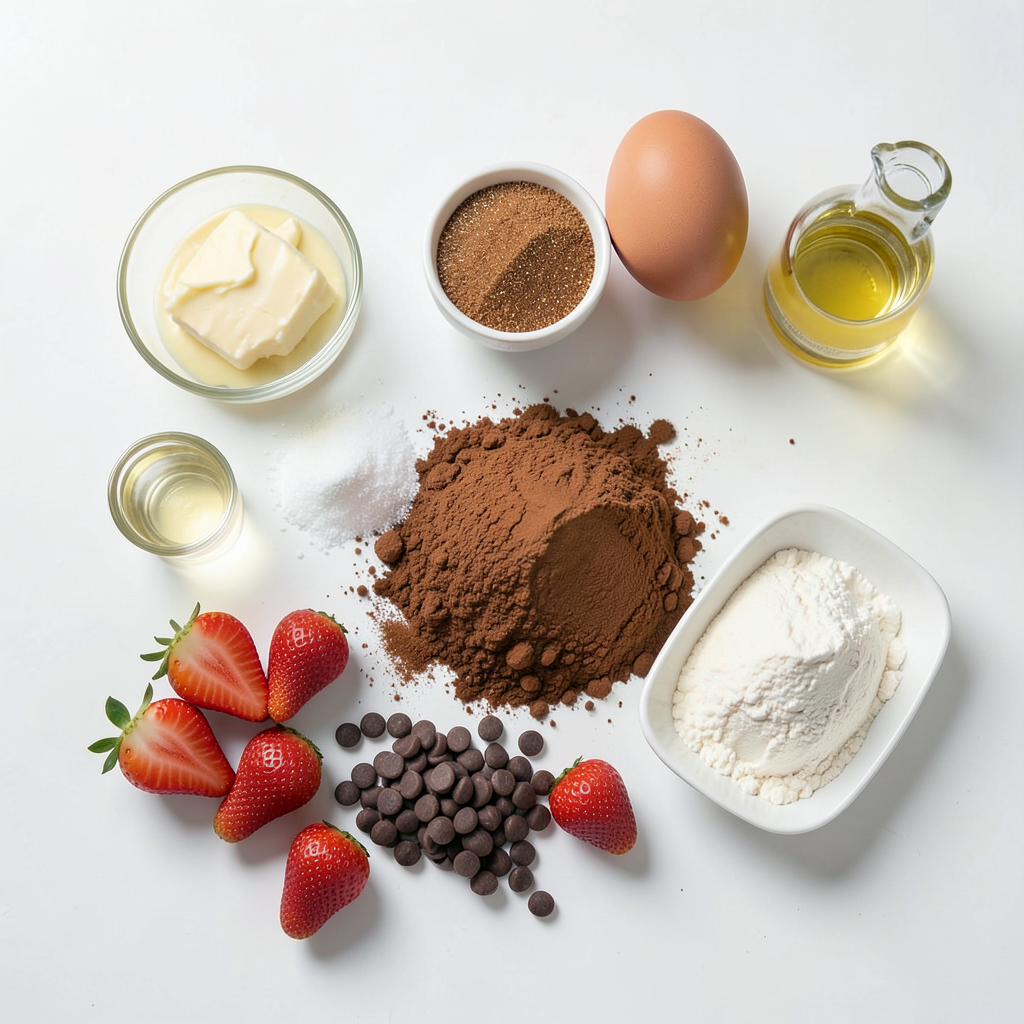
List of Ingredients
- 1 cup unsalted butter, melted
- 1 ¾ cups granulated sugar
- 1 cup brown sugar, packed
- 4 large eggs
- 1 teaspoon vanilla extract
- 1 cup all-purpose flour
- 1 cup unsweetened cocoa powder
- ½ teaspoon salt
- 1 cup fresh strawberries, hulled and halved
- 6 oz semi-sweet chocolate chips
- 2 tablespoons vegetable oil
To make these chocolate-covered strawberry brownies, you need simple yet rich ingredients. First, the butter brings a lovely texture. The mix of granulated and brown sugar adds sweetness and depth. The eggs help bind everything together. Vanilla extract gives a nice aroma.
For the dry mix, all-purpose flour and cocoa powder are key. They create the brownie base. Salt enhances the flavors beautifully. Fresh strawberries add a fruity twist that makes each bite special. Finally, semi-sweet chocolate chips and vegetable oil create a smooth chocolate coating that takes these brownies to the next level.
Tools You'll Need
- Mixing bowls
- Baking pan (9x13-inch)
- Whisk or electric mixer
- Microwave-safe bowl
Having the right tools makes cooking easier and more fun. A mixing bowl is perfect for combining your ingredients. Use a 9x13-inch baking pan to shape your brownies. A whisk or electric mixer helps mix well without lumps. A microwave-safe bowl is necessary for melting chocolate smoothly. These tools help you create delicious brownies with ease.
Step-by-Step Instructions
Preheat and Prepare the Pan
First, set your oven to 350°F (175°C). This step is crucial for even baking. Next, grab a 9x13-inch baking pan. Grease it lightly with butter or line it with parchment paper. This will help you remove the brownies easily after baking.
Combine Wet Ingredients
In a large bowl, mix 1 cup of melted unsalted butter with 1 ¾ cups of granulated sugar and 1 cup of packed brown sugar. Stir these together until well blended. Next, add 4 large eggs, one at a time. Make sure to mix well after each egg. Finally, add 1 teaspoon of vanilla extract and mix until everything is smooth.
Mix Dry Ingredients
Now, take a separate bowl. Sift together 1 cup of all-purpose flour, 1 cup of unsweetened cocoa powder, and ½ teaspoon of salt. Sifting helps to break up clumps and aerate the flour. Once sifted, gently fold the dry mix into the wet ingredients. Be careful not to overmix; stop as soon as it combines.
Assembling the Brownies
Pour half of the brownie batter into your prepared baking pan. Spread it out evenly. Now, take 1 cup of fresh strawberries that are hulled and halved. Arrange them on top of the batter. Pour the rest of the brownie batter over the strawberries, making sure to cover them completely.
Baking Instructions
Place the pan in your preheated oven. Bake for 25 to 30 minutes. To check if they are done, insert a toothpick into the center. It should come out with a few moist crumbs but not wet batter.
Prepare the Chocolate Coating
While the brownies bake, prepare the chocolate coating. In a microwave-safe bowl, combine 6 oz of semi-sweet chocolate chips with 2 tablespoons of vegetable oil. Microwave this mixture in 30-second intervals, stirring each time until it’s smooth and melted.
Finishing Touches
Once the brownies cool completely in the pan, cut them into squares. You can either dip the top of each brownie into the melted chocolate or drizzle the chocolate over them for a nice finish. Let the chocolate set before serving. Enjoy your delightful dessert!
Tips & Tricks
Achieving the Perfect Brownie Texture
To get the best brownie texture, start by mixing your wet ingredients well. I combine melted butter, granulated sugar, and brown sugar until smooth. Add eggs one at a time, mixing after each. This helps incorporate air, making the brownies fluffy. Next, avoid overmixing when you add the dry stuff. Just mix until combined. Overbaking is a common mistake. I watch the time closely. Bake for 25 to 30 minutes. Use a toothpick to check doneness; it should come out with a few moist crumbs.
Chocolate Drizzling Techniques
Drizzling chocolate on your brownies makes them look fancy. I recommend using a fork or a squeeze bottle. If you use a fork, dip it in the melted chocolate and move it back and forth over the brownies. For a squeeze bottle, fill it with melted chocolate and squeeze it gently. This method gives you nice control over the drizzle. Make sure the chocolate is warm and smooth for the best look.
Serving Suggestions
When serving your brownies, think about presentation. Arrange them on a pretty plate. I love to add fresh strawberries on top for color. You can also dust them with powdered sugar for a snowy look. Another idea is to serve them warm with a scoop of ice cream. This adds a creamy touch that pairs well with the chocolate and strawberries.
Pro Tips
- Use Room Temperature Ingredients: Ensure your eggs and butter are at room temperature for a smoother batter and better incorporation of ingredients.
- Don't Overmix the Batter: Mix until just combined to keep your brownies fudgy and prevent them from becoming tough.
- Let the Brownies Cool: Allow the brownies to cool completely in the pan before cutting to achieve clean, even squares.
- Customize Your Toppings: Feel free to add crushed nuts or sprinkles on top of the chocolate for added texture and visual appeal.
Variations
Flavor Additions
You can make these brownies even better by adding flavors. Try mixing in nuts, like walnuts or pecans, for a nice crunch. Chopped nuts add a fun texture. You can also use extracts. Almond extract brings a sweet twist. A hint of coffee can boost the chocolate flavor too.
Alternative Toppings
Want to change the look? Use white chocolate instead of dark chocolate. Melt it the same way as the semi-sweet chocolate. Drizzle it on top for a beautiful contrast. You can also try caramel drizzle. It adds a sweet and gooey touch. Both options make your brownies stand out.
Dietary Adjustments
If you need a gluten-free version, swap the all-purpose flour for a gluten-free blend. Many blends work well in baking. For a vegan option, use flax eggs instead of regular eggs. Mix one tablespoon of ground flaxseed with three tablespoons of water for each egg. These changes keep the taste and texture great!
Storage Info
How to Store Brownies
Store your brownies in an airtight container. This keeps them fresh and moist. Place a piece of wax paper between the layers if you stack them. You can store them at room temperature for up to four days. If they last longer, consider refrigerating them. This helps prevent spoilage, but it might change their texture a bit.
Freezing Instructions
To freeze brownies, let them cool completely first. Cut them into squares. Wrap each piece in plastic wrap. Then, place the wrapped brownies in a freezer-safe bag. This method keeps them fresh for up to three months. When you're ready to enjoy them, take them out of the freezer. Let them thaw in the fridge overnight or at room temperature for a few hours.
Reheating Tips
To reheat brownies, preheat your oven to 350°F (175°C). Place your brownies on a baking sheet. Heat them for about 10 minutes. This warms them up nicely without drying them out. You can also use the microwave. Heat each brownie for about 15-20 seconds. This method makes them soft and gooey again. Enjoy them warm with a scoop of ice cream for a special treat!
FAQs
Can I use frozen strawberries for this recipe?
Yes, you can use frozen strawberries. They will work well, but they may release more juice. This can make the brownies a bit moister. To avoid too much liquid, you can thaw and drain them before adding. Fresh strawberries give the best flavor, but frozen ones can still taste great.
What if I don't have cocoa powder?
If you lack cocoa powder, you can use Dutch-processed cocoa. It has a smooth taste. Another option is to use dark chocolate instead. Melt about 6 oz of dark chocolate and replace cocoa powder with it. This change will give your brownies a rich flavor.
How do I know when the brownies are done baking?
To check if your brownies are done, use a toothpick. Insert it into the center of the brownies. If it comes out with a few moist crumbs, they are ready. Avoid overbaking as this will make them dry. Check around the 25-minute mark for best results.
Can I use dark chocolate chips instead?
Yes, dark chocolate chips can replace semi-sweet ones. They will add a deeper chocolate flavor. If you prefer less sweetness, dark chips are a great choice. Keep in mind that the brownies will be less sweet than with semi-sweet chips.
How long do the brownies last?
Brownies can last about 3 to 5 days at room temperature. Store them in an airtight container to keep them fresh. If you want them to last longer, you can freeze them. They can stay fresh in the freezer for up to three months.
This guide has laid out how to make delicious brownies with strawberries. We covered the key ingredients, tools needed, and each step to bake perfectly. I shared tips for texture and chocolate drizzling, plus fun variations to try. Remember, these brownies can be stored and frozen for later enjoyment. With simple adjustments, you can also cater to different dietary needs. Enjoy making and sharing these tasty treats with family and friends!