Are you ready to elevate your snack game? My Roasted Garlic Hummus recipe is packed with rich flavor and easy to make. It’s smooth, creamy, and perfect for veggies, pita, or just a spoon! In this post, I’ll guide you through the simple steps to create a delicious hummus that’s sure to impress. Let’s dive into the ingredients and get started on this tasty adventure!
Why I Love This Recipe
- Rich Flavor: The roasted garlic adds a deep, sweet flavor that elevates the traditional hummus experience.
- Healthy & Nutritious: This hummus is packed with protein and healthy fats, making it a great snack or meal addition.
- Versatile Dip: Perfect for dipping with vegetables or spreading on sandwiches, it complements many dishes.
- Easy to Make: With just a few ingredients and simple steps, you can whip up this delicious hummus in no time!
Ingredients
List of Required Ingredients
To make roasted garlic hummus, gather these key items:
- 1 cup canned chickpeas, drained and rinsed
- 4 cloves roasted garlic
- 1/4 cup tahini
- 2 tablespoons fresh lemon juice
- 2 tablespoons olive oil, plus extra for drizzling
- 1/2 teaspoon ground cumin
- Salt to taste
- Water as needed
Optional Ingredients for Extra Flavor
You can enhance the flavor with these options:
- Fresh parsley for garnish
- Paprika for garnish
- A pinch of cayenne for heat
- A squeeze of lime juice
Nutritional Information per Serving
Each serving of this hummus has about:
- Calories: 150
- Protein: 5g
- Carbohydrates: 15g
- Fat: 8g
- Fiber: 4g
- Sodium: Varies with added salt
Step-by-Step Instructions
Preparation of Roasted Garlic
To start, I preheat the oven to 400°F (200°C). I take four garlic cloves and wrap them in aluminum foil. This helps them roast well. I place the foil on a baking sheet. After about 25 to 30 minutes, the garlic will be soft and sweet. Once done, I let them cool slightly. Roasted garlic brings a rich, mellow flavor to the hummus.
Blending Ingredients
Next, I grab my food processor. I add the roasted garlic, one cup of drained chickpeas, and 1/4 cup of tahini. I also squeeze in two tablespoons of fresh lemon juice. Then, I pour in two tablespoons of olive oil and sprinkle in 1/2 teaspoon of ground cumin. I blend it all together until smooth. If the mixture feels thick, I add water, one tablespoon at a time. I want it creamy and spreadable.
Adjusting Consistency and Seasoning
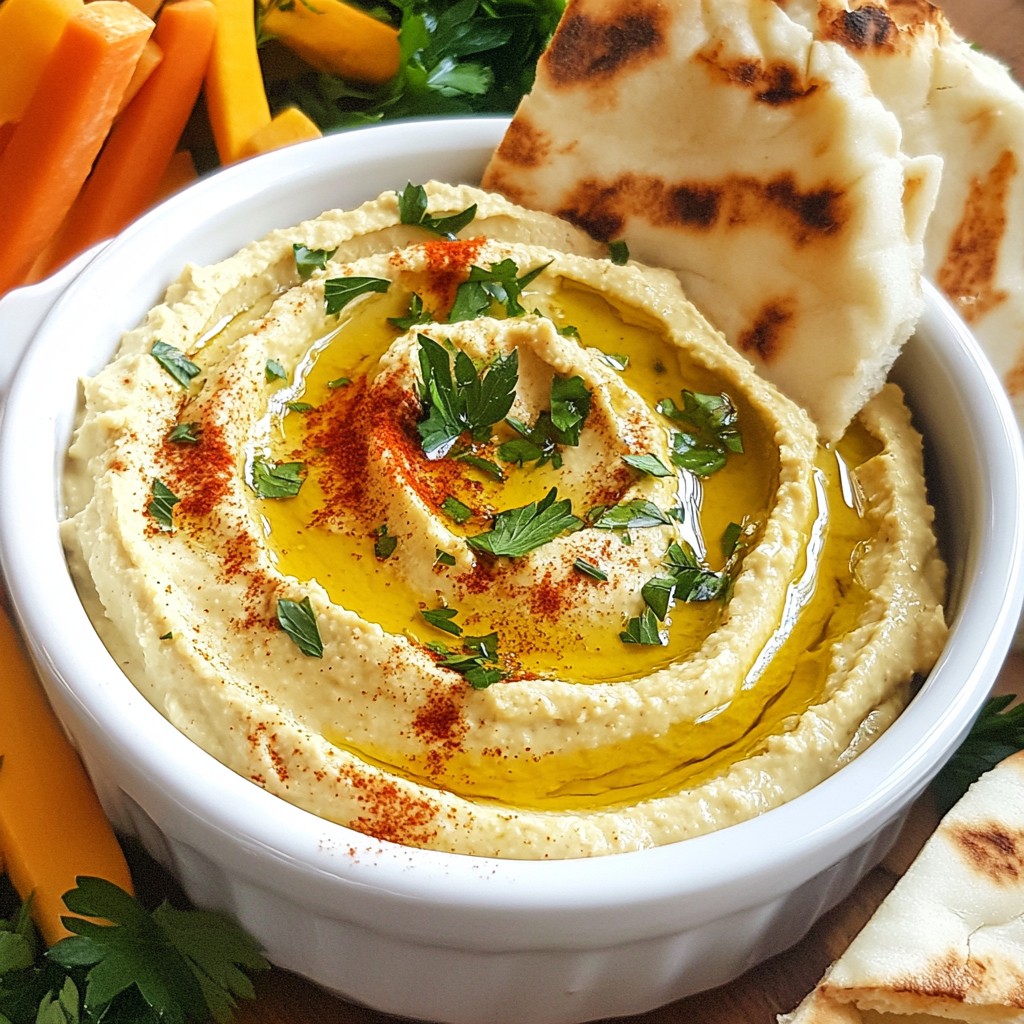
After blending, I taste the hummus. If it needs more flavor, I add salt and blend again. This step is key for a perfect taste. Once satisfied, I transfer the hummus to a serving bowl. I drizzle a little olive oil on top. Finally, I garnish with paprika and fresh parsley. This makes it look bright and inviting.
Tips & Tricks
How to Store Leftover Hummus
If you have leftover hummus, store it in an airtight container. This keeps it fresh. Place a thin layer of olive oil on top. This helps prevent drying out. You can keep it in the fridge for up to one week. If you want to store it longer, freeze it. Just make sure to use a freezer-safe container.
Achieving the Perfect Creamy Texture
To get the best texture, use a food processor. Make sure to blend the ingredients well. Start with the roasted garlic and chickpeas. Add tahini, lemon juice, and olive oil next. If the hummus is too thick, add water slowly. Just a tablespoon at a time. Blend until it’s smooth and creamy.
Pairing Suggestions for Roasted Garlic Hummus
Roasted garlic hummus goes well with many foods. I love serving it with warm pita bread. Fresh veggies like carrots, cucumbers, and bell peppers are great too. You can also use it as a spread for sandwiches. For a twist, try it with crackers or chips. It’s tasty and healthy!
Pro Tips
- Roasting Garlic: Ensure the garlic is wrapped tightly in aluminum foil to prevent it from drying out while roasting, which helps to achieve a sweet, caramelized flavor.
- Consistency Control: When blending the hummus, add water gradually to control the texture. Aim for a creamy consistency that is easy to spread.
- Flavor Infusion: Let the hummus sit for at least 30 minutes before serving to allow the flavors to meld together for a more robust taste.
- Serving Suggestions: Pair the hummus with a variety of dippers like pita chips, fresh vegetables, or even spread it on sandwiches for added flavor.
Variations
Adding Spices for a Kick
You can spice up your hummus easily. Try adding cayenne pepper or smoked paprika. These spices bring warmth and depth. Start with a pinch and blend it in. Taste and adjust as needed. You can also add ground coriander or chili powder for more flavor. Mix in a bit of fresh black pepper for a nice bite. These little tweaks can make a big difference!
Gluten-Free and Vegan Options
This hummus is already vegan and gluten-free! You can enjoy it with pita chips or veggies. If you want a twist, serve it on gluten-free crackers. Use a variety of veggies like carrots, cucumbers, or bell peppers for dipping. This makes a colorful platter, perfect for parties or gatherings.
Creative Serving Ideas
Get creative with how you serve your hummus! Try using it as a spread on sandwiches or wraps. It adds a creamy texture and rich flavor. You can also use it as a dip for chips or pretzels. Another fun idea is to serve it in small bowls at a party. Garnish each bowl with olive oil and fresh herbs. This makes a great appetizer that everyone will love!
Storage Info
Best Practices for Refrigeration
To keep your roasted garlic hummus fresh, store it in an airtight container. Make sure the lid is tight. This helps to prevent air from getting in. Keep the hummus in the fridge. It will stay good for about a week. Always use a clean spoon when serving. This way, you avoid adding extra bacteria.
Freezing Roasted Garlic Hummus
You can freeze roasted garlic hummus for longer storage. Use a freezer-safe container or freezer bag. Leave some space at the top for expansion. This helps prevent spills. When you want to use it, thaw it in the fridge overnight. Once thawed, stir it well. You may need to add a little water to get the right texture again.
Shelf Life Information
Roasted garlic hummus lasts about five to seven days in the fridge. If you freeze it, it can last up to three months. Always check for changes in smell or texture before eating. If it looks off, it's best to throw it away. Enjoy your hummus when it's fresh for the best flavor!
FAQs
Can I use raw garlic instead of roasted?
No, I don’t recommend using raw garlic. Raw garlic has a strong, sharp taste. Roasting softens garlic and gives it a sweet, nutty flavor. Roasted garlic blends well in hummus, making it smooth and rich.
What can I substitute for tahini?
If you don’t have tahini, you can use sunflower seed butter. You can also try almond butter or peanut butter. These options will change the flavor a bit but still work well in the recipe.
How can I make this recipe spicier?
To add heat, try adding a pinch of cayenne pepper or a few dashes of hot sauce. You can also mix in some chopped jalapeños for a fresh kick. Adjust the heat to your taste.
Is Roasted Garlic Hummus healthy?
Yes, Roasted Garlic Hummus is healthy! It is made with chickpeas, which are high in protein and fiber. The healthy fats from olive oil and tahini are good for your heart. Plus, garlic has many health benefits.
How to serve Roasted Garlic Hummus for a party?
For a party, serve Roasted Garlic Hummus in a nice bowl. Drizzle with olive oil and sprinkle paprika on top. Provide pita bread, veggie sticks, and crackers for dipping. You can also add fresh herbs for a colorful touch.
Roasted garlic hummus is easy to make and full of flavor. We reviewed key ingredients, including options for extra taste. I shared simple steps to create the perfect blend and tips for storing leftovers. Different variations let you customize your hummus for any occasion.
Remember to adjust the recipe to your liking. Enjoy this healthy dip at home or at your next gathering. Happy hummus making!