No Bake S’mores Cheesecake Cups Delightful Dessert Treat

WANT TO SAVE THIS RECIPE?

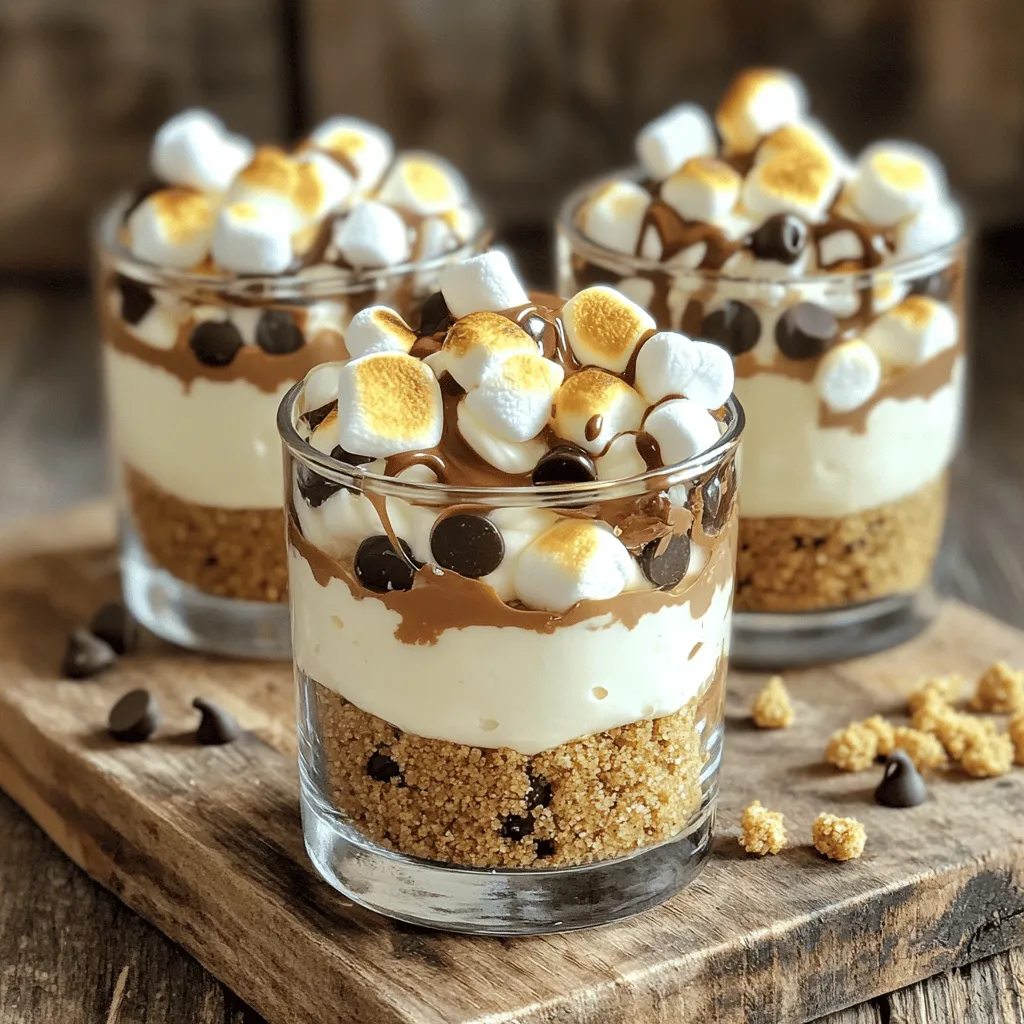
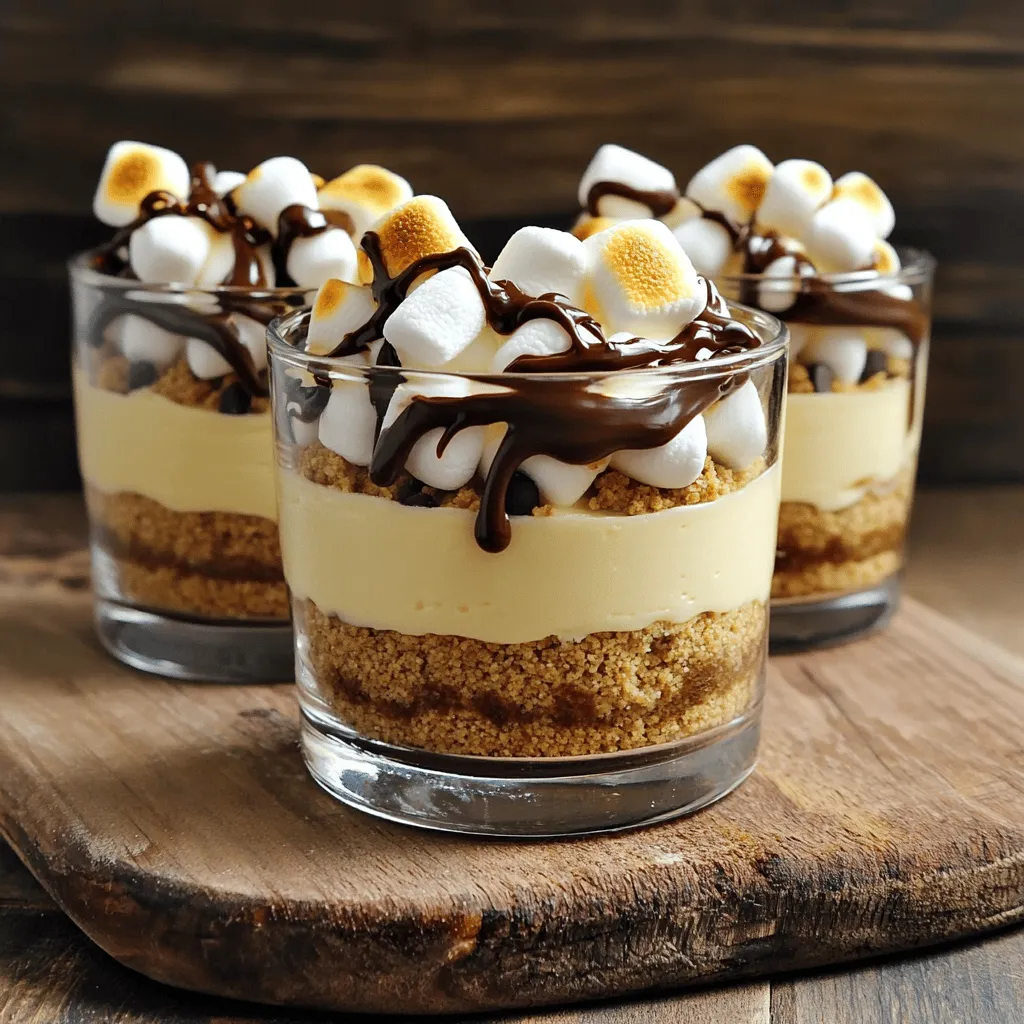
Are you craving a sweet treat that’s fun and easy to make? Look no further! My No Bake S’mores Cheesecake Cups are the perfect way to enjoy classic s’mores without the campfire. With layers of creamy cheesecake, chocolate, and marshmallows, these delightful cups will bring smiles to every dessert lover. Join me as we create this simple no-bake dessert that’s perfect for any occasion!

Ingredients

Main Ingredients

– 1 cup graham cracker crumbs

– 4 tablespoons unsalted butter, melted

– 2 (8 oz) packages cream cheese, softened

– 1 cup powdered sugar

– 1 teaspoon vanilla extract

– 1 cup heavy whipping cream

– 1 cup mini marshmallows

– 1/2 cup chocolate chips

– Extra graham cracker crumbs for topping

– Mini marshmallows for garnish

The first step to our delightful no bake s’mores cheesecake cups is gathering the main ingredients. You need graham cracker crumbs for the base. The melted butter helps bind this crumb. Cream cheese makes the filling rich and smooth. Adding powdered sugar gives it sweetness. Vanilla extract adds warmth and flavor. Heavy whipping cream is crucial for a fluffy texture. Mini marshmallows and chocolate chips give a s’mores twist. Finally, extra graham crumbs and mini marshmallows are for topping.

Equipment Needed

– Mixing bowls

– Electric mixer

– Serving cups

– Measuring cups and spoons

You will also need some tools to make this treat. A few mixing bowls help keep things organized. An electric mixer ensures a smooth, creamy filling. Use serving cups to display your cheesecake cups. Measuring cups and spoons help you get the right amounts. Having these tools ready makes cooking easier and more fun.

Recommended Brands

– Cream cheese brands

– Types of chocolate chips

For cream cheese, I recommend brands like Philadelphia or Trader Joe’s. These brands give great taste and texture. For chocolate chips, Ghirardelli or Nestlé Toll House are fantastic choices. They melt smoothly and add rich flavor. Choosing quality ingredients helps you make the best dessert.

Step-by-Step Instructions

Preparation Steps

Step 1: Prepare the graham cracker crust

Start by mixing 1 cup of graham cracker crumbs with 4 tablespoons of melted unsalted butter. Stir until it looks like wet sand. This mixture gives our cups a nice base.

Step 2: Mix the cheesecake filling

In a large bowl, beat 2 packages of softened cream cheese with 1 cup of powdered sugar and 1 teaspoon of vanilla extract. Mix it until it is smooth and creamy. This makes the cheesecake filling rich and tasty.

Step 3: Combine the whipped cream

In a separate bowl, whip 1 cup of heavy cream until stiff peaks form. Gently fold this whipped cream into the cream cheese mixture. This step adds lightness and fluff to our cheesecake.

Assembly Steps

Step 4: Layering the cheesecake mixture

Take your graham cracker crust and spoon the cheesecake filling over it. Fill each cup generously. You can even stir in 1 cup of mini marshmallows and 1/2 cup of chocolate chips into the filling for extra flavor.

Step 5: Refrigeration instructions

Place the cups in the refrigerator for at least 2 hours. This helps the cheesecake set properly. The longer they chill, the better they taste!

Serving Suggestions

Presentation tips for serving

Serve the cheesecake cups on a wooden board. Add whole graham crackers and chocolate bars around them for a fun look. This makes the dessert even more inviting.

Suggested pairings

These cups pair well with a glass of cold milk or a hot cup of coffee. The mix of flavors will delight your taste buds!

Tips & Tricks

Perfecting the Cheesecake Texture

To make your cheesecake creamy, use softened cream cheese. Beat it until smooth. This helps avoid lumps. Mix the cream cheese, powdered sugar, and vanilla extract well. If lumps form, keep mixing until it is even.

Enhancements for Flavor

You can add fun flavors to your cheesecake. Peppermint or espresso gives it a nice twist. For a lighter option, use Greek yogurt instead of cream cheese. It keeps the taste but cuts down on fat.

Tools for Easier Preparation

Having the right tools makes a big difference. Use mixing bowls and an electric mixer for smooth batter. Silicone molds make serving easy. They help the cheesecake cups pop out without sticking.

Variations

Flavor Variations

You can play with flavors for your no-bake s’mores cheesecake cups. One great idea is to make peanut butter s’mores cheesecake cups. Just mix in some creamy peanut butter into the cheesecake filling. This twist adds a nutty flavor that pairs well with chocolate and marshmallows.

Another fun option is to create fruit-infused versions. For example, try adding fresh raspberries into the mix. Mash the berries and fold them into the cheesecake. This gives your cups a fruity burst of flavor that is refreshing.

Dietary Adaptations

If you need to make gluten-free options for the crust, simply swap graham crackers for gluten-free ones. There are many brands available that taste just as good. This way, everyone can enjoy the treat without worry.

For those who want a dairy-free cheesecake alternative, consider using dairy-free cream cheese. You can find brands made from nuts or soy. They work great in this recipe and make it just as creamy and delicious.

Seasonal Twists

You can also change your no-bake s’mores cheesecake cups with the seasons. In the fall, try pumpkin s’mores. Just add pumpkin puree and warm spices like cinnamon. This makes the dessert cozy and perfect for autumn gatherings.

In the summer, think about making summer berry s’mores cheesecake cups. Use mixed berries like strawberries and blueberries. They add a bright color and a burst of flavor, making the cups light and fun for warm days.

Storage Info

Refrigeration Guidelines

To keep your no bake s’mores cheesecake cups fresh, store them in the fridge. Use airtight containers to prevent moisture loss. These cups should sit in the fridge for up to four days. If you use glass containers, they help maintain coolness. Make sure the lids are on tight to keep out air.

Freezing Instructions

You can freeze these cheesecake cups if you need to store them longer. Use freezer-safe containers to prevent freezer burn. Wrap each cup with plastic wrap before placing it in the container. When you are ready to eat them, thaw the cups in the fridge overnight. This keeps the texture smooth and creamy.

Shelf Life

These cheesecake cups last about four days in the fridge. In the freezer, they can last up to two months. Check for signs of spoilage before eating. If the cheesecake looks discolored or has an off smell, throw it away. Enjoy your dessert while it’s fresh for the best taste!

FAQs

Can I make this recipe ahead of time?

Yes, you can make these cups a day before. For best taste, chill them overnight. This allows the flavors to blend well. Just cover them with plastic wrap to keep them fresh.

What can I substitute for cream cheese?

You can use mascarpone cheese or Greek yogurt. Both have a creamy texture. They also add a unique taste to your cups. You may need to adjust the sugar amount. Taste as you mix for the best flavor.

How do I make a dairy-free version?

For a dairy-free cheesecake, use dairy-free cream cheese. Brands like Tofutti or Kite Hill work well. You can also use blended cashews for a rich texture. Just soak them in water overnight, then blend until smooth.

We covered all the key steps to make delicious no-bake cheesecake cups. You learned about the main ingredients and tools you need. I shared tips for perfect texture and tasty variations. Don’t forget the importance of proper storage. Feel free to customize your flavors and dietary needs. This simple dessert is perfect for any occasion. Enjoy making these treats and impressing your friends and family with your skills. Happy baking!

- 1 cup graham cracker crumbs - 4 tablespoons unsalted butter, melted - 2 (8 oz) packages cream cheese, softened - 1 cup powdered sugar - 1 teaspoon vanilla extract - 1 cup heavy whipping cream - 1 cup mini marshmallows - 1/2 cup chocolate chips - Extra graham cracker crumbs for topping - Mini marshmallows for garnish The first step to our delightful no bake s'mores cheesecake cups is gathering the main ingredients. You need graham cracker crumbs for the base. The melted butter helps bind this crumb. Cream cheese makes the filling rich and smooth. Adding powdered sugar gives it sweetness. Vanilla extract adds warmth and flavor. Heavy whipping cream is crucial for a fluffy texture. Mini marshmallows and chocolate chips give a s'mores twist. Finally, extra graham crumbs and mini marshmallows are for topping. - Mixing bowls - Electric mixer - Serving cups - Measuring cups and spoons You will also need some tools to make this treat. A few mixing bowls help keep things organized. An electric mixer ensures a smooth, creamy filling. Use serving cups to display your cheesecake cups. Measuring cups and spoons help you get the right amounts. Having these tools ready makes cooking easier and more fun. - Cream cheese brands - Types of chocolate chips For cream cheese, I recommend brands like Philadelphia or Trader Joe’s. These brands give great taste and texture. For chocolate chips, Ghirardelli or Nestlé Toll House are fantastic choices. They melt smoothly and add rich flavor. Choosing quality ingredients helps you make the best dessert. - Step 1: Prepare the graham cracker crust Start by mixing 1 cup of graham cracker crumbs with 4 tablespoons of melted unsalted butter. Stir until it looks like wet sand. This mixture gives our cups a nice base. - Step 2: Mix the cheesecake filling In a large bowl, beat 2 packages of softened cream cheese with 1 cup of powdered sugar and 1 teaspoon of vanilla extract. Mix it until it is smooth and creamy. This makes the cheesecake filling rich and tasty. - Step 3: Combine the whipped cream In a separate bowl, whip 1 cup of heavy cream until stiff peaks form. Gently fold this whipped cream into the cream cheese mixture. This step adds lightness and fluff to our cheesecake. - Step 4: Layering the cheesecake mixture Take your graham cracker crust and spoon the cheesecake filling over it. Fill each cup generously. You can even stir in 1 cup of mini marshmallows and 1/2 cup of chocolate chips into the filling for extra flavor. - Step 5: Refrigeration instructions Place the cups in the refrigerator for at least 2 hours. This helps the cheesecake set properly. The longer they chill, the better they taste! - Presentation tips for serving Serve the cheesecake cups on a wooden board. Add whole graham crackers and chocolate bars around them for a fun look. This makes the dessert even more inviting. - Suggested pairings These cups pair well with a glass of cold milk or a hot cup of coffee. The mix of flavors will delight your taste buds! To make your cheesecake creamy, use softened cream cheese. Beat it until smooth. This helps avoid lumps. Mix the cream cheese, powdered sugar, and vanilla extract well. If lumps form, keep mixing until it is even. You can add fun flavors to your cheesecake. Peppermint or espresso gives it a nice twist. For a lighter option, use Greek yogurt instead of cream cheese. It keeps the taste but cuts down on fat. Having the right tools makes a big difference. Use mixing bowls and an electric mixer for smooth batter. Silicone molds make serving easy. They help the cheesecake cups pop out without sticking. {{image_2}} You can play with flavors for your no-bake s'mores cheesecake cups. One great idea is to make peanut butter s'mores cheesecake cups. Just mix in some creamy peanut butter into the cheesecake filling. This twist adds a nutty flavor that pairs well with chocolate and marshmallows. Another fun option is to create fruit-infused versions. For example, try adding fresh raspberries into the mix. Mash the berries and fold them into the cheesecake. This gives your cups a fruity burst of flavor that is refreshing. If you need to make gluten-free options for the crust, simply swap graham crackers for gluten-free ones. There are many brands available that taste just as good. This way, everyone can enjoy the treat without worry. For those who want a dairy-free cheesecake alternative, consider using dairy-free cream cheese. You can find brands made from nuts or soy. They work great in this recipe and make it just as creamy and delicious. You can also change your no-bake s'mores cheesecake cups with the seasons. In the fall, try pumpkin s'mores. Just add pumpkin puree and warm spices like cinnamon. This makes the dessert cozy and perfect for autumn gatherings. In the summer, think about making summer berry s'mores cheesecake cups. Use mixed berries like strawberries and blueberries. They add a bright color and a burst of flavor, making the cups light and fun for warm days. To keep your no bake s'mores cheesecake cups fresh, store them in the fridge. Use airtight containers to prevent moisture loss. These cups should sit in the fridge for up to four days. If you use glass containers, they help maintain coolness. Make sure the lids are on tight to keep out air. You can freeze these cheesecake cups if you need to store them longer. Use freezer-safe containers to prevent freezer burn. Wrap each cup with plastic wrap before placing it in the container. When you are ready to eat them, thaw the cups in the fridge overnight. This keeps the texture smooth and creamy. These cheesecake cups last about four days in the fridge. In the freezer, they can last up to two months. Check for signs of spoilage before eating. If the cheesecake looks discolored or has an off smell, throw it away. Enjoy your dessert while it's fresh for the best taste! Yes, you can make these cups a day before. For best taste, chill them overnight. This allows the flavors to blend well. Just cover them with plastic wrap to keep them fresh. You can use mascarpone cheese or Greek yogurt. Both have a creamy texture. They also add a unique taste to your cups. You may need to adjust the sugar amount. Taste as you mix for the best flavor. For a dairy-free cheesecake, use dairy-free cream cheese. Brands like Tofutti or Kite Hill work well. You can also use blended cashews for a rich texture. Just soak them in water overnight, then blend until smooth. We covered all the key steps to make delicious no-bake cheesecake cups. You learned about the main ingredients and tools you need. I shared tips for perfect texture and tasty variations. Don’t forget the importance of proper storage. Feel free to customize your flavors and dietary needs. This simple dessert is perfect for any occasion. Enjoy making these treats and impressing your friends and family with your skills. Happy baking!

No Bake S’mores Cheesecake Cups

Indulge in the deliciousness of No Bake S’mores Cheesecake Cups with this easy recipe! Perfect for satisfying your sweet cravings, these creamy treats combine graham cracker crust with fluffy cheesecake and melty chocolate. Ready in just 20 minutes (plus chilling time), they are a fun and simple dessert. Click through to discover how to create these delightful cups and impress your family and friends at your next gathering!

Ingredients
  

1 cup graham cracker crumbs

4 tablespoons unsalted butter, melted

2 (8 oz) packages cream cheese, softened

1 cup powdered sugar

1 teaspoon vanilla extract

1 cup heavy whipping cream

1 cup mini marshmallows

1/2 cup chocolate chips

Extra graham cracker crumbs for topping

Mini marshmallows for garnish

Instructions
 

In a medium bowl, combine graham cracker crumbs and melted butter. Mix until combined and resembles wet sand.

    Divide the graham cracker mixture evenly among serving cups, pressing it down to form an even layer at the bottom.

      In a large mixing bowl, beat the softened cream cheese, powdered sugar, and vanilla extract until smooth and creamy.

        In a separate bowl, whip the heavy cream until stiff peaks form. Gently fold the whipped cream into the cream cheese mixture until fully combined.

          Stir in the mini marshmallows and chocolate chips into the cheesecake batter.

            Spoon the cheesecake mixture over the graham cracker crust in each cup, filling them generously.

              Refrigerate the cups for at least 2 hours, or until set.

                Before serving, top each cheesecake cup with crushed graham cracker crumbs, mini marshmallows, and a drizzle of melted chocolate if desired.

                  Prep Time: 20 minutes | Total Time: 2 hours 20 minutes | Servings: 6

                    - Presentation Tips: Serve the cups on a rustic wooden board, adding a few whole graham crackers and chocolate bars around for a fun, inviting look!

                      WANT TO SAVE THIS RECIPE?

                      Leave a Comment

                      Recipe Rating