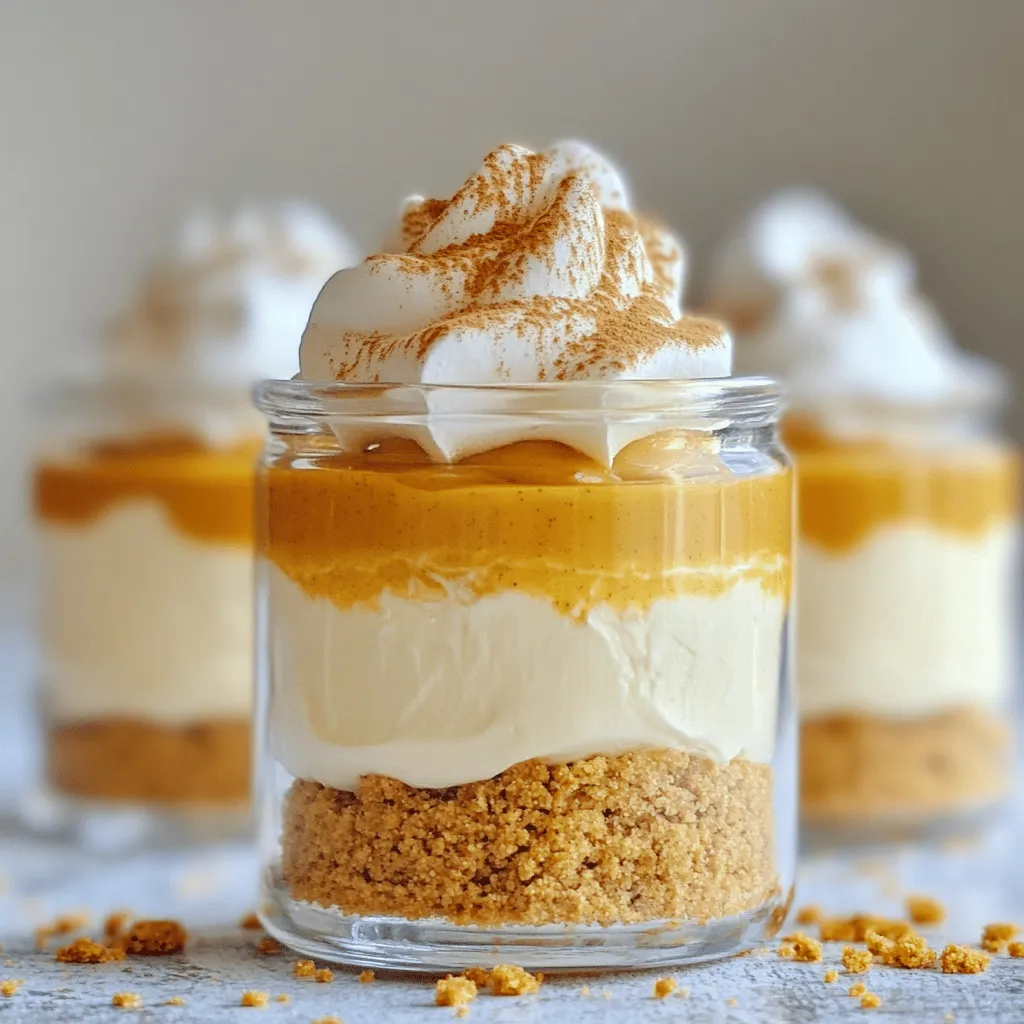
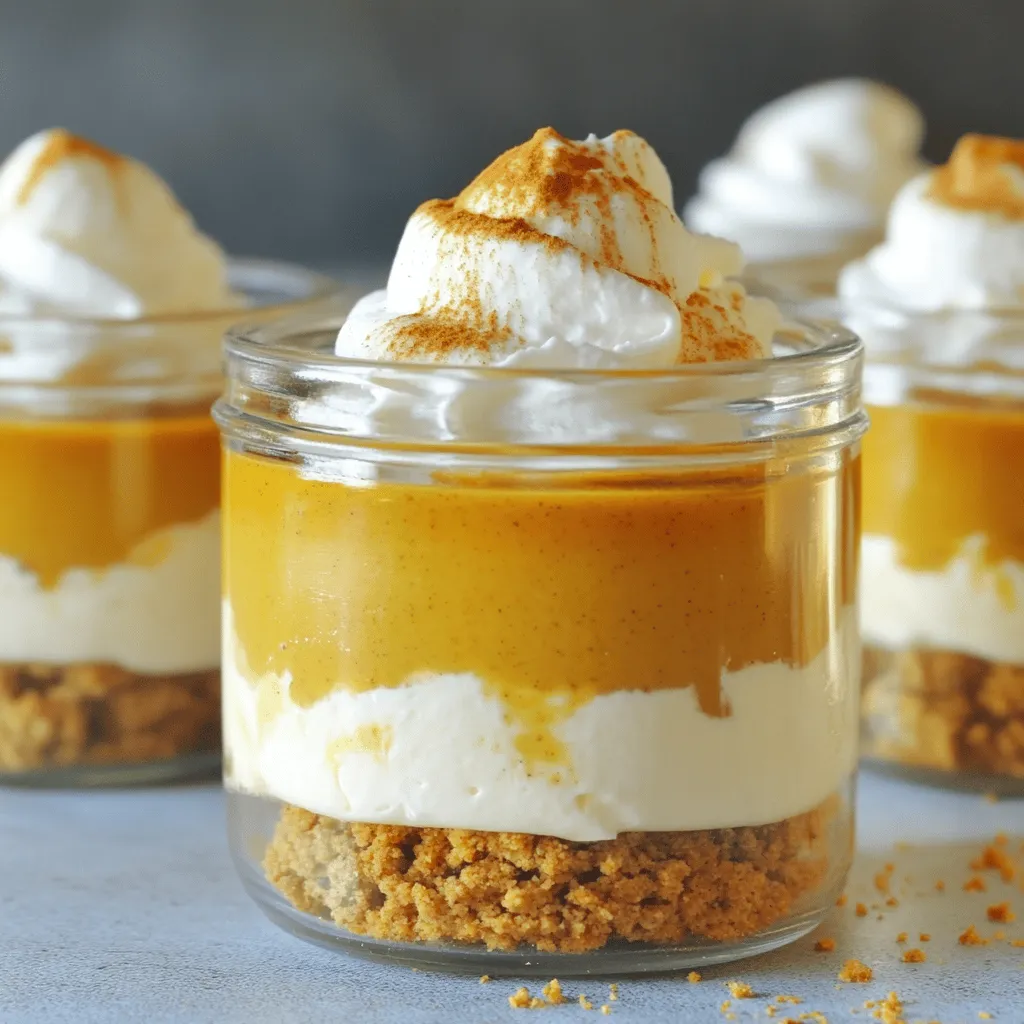
Do you crave a sweet treat that packs a fall punch? Look no further! These No-Bake Pumpkin Spice Cheesecake Cups are easy to make and absolutely delicious. With creamy pumpkin filling layered over a crunchy crust, they’re perfect for any pumpkin lover. Get ready to impress your friends and family this season with a dessert that requires no baking and very little time. Let’s dive into the sweet details!
Ingredients
Main Ingredients
To make these No-Bake Pumpkin Spice Cheesecake Cups, you need:
– 1 cup cream cheese, softened
– 1/2 cup canned pumpkin puree
– 1/2 cup powdered sugar
– 1 teaspoon vanilla extract
– 1 teaspoon pumpkin pie spice
– 1/2 cup heavy whipping cream
These main ingredients work together to create a rich and creamy filling. Cream cheese gives a nice texture and flavor. Canned pumpkin adds that warm, fall taste. Powdered sugar sweetens the mix without being gritty. Vanilla extract offers a hint of warmth. Pumpkin pie spice brings that cozy seasonal flavor.
Crust Ingredients
For the crust, gather:
– 1 cup crushed graham crackers
– 1/4 cup melted butter
The crushed graham crackers form a crunchy base. Mixing them with melted butter helps the crumbs stick together. This creates the perfect contrast to the smooth cheesecake filling.
Optional Garnishes
You might want to add some finishing touches:
– Whipped cream
– Pumpkin pie spice
Whipped cream gives a fun, fluffy element. A sprinkle of pumpkin pie spice on top adds a nice visual and flavor boost. These garnishes make your cheesecake cups even more delightful.
Step-by-Step Instructions
Preparing the Pumpkin Cream Cheese Mixture
First, get a large mixing bowl. Add the softened cream cheese and pumpkin puree. Next, sprinkle in the powdered sugar, vanilla extract, and pumpkin pie spice. Beat this mixture with an electric mixer until it turns smooth and creamy. This is the base of your cheesecake.
Whipping the Heavy Cream
Now, take a separate bowl. Pour in the heavy whipping cream. Beat it with your mixer until stiff peaks form. This means it should hold its shape well. Gently fold this whipped cream into the pumpkin cream cheese mixture. You want to combine them without losing air. This keeps the texture light and fluffy.
Assembling the Cheesecake Cups
Grab another bowl and mix the crushed graham crackers with melted butter. Make sure the crumbs are well coated. Now, it’s time to layer your cheesecake cups. Start with a layer of the graham cracker mixture at the bottom of each cup. Then, add a layer of the pumpkin cheesecake filling. Repeat these layers until the cups are full. Finish with a cheesecake layer on top.
Lastly, refrigerate the cups for at least 2 hours. This helps them set before you serve. When you’re ready to enjoy, top with a dollop of whipped cream and a sprinkle of pumpkin pie spice for a nice touch.
Tips & Tricks
Achieving the Perfect Whipped Cream
To whip cream well, start with cold heavy cream. Use a clean bowl and beaters. Whip the cream on medium speed. Watch for stiff peaks to form, which means it’s ready. This takes about 2 to 5 minutes. Don’t overwhip or it will turn grainy.
Ensuring Smooth Cheesecake Texture
Softened cream cheese is key for a smooth texture. Take it out of the fridge 30 minutes before use. This helps it mix easily. If it’s too cold, you’ll have lumps in your mix. Use an electric mixer to blend it well with the other ingredients.
Serving Ideas
For a pretty presentation, serve in clear cups or jars. This lets the layers shine. Top each cup with whipped cream and a sprinkle of pumpkin pie spice. You can also add a slice of caramel or chocolate drizzle. Pair these cups with a warm drink, like spiced cider or coffee.
Variations
Different Flavors
You can easily change the flavor of your no-bake pumpkin spice cheesecake cups. Try adding chocolate or caramel for a rich twist. Mixing in chocolate chips gives a fun surprise in each bite. Drizzling caramel on top adds sweetness and a nice look. You can also use flavored extracts, like almond or maple, to change things up. Experimenting with flavors keeps the dessert fresh and exciting.
Alternative Base Options
The crust is key to these cheesecake cups. While graham crackers work well, you can try other cookies too. Oreos, gingersnaps, or vanilla wafers can make great bases. Just crush them and mix with melted butter, just like you do with graham crackers. Each type of cookie adds its own flavor, making your cheesecake cups unique.
Dairy-Free Adaptations
If you want a dairy-free version, there are great substitutes. You can use vegan cream cheese instead of regular cream cheese. For the heavy cream, coconut cream works well. Just whip it until it’s fluffy, just like you would with regular cream. These changes keep the dessert creamy and tasty while being kind to those who avoid dairy.
Storage Info
Refrigeration Guidelines
To store your cheesecake cups, cover them tightly with plastic wrap. You can also use an airtight container. This keeps the cups fresh and prevents any odors from other foods in the fridge. Always place them in the coldest part of the fridge. This way, they stay at the right temperature.
Freezing Instructions
Yes, you can freeze these cheesecake cups! To do this, first, let them chill in the fridge for about 2 hours. Then, cover each cup with plastic wrap and foil. This helps protect them from freezer burn. When you want to eat them, move them to the fridge overnight to thaw.
Shelf Life
These cheesecake cups can last in the fridge for up to 5 days. Keep an eye on them for any signs of spoilage, like changes in smell or texture. If they start to look or smell off, it’s best to toss them. Enjoy your delicious treat while they’re fresh!
FAQs
Can I use fresh pumpkin instead of canned?
Yes, you can use fresh pumpkin. Fresh pumpkin offers a bright flavor. It is also free from added sugars or preservatives. To use fresh pumpkin, start by roasting a small pumpkin. Cut it, remove the seeds, and bake it until soft. Then, scoop out the flesh and mash it. Use the same amount as canned pumpkin. This gives you a fresh taste in your cheesecake cups. Just ensure it is well-pureed so it mixes smoothly.
How long do the cheesecake cups need to chill?
The cheesecake cups need to chill for at least 2 hours. This time allows them to set properly. Chilling helps the flavors meld and gives the cups a nice texture. The longer you chill, the better the taste. If you can, chill them overnight for the best results. Just be sure to keep them covered in the fridge to prevent drying out.
Can I make this recipe ahead of time?
Absolutely! You can prepare the cheesecake cups a day in advance. Just follow the recipe and chill them. This makes them a great option for parties. When you are ready to serve, add the whipped cream and sprinkle with pumpkin pie spice. Making them ahead saves time and ensures a delicious dessert at your event.
You learned how to make delicious pumpkin cheesecake cups. We covered key ingredients like cream cheese, pumpkin, and whipped cream. You also saw tips for whipping cream and achieving a smooth texture. Don’t forget the fun variations, from flavors to crusts. Proper storage keeps your dessert fresh for longer. Now, get creative in the kitchen. Enjoy this tasty treat at your next gathering or cozy night in!