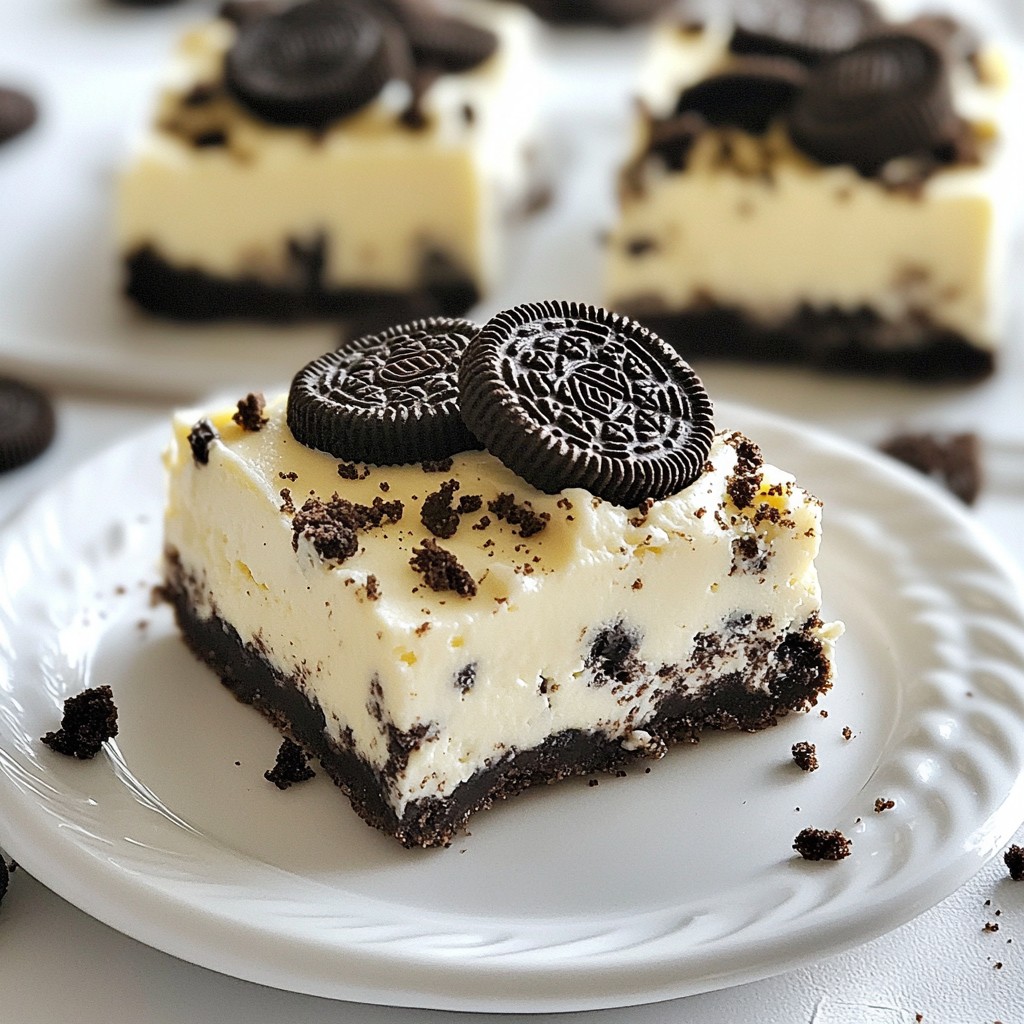
Craving a sweet treat that’s both simple and satisfying? Let’s make No Bake Oreo Cheesecake Bars! You’ll love this creamy, dreamy dessert that combines classic Oreo flavor with easy prep. Forget baking—just mix, chill, and enjoy. I’ll walk you through every step, from the perfect crust to expert tips, so you can impress your friends and family. Ready to dive in? Let’s get started!
Why I Love This Recipe
- Easy to Make: This no-bake cheesecake requires minimal effort, making it perfect for quick desserts.
- Rich and Creamy: The combination of cream cheese and whipped cream creates a luscious texture that melts in your mouth.
- Oreo Lovers Delight: With crushed Oreos in the crust and filling, this dessert is a dream come true for cookie fans.
- Perfect for Any Occasion: Whether it’s a birthday, holiday, or just a weekend treat, these cheesecake bars are always a hit!
Ingredients
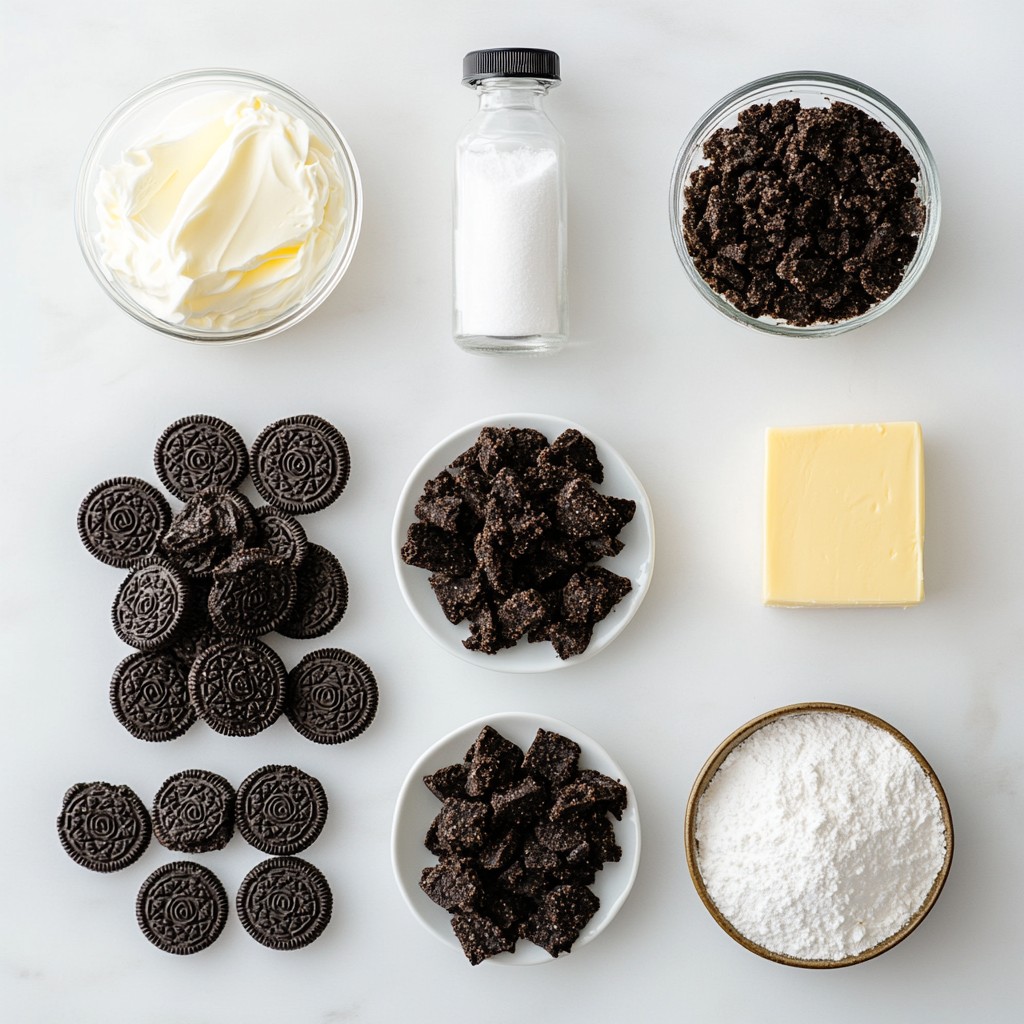
List of Ingredients
- 24 Oreo cookies (crushed for crust)
- 1/4 cup unsalted butter (melted)
- 16 oz cream cheese (softened)
- 1 cup powdered sugar
- 1 teaspoon vanilla extract
- 2 cups heavy whipping cream
- 16 Oreo cookies (coarsely chopped for layering and topping)
To make these No Bake Oreo Cheesecake Bars, you need simple ingredients. First, you’ll start with 24 Oreo cookies. These cookies create a yummy crust and add flavor. You’ll need 1/4 cup of melted unsalted butter to hold the crust together.
For the creamy filling, use 16 oz of softened cream cheese. This gives the bars a rich taste. Add 1 cup of powdered sugar to sweeten the mix. You’ll want a teaspoon of vanilla extract for extra flavor.
Finally, whip up 2 cups of heavy whipping cream. This makes the filling light and fluffy. Don’t forget 16 more Oreo cookies to chop and mix into the filling and for topping.
Feel free to swap ingredients if needed. You can use gluten-free Oreos for a gluten-free version.
Step-by-Step Instructions
Preparing the Crust
To make the crust, first take 24 Oreo cookies and crush them in a bowl. You want fine crumbs, so use a food processor or a rolling pin. Next, melt 1/4 cup of unsalted butter. Then, mix the crushed Oreos with the melted butter. Stir until all the crumbs are coated. This mixture should be damp but crumbly.
Now, line an 8x8 inch baking pan with parchment paper. You can also spray it with non-stick spray. Press the Oreo mixture firmly into the bottom of the pan. Use your fingers or the bottom of a cup to make it even. This crust will hold the cheesecake filling later. Place the crust in the refrigerator while you make the filling. This helps it to firm up.
Making the Cheesecake Filling
For the cheesecake filling, take 16 oz of softened cream cheese and beat it in a large bowl. Use an electric mixer and mix until it is smooth and creamy. It should not have lumps. Next, gradually add 1 cup of powdered sugar and 1 teaspoon of vanilla extract. Mix this until it is well combined. The filling should taste sweet and creamy.
In another bowl, whip 2 cups of heavy whipping cream. Beat it until stiff peaks form. This means it should hold its shape well. Now, gently fold the whipped cream into the cream cheese mixture. Be careful! You don’t want to deflate the whipped cream. Fold until it is all mixed together and fluffy.
Assembling and Chilling the Bars
Now it’s time to add some Oreo crunch. Take 16 coarsely chopped Oreo cookies and fold them into the cheesecake filling. Make sure they are spread evenly. Then, pour the cheesecake filling over the crust in the pan. Use a spatula to spread it out evenly.
Cover the pan with plastic wrap and place it in the fridge. Chill for at least 4 to 6 hours. This helps the bars set and become firm. Once they are set, lift the bars out of the pan using the parchment paper. Cut them into squares to serve. If you want, top with more crumbled Oreos for extra flavor. Enjoy your no-bake Oreo cheesecake bars!
Tips & Tricks
Achieving the Perfect Texture
To get a smooth cheesecake, start with room temperature cream cheese. This helps it blend better. Soft cream cheese mixes easily and creates a creamy texture. If it’s cold, you may get lumps.
When whipping cream, use a cold bowl and beaters. This helps the cream whip faster. Whip until stiff peaks form. This means the cream holds its shape well. Be careful not to over-whip, as this can turn it into butter.
Preventing Common Mistakes
For a sturdy crust, crush the Oreo cookies well. Mix them fully with melted butter. This ensures the crust holds together. Press the mixture firmly into the pan. A tight crust helps support the filling.
To avoid deflated whipped cream, fold it gently into the cream cheese mixture. Use a spatula and mix slowly. This keeps the air in the whipped cream, making the cheesecake light and fluffy.
Serving Suggestions
Serve these cheesecake bars chilled for the best flavor. You can cut them into squares or rectangles. This makes for easy serving and sharing.
For a fun touch, garnish with extra crumbled Oreos. You can sprinkle them on top or along the sides for decoration. This adds extra crunch and flavor to each bite.
Pro Tips
- Use Room Temperature Cream Cheese: For a smooth and creamy filling, ensure your cream cheese is at room temperature before mixing.
- Don't Overmix the Whipped Cream: Gently fold the whipped cream into the cream cheese mixture to maintain its light and airy texture.
- Chill Longer for Best Results: Although the recipe calls for 4-6 hours, chilling the bars overnight will enhance the flavors and improve the texture.
- Customize Your Toppings: Feel free to add different toppings like chocolate drizzle or additional crushed Oreos for extra flavor and presentation.
Variations
Flavor Variations
You can switch up the flavor of your No Bake Oreo Cheesecake Bars in fun ways. For a twist, try using gluten-free Oreos. This makes the bars safe for those with gluten issues, but still tasty!
You can also add flavors like peppermint or peanut butter. Just mix in a few drops of peppermint extract or fold in peanut butter before you add the whipped cream. This gives you a unique and fun taste.
Dietary Modifications
If you're looking for vegan options, you can use dairy-free cream cheese and whipped coconut cream. This keeps the rich taste while being plant-based. For a low-sugar treat, try using sugar substitutes, like erythritol or stevia, in place of powdered sugar. You can also use low-fat cream cheese to cut down on calories.
Presentation Ideas
When it comes to serving, you can get creative! Slice the bars into different shapes. Try triangles or small squares for a fun look. You can also drizzle chocolate or caramel sauce on top for added flair. Adding colorful sprinkles or fresh fruit can make them pop. These ideas will impress your guests and make your bars look as good as they taste!
Storage Info
How to Properly Store
To keep your no bake Oreo cheesecake bars fresh, start by covering them tightly. Use plastic wrap or foil to seal the pan. This helps avoid any unwanted smells or flavors from your fridge. Store the bars in the fridge for the best taste. They will stay nice and cool, ready to enjoy.
If you have leftovers, you can freeze the cheesecake bars too. Cut them into squares before freezing. Wrap each piece in plastic wrap, then place them in an airtight container. This way, you can enjoy a sweet treat later without losing flavor.
Shelf Life
In the refrigerator, these cheesecake bars last about 5 to 7 days. Always check for freshness before eating. If they look or smell off, it’s best to discard them.
Signs of spoilage include a sour smell or a change in texture. If the bars feel slimy or dried out, it’s time to throw them away. Always prioritize food safety to keep your treats enjoyable!
FAQs
Can I use other types of cookies for the crust?
Yes, you can use other cookies for the crust. Some great options include:
- Graham crackers: They give a nice, sweet crunch.
- Chocolate wafer cookies: These add more chocolate flavor.
- Biscoff cookies: They bring a hint of spice and caramel.
Feel free to experiment with different cookies. Just crush them and mix with melted butter as you would with Oreos.
How long does it take for the bars to set?
The bars need time to chill and set. I recommend refrigerating them for at least 4-6 hours. This allows the cheesecake filling to firm up nicely. If you want them extra cold, leave them overnight. The longer they chill, the better they taste.
Can I make this recipe ahead of time?
Yes, this recipe is perfect for meal prep. You can make the cheesecake bars a day or two ahead. Just store them covered in the fridge. When you are ready to serve, cut them into squares. They stay fresh and tasty for up to 5 days in the fridge. Enjoy them at your next gathering or party!
This blog post covers a delicious cheesecake bars recipe. We explored the key ingredients, step-by-step instructions, and helpful tips. You learned how to prepare a tasty crust and a smooth filling. I shared variations for different diets and flavor choices. Lastly, you now know proper storage methods and how long these bars last.
Use these insights to make your own Oreo cheesecake bars. Enjoy every bite!