No Bake Chocolate Peppermint Bark Delightful Treat

WANT TO SAVE THIS RECIPE?

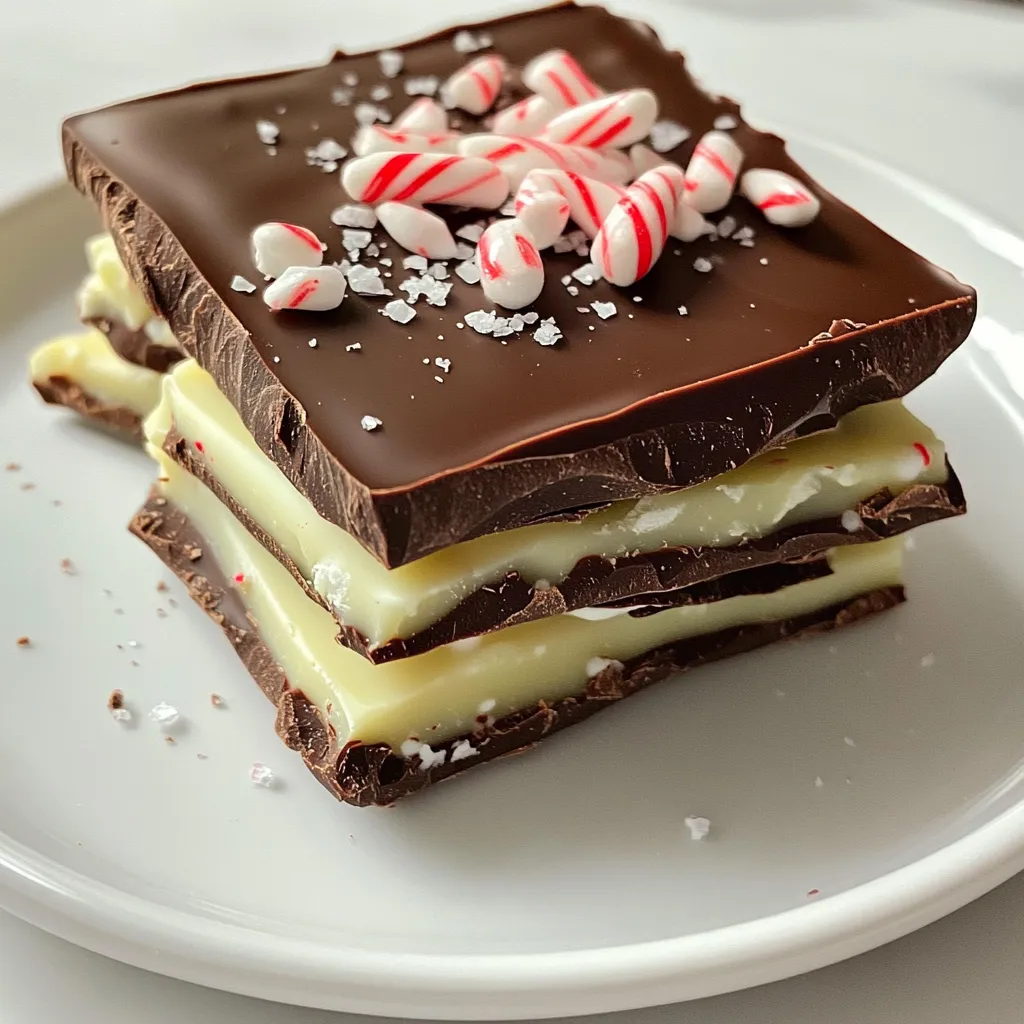
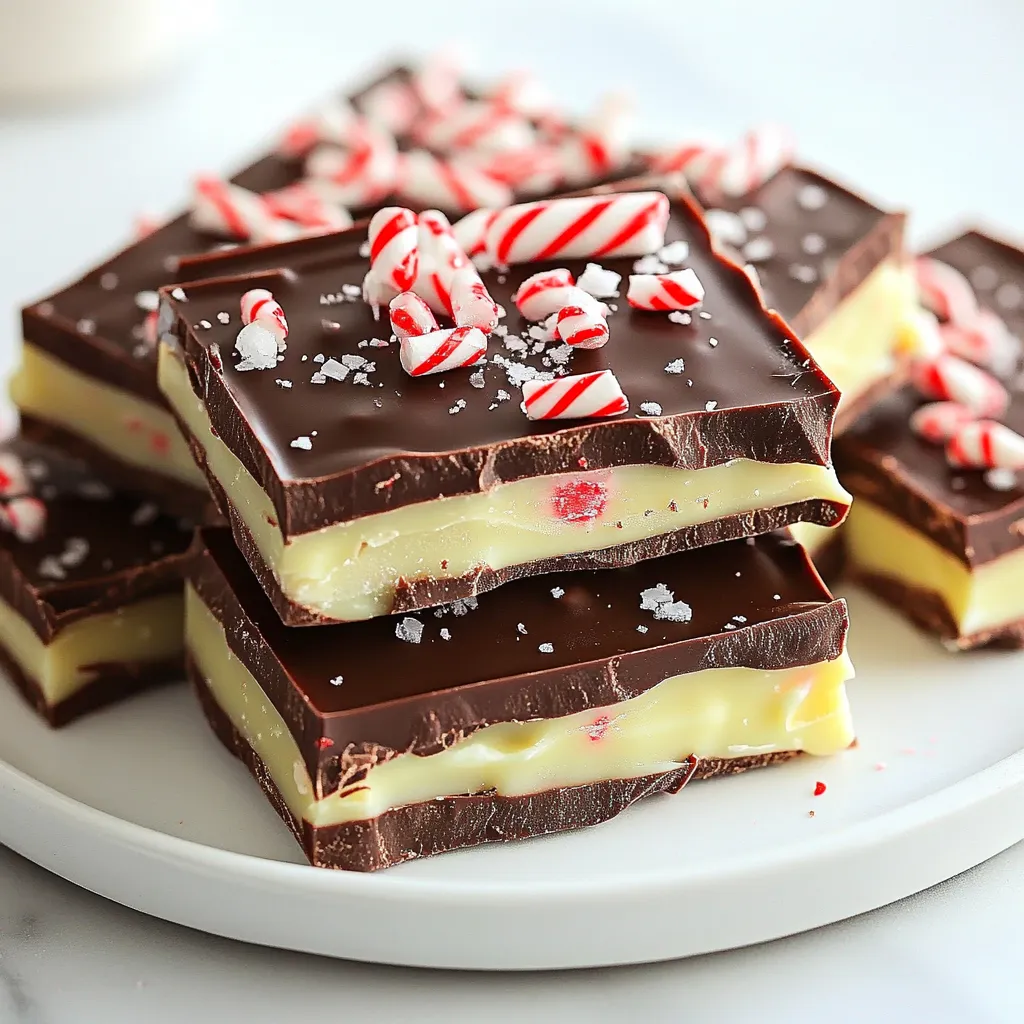
If you’re looking for a sweet and easy treat, no bake chocolate peppermint bark is the answer! This delightful dessert combines rich chocolate with refreshing peppermint. It’s a fun recipe that you can enjoy any time of year, especially during the holidays. In this article, I’ll share all the steps to make this delicious bark, along with tips and variations to make it your own. Let’s get started!

Ingredients

Main Ingredients for No Bake Chocolate Peppermint Bark

– 12 oz dark chocolate chips

– 12 oz white chocolate chips

– 1 teaspoon peppermint extract

– ½ cup crushed candy canes (plus extra for garnish)

– A pinch of sea salt

These ingredients form the base of your peppermint bark. The dark chocolate gives a rich taste, while the white chocolate adds sweetness. Peppermint extract brings in the holiday cheer. Crushed candy canes provide a nice crunch and festive look.

Optional Ingredients for Enhancement

– 1 tablespoon coconut oil (optional for shine)

Adding coconut oil makes the chocolate shiny. It also helps it set better. You can leave it out if you want.

Recommended Tools and Equipment

– 8×8 inch square baking dish

– Parchment paper

– Microwave-safe bowls

– Spatula

Having the right tools makes this process easier. Parchment paper helps you lift the bark out easily. A spatula is key for spreading the chocolate evenly. Using microwave-safe bowls ensures you can melt the chocolate safely.

Step-by-Step Instructions

Preparing the Baking Dish

First, grab an 8×8 inch square baking dish. Line the dish with parchment paper. Make sure it hangs over the edges. This helps you lift the bark out later.

Melting the Dark Chocolate

Next, take a microwave-safe bowl. Add 12 oz of dark chocolate chips and 1 tablespoon of coconut oil if you want extra shine. Microwave for 30 seconds. Stir the mix and repeat until smooth.

Combining Flavors with Peppermint

Once the dark chocolate is melted, pour in ½ teaspoon of peppermint extract. Stir it well. This will give the chocolate a nice minty taste.

Layering the Chocolate

Pour the melted dark chocolate into your prepared dish. Spread it evenly using a spatula. Tap the dish on the counter to get rid of air bubbles. Then, place it in the fridge for about 20 minutes to set.

Final Steps and Serving Suggestions

While the dark layer sets, melt the white chocolate chips in a separate bowl using the same microwave method. Stir in the other ½ teaspoon of peppermint extract. After the dark chocolate sets, pour the white chocolate over it. Quickly sprinkle crushed candy canes on top and press them down slightly. Return the dish to the fridge for 30 minutes. Once set, lift the bark out using the overhang. Cut it into pieces and add a few more crushed candy canes and a pinch of sea salt for a festive touch. Enjoy your treat!

Tips & Tricks

How to Achieve the Best Texture

To get the best texture, use high-quality chocolate chips. Dark chocolate should be smooth and shiny. If using coconut oil, it adds a lovely shine and helps the chocolate set well. Make sure you melt the chocolate just right. Don’t overheat it; otherwise, it can become grainy. Stir well after melting to ensure a creamy mix.

Storing Leftover Peppermint Bark

Keep any leftover peppermint bark in an airtight container. This keeps it fresh and tasty. Store it in the fridge if you live in a warm area. It can last up to two weeks if stored properly. If you want to keep it longer, consider freezing it. Just make sure to wrap it well to avoid freezer burn.

Enhancing Flavor Profiles

To boost flavor, try adding a splash of vanilla extract with the peppermint. This adds warmth and depth. You can also mix in a bit of orange zest for a citrus twist. For those who love spice, a hint of cinnamon can add a nice kick. Finally, don’t forget to sprinkle extra crushed candy canes on top for added crunch and color.

Variations

Dark vs. Milk Chocolate Options

You can use either dark or milk chocolate for your bark. Dark chocolate gives a rich taste. It pairs well with the minty flavor. Milk chocolate offers a sweeter option. It adds a creamy touch that many love. Just remember, dark chocolate has a stronger taste. Choose based on your preference.

Swapping Peppermint for Other Flavors

If you want to change things up, swap peppermint for another flavor. Almond or orange extract can add a nice twist. You could even use vanilla for a classic taste. Just keep the same amount of extract. This way, your bark stays flavorful and fun. Don’t be afraid to experiment!

Adding Mix-Ins or Toppings

Adding mix-ins can make your bark more exciting. You can sprinkle nuts or dried fruits on top. Chopped almonds or cranberries work well. For extra crunch, add pretzels or toffee bits. You can also sprinkle more crushed candy canes for a festive look. Just make sure to press them down lightly. This helps them stick to the chocolate.

Storage Info

Best Storage Practices for Freshness

To keep your No Bake Chocolate Peppermint Bark fresh, store it in an airtight container. Ensure it is completely cooled before sealing. Place parchment paper between layers to prevent sticking. Store the container in a cool, dry place or in the fridge. This helps maintain the bark’s texture and flavor.

How Long Does No Bake Chocolate Peppermint Bark Last?

When stored properly, your peppermint bark lasts about two weeks at room temperature. If you keep it in the fridge, it can last up to three weeks. Always check for any signs of spoilage before enjoying your treat. Signs include changes in texture or an off smell.

Freezing Instructions

You can freeze No Bake Chocolate Peppermint Bark for longer storage. Wrap pieces tightly in plastic wrap, then place them in a freezer bag. This method helps keep the bark fresh for about three months. When you’re ready to enjoy it, thaw it in the fridge overnight for the best taste.

FAQs

How do I make chocolate peppermint bark without an oven?

You can make chocolate peppermint bark easily without an oven. Use a microwave to melt the chocolate. Start with dark chocolate chips and mix in coconut oil if you want a shiny finish. Melt in 30-second bursts, stirring between each. Once melted, mix in peppermint extract, then spread in a dish. Let it set in the fridge.

Can I use different types of chocolate?

Yes, you can use different types of chocolate. Milk chocolate, dark chocolate, or white chocolate all work well. Each type will give a unique taste and texture. Just remember to melt them the same way as the recipe suggests.

What can I substitute for coconut oil?

If you do not have coconut oil, you can skip it. The bark will still taste great without it. You can also use vegetable oil or butter as a substitute. Just remember, the oil helps the chocolate shine.

How do I easily cut chocolate bark into pieces?

To cut chocolate bark easily, let it set fully. Use a sharp knife to score the bark before cutting. This will help make clean cuts. Alternatively, you can break it apart with your hands for a rustic look.

Can I add other candies to my peppermint bark?

Absolutely! You can add other candies like M&M’s, nuts, or even dried fruit. Just make sure to sprinkle them on top before the chocolate sets. This will help them stick better. You can get creative with flavors and textures!

You learned how to make no-bake chocolate peppermint bark. We discussed main ingredients, tools, and easy steps. Tips on texture and storage will keep your bark fresh. You can try variations like milk chocolate or different flavors.

Enjoy making this treat. It’s simple, fun, and perfect for sharing. Now, get creative and enjoy every bite!

- 12 oz dark chocolate chips - 12 oz white chocolate chips - 1 teaspoon peppermint extract - ½ cup crushed candy canes (plus extra for garnish) - A pinch of sea salt These ingredients form the base of your peppermint bark. The dark chocolate gives a rich taste, while the white chocolate adds sweetness. Peppermint extract brings in the holiday cheer. Crushed candy canes provide a nice crunch and festive look. - 1 tablespoon coconut oil (optional for shine) Adding coconut oil makes the chocolate shiny. It also helps it set better. You can leave it out if you want. - 8x8 inch square baking dish - Parchment paper - Microwave-safe bowls - Spatula Having the right tools makes this process easier. Parchment paper helps you lift the bark out easily. A spatula is key for spreading the chocolate evenly. Using microwave-safe bowls ensures you can melt the chocolate safely. First, grab an 8x8 inch square baking dish. Line the dish with parchment paper. Make sure it hangs over the edges. This helps you lift the bark out later. Next, take a microwave-safe bowl. Add 12 oz of dark chocolate chips and 1 tablespoon of coconut oil if you want extra shine. Microwave for 30 seconds. Stir the mix and repeat until smooth. Once the dark chocolate is melted, pour in ½ teaspoon of peppermint extract. Stir it well. This will give the chocolate a nice minty taste. Pour the melted dark chocolate into your prepared dish. Spread it evenly using a spatula. Tap the dish on the counter to get rid of air bubbles. Then, place it in the fridge for about 20 minutes to set. While the dark layer sets, melt the white chocolate chips in a separate bowl using the same microwave method. Stir in the other ½ teaspoon of peppermint extract. After the dark chocolate sets, pour the white chocolate over it. Quickly sprinkle crushed candy canes on top and press them down slightly. Return the dish to the fridge for 30 minutes. Once set, lift the bark out using the overhang. Cut it into pieces and add a few more crushed candy canes and a pinch of sea salt for a festive touch. Enjoy your treat! To get the best texture, use high-quality chocolate chips. Dark chocolate should be smooth and shiny. If using coconut oil, it adds a lovely shine and helps the chocolate set well. Make sure you melt the chocolate just right. Don’t overheat it; otherwise, it can become grainy. Stir well after melting to ensure a creamy mix. Keep any leftover peppermint bark in an airtight container. This keeps it fresh and tasty. Store it in the fridge if you live in a warm area. It can last up to two weeks if stored properly. If you want to keep it longer, consider freezing it. Just make sure to wrap it well to avoid freezer burn. To boost flavor, try adding a splash of vanilla extract with the peppermint. This adds warmth and depth. You can also mix in a bit of orange zest for a citrus twist. For those who love spice, a hint of cinnamon can add a nice kick. Finally, don’t forget to sprinkle extra crushed candy canes on top for added crunch and color. {{image_2}} You can use either dark or milk chocolate for your bark. Dark chocolate gives a rich taste. It pairs well with the minty flavor. Milk chocolate offers a sweeter option. It adds a creamy touch that many love. Just remember, dark chocolate has a stronger taste. Choose based on your preference. If you want to change things up, swap peppermint for another flavor. Almond or orange extract can add a nice twist. You could even use vanilla for a classic taste. Just keep the same amount of extract. This way, your bark stays flavorful and fun. Don't be afraid to experiment! Adding mix-ins can make your bark more exciting. You can sprinkle nuts or dried fruits on top. Chopped almonds or cranberries work well. For extra crunch, add pretzels or toffee bits. You can also sprinkle more crushed candy canes for a festive look. Just make sure to press them down lightly. This helps them stick to the chocolate. To keep your No Bake Chocolate Peppermint Bark fresh, store it in an airtight container. Ensure it is completely cooled before sealing. Place parchment paper between layers to prevent sticking. Store the container in a cool, dry place or in the fridge. This helps maintain the bark's texture and flavor. When stored properly, your peppermint bark lasts about two weeks at room temperature. If you keep it in the fridge, it can last up to three weeks. Always check for any signs of spoilage before enjoying your treat. Signs include changes in texture or an off smell. You can freeze No Bake Chocolate Peppermint Bark for longer storage. Wrap pieces tightly in plastic wrap, then place them in a freezer bag. This method helps keep the bark fresh for about three months. When you’re ready to enjoy it, thaw it in the fridge overnight for the best taste. You can make chocolate peppermint bark easily without an oven. Use a microwave to melt the chocolate. Start with dark chocolate chips and mix in coconut oil if you want a shiny finish. Melt in 30-second bursts, stirring between each. Once melted, mix in peppermint extract, then spread in a dish. Let it set in the fridge. Yes, you can use different types of chocolate. Milk chocolate, dark chocolate, or white chocolate all work well. Each type will give a unique taste and texture. Just remember to melt them the same way as the recipe suggests. If you do not have coconut oil, you can skip it. The bark will still taste great without it. You can also use vegetable oil or butter as a substitute. Just remember, the oil helps the chocolate shine. To cut chocolate bark easily, let it set fully. Use a sharp knife to score the bark before cutting. This will help make clean cuts. Alternatively, you can break it apart with your hands for a rustic look. Absolutely! You can add other candies like M&M's, nuts, or even dried fruit. Just make sure to sprinkle them on top before the chocolate sets. This will help them stick better. You can get creative with flavors and textures! You learned how to make no-bake chocolate peppermint bark. We discussed main ingredients, tools, and easy steps. Tips on texture and storage will keep your bark fresh. You can try variations like milk chocolate or different flavors. Enjoy making this treat. It's simple, fun, and perfect for sharing. Now, get creative and enjoy every bite!

No Bake Chocolate Peppermint Bark

Indulge in the festive delight of No Bake Chocolate Peppermint Bark! This easy recipe combines rich dark and creamy white chocolate with a refreshing peppermint twist, topped with crushed candy canes for that perfect crunch. Perfect for holiday gatherings or as a sweet gift, this no-bake treat is simple to make and delicious to enjoy! Click to explore the full recipe and impress your friends and family with this tasty treat! #NoBakeDesserts #ChocolatePeppermintBark #HolidayRecipes #EasyTreats

Ingredients
  

12 oz dark chocolate chips

12 oz white chocolate chips

1 teaspoon peppermint extract

½ cup crushed candy canes (plus extra for garnish)

1 tablespoon coconut oil (optional for shine)

A pinch of sea salt

Instructions
 

Prepare the Pan: Line an 8x8 inch square baking dish with parchment paper, allowing some overhang for easy removal.

    Melt the Dark Chocolate: In a microwave-safe bowl, combine the dark chocolate chips and coconut oil (if using). Microwave in 30-second intervals, stirring in between, until fully melted and smooth.

      Add Peppermint to Dark Chocolate: Stir in ½ teaspoon of peppermint extract into the melted dark chocolate and mix well.

        Spread Dark Chocolate: Pour the melted dark chocolate into the prepared baking dish and spread it evenly with a spatula. Tap the dish gently on the counter to eliminate air bubbles. Place it in the refrigerator to set for about 20 minutes.

          Melt the White Chocolate: While the dark layer is setting, melt the white chocolate chips in a separate bowl using the same microwave method.

            Flavor the White Chocolate: Stir in the remaining ½ teaspoon of peppermint extract into the melted white chocolate until thoroughly combined.

              Spread White Chocolate Layer: Once the dark chocolate layer has set, remove it from the refrigerator. Pour the melted white chocolate over the dark chocolate layer and spread evenly.

                Add Candy Canes: Quickly sprinkle the crushed candy canes over the top of the white chocolate before it hardens. Lightly press them down to ensure they stick.

                  Final Setting: Return the baking dish to the refrigerator for about 30 minutes or until fully set.

                    Cut and Serve: Once set, lift the bark out of the dish using the overhang of parchment paper. Cut into pieces of desired size.

                      Garnish: For an extra festive touch, sprinkle a few more crushed candy canes and a pinch of sea salt on top before serving.

                        Prep Time: 15 minutes | Total Time: 1 hour | Servings: 16

                          WANT TO SAVE THIS RECIPE?

                          Leave a Comment

                          Recipe Rating