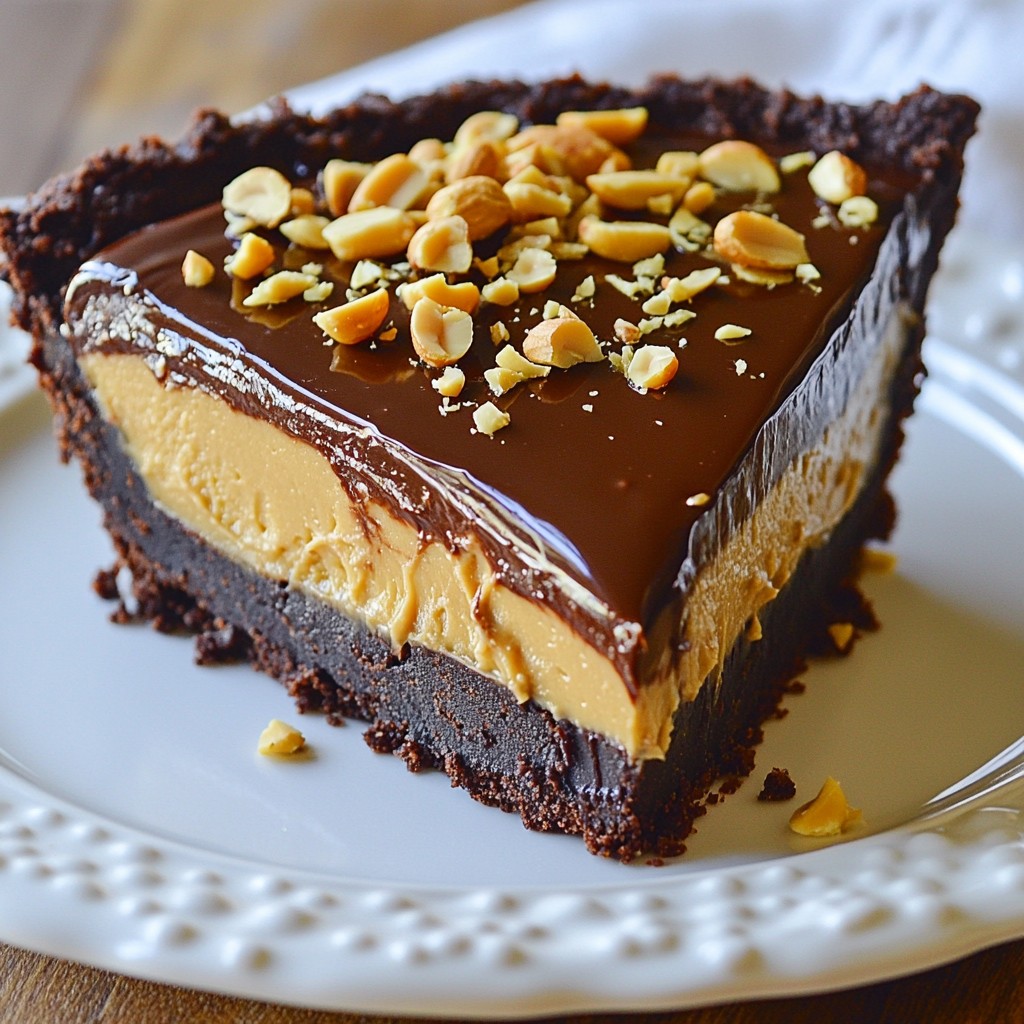
Discover the ultimate dessert: No-Bake Chocolate Peanut Butter Pie! With just a few simple ingredients, you can whip up this creamy, dreamy pie that’s perfect for any occasion. I’ll guide you through each step, from the crumbly crust to the rich peanut butter filling, ensuring a treat that's both easy and delicious. Ready to dive into a sweet delight? Let's get started!
Why I Love This Recipe
- Decadent Flavor: This pie perfectly balances rich chocolate and creamy peanut butter, creating a decadent dessert that satisfies any sweet tooth.
- No-Bake Convenience: With no baking required, this recipe is easy to prepare and perfect for warm weather gatherings.
- Customizable Toppings: Feel free to get creative with toppings! Crushed peanuts and chocolate shavings add texture and visual appeal.
- Impressive Presentation: This pie is not only delicious but also looks stunning, making it a showstopper for any occasion.
Ingredients
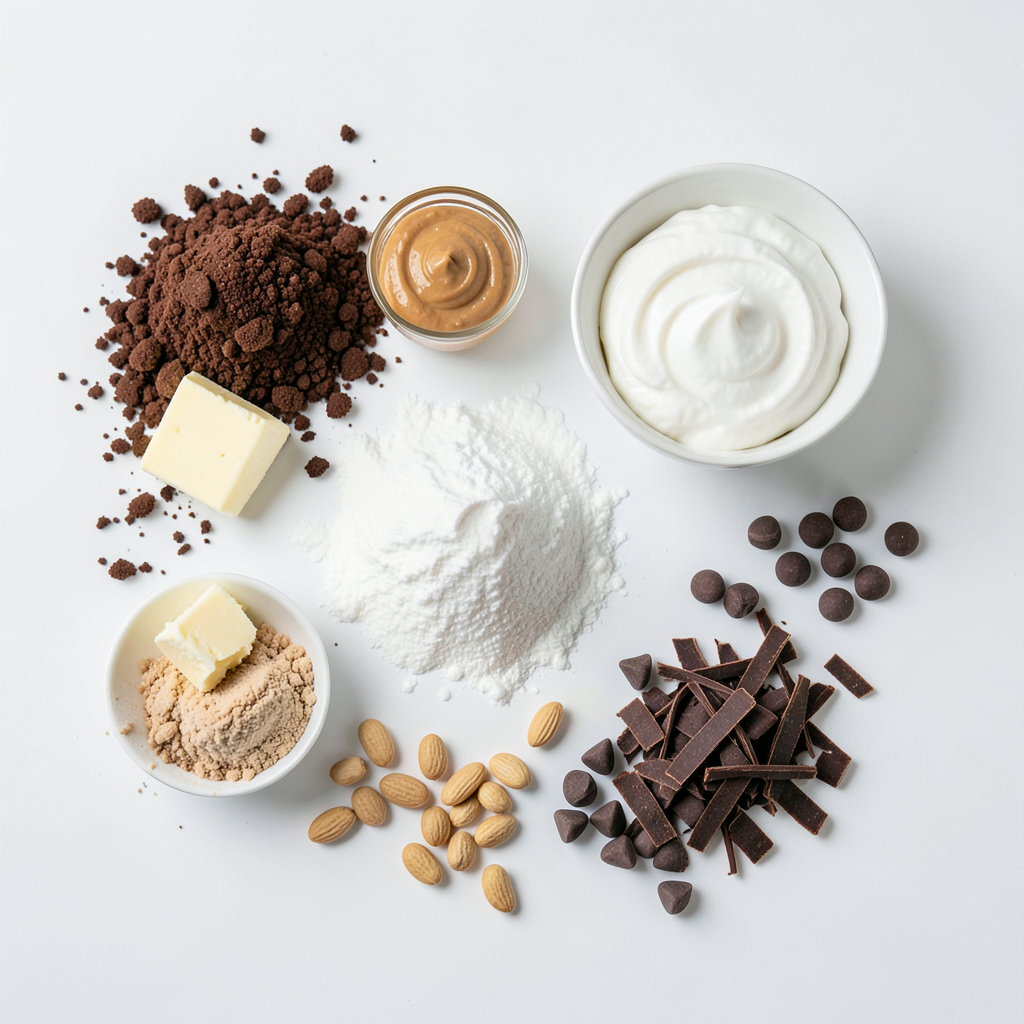
List of Ingredients
- 1 ½ cups chocolate cookie crumbs
- ½ cup unsalted butter, melted
- 1 cup creamy peanut butter
- 1 cup powdered sugar
- 1 cup heavy whipped cream
- 1 cup semi-sweet chocolate chips
- 1 teaspoon vanilla extract
- Pinch of salt
- Crushed peanuts and chocolate shavings for topping (optional)
Optional Ingredient Substitutions
- For a gluten-free pie, use gluten-free chocolate cookies.
- You can use coconut cream instead of heavy cream for a dairy-free option.
- Swap powdered sugar with agave nectar or stevia for a healthier sweetener.
Step-by-Step Instructions
Preparing the Crust
Start by mixing the chocolate cookie crumbs and melted butter in a bowl. Stir until the crumbs look like wet sand. This mix will form your crust. Next, take a 9-inch pie dish and press the crumb mix into the bottom and up the sides. Use your fingers or the back of a measuring cup to make it even. Once done, place the dish in the freezer for about 15 minutes. This helps the crust set and hold its shape.
Making the Peanut Butter Filling
In a large bowl, combine the creamy peanut butter and powdered sugar. Beat these together until the mix is smooth and thick. It's important to mix well, so there are no lumps. To make it extra light, whip the heavy cream in another bowl until stiff peaks form. Then, gently fold one cup of this whipped cream into the peanut butter mix. This step is key to a creamy texture.
Assembling and Topping the Pie
Once the crust is set, spoon the peanut butter filling into it. Spread it out evenly with a spatula. Now, let’s prepare the chocolate topping. In a small saucepan, melt the semi-sweet chocolate chips over low heat. Stir constantly until it’s smooth. Remove from heat and mix in the vanilla extract and a pinch of salt. Pour this chocolate over the peanut butter filling. Spread it evenly to cover the pie. Finally, put the pie back in the refrigerator to chill for at least 4 hours. For the best taste, let it chill overnight.
Tips & Tricks
Achieving the Perfect Texture
To whip cream to stiff peaks, start with cold heavy cream. Use a clean bowl and beaters. Beat on high speed until you see peaks form. Stop when peaks hold their shape.
When folding whipped cream into the peanut butter mix, use a spatula. Gently scoop from the bottom and fold over the top. This keeps your mixture light and airy.
Enhancing Flavor
You can boost flavor with a pinch of sea salt or espresso powder. A dash of almond extract also adds a nice touch.
For sweetness, taste the mixture. If you want it sweeter, add a bit more powdered sugar. Adjust to your liking for the best taste.
Serving Suggestions
This pie pairs well with a scoop of vanilla ice cream. A glass of cold milk also works great.
For special occasions, serve slices on pretty plates. Add crushed peanuts and chocolate shavings on top for a nice look. Enjoy your pie with family and friends!
Pro Tips
- Chill the Cream: For the best whipped cream texture, ensure your mixing bowl and beaters are chilled before whipping. This helps the cream whip faster and achieve stiff peaks more easily.
- Use High-Quality Chocolate: The flavor of your pie will greatly benefit from using high-quality semi-sweet chocolate chips. They melt better and enhance the overall taste of the pie.
- Let It Set: For optimum flavor and texture, allow the pie to chill overnight. This ensures the filling is firm and all the flavors meld beautifully.
- Presentation Matters: For a stunning presentation, use a vegetable peeler to create chocolate shavings from a chocolate bar, and sprinkle them along with crushed peanuts on top before serving.
Variations
Dietary Variations
You can easily tweak the no-bake chocolate peanut butter pie to fit special diets. For a vegan version, swap the heavy cream with coconut cream. Use a plant-based butter and replace the powdered sugar with a vegan sweetener. This way, everyone can enjoy this tasty treat without worry.
If you're looking for keto-friendly options, go for sugar-free sweeteners like erythritol or stevia. You can also use almond flour instead of chocolate cookie crumbs to cut carbs. These simple changes will keep the taste delicious while meeting your dietary needs.
Flavor Variations
Want to get creative? You can change the flavors of this pie. Try using dark chocolate or white chocolate chips for a twist. Each type brings a different taste and richness to the pie.
You can also infuse flavors like coffee or cinnamon into the filling. Just add a teaspoon of instant coffee or a dash of cinnamon when mixing the peanut butter. This adds a warm, rich depth to the pie that many will love.
Presentation Variations
Think about how you want to serve the pie. Instead of one pie, try using individual cups or jars. This makes it easy for guests to grab and enjoy. Plus, it looks cute on a table!
For added flair, use different toppings. Consider crushed peanuts, chocolate shavings, or even fresh berries. These toppings not only make the pie look great, but they also add fun flavors and textures.
Storage Info
Proper Storage Techniques
To keep your no-bake chocolate peanut butter pie fresh, store it in the fridge. Use an airtight container or wrap it tightly with plastic wrap. This helps prevent the pie from drying out and keeps it tasty. If you want to save it for later, you can freeze it. Cut the pie into slices and wrap each slice in plastic wrap. Then, place the slices in a freezer-safe bag or container. This method makes it easy to enjoy a slice anytime.
Shelf Life
In the fridge, the pie lasts about 5 to 7 days. Keep an eye on it. Look for signs like a change in texture or smell. If it smells off or feels sticky, it's time to toss it. When frozen, the pie can stay good for up to 2 months. Just remember to thaw it in the fridge before serving. This pie is best enjoyed fresh, but with proper storage, you can savor it for days.
FAQs
Common Questions About No-Bake Chocolate Peanut Butter Pie
Can I make this pie ahead of time? Yes, you can make this pie a day ahead. Just chill it overnight. This helps the flavors blend well.
What do I do if my filling is too thick? If your filling is thick, add a splash of milk. This helps smooth it out. Mix gently until you reach the right consistency.
Can I use other types of nut butter? Absolutely! You can use almond, cashew, or sunflower butter. Each will give a unique taste to your pie.
How can I make a gluten-free version? To make it gluten-free, choose gluten-free cookies for the crust. Check the labels to be safe. The rest of the ingredients should be gluten-free too.
In this blog post, we covered how to make a no-bake chocolate peanut butter pie. You learned about the key ingredients, simple steps for the crust and filling, and tips for the best results. We also explored variations and storage solutions to keep your pie fresh.
This dessert is tasty, fun to make, and can fit many diets. Try it at your next gathering! Enjoy the joy it brings to friends and family.