Are you tired of store-bought snacks filled with mystery ingredients? Let’s change that! Making your own homemade granola bars is easy, fun, and tasty. You’ll control the flavors and nutrition, ensuring they fit your needs. In this article, I’ll share my simple, delicious recipe, along with tips to customize your bars. Get ready to discover how satisfying it is to create your own snacks right at home!
Ingredients
Main Ingredients for Homemade Granola Bars
– 2 cups rolled oats
– 1/2 cup almond butter or peanut butter
– 1/3 cup honey or maple syrup
The main ingredients form the base of your granola bars. Rolled oats give structure and fiber. Nut butter adds healthy fats and protein. Honey or maple syrup provides sweetness and binds everything together.
Additional Ingredients
– 1/2 cup mixed nuts (almonds, walnuts, and cashews), chopped
– 1/4 cup seeds (pumpkin seeds and sunflower seeds)
– 1/2 cup dried fruits (cranberries, apricots, or raisins), chopped
– 1/4 teaspoon sea salt
– 1 teaspoon vanilla extract
– 1/2 teaspoon cinnamon (optional)
Adding mixed nuts and seeds boosts crunch and nutrients. Dried fruits add natural sweetness and chewiness. Sea salt enhances flavors, while vanilla and cinnamon bring warmth and depth to your bars.
Nutritional Information
Each serving of granola bars has about 150-200 calories. You get around 7-10 grams of fat and 20-25 grams of carbohydrates. These bars offer a good balance of energy, making them perfect for snacks or breakfast.
Step-by-Step Instructions
Preparation Steps
1. First, preheat your oven to 350°F (175°C). This step is key for even baking.
2. Next, line an 8×8 inch baking pan with parchment paper. Leave some paper hanging over the sides. This makes removal easy later.
3. In a large bowl, mix the dry ingredients. Combine the rolled oats, chopped nuts, seeds, dried fruits, sea salt, and optional cinnamon. Stir until everything blends well.
Combining Ingredients
1. In a small saucepan, melt the nut butter and sweetener together over low heat. Stir often to combine.
2. Once melted, take the pan off the heat and add the vanilla extract. This adds flavor and aroma.
3. Pour this mixture over your dry ingredients. Use a spatula to mix everything together. Make sure all the dry ingredients get coated.
Baking and Cooling
1. Transfer the mixture to your prepared baking pan. Press it down firmly to form an even layer. This helps the bars hold together.
2. Bake in your preheated oven for 15 to 18 minutes. Look for the edges to turn golden brown.
3. After baking, take the pan out and let it cool for at least 30 minutes. Once cooled, use the parchment paper to lift the granola out.
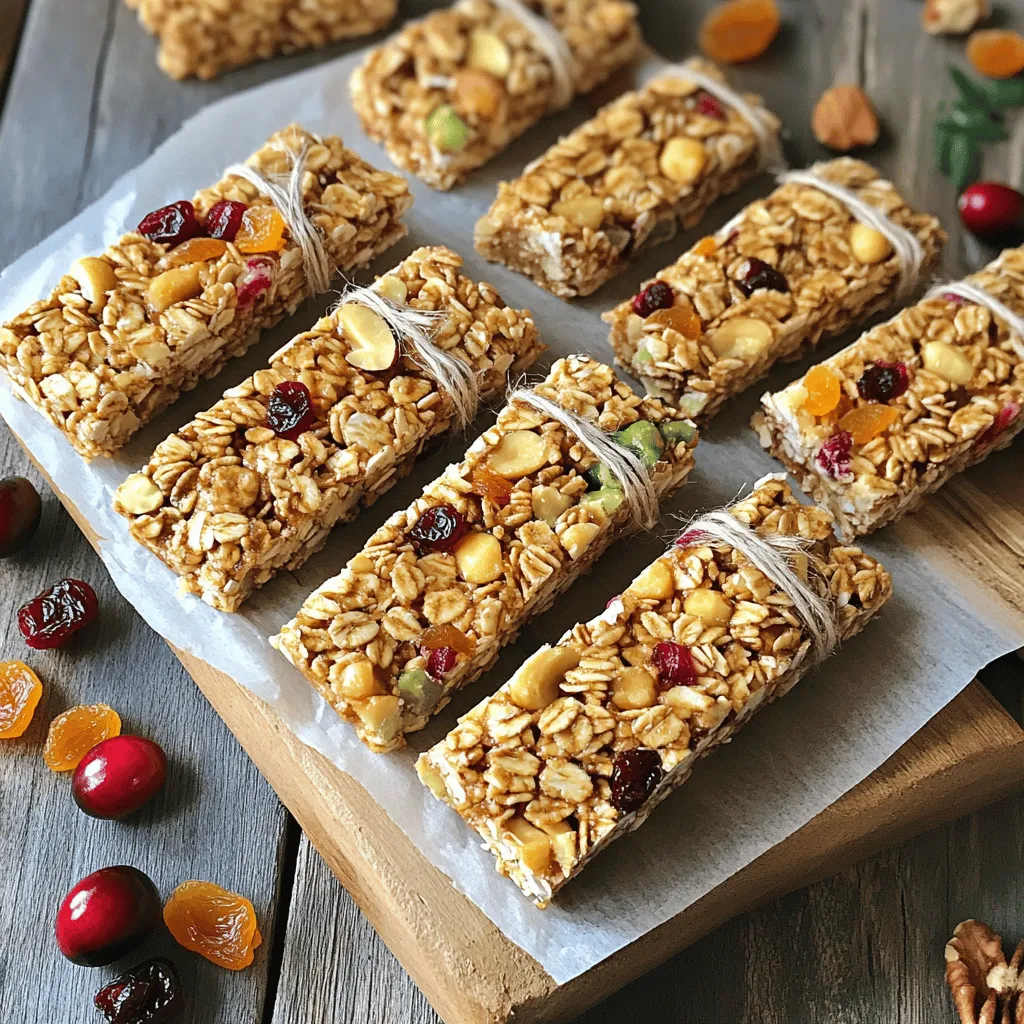
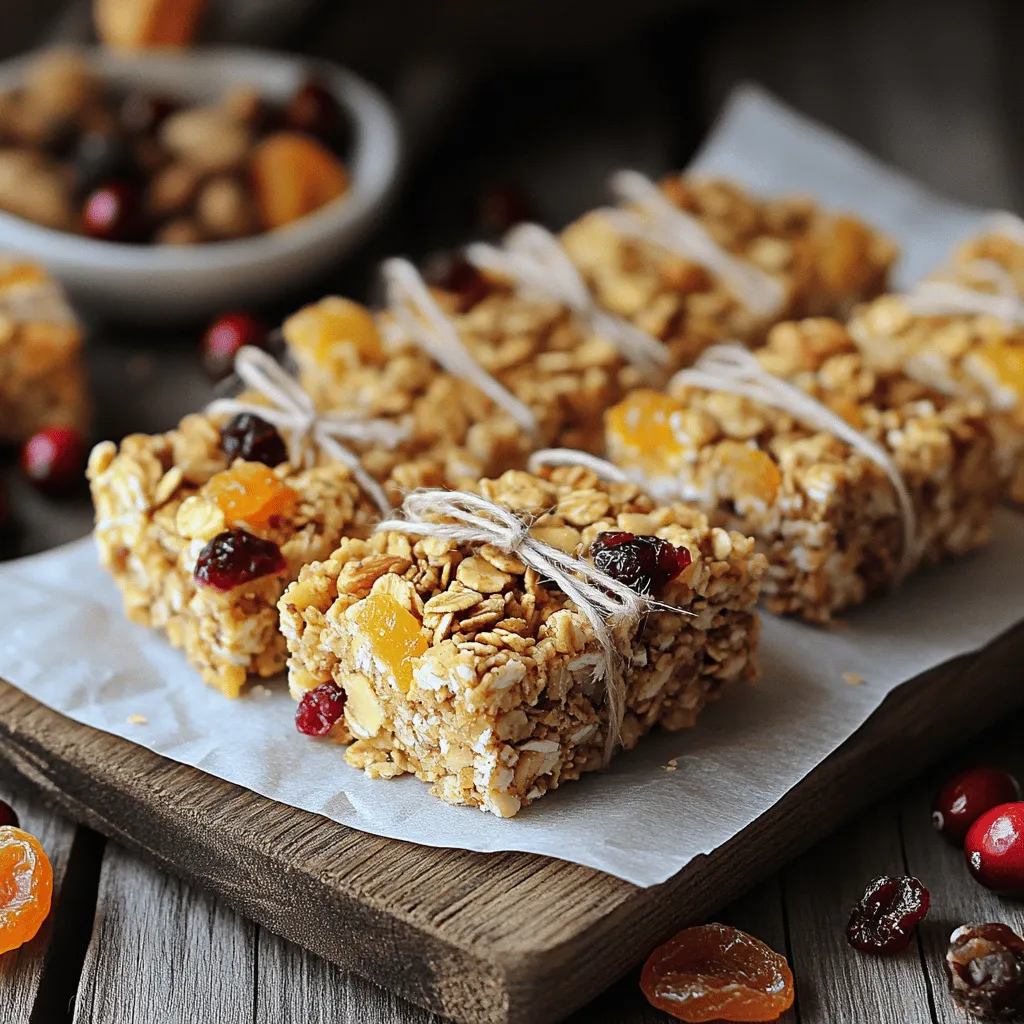
4. Place it on a cutting board and cut it into bars or squares. Store your delicious creation in an airtight container for up to a week.Enjoy your homemade treats!
Tips & Tricks
Perfecting Your Granola Bars
To make the best granola bars, focus on texture and balance. Here are some key tips:
– Use fresh ingredients: Fresh oats and nuts taste better.
– Press firmly: When you pack the mixture in the pan, press it down hard. This helps the bars hold together.
– Don’t overbake: Keep an eye on the edges. They should be golden but not too dark.
Common pitfalls include:
– Not measuring ingredients: Accurate measurements ensure the right texture.
– Skipping the cool time: Allow bars to cool fully before cutting to avoid crumbling.
Enhancing Flavor and Texture
Adding flavors can take your granola bars to the next level. Here are some ideas:
– Spices: Try adding nutmeg or ginger for warmth.
– Cocoa powder: This can give a chocolatey twist without adding chips.
The right ingredient proportions matter. Too much nut butter can make bars greasy. Too little sweetener makes them dry.
Presentation Tips
Make your granola bars visually appealing. Here are some fun ways to serve them:
– Wooden board display: Lay the bars out on a wooden board and sprinkle extra nuts and dried fruits around them for a pop of color.
– Gift wrapping: Wrap each bar in parchment paper and tie it with twine. This adds a homemade touch.
These presentation ideas make your homemade granola bars even more special!
Variations
Dietary Variations
You can easily make vegan granola bars. Just swap honey for maple syrup. Use a nut butter that fits your diet, like almond or sunflower butter. These changes keep your bars tasty and plant-based.
For gluten-free options, choose oats labeled gluten-free. Check all other ingredients too. Some nut butters and sweeteners may include gluten. Always read labels to ensure your granola bars are safe to eat.
Flavor Combinations
Get creative with flavor! You can add chocolate chips or coconut flakes for a twist. Both options add a fun taste that kids and adults love.
Seasonal flavors are a hit as well. Try pumpkin spice in the fall or peppermint for winter treats. These flavors make your granola bars festive and exciting.
Texture Variations
Do you prefer chewy or crunchy bars? To make chewy bars, add more nut butter and sweetener. This makes the bars softer and stickier.
For crunchy bars, increase the oats and nuts. Less sticky ingredients will give you that satisfying crunch. Adjust the ratios to find your perfect texture.
Storage Info
How to Store Homemade Granola Bars
To keep your granola bars fresh, use airtight containers. A glass jar or a plastic container works well. Store them in a cool, dry place. They last about one week at room temperature. If you see any signs of moisture, it’s best to toss them.
Freezing Granola Bars
Freezing granola bars is easy. First, wrap each bar in plastic wrap. Then place them in a freezer-safe bag. You can store them for up to three months. When you want to eat one, take it out and let it thaw at room temperature. For quicker thawing, you can microwave it for about 15 seconds.
Signs of Spoilage
Check for a change in smell or texture. If they smell off or feel sticky, they may be bad. You can also look for mold or discoloration. If you see any signs of spoilage, throw them away. Always prioritize your health.
FAQs
How can I customize homemade granola bars?
You can customize granola bars easily. Start by adding your favorite nuts, seeds, or dried fruits. If you’re allergic to certain ingredients, swap them out. For a sweet touch, consider adding dark chocolate chips. You can also try different nut butters, like peanut butter or sunbutter, for varied flavors.
Can I make granola bars without nuts?
Yes, you can make nut-free granola bars. Use seeds like sunflower or pumpkin instead. You can also use puffed rice or oats to add crunch. These alternatives still give your bars great flavor and texture.
What is the best way to cut granola bars?
To cut your granola bars neatly, let them cool completely. Use a sharp knife for clean edges. You can also grease the knife to prevent sticking. For small pieces, cut them into squares. For larger snacks, cut them into rectangles.
Can I use quick oats instead of rolled oats?
Quick oats can work, but they change the texture. Rolled oats provide a chewier bite, while quick oats create a softer bar. If using quick oats, reduce the baking time slightly. This ensures your bars stay moist and tasty.
How long do homemade granola bars last?
Homemade granola bars last about a week when stored in an airtight container. To keep them fresh longer, refrigerate them. If you want to save them for later, consider freezing. Just wrap each bar well to avoid freezer burn.
Should I use unsweetened nut butter?
Using unsweetened nut butter is a good choice. It allows you to control the sweetness. If you prefer a sweeter taste, add more honey or maple syrup. This way, you can make the bars just how you like them.
Making homemade granola bars is simple and fun. We covered the main ingredients like rolled oats and nut butter. You learned how to prepare, bake, and store your bars. Remember to customize flavors to your taste and avoid common mistakes for the perfect texture. Keep an eye on storage to maintain freshness. Now, you can enjoy healthy, tasty snacks or share them as gifts. With these tips, your homemade granola bars will be a hit!