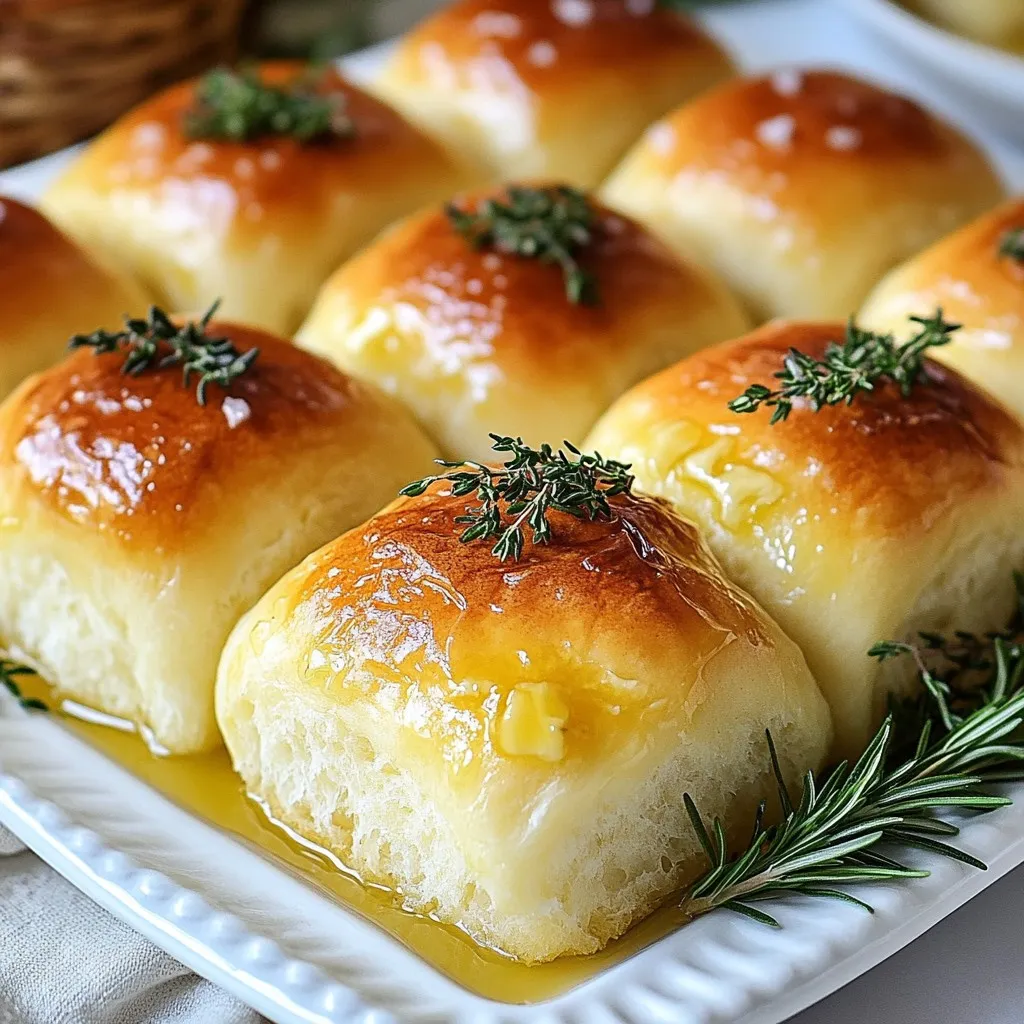
Are you craving soft, fluffy dinner rolls but need a gluten-free option? You’ve come to the right place! I’ll show you how to make Extra Soft Gluten Free Dinner Rolls that everyone will love. With simple steps and easy-to-find ingredients, you’ll bake up rolls that are delightfully airy and tasty. Ready to impress your friends and family? Let’s get started!
Why I Love This Recipe
- Fluffy Texture: These rolls are incredibly light and fluffy, making them a delightful addition to any meal.
- Gluten-Free: Perfect for those with gluten sensitivities, allowing everyone to enjoy fresh bread!
- Easy to Make: The recipe is simple and requires minimal ingredients, making it accessible for all skill levels.
- Customizable: Add your favorite herbs or spices for a personalized touch that suits your taste.
Ingredients
List of Essential Ingredients
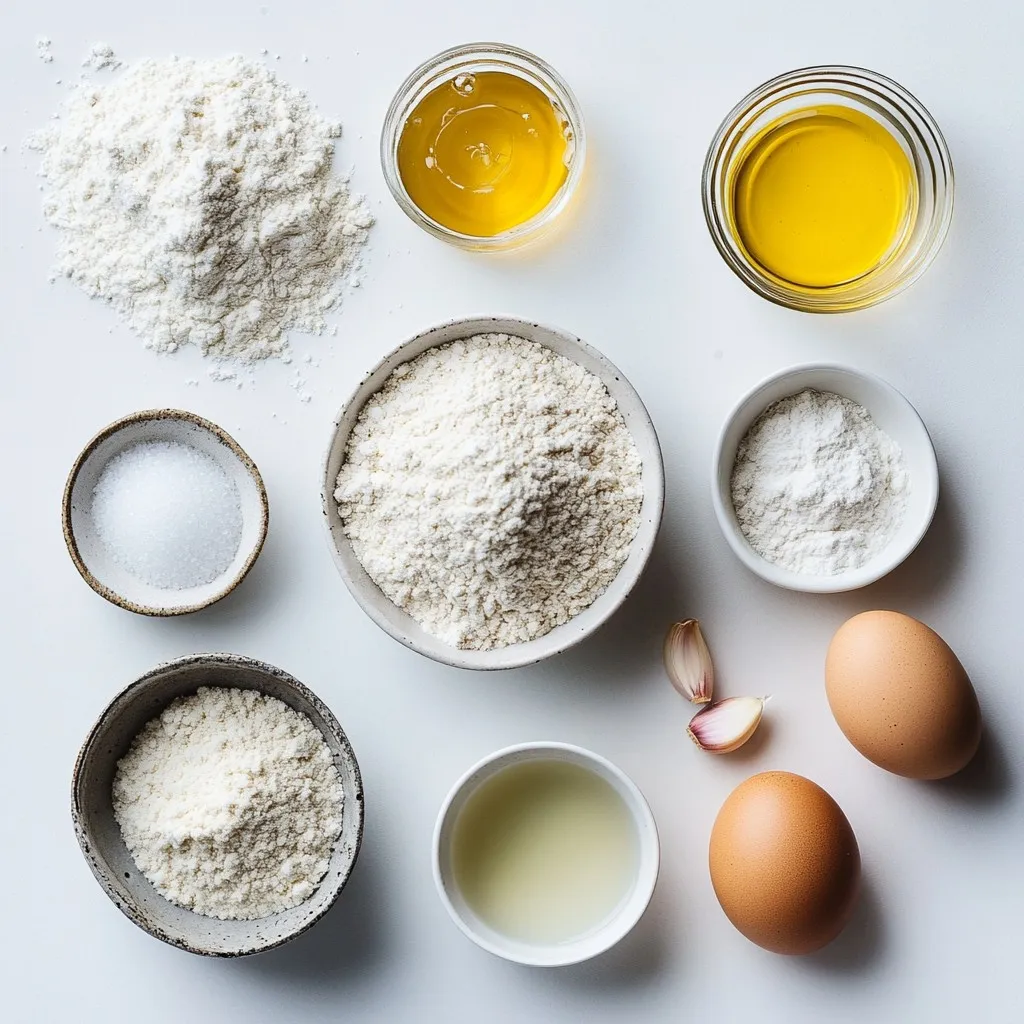
– 2 cups gluten-free all-purpose flour
– 1 teaspoon instant yeast
– 1 tablespoon sugar
– 1 teaspoon salt
– 1 cup warm water (110°F or 45°C)
– 2 tablespoons olive oil
– 1 tablespoon apple cider vinegar
– 1 large egg
– 1 teaspoon garlic powder (optional for flavor)
To make these rolls, you need simple ingredients. Start with gluten-free all-purpose flour. This flour blend gives the rolls a soft texture. Next, you need instant yeast. This helps the rolls rise. Sugar adds a hint of sweetness. Don’t forget salt, which enhances the flavor.
Use warm water to activate the yeast. The water should be around 110°F. Olive oil keeps the rolls moist. Apple cider vinegar adds a nice tang. Lastly, you need one large egg to bind everything together. If you want, add garlic powder for extra flavor.
These rolls are easy to make. Each ingredient plays a key role in creating soft, pillowy rolls. Enjoy the process and have fun!
Step-by-Step Instructions
Preparation Process
1. Mixing dry ingredients
In a large bowl, add 2 cups of gluten-free all-purpose flour, 1 teaspoon of instant yeast, 1 tablespoon of sugar, and 1 teaspoon of salt. Whisk them well until blended. This mix creates a good base for your rolls.
2. Combining wet ingredients
In a separate bowl, combine 1 cup of warm water, 2 tablespoons of olive oil, 1 tablespoon of apple cider vinegar, and 1 large egg. Whisk everything until it blends smoothly. The warm water helps the yeast grow.
3. Forming the dough
Pour the wet mix into the dry mix. Use a spatula to mix until you get a thick, sticky dough. If you like garlic, add 1 teaspoon of garlic powder here for extra flavor.
Rising and Baking
1. First rise duration
Cover the bowl with a clean kitchen towel. Let the dough rise in a warm spot for about 30-45 minutes. You want it to puff up a bit.
2. Preheating the oven
While the dough rises, preheat your oven to 375°F (190°C). This ensures your rolls bake evenly. Line a baking sheet with parchment paper or spray it lightly with non-stick cooking spray.
3. Shaping the rolls
Once the dough has risen, wet your hands to prevent sticking. Scoop out portions of dough, roughly the size of golf balls. Place them on the baking sheet, spaced apart. You can shape them into smooth balls for a nicer look.
Final Baking Steps
1. Second rise duration
Cover the rolls with the towel again. Let them rise for another 15-20 minutes. This helps them become extra soft.
2. Baking time and tips
Bake the rolls in the preheated oven for about 20-25 minutes. They should turn golden brown. To check, insert a toothpick in the center. If it comes out clean, they are ready.
3. Cooling before serving
After baking, remove the rolls from the oven. Let them cool slightly before serving. Enjoy them warm with herb-infused butter or olive oil for dipping!
Tips & Tricks
Ensuring Extra Softness
To keep your rolls soft, pay attention to the ingredient temperature. Use warm water at 110°F (45°C) for the best rise. This warmth helps yeast activate, making the rolls fluffy.
Next, create the right rising conditions. Find a warm spot in your kitchen. Cover the dough with a clean towel. This keeps it warm and moist, which is key for rising.
Also, avoid overmixing. Mix until just combined. Overmixing can make the texture tough. A gentle touch helps keep those rolls light and airy.
Flavor Enhancements
Adding herbs or spices can elevate your rolls. For a savory touch, try garlic powder or dried herbs. Mix them into the dough for a burst of flavor.
Pair your rolls with dips for extra taste. Herb-infused butter or olive oil suits these rolls perfectly. The richness of the dips complements the soft texture.
Consider using different gluten-free flours too. Each flour adds its unique flavor and texture. Almond flour or oat flour can change your rolls in tasty ways. Enjoy experimenting!
Pro Tips
- Perfect Temperature: Ensure your water is at the right temperature (110°F or 45°C) to activate the yeast properly without killing it.
- Sticky Dough Handling: Use wet hands when shaping the dough to prevent it from sticking to your fingers.
- Rising Time: Allow the dough to rise in a warm, draft-free area to achieve the best texture and fluffiness.
- Storage Tips: Store leftover rolls in an airtight container to maintain their softness, and reheat them in the oven before serving.
Variations
Different Flavor Profiles
You can easily change the flavors of your rolls. Here are some fun ideas:
– Garlic and herb rolls: Add garlic powder and fresh herbs like rosemary or thyme. Mix these in with your dry ingredients. The rolls will have a tasty, savory kick.
– Sweet rolls with cinnamon: Replace some sugar with ground cinnamon. Add raisins for extra sweetness. These rolls make a great treat for breakfast or dessert.
– Cheesy gluten-free rolls: Stir in shredded cheese like cheddar or mozzarella into the dough. This adds richness and a nice cheesy flavor. Perfect for pairing with soup or salad.
Dietary Adjustments
Making these rolls fit your diet is easy. Here are some swaps you can try:
– Dairy-free substitutions: Use almond milk or oat milk instead of regular milk. You can also swap butter for olive oil or dairy-free butter.
– Egg-free alternatives: Replace the egg with a flaxseed meal. Mix one tablespoon of flaxseed with three tablespoons of water. Let it sit for a few minutes to thicken.
– Low-carb modifications: Use a low-carb gluten-free flour blend. You can also add more fiber by including ground chia seeds or psyllium husk. This keeps the rolls soft while lowering carbs.
These variations and substitutions make your gluten-free dinner rolls fun and friendly for all diets. Enjoy experimenting!
Storage Info
Storing Leftovers
To keep your rolls fresh, store them properly. For short-term storage, place them in an airtight container in the fridge. This helps maintain their softness. Make sure they cool before sealing. For longer storage, freezing is best. Wrap each roll in plastic wrap and place them in a freezer bag. This prevents freezer burn and keeps them tasty. You can freeze them for up to three months. When you want to enjoy them, just thaw them overnight in the fridge.
Reheating Instructions
To reheat your rolls, use the oven for the best results. Preheat the oven to 350°F (175°C). Place the rolls on a baking sheet and cover them with foil. Heat them for about 10-15 minutes. This keeps them soft and warm. If you want to warm them quickly, you can use a microwave. Heat each roll for about 10-15 seconds. But be careful not to overheat, as this can make them tough. Enjoy your gluten-free rolls warm and soft!
FAQs
Common Questions About Gluten-Free Dinner Rolls
Can I use regular flour instead?
No, you should not use regular flour. Gluten-free flour is different. It lacks gluten, which gives bread its structure. Using regular flour will change the rolls’ texture and taste. Stick to gluten-free all-purpose flour for the best results.
How can I tell if my rolls are fully baked?
Your rolls are done when they turn golden brown on top. Insert a toothpick in the center. If it comes out clean, they are baked. If there is dough on the toothpick, bake for a few more minutes.
What is the best way to reheat gluten-free rolls?
To reheat, wrap rolls in foil and place in a preheated oven at 350°F (175°C). Heat for about 10 minutes. This keeps them soft. You can also microwave them for about 15-20 seconds. Just make sure not to overheat.
Texture and Taste Concerns
Why are my rolls dense?
Dense rolls often come from not enough rising time. Ensure your dough rises as it should. If the yeast is old, it may not work well. Always check the yeast’s expiry date. Also, measure the flour accurately. Too much flour can lead to density.
How do I achieve a crispy exterior?
To get a crispy outside, bake your rolls at a high temperature. Preheat your oven to 375°F (190°C). You can also place a pan of water in the oven. This adds steam, which helps form a crust. Bake until the tops are golden brown for the best results.
You learned about making gluten-free dinner rolls, from ingredients to techniques. Start with essential items like gluten-free flour and instant yeast. Mixing is key, and two rises help achieve fluffiness. Tips on baking will ensure your rolls are soft and tasty.
In the end, you can customize these rolls with flavors or adjust for dietary needs. Store leftovers properly to keep them fresh. Ready to bake? You’ve got this! Enjoy your homemade gluten-free rolls with family and friend