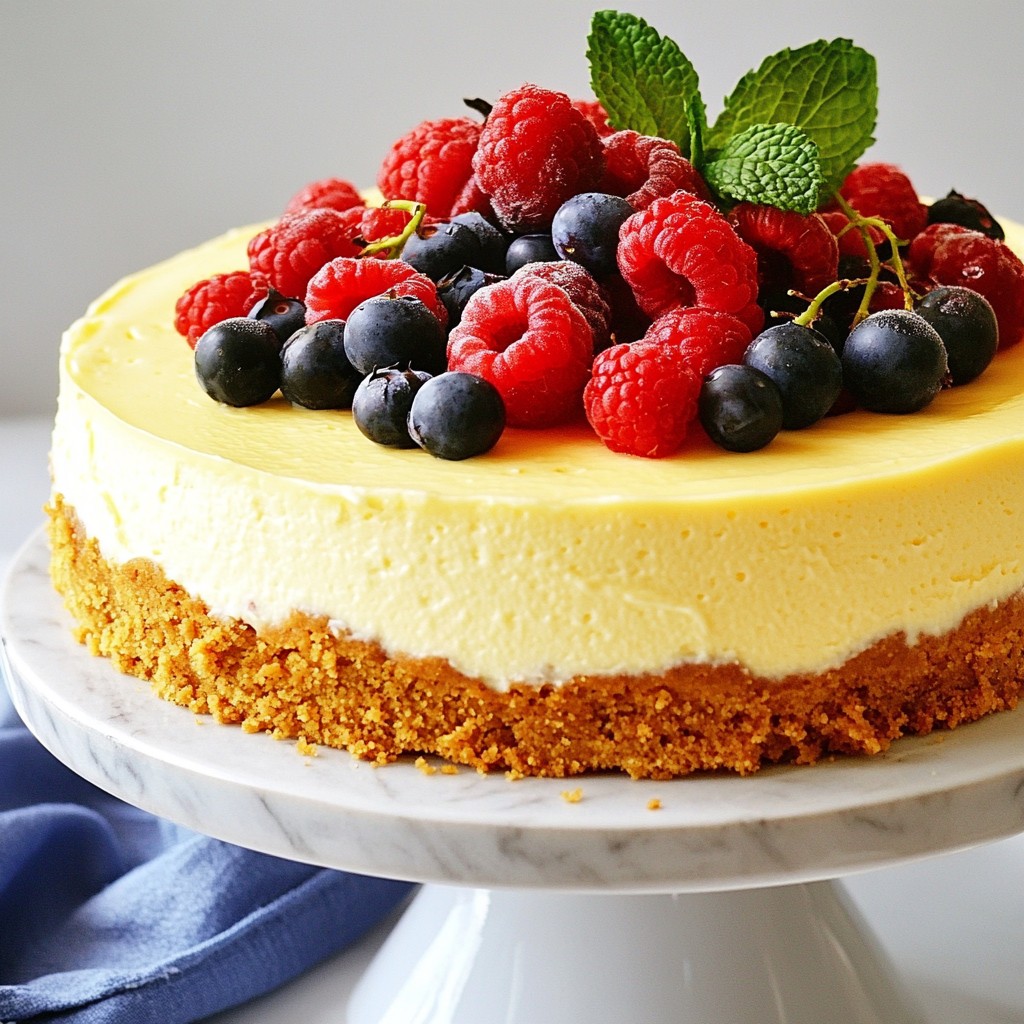
Welcome to a slice of heaven: Classic Vanilla Bean Cheesecake! This rich and creamy delight will make your taste buds dance. With a buttery graham cracker crust and a smooth filling infused with real vanilla, this cheesecake is a crowd-pleaser. I’ll guide you step by step through the process and share tips to avoid cracks. Get ready to impress your family and friends with a dessert they'll never forget!
Why I Love This Recipe
- Rich and Creamy Texture: This cheesecake has an incredibly smooth and velvety texture that melts in your mouth, making every bite a luxurious experience.
- Classic Flavor Profile: The combination of cream cheese, vanilla bean, and a hint of sour cream creates a timeless flavor that appeals to all palates.
- Impressive Presentation: With its elegant appearance and the option to garnish with fresh berries, this cheesecake is perfect for special occasions or gatherings.
- Make-Ahead Convenience: This cheesecake can be made a day in advance, allowing you to save time and ensure a stress-free serving on the day of your event.
Ingredients
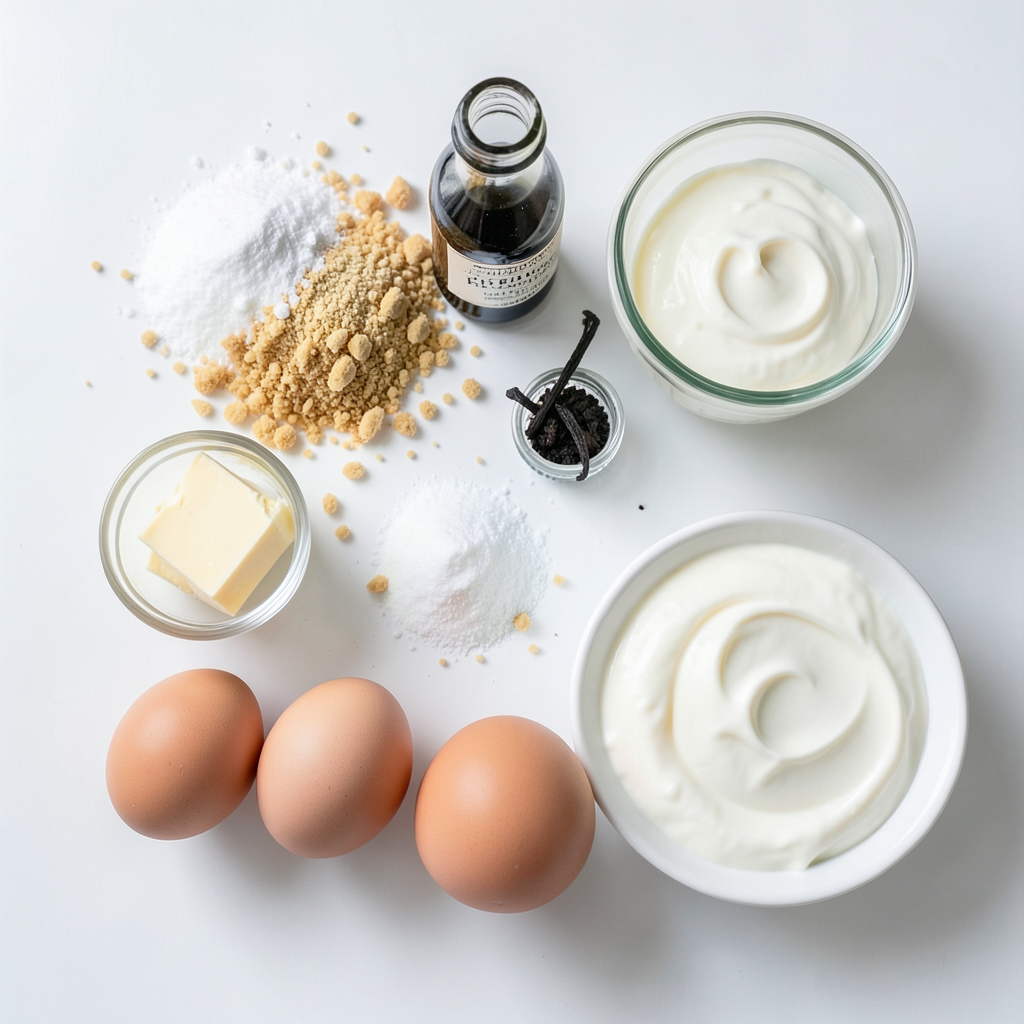
List of Ingredients
- 1 ½ cups graham cracker crumbs
- ⅓ cup granulated sugar
- ½ cup unsalted butter, melted
- 4 packages (8 oz each) cream cheese, softened
- 1 ¼ cups granulated sugar
- 1 teaspoon pure vanilla extract
- 1 vanilla bean, split and seeds scraped
- 4 large eggs
- 1 cup sour cream
- ½ cup heavy cream
Optional Ingredients
- Fresh berries for garnish
- Mint leaves for garnish
Every great cheesecake starts with quality ingredients. For this classic vanilla bean cheesecake, I use fresh, simple items. This makes a big difference in flavor and texture.
First, I use graham cracker crumbs to form a crunchy base. The sugar balances the flavors and the melted butter helps bind everything. For the filling, I stick with cream cheese as the main star. I make sure it's softened for easy mixing.
I love using pure vanilla extract and a whole vanilla bean. The seeds add rich flavor and little specks that look lovely. Eggs bring the cheesecake together, giving it a creamy texture. Sour cream and heavy cream add richness and a touch of tang.
If you want to make it special, add fresh berries or mint on top. These add color and freshness. You will love how these simple ingredients create a rich and creamy delight!
Step-by-Step Instructions
Preparing the Crust
1. Preheat the oven to 325°F (163°C).
2. In a bowl, combine 1 ½ cups of graham cracker crumbs, ⅓ cup of granulated sugar, and ½ cup of melted unsalted butter.
3. Mix until the crumbs are well coated.
4. Press the crumb mixture evenly into the bottom of a greased 9-inch springform pan.
5. Bake for 10 minutes, then remove and let it cool slightly.
Making the Cheesecake Filling
1. In a large mixing bowl, beat 4 packages of softened cream cheese until smooth.
2. Gradually add in 1 ¼ cups of sugar, mixing until fluffy.
3. Incorporate 1 teaspoon of pure vanilla extract and the seeds from 1 vanilla bean.
4. Add 4 large eggs, one at a time, mixing gently after each addition.
5. Fold in 1 cup of sour cream and ½ cup of heavy cream until smooth.
Baking the Cheesecake
1. Pour the cheesecake batter over the cooled crust.
2. Tap the pan lightly on the counter to release any air bubbles.
3. Bake in the preheated oven for 50-60 minutes. The edges should be set, and the center should have a slight jiggle.
4. Turn off the oven and let the cheesecake cool inside for about an hour with the door cracked open.
Tips & Tricks
Achieving the Perfect Texture
To get a smooth cheesecake, avoid overmixing after you add the eggs. Mix just enough to blend them in. Overmixing can add too much air, which changes the texture. Once baked, allow your cheesecake to cool slowly. This helps it set without forming cracks.
Preventing Cracks
To prevent cracks, crack the oven door while the cheesecake cools. This gradual change in temperature helps keep the surface smooth. After baking, refrigerate your cheesecake for at least four hours. Chilling it overnight is even better. This makes it firmer and easier to slice.
Slicing Techniques
Use a hot knife for clean edges when slicing. Heat the knife under hot water, then dry it off. This makes each cut smooth and neat. Wipe the knife between cuts to keep the edges clean. This small step improves how your cheesecake looks when served.
Pro Tips
- Cool Gradually: Allow the cheesecake to cool in the oven with the door cracked open to prevent sudden temperature changes that can cause cracking.
- Use Room Temperature Ingredients: Ensure all ingredients, especially cream cheese and eggs, are at room temperature for a smooth batter and even baking.
- Don’t Overmix: Mix the batter just until combined to maintain a light and airy texture. Overmixing can lead to a dense cheesecake.
- Chill Overnight: For the best flavor and texture, refrigerate the cheesecake overnight before serving to allow it to set properly.
Variations
Flavor Variations
You can change up the classic vanilla bean cheesecake in fun ways. One tasty option is to make a lemon vanilla bean cheesecake. Just add fresh lemon juice and zest to the filling. This gives a bright and zesty flavor. It pairs well with the creamy base.
Another great twist is the chocolate swirl vanilla bean cheesecake. For this, melt some chocolate and swirl it into the cheesecake batter before baking. You get rich chocolate flavor with a creamy texture. Both options add excitement to the classic recipe.
Crust Alternatives
The crust can also change to fit your taste. Instead of graham crackers, try using crushed Oreos or digestive biscuits. This gives a deep, chocolatey flavor that many love.
If you need a gluten-free option, a nut-based crust works well. Simply blend your favorite nuts with a little butter and sugar. Press this mixture into your pan. It adds a nice crunch and a different taste to the cheesecake.
Toppings and Serve Suggestions
Toppings can enhance the cheesecake's look and taste. Drizzle some caramel or chocolate sauce over the top for a sweet touch. You can also use fruit compote made from berries. This adds freshness and color.
Serve your cheesecake with coffee or tea for a delightful pairing. The warmth of the drink goes well with the cool, creamy cheesecake. Each bite offers a mix of flavors that makes it special.
Storage Info
Refrigeration
You can store your cheesecake in the fridge for up to 5 days. Use a covered container or plastic wrap to keep it fresh. This helps prevent any odors from the fridge from affecting its taste. If you slice it, cover the cut edges to keep them moist.
Freezing the Cheesecake
To freeze the cheesecake, let it cool completely first. Wrap it tightly in plastic wrap, then cover it with aluminum foil. This method stops freezer burn. You can freeze it for up to 3 months. When ready to enjoy, move it to the fridge for 24 hours to thaw. This slow process keeps the texture creamy.
Serving After Storage
After refrigeration or freezing, your cheesecake may need a little refresh. If it feels a bit firm, let it sit at room temperature for 30 minutes before serving. This helps restore its creamy texture. You can also top it with fresh berries or a drizzle of chocolate to add a pop of flavor.
FAQs
What is the best way to prevent a cheesecake from cracking?
To prevent cracks, keep the oven door closed while baking. After baking, turn off the oven. Let the cheesecake cool inside with the door cracked open. This slow cooling helps keep the texture even. You can also add a water bath while baking. Place a pan with water on the oven rack below the cheesecake. This method adds moisture, which helps keep the cheesecake creamy.
Can I use low-fat cream cheese?
Yes, you can use low-fat cream cheese. However, the texture may change. Low-fat cream cheese often makes the cheesecake less creamy. The flavor might also be less rich and smooth. If you want a lighter option, you could mix low-fat cream cheese with full-fat sour cream. This can help balance the flavors while keeping some creaminess.
How long should I refrigerate the cheesecake before serving?
You should refrigerate the cheesecake for at least 4 hours. However, chilling it overnight is best. This time allows the flavors to develop. It also helps the cheesecake set properly. The longer it chills, the better it tastes. When you finally slice it, you will notice a smooth and rich texture.
This blog post laid out how to make a rich and creamy cheesecake. You learned about the ingredients needed, step-by-step instructions, and helpful tips to prevent cracks. We also explored variations and storage methods to keep it fresh.
In conclusion, making cheesecake is fun and rewarding. With practice, you can create a delicious dessert that impresses everyone. Enjoy your baking journey and savor every bite!