Looking for an easy and tasty meal idea? You’ll love these Cheesy Garlic Chicken Wraps! With just a few simple ingredients, you can create a delightful wrap that’s packed with flavor. I’ll guide you through mixing the right ingredients and cooking them to a perfect golden brown. Get ready to impress your family or friends with this fun and quick recipe that’s sure to become a favorite. Let’s dive in!
Why I Love This Recipe
- Quick and Easy: This recipe comes together in just 25 minutes, making it perfect for busy weeknights.
- Cheesy Goodness: With melted mozzarella and cream cheese, every bite is a deliciously cheesy experience.
- Customizable Filling: You can easily swap in your favorite veggies or proteins to suit your taste preferences.
- Perfect for Meal Prep: These wraps are great for meal prep, allowing you to enjoy a tasty lunch or dinner throughout the week.
Ingredients
Main Ingredients
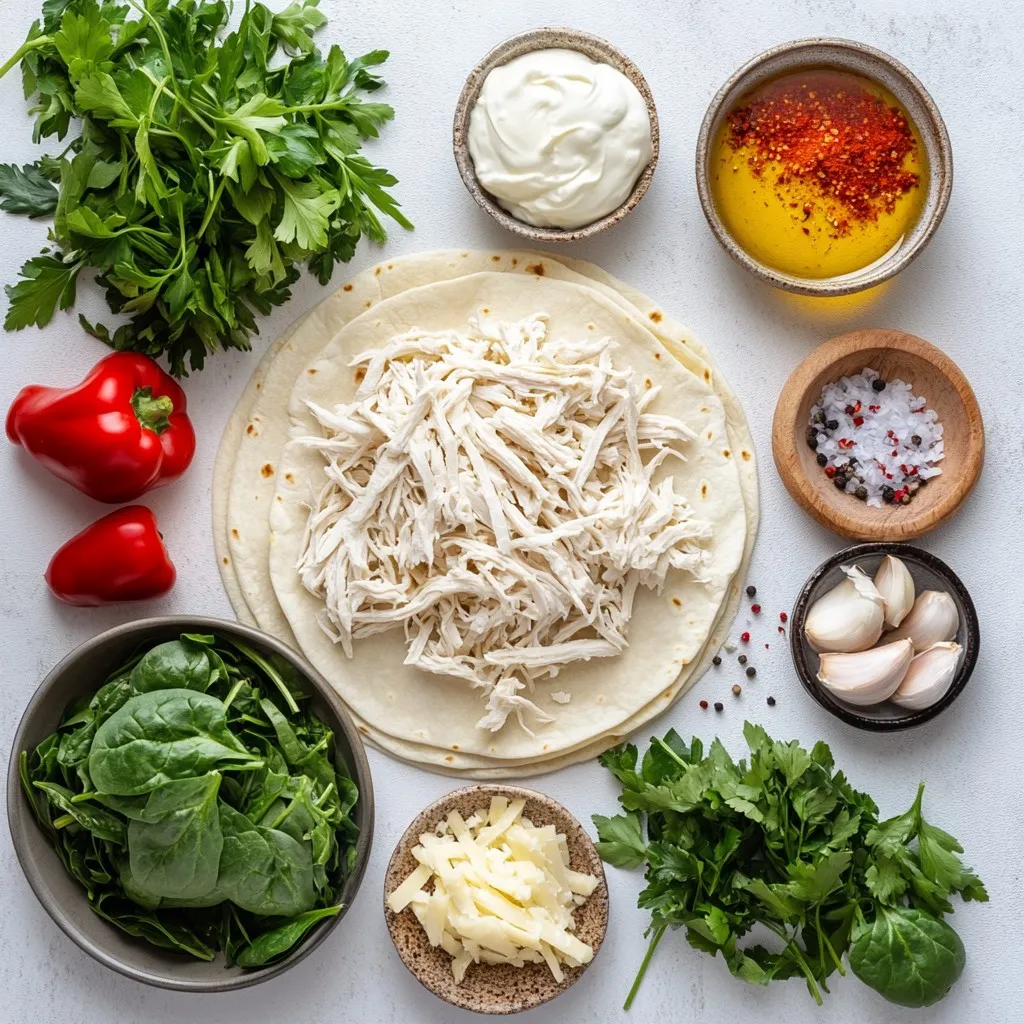
– 2 cups cooked chicken, shredded
– 1 cup mozzarella cheese, shredded
– ¼ cup cream cheese, softened
– 4 large flour tortillas
You want to start with cooked chicken. Shredded chicken works best here. You can use leftover chicken or rotisserie chicken for ease. Next, let’s talk about cheese. Mozzarella cheese adds a nice stretch. Cream cheese gives a creamy texture and rich taste. For the wraps, large flour tortillas are perfect. They hold everything well and are easy to fold.
Seasonings and Extras
– 3 cloves garlic, minced
– ½ cup spinach, chopped
– ½ teaspoon garlic powder
– ½ teaspoon paprika
– Salt and pepper to taste
– 2 tablespoons olive oil
– Optional: fresh parsley for garnish
Garlic is a star in this dish. Use three cloves for a strong garlic flavor. Minced garlic adds great taste, while garlic powder gives an extra kick. Paprika brings a bit of warmth. Don’t forget salt and pepper; they enhance all the flavors. Adding spinach or other greens gives freshness and color. Use olive oil to cook the wraps. For a finishing touch, sprinkle fresh parsley on top for a pop of green.
Step-by-Step Instructions
Preparation Steps
Mixing the filling
First, grab a large mixing bowl. Add 2 cups of shredded chicken. Toss in 1 cup of shredded mozzarella cheese and ¼ cup of softened cream cheese. Next, add 3 cloves of minced garlic, ½ cup of chopped spinach, ½ teaspoon of garlic powder, and ½ teaspoon of paprika. Sprinkle in salt and pepper to taste. Mix everything well. You want all the flavors to blend nicely.
Heating the tortillas
Now, heat 2 tablespoons of olive oil in a skillet over medium heat. Place one tortilla in the skillet and warm it for about 30 seconds. This makes it soft and easy to fold later.
Cooking Process
Folding and sealing the wraps
Spoon a generous amount of the cheesy chicken mixture onto one half of the warmed tortilla. Carefully fold the tortilla over the filling. Press down lightly to seal it. This step keeps the filling inside while cooking.
Cooking on both sides
Cook the wrap for about 2-3 minutes until the bottom is golden and crispy. Flip the wrap carefully and cook for another 2-3 minutes. You want both sides to be golden brown and crunchy. Repeat this process for the remaining tortillas and filling.
Final Touch
Slicing and serving suggestions
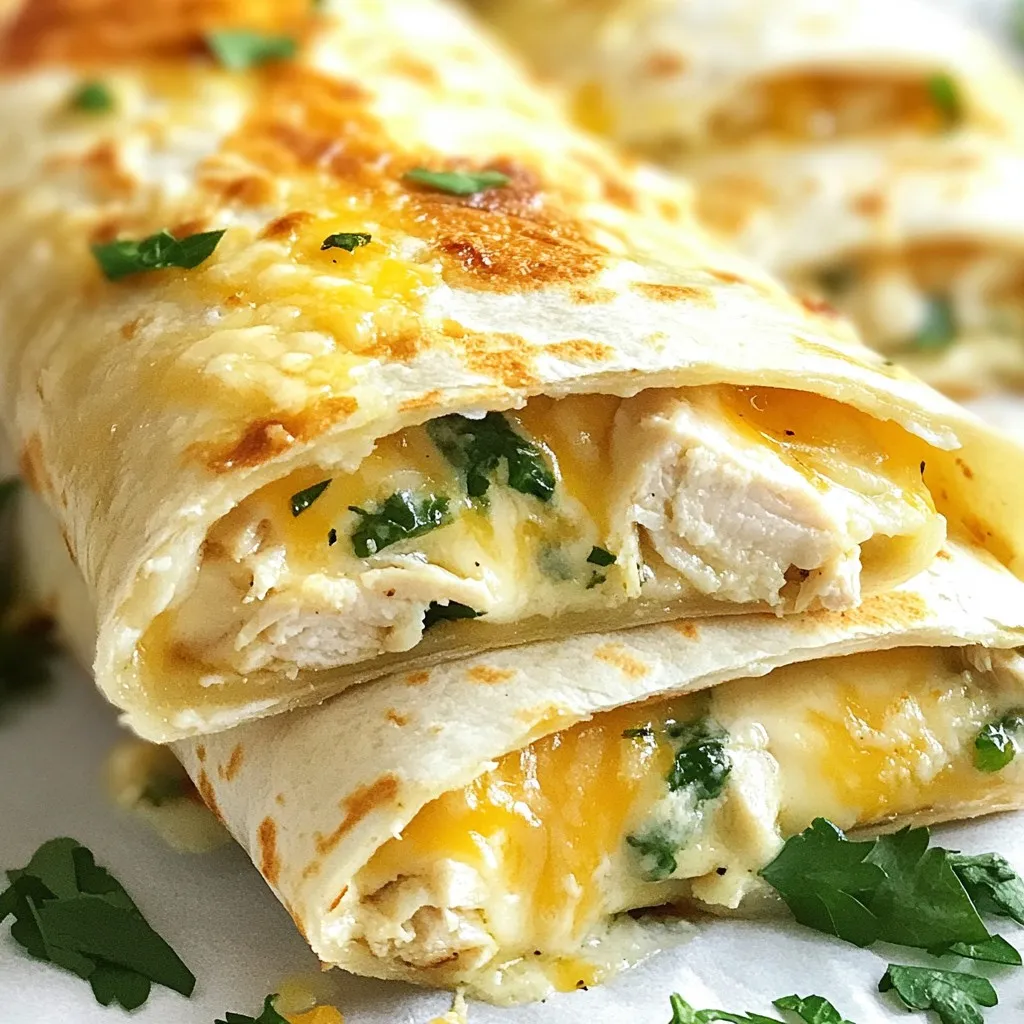
Once cooked, remove the wraps from the skillet. Let them cool for a minute. Then slice each wrap in half. Serve them warm on a plate. If you like, garnish with fresh parsley for a pop of color. Enjoy your tasty cheesy garlic chicken wraps!
Tips & Tricks
Cooking Tips
To get a perfect golden wrap, use medium heat. If the heat is too high, the outside may burn before the inside warms.
Use fresh ingredients for the best taste. Fresh garlic brings a strong flavor. Fresh spinach adds a nice crunch and color.
Mix your filling well. This helps to spread the flavors evenly.
When you cook the wraps, press down gently with a spatula. This helps seal the wrap and keeps the filling inside.
Serving Recommendations
These wraps taste great with a side salad. A simple mix of greens and tomatoes works well.
For dips, try ranch or garlic sauce. These pair well with the cheesy flavor.
You can also serve them with salsa. The fresh taste of salsa adds a nice twist.
Don’t forget about garnishes! Fresh parsley not only looks nice but adds a fresh taste.
Pro Tips
- Use Rotisserie Chicken: For a quicker preparation, use store-bought rotisserie chicken. It saves time and adds great flavor.
- Customize Your Fillings: Feel free to add other ingredients like bell peppers or mushrooms to the filling for extra texture and flavor.
- Perfectly Crispy Wraps: Ensure the skillet is hot enough before adding the wraps to achieve a golden, crispy exterior.
- Serve with Dips: Pair these wraps with your favorite dipping sauces, such as ranch or marinara, for an extra flavor boost.
Variations
Ingredient Swaps
You can switch out the chicken for other proteins. Try shredded turkey or even beef. Tofu works well too if you want a vegetarian option. Each protein brings its own taste and texture.
You can also change the cheese. While mozzarella is classic, try cheddar or pepper jack for a kick. Cream cheese adds richness, but you can use ricotta or goat cheese instead. Mix and match to find your favorite flavor.
Dietary Modifications
If you need gluten-free options, use gluten-free tortillas. They are widely available and taste great. You won’t miss the regular ones at all.
For vegan adaptations, use plant-based chicken or seitan. Replace all cheese with vegan cheese. Cream cheese can be swapped for cashew cream or hummus. This way, everyone can enjoy cheesy garlic chicken wraps!
Storage Info
Storing Leftovers
To keep your cheesy garlic chicken wraps fresh, follow these steps:
– Refrigeration: Place leftover wraps in an airtight container. This keeps them from drying out. They stay good for about 3 days in the fridge.
– Freezing Options: You can freeze these wraps for longer storage. Wrap each one tightly in plastic wrap, then place them in a freezer-safe bag. They last up to 3 months in the freezer.
Reheating Instructions
To enjoy your cheesy garlic chicken wraps again, reheating is key. Here are some methods:
– Skillet Method: Heat a skillet over medium heat. Add the wrap and cook for 2-3 minutes on each side. This keeps them crispy.
– Oven Method: Preheat your oven to 350°F (175°C). Place the wraps on a baking sheet and heat for about 10-15 minutes. This helps to warm them without making them soggy.
Both methods help preserve the flavor and texture of your cheesy garlic chicken wraps.
FAQs
Common Questions
How do I ensure the wraps stay crispy?
To keep your wraps crispy, cook them on medium heat. Use enough oil in the skillet. Make sure to fold the tortilla well. This seals the filling inside. Avoid overstuffing the wraps. Less filling means a better seal.
Can I make these wraps ahead of time?
Yes, you can prepare the filling ahead. Store it in the fridge for up to a day. When ready, fill and cook the tortillas. This way, you save time during busy days.
Recipe Troubleshooting
What to do if the filling spills out?
If the filling spills out while cooking, it’s usually too full. Gently press down on the wrap to seal it better. If it happens, use a spatula to push the filling back in.
How to fix a soggy wrap?
To fix a soggy wrap, cook it longer on low heat. This helps the excess moisture escape. You can also try baking the wraps briefly in the oven. This adds extra crispiness.
In this blog post, we explored the key ingredients for delicious wraps, including cooked chicken, cheese, and tortillas. I shared steps for preparing, cooking, and serving your wraps, along with helpful tips for perfect results. We also discussed variations for dietary needs and how to store leftovers. Remember, fresh ingredients make a big difference. Enjoy these wraps any time you want a quick meal! Get creative with flavors and have fun in the kitche