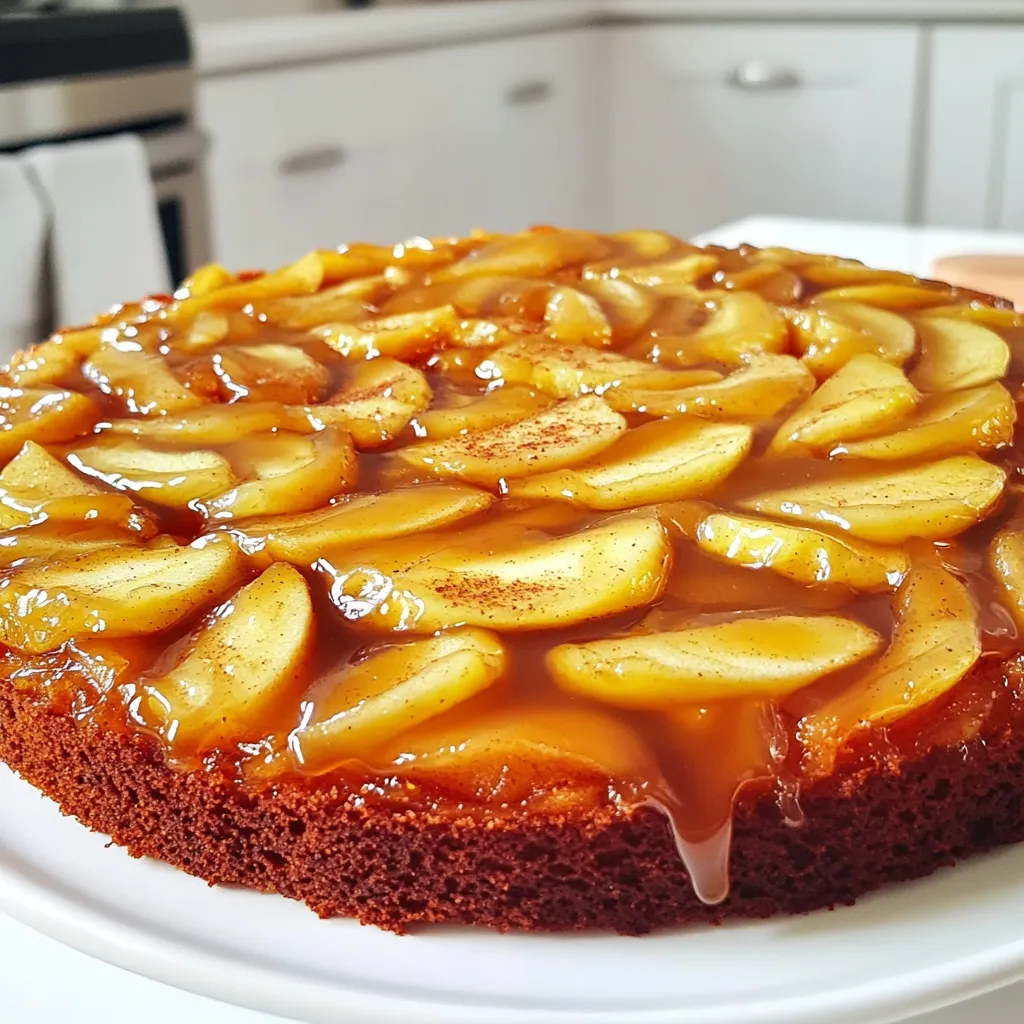
Get ready for a sweet adventure with my Caramel Apple Upside Down Cake! This rich and flavorful delight combines tender apples, buttery caramel, and a soft cake that flips to perfection. Whether you want a dessert to impress friends or a cozy treat for your family, this recipe delivers. Join me as I walk you through simple steps and tips to make this mouthwatering cake a standout in your kitchen. Let’s dive in!
Ingredients
List of Ingredients
– Apples: I recommend using Granny Smith or Honeycrisp apples. Granny Smith offers a tart flavor, while Honeycrisp adds sweetness. Both create a nice balance in the cake.
– Other key ingredients:
– 1 cup brown sugar
– 1/2 cup unsalted butter (1 stick)
– 1 teaspoon vanilla extract
– 1 teaspoon ground cinnamon
– 1 1/2 cups all-purpose flour
– 1 1/2 teaspoons baking powder
– 1/2 teaspoon salt
– 3/4 cup granulated sugar
– 3 large eggs
– 1/2 cup whole milk
– Optional garnishes: I like to serve this cake with whipped cream or vanilla ice cream. You can also sprinkle some chopped nuts for extra crunch.
Using these ingredients will ensure your Caramel Apple Upside Down Cake turns out rich and flavorful. The apples caramelize beautifully, creating a sweet layer that pairs perfectly with the moist cake.
Step-by-Step Instructions
Preparation of the Apple Layer
Start by preheating your oven to 350°F (175°C). In a medium skillet, melt 1/2 cup of unsalted butter over medium heat. Once melted, add 1 cup of brown sugar. Stir it until it bubbles. This will create a rich caramel base. Now, add the sliced apples, one teaspoon of vanilla extract, and one teaspoon of ground cinnamon. Cook this mixture for about 5-7 minutes. You want the apples to soften slightly but not fall apart. Once they are ready, remove the skillet from heat and set this delicious mixture aside.
Arranging the Apples
Grab a greased 9-inch round cake pan. Take the caramelized apple mixture and pour it into the bottom of the pan. Spread it out evenly. Make sure to arrange the sliced apples in a nice circular pattern. Layer them if needed, so every slice gets some caramel goodness. This will be your beautiful base for the cake.
Mixing the Batter
In a medium bowl, whisk together 1 1/2 cups of all-purpose flour, 1 1/2 teaspoons of baking powder, and 1/2 teaspoon of salt. Set this mix aside. Now, in a large mixing bowl, beat together 3/4 cup of granulated sugar and the remaining 1/2 cup of softened butter until it is creamy. Next, add three large eggs one at a time, mixing well after each addition. Stir in 1/2 cup of whole milk until combined.
Gradually add the dry mix to the wet mix. Stir until just combined and there are no lumps. This is key to getting the right cake texture.
Baking and Cooling
Carefully pour the batter over the apple layer in the cake pan. Spread it evenly across the apples. Place the cake in your preheated oven. Bake for 30-35 minutes. To check if the cake is done, insert a toothpick into the center. If it comes out clean, the cake is ready.
Once baked, take the cake out and let it cool in the pan for about 10 minutes. Run a knife around the edges to loosen the cake. Finally, place a serving plate on top and flip it over to release the cake. Enjoy this sweet treat warm or at room temperature!
Tips & Tricks
Choosing the Right Apples
Choosing the right apples matters a lot. I recommend using Granny Smith or Honeycrisp apples.
– Granny Smith: They are tart and hold their shape well. This adds a nice contrast to the sweet cake.
– Honeycrisp: These apples are sweet and juicy, giving a great flavor boost.
To keep the apples firm, avoid overcooking them. Cook just until they soften slightly. This will help them hold up in the cake.
Common Mistakes to Avoid
Some common mistakes can ruin your cake. Here are ways to avoid them:
– Not Greasing the Pan: Always grease your pan well. This helps the cake come out easily.
– Skipping the Cooling Step: Let the cake cool in the pan for 10 minutes. This makes flipping easier.
Check the cake with a toothpick. If it comes out clean, your cake is done.
Serving Suggestions
Pairing can enhance your cake’s flavor. Here are some tasty ideas:
– Whipped Cream: A dollop of whipped cream adds richness.
– Vanilla Ice Cream: This classic pairing makes the cake even more delightful.
– Nuts: Chopped walnuts or pecans can add a nice crunch.
Feel free to get creative with your toppings!
Variations
Incorporating Nuts
Adding nuts can boost flavor and crunch in your cake. I suggest using walnuts or pecans. Both give a nice texture. Chop them coarsely before mixing them into the batter, or sprinkle them on top of the apples. They add a lovely nutty taste that pairs well with the sweet apples.
Alternative Sweeteners
If you want a healthier treat, consider using alternative sweeteners. Honey or maple syrup works well. You can also use coconut sugar. These options provide a different flavor and lower the glycemic index. Just remember to adjust the liquid in the recipe if needed.
Gluten-Free Adaptations
Making this cake gluten-free is simple. Swap all-purpose flour with a gluten-free blend. Look for blends that include xanthan gum, as it helps with texture. Ensure your baking powder is gluten-free too. This way, everyone can enjoy this delicious cake without worry.
Storage Info
Storing Leftovers
To keep your Caramel Apple Upside Down Cake fresh, store it properly. First, let the cake cool completely. Then, wrap it tightly in plastic wrap or place it in an airtight container. This keeps the cake moist and tasty. You can store it in the fridge for up to five days. If you want to save it longer, freeze it. Cut the cake into slices, wrap each piece in plastic, and put them in a freezer bag. This way, you can enjoy a slice anytime!
Reheating Guidelines
When you want to enjoy your cake again, reheating is key. For the best texture, use the oven. Preheat your oven to 350°F (175°C). Place the cake on a baking sheet. Cover it lightly with foil to prevent it from drying out. Heat for about 10-15 minutes. If you prefer the microwave, use it carefully. Heat a slice for about 20-30 seconds, but check it often. You want it warm, not hot. This keeps the cake soft and yummy.
Shelf Life
If stored correctly, the cake can last up to five days in the fridge and three months in the freezer. This makes it a great treat to have on hand! Just remember, the longer it sits, the more it may lose its fresh taste. For the best flavor, try to eat it within a few days. Enjoy your delicious cake and share it with friends and family!
FAQs
Can I use different fruits?
You can use other fruits in this cake. Pears and peaches work well. Pineapples add a tropical twist. Ensure you slice them evenly for the best look and taste.
How do I prevent the cake from sticking?
Sticking can happen for a few reasons. First, make sure you grease the pan well. Use butter or cooking spray. Also, let the cake cool for a bit before flipping it. Running a knife around the edge helps too.
Can I make this cake ahead of time?
Yes, you can make this cake ahead of time. Bake it a day in advance. Just store it in an airtight container. For the best taste, reheat it for a few minutes before serving. This keeps it moist and tasty.
This blog post explored making an amazing apple cake. We covered ingredient choices, helpful steps, and tips for baking. You learned how to layer apples, mix batter, and avoid common mistakes. Serving suggestions and variations made the cake even more fun. Remember, storage matters too! Follow these steps, and you’ll enjoy a great treat. Your apple cake will impress friends and family. I hope you feel inspired and ready to bake!