Skip to content
DisclaimerTerms Of UseGDPR PolicyCookie Policy

savoryspiral

  • Home
  • Drinks
  • Appetizers
  • Dinner
  • Dessert
  • About
  • Contact
  • Privacy Policy
DisclaimerTerms Of UseGDPR PolicyCookie Policy

Charlotte

- 2 cups fresh broccoli florets, steamed and finely chopped - 1 cup shredded sharp cheddar cheese - 1/2 cup breadcrumbs (whole wheat for a healthier option) - 2 large eggs - 1/4 cup finely chopped onion - 2 cloves garlic, minced - 1/4 teaspoon black pepper - 1/4 teaspoon salt - 1/2 teaspoon smoked paprika - Olive oil spray When I create Healthy Broccoli Cheddar Bites, I focus on fresh, quality ingredients. The broccoli gives a great crunch and a bright color. Steaming the broccoli softens it, making it easy to mix. Sharp cheddar cheese adds a strong flavor that pairs well with the veggies. Whole wheat breadcrumbs help bind everything together while adding fiber. Eggs are essential for holding the bites together. They give a light and airy texture. Onions and garlic add depth and richness to each bite. Black pepper and salt enhance the overall taste, while smoked paprika brings a unique twist. - Calories per serving: About 150 calories - Macronutrient breakdown: - Protein: 7 grams - Fat: 5 grams - Carbohydrates: 20 grams - Dietary benefits: High in fiber and low in calories These bites are not just tasty; they are also nutritious. They provide protein from cheese and eggs. The broccoli adds vitamins and minerals, making these bites a healthy snack. First, preheat your oven to 375°F (190°C). This step gets the oven ready for baking. While it heats, line a baking sheet with parchment paper. This keeps the bites from sticking and makes clean-up easier. Next, steam your broccoli. Steaming keeps the bright green color and nutrients. After steaming, chop it finely. This ensures even mixing in your bites. In a large bowl, combine your ingredients. Mix together steamed broccoli, shredded cheddar cheese, breadcrumbs, chopped onion, minced garlic, black pepper, salt, and smoked paprika. Use a spatula or your hands to mix well. Make sure every ingredient is evenly spread. This helps each bite taste great. If you want a smoother texture, you can mash the mixture slightly. In a separate bowl, beat the eggs. Then, add the eggs to your broccoli mixture. Stir until everything sticks together. Now, it’s time to form the bites. Use your hands to shape the mixture into small patties. Aim for 1 to 1.5 inches in diameter. Place the patties on your prepared baking sheet. Leave some space between each one. This allows the air to flow and helps them crisp up. To achieve the perfect crispiness, lightly spray the tops with olive oil. This little step makes a big difference. Bake the bites for 20-25 minutes. You’ll know they are done when they turn golden brown and the cheese is bubbling. Let them cool for a few minutes before serving. Enjoy your healthy broccoli cheddar bites! To make your Healthy Broccoli Cheddar Bites even better, swap some ingredients. Use low-fat cheese to cut calories. You can mix in extra veggies like carrots or bell peppers. Fresh herbs, such as parsley or chives, can add flavor. Try sprinkling in spices like garlic powder or onion powder for more taste. These small changes can boost nutrition without losing flavor. When it’s time to eat, pair your bites with tasty dips. Greek yogurt adds creaminess and tang. Try a zesty salsa for a fresh kick. For a gourmet touch, serve with a homemade yogurt sauce mixed with lemon juice and dill. Plating matters too! Arrange the bites on a colorful platter. Garnish with fresh herbs or cherry tomatoes for a pop of color. For easy prep, use a large mixing bowl and a sturdy spatula. A cookie scoop helps shape the bites neatly. Don’t forget parchment paper! It keeps your bites from sticking and makes cleanup a breeze. Using parchment ensures your bites cook evenly and get that perfect crisp. You’ll love how simple it is to work with these tools. {{image_2}} When making Healthy Broccoli Cheddar Bites, you can switch up the cheese. Instead of sharp cheddar, try mozzarella for a milder taste. Gouda brings a rich, creamy flavor that works well too. If you're looking for vegan options, use cashew cheese or almond-based cheese. Both melt nicely and give a great taste. You can add a kick to your bites with flavor boosters. Red pepper flakes give a nice heat. Sun-dried tomatoes add a sweet and tangy twist. Mixing in other veggies like spinach or cauliflower can enhance nutrition and flavor. These changes make each batch unique and fun. Baking is a classic method for these bites. It keeps them crisp without extra oil. If you want a quicker option, try air frying them. Both methods keep the bites healthy and tasty. For later meals, you can freeze the uncooked bites. Just let them thaw before baking. This way, you have a quick snack ready when you need it. To keep your Healthy Broccoli Cheddar Bites fresh, place them in an airtight container. Refrigerate them within two hours of cooking. This helps prevent bacteria growth. You can enjoy them for up to three days in the fridge. If you have leftover bites, use a shallow container to store them. This allows them to cool quickly before sealing. To reheat broccoli cheddar bites, use your oven for the best results. Preheat it to 350°F (175°C). Place the bites on a baking sheet and heat for about 10-15 minutes. This method keeps them crispy. Avoid using the microwave, as it can make them soggy. If you do use a microwave, heat them in short bursts and check often. You can freeze these bites both before and after cooking. To freeze them uncooked, shape the patties and place them on a baking sheet. Freeze for about an hour, then transfer them to a freezer bag. For cooked bites, let them cool completely before freezing. To thaw, leave them in the fridge overnight. Reheat them in the oven as mentioned above. This keeps them tasty and prevents freezer burn. Yes, you can make these bites ahead. First, prepare the mixture as directed. Then, form the patties. You can store them in the fridge for up to 24 hours. For longer storage, freeze them on a baking sheet first. Once frozen, place them in a sealed bag. This way, you can grab them later for quick snacks. Yes, you can make these bites gluten-free. Instead of regular breadcrumbs, use gluten-free breadcrumbs. You can also use crushed gluten-free crackers or oats. These options keep the bites tasty and crunchy without gluten. To add heat, mix in some red pepper flakes or cayenne pepper. You can also try jalapeños or hot sauce in the mixture. For a zesty kick, serve the bites with sriracha or your favorite spicy dip. This way, you can adjust the heat to your taste! In this article, we explored a tasty broccoli cheddar bites recipe. You learned about the ingredients, step-by-step cooking instructions, and the nutritional benefits. I shared tips for enhancing flavors and healthy substitutes. Remember, you can experiment with different cheeses and spices to suit your taste. Proper storage and reheating ensure these bites stay delicious. Try making them ahead of time for quick snacks. Enjoy your cooking, and savor every crunchy bite!

Healthy Broccoli Cheddar Bites Flavorful Snack Delight

Looking for a tasty snack that’s both healthy and satisfying? These Healthy Broccoli Cheddar Bites are packed with flavor and

- 1 pound chicken breast, sliced into thin strips - 1 red bell pepper, sliced - 1 yellow bell pepper, sliced - 1 green bell pepper, sliced - 1 red onion, sliced - 3 tablespoons olive oil - 2 teaspoons chili powder - 1 teaspoon cumin - 1 teaspoon smoked paprika - 1 teaspoon garlic powder - ½ teaspoon salt - ½ teaspoon black pepper - Juice of 1 lime - Fresh cilantro, chopped (for garnish) - Tortillas (for serving) I love using fresh, colorful ingredients for this dish. The chicken and peppers blend well. The lime juice adds a bright taste. The spices create a warm flavor that feels cozy. When I make this meal, I grab my favorite veggies. The red, yellow, and green peppers not only taste great, but they also look pretty. The sliced onion adds a nice crunch. I chop everything to the same size. This way, they cook evenly and look nice on the plate. For the seasoning, I mix olive oil with chili powder, cumin, smoked paprika, garlic powder, salt, and black pepper. This mix gives the chicken and veggies a bold flavor. I squeeze fresh lime juice to finish it off. It makes everything taste bright and zesty. You can find the full recipe in the section above. Enjoy the vibrant colors and flavors! - Preheat your oven to 400°F (200°C). - Line a large baking sheet with parchment paper. These steps set you up for success. Preheating the oven ensures that your fajitas cook evenly. The parchment paper makes cleanup easy. - Combine sliced chicken, bell peppers, and onion in a mixing bowl. - Drizzle with olive oil and add seasonings. Mixing is where the magic happens. The chicken and veggies soak up the oil and spices. I love using chili powder and cumin for a warm flavor. Toss it well to coat every piece. - Spread chicken and vegetable mixture on the baking sheet. - Roast for 20-25 minutes. - Let cool and toss before serving. Roasting is the final step. Spread everything out so it cooks evenly. This method gives the chicken a nice char and the veggies a sweet flavor. After roasting, let it cool for a few minutes. Toss everything again to mix the flavors. For the full recipe, you can refer to the previous section. Enjoy your delicious meal! To get the best results from your sheet pan chicken fajitas, follow these tips: - Ensure even cooking by spreading the mixture in a single layer. This helps the chicken and veggies cook evenly. If they overlap, some may cook faster than others. - Adjust cooking time based on thickness of chicken strips. Thicker strips take longer to cook. Cut them all the same size for perfect timing. Want to boost the taste of your fajitas? Here are some suggestions: - Experiment with additional spices or herbs. Try adding oregano or paprika for more depth. You can also use a pinch of cayenne for some heat. - Consider marinating the chicken beforehand. A quick marinade can add flavor. Mix olive oil, lime juice, and spices, and let the chicken soak for 30 minutes. It's all about the little touches that make a meal shine: - Serve with lime wedges for extra flavor. Squeezing lime juice over your fajitas can brighten the taste. - Add toppings like avocado, sour cream, or salsa. These toppings can add creaminess, zest, and freshness to each bite. For a full step-by-step guide, check out the [Full Recipe]. Enjoy your cooking adventure! {{image_2}} You can easily switch up the protein in this dish. Use shrimp or beef instead of chicken for a different taste. Shrimp cooks fast, so keep an eye on it. Beef adds a rich flavor, but be sure to slice it thin. For veggies, feel free to swap in zucchini or mushrooms. Both add nice texture and flavor, making your fajitas even more colorful. If you need a gluten-free option, use corn tortillas. They taste great and hold the filling well. For those watching sodium, use low-sodium seasonings. This keeps your fajitas tasty without extra salt. These small changes let everyone enjoy a delicious meal. You can also play with the spices in your fajitas. Try different spice blends for unique tastes. For example, taco seasoning or a dash of cumin can add depth. If you like heat, add a dash of hot sauce. It gives your meal a nice kick and makes it even more exciting. After enjoying your meal, store any leftover fajitas in an airtight container. Keep them in the refrigerator to maintain freshness. Aim to use them within 3-4 days for the best taste. If you want to save some for later, freeze the leftover fajitas. Place them in a freezer-safe container. They will stay good for several months. When you are ready to eat, thaw them overnight in the refrigerator. This will help to keep the texture nice. To reheat your fajitas, the oven works best. It helps to keep everything crispy. Preheat your oven to 350°F (175°C) and warm them for about 10-15 minutes. If you’re in a hurry, the microwave is a quick option. Just warm them up for 1-2 minutes, but they may not be as crispy. For the full recipe, check back to make sure you have everything you need! Yes, you can prepare the mixture ahead and store it in the fridge. Just mix the sliced chicken, bell peppers, and onion with the seasonings. Then, cover the bowl and keep it in the fridge for up to 24 hours. When you are ready to cook, just spread the mixture on the baking sheet and roast. This saves time and makes dinner prep easy! Serve with rice, beans, or a side salad for a complete meal. You can also add toppings like guacamole or salsa for extra flavor. Tortillas work great for wrapping the fajitas. This way, everyone can enjoy their meal just how they like it. Use a meat thermometer; chicken should reach an internal temperature of 165°F (74°C). This ensures the chicken is safe to eat and juicy. Insert the thermometer into the thickest part of the chicken for an accurate reading. If you don’t have a thermometer, make sure the chicken is no longer pink inside. This blog post covered making delicious sheet pan chicken fajitas. You learned about key ingredients like chicken, peppers, and spices. I shared step-by-step instructions for prep and cooking. We also discussed storage and how to reheat leftover fajitas. Finally, I offered tips for variations and serving ideas. With these insights, you can enjoy tasty fajitas in no time. Get creative, and make this dish your own!

Sheet Pan Chicken Fajitas Quick and Tasty Dinner

Looking for a quick and tasty dinner idea? Sheet Pan Chicken Fajitas are here to save the day! With just

For this trifle, you need two cups of mixed fresh berries. I love using strawberries, blueberries, and raspberries. They add color and flavor. Choose ripe berries for the best taste. Wash them gently under cool water and pat them dry. This step is key to keeping them fresh. You will need one cup of heavy whipping cream. This cream makes the trifle rich and smooth. Add a quarter cup of powdered sugar to sweeten it. One teaspoon of vanilla extract gives it a lovely flavor. These ingredients blend well to create a light and fluffy topping. You will also need one pound of pound cake, cut into cubes. This cake acts as the base layer. You can use store-bought or homemade. Include one cup of vanilla yogurt for creaminess and tang. Fresh mint leaves are great for garnish. They add a bright touch to your dessert. For the complete recipe, check the Full Recipe. Start by washing your mixed berries. Use cool, running water to keep them fresh. After rinsing, pat them dry with a paper towel. If you use strawberries, remove the stems. Cut them in halves or quarters to match the size of the other berries. This step helps create a nice mix in each bite. Next, it’s time to whip the cream. Grab a mixing bowl and add the heavy whipping cream, powdered sugar, and vanilla extract. Use an electric mixer to whip the cream until soft peaks form. Be careful! Over-whipping can turn the cream into butter. You want it light and fluffy for that perfect texture. Now, let’s build your trifle. Take a large trifle dish or individual cups. Start with a layer of pound cake cubes at the bottom. Next, add a layer of mixed berries over the cake. Then, spoon a layer of vanilla yogurt over the berries. Follow this with a layer of whipped cream. Repeat these layers until you use all your ingredients. Finish with a nice layer of whipped cream on top. Add extra mixed berries and a few mint leaves on top for garnish. This adds color and a fresh touch. Lastly, chill your trifle in the fridge for at least 1 hour. This helps the flavors blend nicely. Enjoy this delicious dessert with friends and family! Check out the Full Recipe for more details. To make great whipped cream, use heavy cream. Chill your bowl and beaters in the fridge first. This helps the cream whip faster. Add powdered sugar and vanilla for taste. Mix until soft peaks form. Stop before it turns into butter. If you want flavor, try adding lemon zest or cocoa powder. Layering is key to a stunning trifle. Start with a layer of pound cake cubes. Next, add mixed berries for color. Use yogurt for creaminess, then add whipped cream for fluffiness. Repeat these layers until you reach the top. Finish with whipped cream and berries. Use clear glasses to show off your work. Serve your trifle chilled for the best taste. Use mint leaves on top for a fresh look. You can also serve individual cups for easy sharing. This dessert is great for parties or family dinners. Have fun with it and let your creativity shine. For the complete recipe, check out the Full Recipe. {{image_2}} You can switch up the berries in your trifle for new flavors. Use blackberries or cherries for a twist. Try peaches for a sweet touch. Each berry adds a unique taste. Mixing colors makes your trifle look bright and fun. You can even use frozen berries if fresh ones aren’t available. Just thaw them before use. Want a lighter trifle? You can use Greek yogurt instead of whipped cream. It adds protein and cuts calories. For a lower sugar option, use honey or maple syrup in the yogurt. You can also replace pound cake with whole grain bread or angel food cake. These swaps keep the trifle tasty without the extra sugar. Create themed trifles for special occasions. For a Fourth of July trifle, use strawberries, blueberries, and whipped cream. It looks like the flag! For a fall theme, use pumpkin puree mixed with yogurt and cinnamon. Layer apples and granola for crunch. Each theme adds a fun twist to the classic recipe. Be creative and enjoy your trifle journey! For the full recipe, check out the details above. To keep your Summer Berry Trifle fresh, store it in the fridge. Cover it well with plastic wrap or a lid. This helps keep the trifle moist and stops it from picking up other smells in the fridge. Try to eat it within two days for the best taste. The best temperature for storing your trifle is around 40°F (4°C). Make sure your fridge is set to keep foods cold. Avoid putting the trifle in the door, as it can be warmer there. Place it on a shelf in the main part of the fridge for the best cooling. If you have leftover trifle, scoop it into a clean, airtight container. Keep it in the fridge and enjoy within two days. If you want to save it longer, freeze the components separately: berries, whipped cream, and cake. Just remember that freezing can change the texture of the whipped cream and berries when thawed. For the full recipe, check out the details above! Yes, you can make Summer Berry Trifle a day ahead. This lets the layers blend well. Just prepare everything and layer it in the trifle dish. Cover it with plastic wrap. Chill it in the fridge overnight. The flavors will come together nicely, making it even more tasty. If you want to swap out pound cake, try sponge cake or angel food cake. They both work well in a trifle. You can also use cookies like ladyfingers for a fun twist. Each option adds its own taste and texture. Choose what you like best! To make a dairy-free Summer Berry Trifle, use coconut cream instead of heavy whipping cream. For yogurt, opt for dairy-free yogurt made from almond or coconut. Use a pound cake made with almond milk or check for dairy-free versions. This way, everyone can enjoy it! In this post, I explored how to make a delicious summer berry trifle. We covered the key ingredients, from fresh berries to cream and other components. I shared a clear guide on preparing the berries, whipping the cream, and layering the trifle. Plus, I included tips for perfect whipped cream and visual appeal. As you make your own trifle, remember the endless variations. You can mix berries, try healthier swaps, and create themed ideas. Enjoy your dessert, and don't forget to store leftovers properly for another treat!

Summer Berry Trifle Delicious and Easy Dessert Recipe

Looking for a sweet treat that screams summer? You’ve found it! This Summer Berry Trifle combines fresh, bright berries with

- 1 pint cherry tomatoes, halved - 8 oz fresh mozzarella balls (bocconcini) - 1 bunch fresh basil leaves - 2 tablespoons balsamic glaze - 1 tablespoon extra virgin olive oil - Salt and pepper to taste - Skewers (wooden or metal, about 6 inches long) When it comes to making Caprese salad skewers, the quality of your ingredients matters. You want the best flavors to shine through. Choosing ripe tomatoes Look for cherry tomatoes that are firm and bright in color. They should smell sweet. Ripe tomatoes taste better and add a pop of freshness. Picking quality mozzarella Fresh mozzarella balls should feel soft and moist. They should be slightly springy to the touch. Avoid dry mozzarella, as it lacks flavor and texture. Fresh vs. dried basil Use fresh basil for the best taste. It adds a fragrant aroma and vibrant flavor. Dried basil won’t give you the same fresh taste. Always choose fresh leaves when you can. By focusing on these tips, you ensure your Caprese salad skewers are a fresh and flavorful delight. For the complete recipe, check out the Full Recipe! - Soak wooden skewers in water for 30 minutes. This helps stop burning. - Gather your fresh ingredients. You will need cherry tomatoes, mozzarella, and basil. - Start with a skewer. Thread on a cherry tomato half, then a basil leaf, followed by a mozzarella ball. - Repeat these layers until the skewer is full, but leave space at the ends for holding. - Aim to make about 12 skewers with all the ingredients from the Full Recipe. - Drizzle extra virgin olive oil over the assembled skewers. This adds rich flavor. - Sprinkle them with salt and pepper to enhance taste. - Finish with a drizzle of balsamic glaze on top or serve it on the side for dipping. - For a nice touch, arrange the skewers on a platter. Add some whole basil leaves for color and freshness. You can easily make your Caprese skewers even better. Try adding prosciutto or olives for a salty kick. These ingredients mix well with the fresh flavors. You can also use other cheeses like goat cheese or feta. Each cheese adds a different taste. Don't be afraid to play around with flavors. When serving your skewers, pair them with dips or sauces. A nice pesto or hummus works well. They add extra flavor and excitement. As for drinks, try a light white wine or sparkling water. These drinks enhance the fresh taste of the skewers. To boost flavor, add fresh herbs or spices. Chopped mint or oregano can brighten your dish. Balancing acidity is also key. Use balsamic glaze for a sweet touch. A bit of sweetness can soften the tang. These tips will help you create the best Caprese Salad Skewers. For a detailed recipe, check out the Full Recipe. {{image_2}} Caprese salad skewers are fun to make and eat. You can change them up for any season or diet. Using seasonal produce keeps the flavors fresh. In summer, try ripe tomatoes and sweet peaches. For winter, use roasted peppers or even small squash. You can also add seasonal herbs like dill or mint. This makes the skewers bright and colorful. At summer BBQs, these skewers shine. They are easy to grab and eat. You can even grill them for extra flavor. In winter, serve them warm with a cozy dip. This way, they fit right into your gatherings. These skewers work for many diets. They are naturally vegetarian. To make them vegan, swap mozzarella with avocado or vegan cheese. This keeps the creamy texture while staying plant-based. If you need gluten-free options, these skewers are safe. Use gluten-free soy sauce in your dips. This way, everyone can enjoy them without worry. Make your skewers more exciting by adding international flair. For a Mediterranean twist, include olives and artichoke hearts. This adds depth and a touch of saltiness. You can also try Asian flavors. Use sesame oil instead of olive oil. Add some fresh ginger for a zing. This gives your skewers a unique taste profile. With these twists, each skewer tells a different story. For the full recipe, check out the Caprese Salad Skewers section above. To keep your Caprese salad skewers fresh, store them in the fridge. Use a clean, airtight container. This helps keep the skewers from drying out. Place a damp paper towel on top of the skewers. This adds moisture and keeps the basil from wilting. Skewers can last for up to two days when stored this way. For long-term storage, you can freeze the assembled skewers. Wrap them in plastic wrap or foil to prevent freezer burn. When ready to eat, thaw them in the fridge overnight. Avoid microwaving them directly. Instead, use a low heat oven to warm them back up. This keeps the flavors intact and the cheese creamy. Each ingredient in your skewers has its own shelf life. Cherry tomatoes last about a week in the fridge, while mozzarella lasts about five days. Fresh basil wilts quickly, so use it within two days for best results. To avoid spoilage, check your ingredients regularly. Remove any spoiled items to keep the rest fresh. For more details, refer to the Full Recipe for Caprese Salad Skewers. Yes, you can prepare Caprese Salad Skewers ahead of time. To do this, assemble the skewers as usual, but keep them in the fridge. If you cover them lightly, they will stay fresh. You can add the balsamic glaze just before serving. This way, the flavors remain bright and tasty. If you want to skip mozzarella, there are great options. Feta cheese is a tasty choice. It adds a nice salty kick. You can also use goat cheese for a creamy texture. Another fun idea is to use cubed cheddar or gouda. These cheeses will still work well with tomatoes and basil. Caprese Salad Skewers pair well with many sides. A fresh green salad complements them nicely. You can also serve garlic bread for a crunchy bite. For drinks, a light white wine or sparkling water works well. These options enhance the meal without overpowering the skewers. Caprese salad skewers are a fun and fresh dish. This blog covered key ingredients, tips for selecting them, and step-by-step instructions for easy assembly. You can customize the skewers with different flavors and ingredients. Plus, I shared storage tips and tasty variations to suit any occasion. Remember, balance is key for great taste. Enjoy making these skewers for your next gathering, and have fun experimenting with new ideas. Simple and delicious, these skewers are perfect for sharing!

Caprese Salad Skewers Fresh and Flavorful Delight

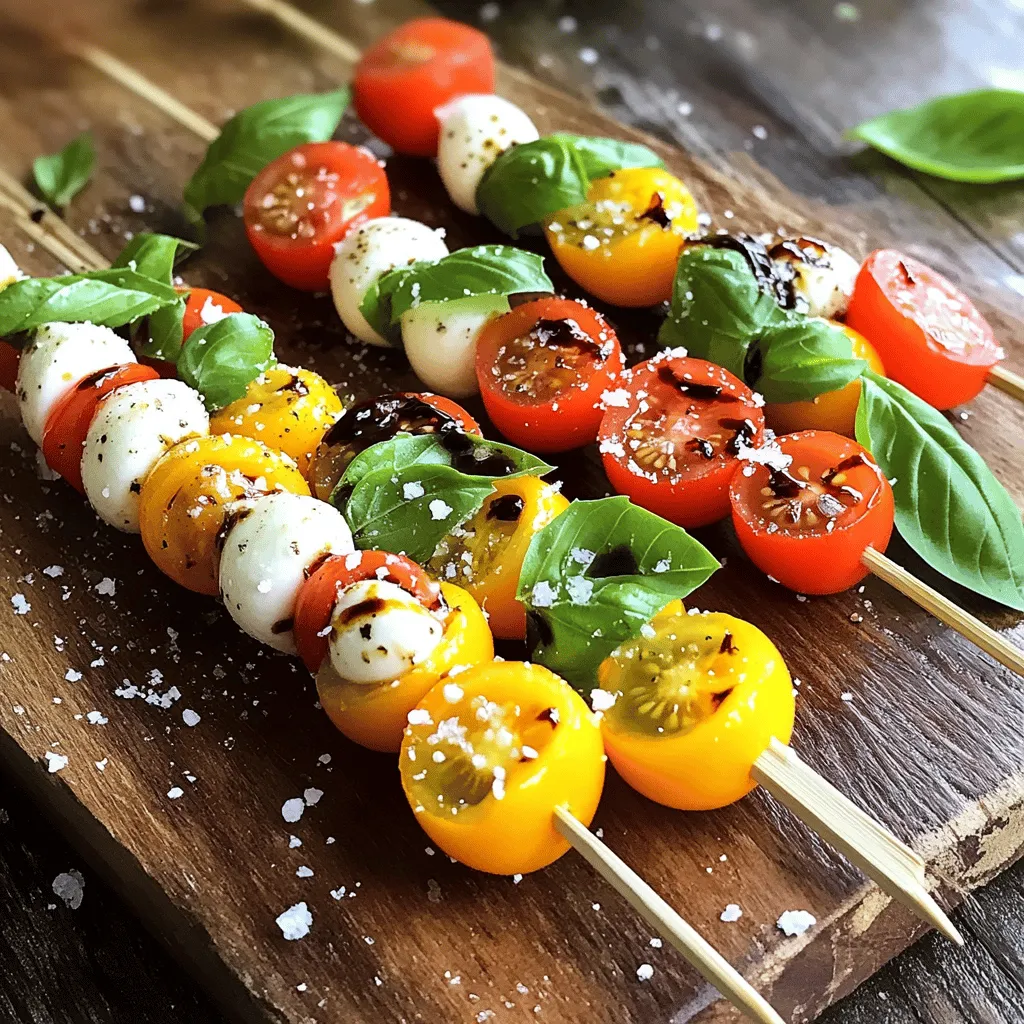
Are you ready to elevate your summer snacking? Caprese Salad Skewers bring fresh flavors and vibrant colors to your table.

To make a great Greek quinoa salad, you need some key ingredients: - 1 cup quinoa, rinsed - 2 cups vegetable broth - 1 cup cucumber, diced - 1 cup cherry tomatoes, halved - 1/2 cup red onion, finely chopped - 1/2 cup Kalamata olives, pitted and halved - 1/2 cup feta cheese, crumbled - 1/4 cup fresh parsley, chopped - 1/4 cup fresh mint, chopped - 1/4 cup extra-virgin olive oil - 2 tablespoons lemon juice - 1 teaspoon dried oregano - Salt and black pepper to taste Each of these ingredients brings its own charm. Quinoa stands out as a base with its nutty flavor. The fresh vegetables add crunch and color. Feta cheese and olives give a salty bite that ties the salad together. Want to kick things up a notch? Here are some optional ingredients: - Fresh herbs like dill or basil - Different types of vinegars, such as balsamic or red wine Fresh herbs can boost your salad’s taste. Vinegars can add a unique twist. Feel free to mix and match to find your favorite flavors. Why should you love this salad? Let me break it down: - Nutritional value of quinoa: Quinoa is a super grain. It has protein, fiber, and many vitamins. It helps keep you full and satisfied. - Benefits of Mediterranean diet components: The Mediterranean diet is famous for heart health. It includes healthy fats from olive oil and fresh produce. This salad is a tasty way to enjoy its benefits. Eating this salad gives you energy and supports your well-being. Try it out! You can find the full recipe [here](#). To cook the quinoa, start by rinsing 1 cup of quinoa under cold water. This step helps remove any bitterness. Next, combine the rinsed quinoa with 2 cups of vegetable broth in a medium saucepan. Bring it to a boil over high heat. Once it boils, reduce the heat to low. Cover the pot and let it simmer for about 15 minutes. The quinoa will absorb the broth and become fluffy. After cooking, remove the pot from heat and let the quinoa cool before using it in the salad. Tips for achieving fluffy quinoa: - Use a 2:1 liquid to quinoa ratio. This ensures proper cooking. - Let it rest after cooking. This helps the quinoa to fluff up. - Fluff it with a fork. This separates the grains and gives it a nice texture. While the quinoa cools, it's time to prepare the vegetables for the salad. Start by dicing 1 cup of cucumber. Then, halve 1 cup of cherry tomatoes and finely chop 1/2 cup of red onion. For the olives, pit and slice 1/2 cup of Kalamata olives. Freshness is key in this dish. Using fresh ingredients makes the salad taste vibrant and full of life. Ways to efficiently chop vegetables: - Use a sharp knife for clean cuts. - Cut the cucumber and tomatoes into similar sizes for a uniform look. - Prepare vegetables just before mixing to keep them fresh. Now that the quinoa and vegetables are ready, it’s time to mix everything. In a large mixing bowl, combine the cooled quinoa, diced cucumber, halved cherry tomatoes, chopped red onion, and sliced olives. Crumble 1/2 cup of feta cheese over the top. Add 1/4 cup of chopped parsley and 1/4 cup of chopped mint for extra flavor. Order of combining ingredients: 1. Start with quinoa at the bottom. 2. Add all vegetables. 3. Top with cheese and herbs last. Tips for ensuring even distribution of dressing: - Whisk the dressing ingredients in a small bowl first. - Pour the dressing over the salad gradually. - Gently toss the salad to coat all ingredients evenly. For the full recipe, check out the Mediterranean Bliss Quinoa Salad. Enjoy! To make your Greek quinoa salad shine, adjust the seasoning to your taste. Start with salt and pepper. Add more if needed. Squeeze in some extra lemon juice for added zing. Taste as you go to get the balance just right. For the best flavors, let your salad chill in the fridge for at least 30 minutes. This wait allows the ingredients to blend well. The quinoa absorbs the dressing, making every bite delicious. You can make this salad your own. Want more protein? Add cooked chicken or chickpeas. Both options pack a punch and keep you full. Try different dressings too. Swap the lemon juice for balsamic vinegar for a sweet twist. Or use tahini for a creamier texture. Your salad, your choice! Serving your salad nicely makes it even more enjoyable. Use a large bowl for a beautiful display. Top it with extra olives and fresh herbs for a pop of color. For a finishing touch, drizzle a bit more olive oil before serving. It adds shine and enhances the flavors. A well-presented salad is a feast for both your eyes and your taste buds. {{image_2}} You can add fun flavors to your Greek quinoa salad. Roasted vegetables bring warmth and depth. Try adding artichoke hearts for a tangy bite. You can also mix in different cheeses. Goat cheese or mozzarella can add a creamy touch. These small changes create a unique twist on the classic recipe. If you want a vegan version, you can easily swap out the feta cheese. Use vegan cheese or leave it out entirely. This keeps the dish full of flavor without dairy. You can also add more plant-based ingredients like chickpeas or lentils. These will boost protein and make your salad heartier. Changing ingredients with the seasons makes your salad exciting. In summer, add fresh berries for sweetness. In fall, diced avocados add creaminess. These fruits not only taste great but also make the salad colorful. You can adapt your Greek quinoa salad to fit what’s fresh and available. For the full recipe, check the Mediterranean Bliss Quinoa Salad section. To keep your Greek quinoa salad fresh, store it in the fridge. Use an airtight container. This helps prevent the salad from drying out or absorbing odors. Make sure to chill the salad for at least 30 minutes before serving. It lets the flavors blend well. For lasting freshness, try to eat the salad within three days. If you notice any change in smell or color, it's best to toss it. Can you freeze quinoa salads? Yes, but it's not ideal. Freezing can change the texture of the fresh veggies. If you want to freeze it, do so without the dressing. Place it in a freezer-safe container. Use it within one month. When you want to eat it, thaw it in the fridge overnight. This helps keep the flavors intact. To reheat leftovers, use the microwave. Heat in short bursts of 30 seconds to avoid overcooking. Stir in between to ensure even heating. If the salad seems dry, add a splash of olive oil or lemon juice. This can refresh the flavors and moisture. You can also serve it cold for a refreshing meal. Greek Quinoa Salad stays fresh in the fridge for about 3 to 5 days. After that, the veggies may lose their crunch and flavor. Make sure to keep it in an airtight container. This helps keep it fresh and tasty. Yes, you can make this salad ahead of time. In fact, it tastes even better after sitting in the fridge for a few hours. This allows the flavors to blend. Just remember to add fresh herbs right before serving, as they can wilt. If you want to switch things up, try using couscous or farro instead of quinoa. Both give a nice texture and flavor. For a gluten-free option, consider using brown rice or millet. These grains will still keep your salad hearty. Yes, Greek Quinoa Salad is gluten-free when you use quinoa. Quinoa is a seed, not a grain. However, if you swap quinoa for couscous or another grain, check if it is gluten-free. Always read labels to be sure. This salad pairs well with many dishes. You can serve it with grilled chicken, fish, or lamb for a filling meal. It also works great as a side with roasted vegetables. Try it with pita bread and hummus for a tasty Mediterranean feast. For the complete recipe, check out the Full Recipe section. Greek quinoa salad is simple, healthy, and versatile. We explored essential ingredients like quinoa, fresh veggies, and feta. I shared tips on cooking quinoa and preparing the salad for the best taste. Customization allows you to make it your own, whether you add protein or seasonal fruits. Proper storage keeps your salad fresh longer. With this guide, you can enjoy a delicious, nutritious meal anytime. Embrace your creativity and make this salad your signature dish!

Greek Quinoa Salad Flavorful and Nutritious Dish

Looking for a tasty and healthy meal? Greek Quinoa Salad is a perfect choice! This colorful dish blends fluffy quinoa,

To make tasty oven roasted sweet potatoes, you need a few key ingredients. Here’s what you should gather: - 4 medium sweet potatoes, peeled and cubed - 3 tablespoons olive oil - 1 teaspoon smoked paprika - 1 teaspoon garlic powder - ½ teaspoon cayenne pepper (adjust to taste) - Salt and black pepper to taste These ingredients create a solid base. The sweet potatoes bring natural sweetness. The oil helps them roast perfectly. To take your sweet potatoes to the next level, consider these seasonings: - 2 tablespoons maple syrup (optional for sweetness) - Fresh parsley, chopped (for garnish) Maple syrup adds a lovely hint of sweetness. Fresh parsley gives a bright touch and looks great on your plate. Feel free to get creative with extra flavors. Try these options: - Cinnamon for warmth - Thyme or rosemary for an herbaceous note - Chopped nuts for a crunchy texture These optional ingredients can enhance your dish. Each addition changes the taste, making it fun to experiment. For the full recipe, check out the instructions above! Start by peeling the sweet potatoes. Use a sharp knife to remove the skin. After peeling, cut them into even cubes. Aim for about one-inch pieces. This size helps them cook evenly. Place the cubed sweet potatoes into a large bowl. Next, it's time to add flavor. Pour in the olive oil. Add smoked paprika for a warm, smoky taste. Then, sprinkle in garlic powder and cayenne pepper. Adjust the cayenne to your spice level. Don't forget to add salt and black pepper. If you want a sweeter touch, drizzle in maple syrup. Toss everything together until all cubes are coated well. Preheat your oven to 425°F (220°C). While it heats, line a baking sheet with parchment paper. Spread the sweet potato cubes in a single layer on the sheet. Make sure they don’t touch each other. This space helps them roast, not steam. Bake in the oven for 25-30 minutes. Flip them halfway through to ensure even cooking. Look for a golden brown color and tenderness. Once done, let them cool slightly. Garnish with fresh parsley for a pop of color. Try the Full Recipe for more details! To get the best texture and flavor from your sweet potatoes, start with even cubes. Aim for about 1-inch pieces. This size helps them cook evenly. Toss your sweet potatoes in olive oil and spices well. A good mix coats all sides and enhances flavor. Use smoked paprika for a rich taste. If you want heat, add cayenne pepper. Roast at 425°F (220°C) for 25-30 minutes. Flip them halfway through to get a golden color on all sides. This method brings out their natural sweetness and creates a crispy edge. For added sweetness, drizzle maple syrup before roasting. This step is optional, but it adds a nice touch. A common mistake is overcrowding the baking sheet. If you place too many sweet potatoes together, they steam instead of roast. This can lead to soft and mushy pieces. Make sure they lie in a single layer. Another mistake is not preheating the oven. Always preheat your oven before roasting. This step helps achieve that perfect crispy texture. Finally, remember to check for doneness. Use a fork to test if they are tender. To make this dish, you need a few tools. First, grab a large mixing bowl for tossing ingredients. A good quality baking sheet is essential too. Line it with parchment paper for easy cleanup. A sharp knife and cutting board help with chopping the sweet potatoes. An oven mitt or pot holder is also a must when handling hot trays. Finally, a spatula will help flip the potatoes during cooking. With these tools, you can make the best oven roasted sweet potatoes. For the full recipe, refer to the top of this article. {{image_2}} You can add fresh herbs to your roasted sweet potatoes. Rosemary and thyme work well. Chop them finely and mix them in with your sweet potatoes before roasting. These herbs add a lovely aroma and taste. You can also use dried herbs if fresh ones are not available. Just remember to use less dried herbs than fresh ones. For those who like heat, try adding chili powder or cayenne pepper. These spices give your sweet potatoes a nice kick. You can also mix in onion powder or cumin for a savory twist. Adding a splash of lime juice after roasting can brighten the flavors. This mix makes a fun side dish or a tasty snack. If you enjoy sweet flavors, go for maple syrup and cinnamon. Drizzle maple syrup over your sweet potatoes before roasting. Just a little will make them sweet and sticky. Add a sprinkle of cinnamon for warmth. This combo is perfect for breakfast or dessert. You can even top them with crushed nuts for extra crunch. For all these variations, you can find the full recipe above to guide you! To store leftover sweet potatoes, let them cool first. Place them in an airtight container. Keep them in the fridge for up to five days. Make sure they are sealed well to avoid drying out. Reheat sweet potatoes in the oven for best results. Preheat your oven to 350°F (175°C). Spread the sweet potatoes on a baking sheet. Heat for about 10 to 15 minutes, until they are warm. You can also use a microwave for quick reheating. Just cover them with a damp paper towel and heat for 1-2 minutes. Freezing sweet potatoes is a great way to save time. Cook and cool the sweet potatoes first. Then, place them in freezer bags or containers. Squeeze out as much air as possible. They can last up to three months in the freezer. When ready to use, thaw them overnight in the fridge. Reheat as needed. For a full recipe, check out the Oven Roasted Sweet Potatoes Delight. Roast sweet potatoes at 425°F for 25 to 30 minutes. Check for doneness by piercing them with a fork. They should feel soft inside and have a nice golden color outside. You can flip them halfway for even cooking. This time gives them a crispy edge and a tender center, perfect for a tasty bite. Yes, you can cook sweet potatoes ahead of time. Roast them, then let them cool. Store them in an airtight container in the fridge for up to four days. When you're ready to eat, simply reheat them in the oven or microwave. They taste great even after being stored! Sweet potatoes pair well with many dips and sauces. Here are some great options: - Greek yogurt: Add herbs for a fresh touch. - Avocado: Mash or slice it for creaminess. - Hummus: A tasty, healthy dip that adds flavor. - Maple syrup: Drizzle some for extra sweetness. - Hot sauce: For a spicy kick, add your favorite hot sauce. Try these options to enhance your oven roasted sweet potatoes! For the full recipe, check out the earlier sections. Oven roasted sweet potatoes are easy and fun to make. We covered essential ingredients, step-by-step instructions, and helpful tips. I shared different flavor variations to keep things interesting. You now know how to store leftovers and reheat them well. Enjoy your delicious sweet potatoes, and feel free to experiment with flavors. Happy cooking!

Oven Roasted Sweet Potatoes Flavorful and Simple Dish

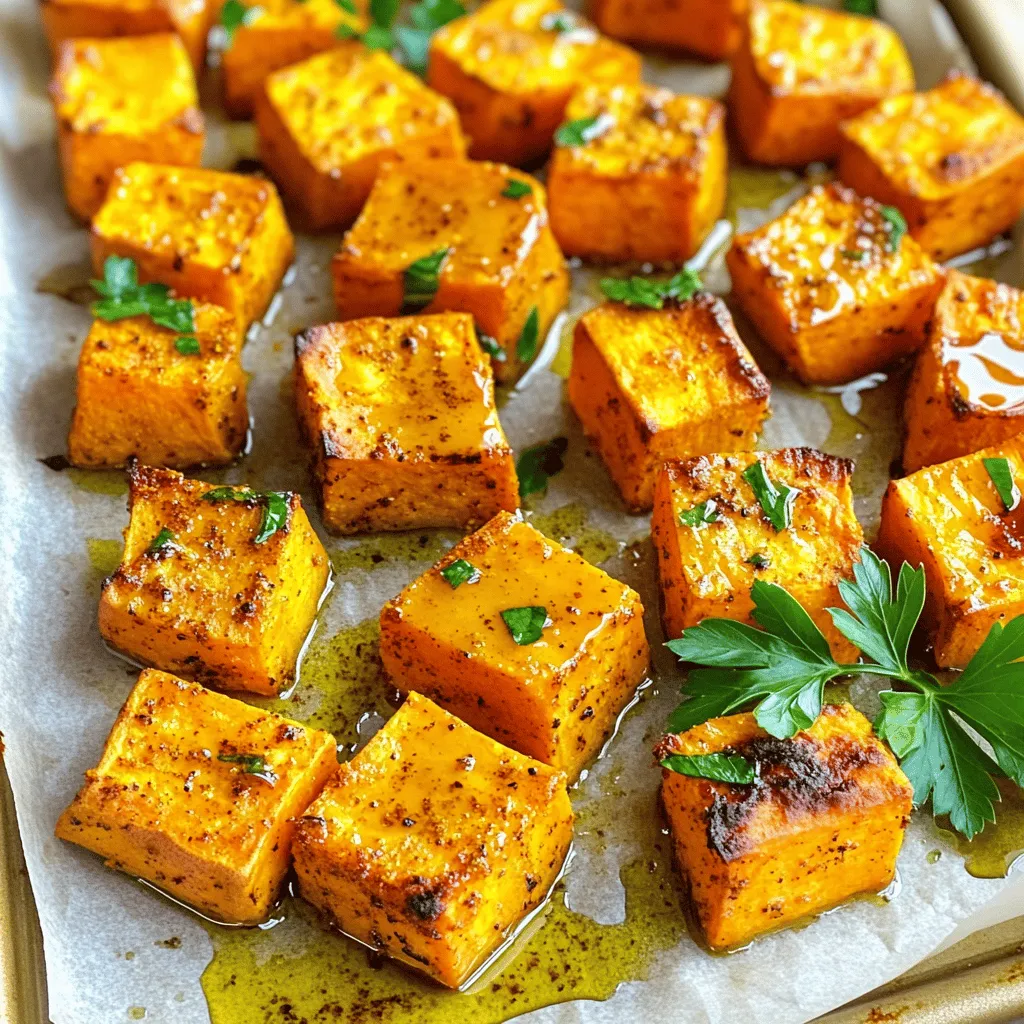
Looking for a simple and tasty side dish? Oven roasted sweet potatoes are just that! I’ll show you how to

- Canned Chickpeas: Canned chickpeas are quick and easy. They save time and work well. Rinsing and draining them helps remove extra salt and keeps them light. - Best Oils for Roasting: I love using olive oil for roasting. It brings a rich flavor. You can also use avocado oil. It has a high smoke point, making it great for crispy snacks. - Seasoning Options: You can get creative with seasonings. Smoky paprika adds depth. Garlic powder gives a nice kick. Cayenne pepper adds heat, but you can adjust it. Sea salt and black pepper enhance all flavors. Lemon zest brightens the dish. Remember, the right ingredients make all the difference. They help you create a tasty, crispy chickpea snack. For the full recipe, check out the details above. Preheating Your Oven: Start by preheating your oven to 400°F (200°C). This temperature is key for crispiness. A hot oven helps the chickpeas turn crunchy and golden. Preparing Chickpeas: Take one can of chickpeas. Rinse and drain them well to remove excess sodium and any canning liquid. After rinsing, pat them dry with paper towels. Drying is important. It removes moisture that can make your chickpeas soggy. Combining Ingredients: In a bowl, mix the dried chickpeas with olive oil and your spices. Use 2 tablespoons of olive oil, 1 teaspoon smoked paprika, 1 teaspoon garlic powder, 1/2 teaspoon cayenne pepper, 1 teaspoon sea salt, 1/2 teaspoon black pepper, and 1 teaspoon lemon zest. Toss everything well. This ensures each chickpea gets coated with flavor. Spreading on the Baking Sheet: Line your baking sheet with parchment paper. This helps with easy cleanup. Spread the chickpeas in a single layer. Avoid crowding them. Space is key for even roasting. Baking Time: Place the baking sheet in the oven. Bake for 25 to 30 minutes. Stir the chickpeas halfway through. This helps them roast evenly. You want them to be golden brown and crispy. Importance of Cooling: Once baked, take the chickpeas out and let them cool. Cooling makes them even crunchier. If you skip this step, they might not be as crisp. Serving Suggestions: Serve your crispy chickpeas in a colorful bowl. You can add lemon wedges for a zesty kick. They make a great snack or a crunchy topping for salads. For the full recipe, check out the earlier sections. Enjoy! To make your crispy chickpea snack truly crunchy, follow these key tips. First, drying the chickpeas is vital. After rinsing the canned chickpeas, pat them dry with paper towels. This step helps remove excess moisture. The drier they are, the crispier they will get. Next, consider the oven placement. Place your baking sheet in the center of the oven. This position allows for even heat distribution. It helps the chickpeas roast perfectly. Now, let’s add some fun flavors! You can try different spice mixes to jazz up your chickpeas. Some great choices include cumin, curry powder, or even Italian herbs. Mix and match to find your favorite blend. Garnishing can also elevate your dish. Fresh herbs like parsley or cilantro add a pop of color and freshness. A squeeze of lemon over the top brings out the best flavors. Avoid overcrowding the baking sheet. If chickpeas are too close together, they will steam instead of roast. Spread them out in a single layer for the best results. Also, keep an eye on the cooking time. If you ignore it, the chickpeas may burn or not get crispy. Check them halfway through and stir to ensure even cooking. {{image_2}} You can transform your crispy chickpea snack by changing the flavors. For a sweet variant, add cinnamon and a bit of maple syrup. This mix gives a delightful twist. On the other hand, for a savory option, you can try adding herbs like rosemary or thyme. These flavors work well for a rich taste. Exploring global spices brings a new life to your snack. Try using curry powder for an Indian twist or za'atar for a Middle Eastern vibe. Each spice blend tells a story and opens up a world of flavors. If you want to use less oil, air frying is a great option. Simply toss the chickpeas with the seasoning and place them in the air fryer. Cook them at 400°F for about 15-20 minutes. Shake the basket halfway through for even crispiness. Stovetop cooking is another quick method. Heat a skillet over medium-high heat and add the seasoned chickpeas. Stir them often for about 10-15 minutes until they are crispy. This method saves time and gives you a crunchy snack fast. For those needing gluten-free options, this recipe is already safe. Chickpeas are naturally gluten-free, and you can choose gluten-free spices. Just check the labels to be sure. If you follow a vegan or vegetarian diet, you're in luck! This snack fits perfectly in your meal plan. All ingredients are plant-based, so enjoy this healthy treat without worries. You can also add nutritional yeast for a cheesy flavor without using cheese. For the full recipe, be sure to check out the Crispy Chickpea Snack. You’ll find all the details you need to create this delicious treat! - Air-Tight Containers: Store your crispy chickpeas in air-tight containers. This keeps them fresh and crunchy. If they are exposed to air, they can become soft. Proper storage is key for long-lasting snacks. - Shelf Life: Crispy chickpeas can last up to a week when stored correctly. After that, they may lose their crunch. Always check for any signs of spoilage before eating. - Oven Method: If your chickpeas lose their crunch, use the oven. Preheat it to 400°F (200°C). Spread the chickpeas on a baking sheet. Bake for about 10 minutes. This method brings back their crispy goodness. - Microwave vs. Oven: The microwave can work, but it may not be as effective. Use it if you’re in a hurry. The oven gives you a better crunch. If you want the best texture, stick with the oven. How do I make chickpeas crispy? To make chickpeas crispy, start by rinsing and drying them well. Pat them dry with paper towels. Use enough olive oil and seasonings. Spread them out on a baking sheet. Bake at 400°F for 25-30 minutes. Stir halfway through for even cooking. Can I make this recipe without cayenne pepper? Yes, you can skip the cayenne pepper. You can replace it with paprika or even leave it out. If you like spice, try chili powder or a pinch of black pepper. What are the nutritional benefits of chickpeas? Chickpeas are packed with protein and fiber. They help keep you full and satisfied. They also provide essential vitamins and minerals like iron and folate. This makes them good for your heart and digestion. How do I store leftover crispy chickpeas? Store leftover crispy chickpeas in an air-tight container. Keep them at room temperature for up to three days. This helps maintain their crunchiness. What can I serve with crispy chickpeas? You can serve crispy chickpeas as a snack or with salads. They also make a great topping for soups. Try pairing them with yogurt dips or hummus for extra flavor. Are there any ready-made options for crispy chickpeas? Yes, many brands sell ready-made crispy chickpeas. Look for them in health food stores or online. Check the ingredients to find a brand you trust. How long does it take to make crispy chickpeas? Making crispy chickpeas takes about 40 minutes. This includes prep time and baking time. You can enjoy them fresh from the oven in no time! Are crispy chickpeas a healthy snack? Yes, crispy chickpeas are a healthy snack option. They are high in fiber and protein, which can help with weight management. They are also lower in fat compared to many snacks. How do chickpeas fit into a balanced diet? Chickpeas are a great addition to a balanced diet. They can serve as a plant-based protein source. Use them in salads, stews, or as a snack. Enjoying chickpeas helps maintain energy levels and supports overall health. Crispy chickpeas are a tasty, healthy snack made with simple ingredients. Use canned chickpeas for quick prep and choose the right oil for roasting. Remember to dry them well and keep baking times in mind. You can enhance flavors with spices and herbs, or try different cooking methods like air frying. Store extras in air-tight containers to keep them fresh. Crispy chickpeas are not only fun to make but also a great addition to your diet. Enjoy experimenting with these ideas to find your favorite flavor!

Crispy Chickpea Snack That Will Delight Your Taste Buds

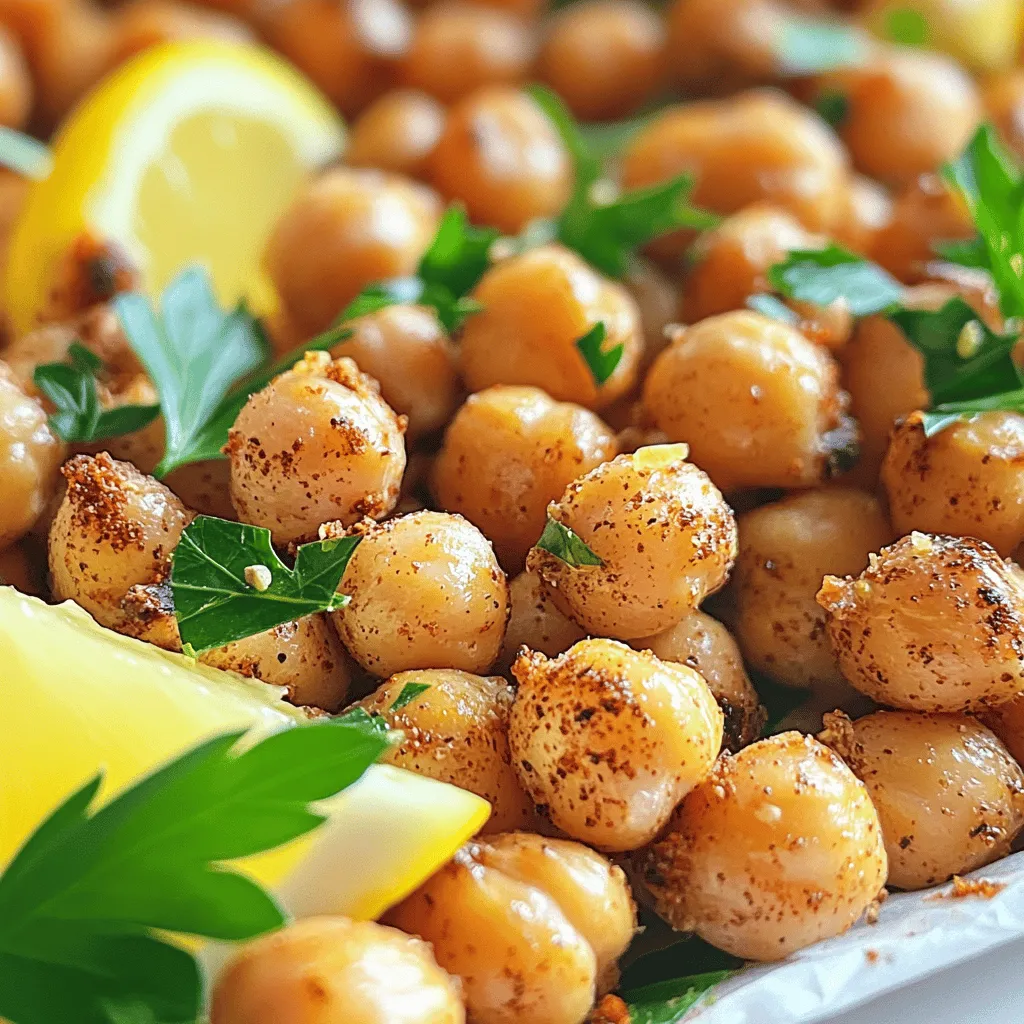
Looking for a tasty snack that’s both crunchy and healthy? Try my Crispy Chickpea Snack! This simple recipe uses canned

- 1 ripe mango, diced - 1 can (15 oz) black beans, rinsed and drained - 1/2 red bell pepper, finely diced - 1/4 red onion, finely chopped - 1 small jalapeño, seeded and minced - 1/4 cup fresh cilantro, chopped - 2 tablespoons lime juice - 1 tablespoon olive oil - Salt and pepper to taste - Avocado cubes - Corn (fresh or canned) - Garlic, minced The main ingredients in mango black bean salsa create a bright and fresh dish. You start with a ripe mango, which gives sweetness. The black beans add protein and a rich texture. The red bell pepper and red onion bring crunch and color. A minced jalapeño gives it a little heat, while cilantro adds a fresh taste. For a flavor boost, consider adding avocado cubes for creaminess. Corn, whether fresh or canned, enhances sweetness. Minced garlic can add depth to your salsa. Each ingredient plays a role in making this dish vibrant and tasty. You can find the full recipe above to create this delicious salsa. Enjoy pairing it with chips or as a topping on your favorite meals! - Step 1: Peel and dice the ripe mango into small cubes. - Step 2: Rinse and drain the black beans, adding them to the bowl. - Step 3: Finely dice red bell pepper and red onion; mix into the bowl with the other ingredients. Mango is sweet and juicy. It gives the salsa a fresh taste. Dice it small so it mixes well. Rinse the black beans under cold water. This step keeps them clean and tasty. When you add the beans to the bowl, they add protein. Next, the red bell pepper brings color and crunch. Dice this finely too. The red onion adds a nice bite. Mixing all these fresh ingredients makes a great base. - Step 4: Prepare jalapeño and add for heat. - Step 5: Chop fresh cilantro and incorporate it into the mixture. - Step 6: Whisk lime juice and olive oil, then pour over salsa mixture. The jalapeño adds spice. Be careful; it can be hot! Remove the seeds and chop it small. If you want less heat, use less jalapeño. Next, chop fresh cilantro. It gives a bright flavor and aroma. Now, squeeze fresh lime juice into a bowl. Add olive oil to this mix. This dressing ties all the flavors together. Pour it over your salsa mix. - Step 7: Gently mix to combine all ingredients thoroughly. - Step 8: Season with salt and pepper, allowing to sit for 15 minutes to meld flavors. Now, gently stir everything together. Make sure all ingredients are mixed well. Season with salt and pepper to taste. This step is key for flavor. Let the salsa sit for 15 minutes at room temperature. This wait helps the flavors blend perfectly. Trust me, it’s worth it! For the full recipe, check the beginning of this article. - Use ripe mango for sweetness and optimal texture. A ripe mango gives the salsa a bright, sweet flavor. - Allow salsa to sit at room temperature before serving. This lets the flavors mix and enhances the taste. - Best served with tortilla chips. They add crunch and contrast to the soft salsa. - Try it as a topping on grilled meats. It pairs well with chicken or fish. - Enjoy it with tacos or burritos. The salsa adds freshness to every bite. - Use it as a condiment for sandwiches. It brightens up any meal. - Consider adding avocado for creaminess. This makes the salsa richer and more satisfying. - Experiment with different types of beans. You can try pinto or kidney beans for unique flavors. For the full recipe, check out the Mango Black Bean Salsa Fiesta 🥭. {{image_2}} Mango black bean salsa is fun to customize! You can add your twist to this dish. Here are some tasty ideas. - Add pineapple: Pineapple brings a sweeter, tropical flavor. It goes great with mango. - Change lime juice: Use lemon juice instead for a different citrus note. This adds a fresh zing. - Add more heat: Toss in extra jalapeño or a dash of hot sauce. This makes the salsa fiery. - Diced red chili: Include diced red chili peppers for more depth. The flavors blend well with mango. - Bean swap: Use white beans or chickpeas instead of black beans. This gives a fresh, seasonal touch. - Seasonal veggies: Add corn in summer or roasted peppers in autumn. These ingredients make the salsa even more vibrant. Experimenting with variations makes this recipe your own. Each twist brings new flavors and fun! For the full recipe, check out the earlier section. To keep your mango black bean salsa fresh, store it in an airtight container in the refrigerator. This method helps keep the flavors intact. Salsa is best consumed within 2-3 days for peak freshness. After that, the taste and texture may change. Can mango black bean salsa be frozen? Yes, you can freeze it! To freeze, place the salsa in a freezer-safe container. Leave some space at the top, as salsa can expand when frozen. Thaw it in the fridge overnight before using. For the best flavor, eat it within three months. How can you tell if your salsa has gone bad? Look for signs such as a sour smell, change in texture, or discoloration. If the salsa smells off, avoid eating it. If you see any mold, it's best to throw it away. Always trust your senses when checking for spoilage. What can I serve with Mango Black Bean Salsa? Mango black bean salsa pairs well with many dishes. You can serve it with tortilla chips for a crunchy snack. It also works great as a topping for grilled chicken or fish. For a light meal, try it on tacos or burritos. The flavors add a fresh twist to any dish. How long does Mango Black Bean Salsa last in the fridge? In the fridge, mango black bean salsa stays fresh for about 2 to 3 days. After that, the ingredients may lose their crunch. Always check for any off smells or changes in texture before eating. Can I make Mango Black Bean Salsa ahead of time? Yes, you can make this salsa ahead of time! It tastes even better after the flavors blend for a few hours. Just cover it and store it in the fridge. I recommend letting it sit for at least 15 minutes before serving. Can I substitute black beans with another type of bean? Yes, you can use other beans if you prefer. White beans or kidney beans can work well too. Just rinse and drain them like you would with black beans. Each type will add a unique flavor and texture. Is it necessary to peel the mango before dicing it? Peeling the mango is best for this salsa. The skin can have a tough texture. Diced mango without the skin offers a sweeter taste and a nice bite. Use a sharp knife to make it easier. What is the best type of mango to use for this salsa? The best mango for salsa is the ripe Ataulfo or Honey mango. They are sweet and have a smooth texture. Look for a mango that is slightly soft to the touch for the best flavor. Can I use canned mango instead of fresh? You can use canned mango, but fresh is better. Canned mango may not have the same taste or texture. If you do use canned, choose one packed in juice, not syrup. Drain it well before adding it to your salsa. For the full recipe, see the section above. Mango black bean salsa is a vibrant dish full of flavor. You learned about key ingredients and could even try variations to suit your taste. Use fresh veggies and ripe mango for the best results. Remember to let your salsa sit for rich flavor. Store it properly for freshness, but enjoy it within a few days. This salsa pairs well with many dishes and is easy to make. Don’t hesitate to get creative with your ingredients!

Mango Black Bean Salsa Tasty and Fresh Recipe

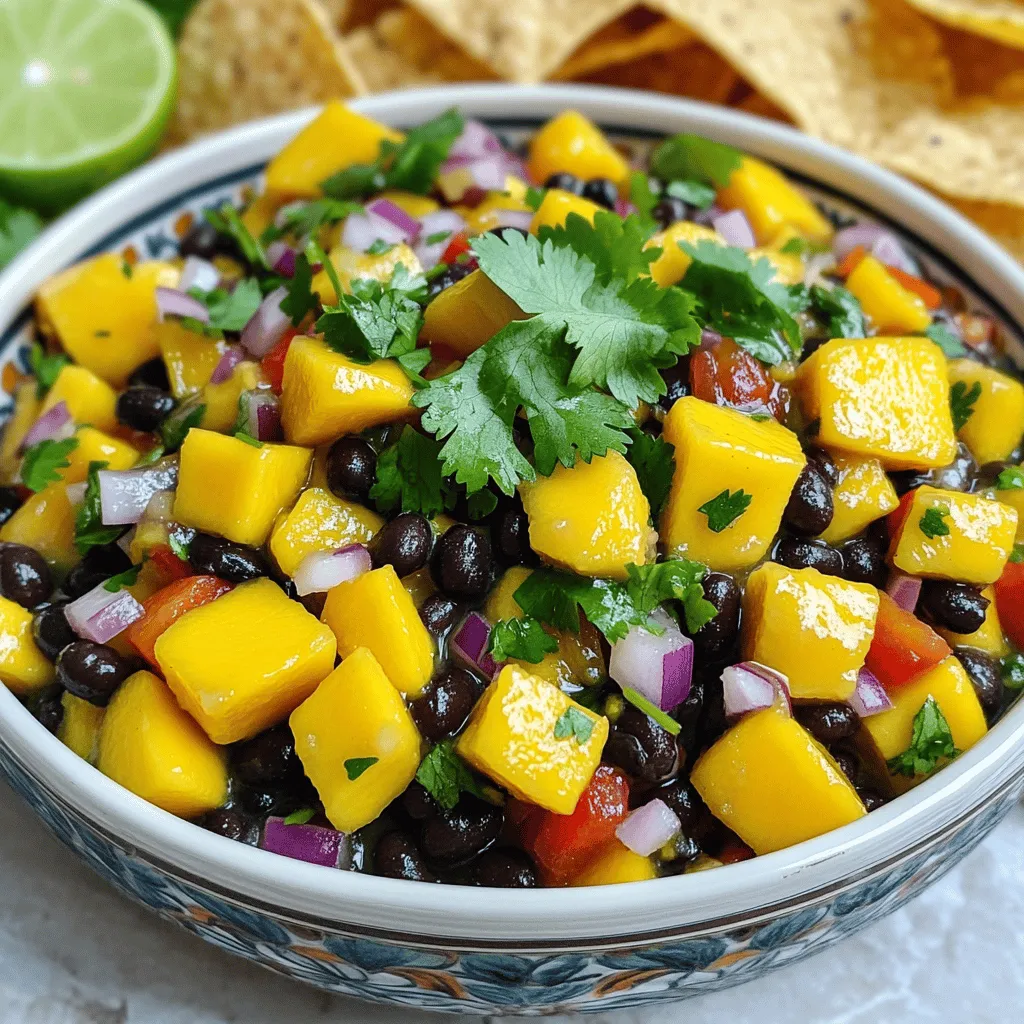
If you’re craving something fresh, vibrant, and bursting with flavor, look no further than Mango Black Bean Salsa! This easy

To make these no-bake lemon cheesecake bars, gather these items: - 1 ½ cups graham cracker crumbs - ½ cup unsalted butter, melted - 2 tablespoons sugar - 16 oz cream cheese, softened - 1 cup powdered sugar - 1 teaspoon vanilla extract - 2 teaspoons lemon zest - ⅓ cup fresh lemon juice - 1 cup heavy whipping cream - Lemon slices and mint leaves for garnish When measuring ingredients, use dry measuring cups for solids. Pack the graham cracker crumbs lightly. For butter, melt it and then let it cool slightly before mixing. Use a liquid measuring cup for lemon juice. Make sure to zest your lemon before juicing it for easy measurement. If you lack graham cracker crumbs, try crushed cookies or oats. For a dairy-free option, use vegan cream cheese. Coconut cream can replace heavy whipping cream for a dairy-free twist. If fresh lemons are out, bottled lemon juice works, but fresh adds more flavor. First, gather your ingredients for the crust. You need graham cracker crumbs, melted butter, and sugar. In a mixing bowl, combine 1 ½ cups of graham cracker crumbs, ½ cup of melted unsalted butter, and 2 tablespoons of sugar. Mix them well until the crumbs look like wet sand. This mixture should stick together when you press it. Next, take a greased 9x9-inch baking dish. Press the crumb mixture firmly into the bottom. Use the back of a measuring cup to make it even. Now it’s time to make the cheesecake filling. In a large bowl, beat 16 oz of softened cream cheese, 1 cup of powdered sugar, and 1 teaspoon of vanilla extract. Mix until it is smooth and creamy. Then, add in 2 teaspoons of lemon zest and ⅓ cup of fresh lemon juice. Stir until everything is mixed well. In another bowl, whip 1 cup of heavy whipping cream until stiff peaks form. Gently fold this whipped cream into the cream cheese mixture. Be careful not to deflate the whipped cream. Once mixed, pour the filling over the crust and spread it evenly. Cover the baking dish with plastic wrap. Refrigerate it for at least 4-6 hours or until the cheesecake is set. Once set, cut the bars into squares. Serve them chilled. For a nice touch, garnish each bar with lemon slices and mint leaves. This will make your no-bake lemon cheesecake bars look extra special. Enjoy your refreshing summer treat! For the detailed recipe, check the Full Recipe. To get the best texture for your no-bake lemon cheesecake bars, focus on the cream cheese. Make sure it is softened well. If it's too cold, it will stay lumpy. Beat the cream cheese until it is smooth and creamy. This step is key for a nice, silky filling. When you fold in the whipped cream, do it gently. This keeps the mixture light and fluffy. The whipped cream adds air and makes it soft. If your cheesecake bars are too soft, it might be from not chilling long enough. Always chill for at least 4-6 hours. If they are too firm, you may have whipped the cream too much. This can make the bars dense. Another common issue is a crumbly crust. If your crust falls apart, add a bit more melted butter. This helps it stick together better. Garnishing makes your cheesecake bars look pretty and adds flavor. Use fresh lemon slices on top. They add a pop of color and zest. Mint leaves are also a nice touch. They give a fresh look and taste. You can even drizzle some honey or lemon glaze over the top. This adds shine and makes the bars more inviting. For an extra layer of flavor, sprinkle some zest on top before serving. For the complete recipe, check the Full Recipe section! {{image_2}} You can easily switch the lemon for other flavors. Try berries like strawberries or blueberries for a fresh twist. Just mash the berries and mix them into the filling. You can add a bit more sugar to balance the tartness. Raspberry cheesecake bars are also a crowd-pleaser. Use the same steps as the lemon, but swap in raspberry puree instead. If you need gluten-free options, use gluten-free graham crackers for the crust. You can also make the filling dairy-free. Substitute the cream cheese with a dairy-free option, like cashew cream. Coconut cream can replace heavy whipping cream. This keeps the creamy texture while being friendly for different diets. Toppings can elevate your cheesecake bars. Fresh fruits like strawberries, raspberries, or blueberries add color and flavor. A drizzle of chocolate sauce brings a nice touch, too. You can even add crushed nuts for crunch. Try mint leaves for a refreshing finish. These small details make your dessert look and taste even better. For a full recipe, check out the zesty no-bake lemon cheesecake bars. To keep your no-bake lemon cheesecake bars fresh, store them in the fridge. Place the bars in an airtight container. This prevents them from drying out or absorbing other smells. Make sure to cover them well with plastic wrap if you don’t have a container. This will help maintain their creamy texture. You can freeze these cheesecake bars for longer storage. First, cut them into bars. Wrap each bar in plastic wrap tightly. Then, place wrapped bars in a freezer-safe bag. This helps avoid freezer burn. They can stay in the freezer for up to three months. When ready to enjoy, move them to the fridge to thaw overnight. These lemon cheesecake bars last about a week in the fridge. If stored properly, they remain tasty and fresh. If you see any changes in smell or texture, it’s best to toss them. Always trust your senses. For optimal taste, enjoy them within the first few days. For the full recipe, visit the linked section above. Yes, you can make these cheesecake bars a day in advance. They taste even better after they chill. Just cover the dish with plastic wrap and place it in the fridge. This will help the flavors meld together. Making them ahead of time is a great way to save time on busy days or parties. No-bake cheesecakes can last up to five days in the fridge. Be sure to keep them covered. This helps prevent them from absorbing other odors. If you notice any changes in texture or smell, it’s best to toss them out. Always trust your senses for food safety. If you don't have heavy whipping cream, you can use whipped topping. Another option is to blend silken tofu with a bit of milk for a lighter choice. You can also use coconut cream for a dairy-free version. Each substitute will slightly change the flavor and texture, but they work well in this recipe. This blog post covered all you need for no-bake lemon cheesecake bars. We explored ingredients, measurements, and substitutes. You learned step-by-step instructions and gained tips to improve texture and fix problems. We even discussed tasty variations and smart storage methods. In the end, making these cheesecake bars is fun and easy. With practice, you’ll impress everyone with your desserts. Enjoy your time baking!

No-Bake Lemon Cheesecake Bars Delightful Summer Treat

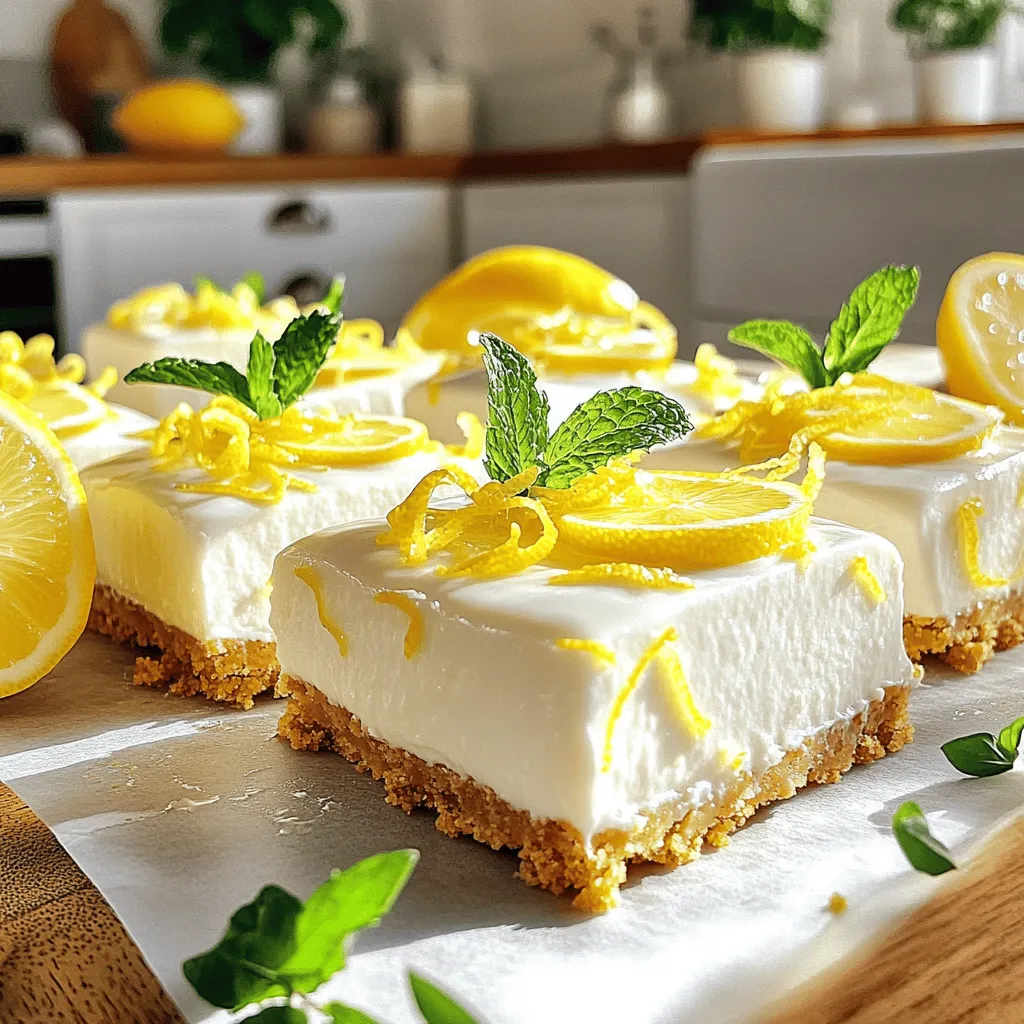
Looking for a refreshing dessert to brighten your summer days? You’ll love these No-Bake Lemon Cheesecake Bars! They are easy

- 2 cups cooked chicken, shredded - 1 can (15 oz) black beans, rinsed and drained - 1 can (10 oz) enchilada sauce (red or green) - 1 cup corn (fresh, canned, or frozen) - 1 cup diced bell peppers (mix of red, yellow, and green) - 2 cups shredded cheese (Cheddar, Monterey Jack, or a blend) - 8 small corn tortillas, cut into strips These main ingredients create a rich and tasty base for your casserole. The shredded chicken gives it protein, while the black beans add fiber. Corn and bell peppers bring sweetness and crunch, making every bite enjoyable. The enchilada sauce ties it all together, giving the dish its classic flavor. - Fresh cilantro - Sour cream Adding fresh cilantro on top gives the casserole a bright flavor. Sour cream adds creaminess, balancing out the spices. You can use one or both, depending on your taste. - Alternative proteins (like turkey or beef) - Different types of beans If you want to switch things up, turkey or beef work well as protein options. You can also try pinto or kidney beans for a new twist. These substitutes can keep the dish exciting and delicious. For the full recipe, check out the [Full Recipe]. - Preheat the oven: First, set your oven to 350°F (175°C). This step gets everything ready for baking. - Mix the filling: In a large bowl, combine the shredded chicken, black beans, corn, and diced bell peppers. Add half of the enchilada sauce, ground cumin, garlic powder, onion powder, and 1 cup of shredded cheese. Mix well until everything is blended. - Layering tortillas: Take a 9x13 inch baking dish and spread a thin layer of the remaining enchilada sauce on the bottom. Place a layer of tortilla strips evenly over the sauce. - Spreading the chicken mixture: Spread half of the chicken mixture over the tortillas. Next, add another layer of tortilla strips, followed by the rest of the chicken mixture. Finish with a top layer of tortilla strips. - Covering and baking: Pour any leftover enchilada sauce over the top layer of tortillas. Sprinkle the remaining cheese on top. Cover the dish with foil, being careful not to touch the cheese with it. - Final baking without foil: Place the casserole in the oven and bake for 25 minutes covered. After that, remove the foil and bake for another 15 minutes. This will make the cheese bubbly and golden. Enjoy making this Chicken Enchilada Casserole with the Full Recipe! How to shred chicken easily To shred chicken, use two forks. Hold one fork steady and pull the chicken apart with the other. You can also use your hands if the chicken is cool enough. For faster results, try using a stand mixer on low speed. Ensuring even cooking For even cooking, make sure your oven is fully preheated. Layer the casserole evenly in the dish. This helps all the layers cook together. Rotate the dish halfway through baking for uniform heat. Adding spices for extra heat Want more spice? Add chopped jalapeños or a pinch of cayenne pepper. You can also mix in chili powder for a deeper flavor. Adjust the spice level to fit your taste. Experimenting with different cheeses Feel free to try different cheeses. Monterey Jack adds a creamy touch. Pepper Jack gives a spicy kick. Mixing cheeses can create a rich flavor that keeps each bite interesting. Serving suggestions Serve the casserole hot right from the oven. Add a sprinkle of fresh cilantro on top for color. A dollop of sour cream works great too, making each serving look appetizing. Ideal side dishes Pair your casserole with a simple side salad. Mexican rice or refried beans also make great sides. These dishes balance the meal and add extra flavor. {{image_2}} If you want a meat-free dish, try using veggies instead of chicken. You can add a mix of your favorite vegetables. Zucchini, mushrooms, and spinach work great. Just chop them into small pieces and sauté them lightly before mixing. This swap keeps the dish full of flavor while catering to vegetarian diets. For a gluten-free version, simply swap out the regular tortillas for gluten-free ones. Many brands offer tasty options made from corn or rice. These tortillas hold up well in the casserole, making sure you enjoy every bite without worries about gluten. You can play with spices to create different flavor profiles. Try adding chili powder or paprika for some heat. For a smokier taste, consider using chipotle powder. You can also mix in fresh herbs like cilantro or parsley. These tweaks can turn a classic dish into something new and exciting. To keep your chicken enchilada casserole fresh, store it in an airtight container. Make sure it cools down first. Place it in the fridge within two hours of cooking. Enjoy it within three to four days for the best taste. If you want to keep it longer, freezing is a great option. To freeze your casserole, wait until it's completely cool. Cut it into portions if you like. Wrap each piece tightly in plastic wrap and then place it in a freezer-safe bag. Remove as much air as possible. When you're ready to eat, thaw it overnight in the fridge. Reheat it in the oven at 350°F (175°C) until it’s hot all the way through. In the fridge, your chicken enchilada casserole lasts about three to four days. If frozen, it can stay good for up to three months. Always check for any signs of spoilage, like odd smells or changes in texture. For the best flavor, try to eat it sooner rather than later. For the full recipe, visit our recipe section. You can use any cooked chicken for this dish. Shredded rotisserie chicken works great. It saves time and adds flavor. You can also use grilled chicken for a smoky taste. Leftover chicken from another meal is a good option too. Just ensure the chicken is boneless and skinless. This makes it easier to mix and layer. Yes, you can prepare this casserole in advance. Make the filling and layer it in the dish. Cover it tightly with plastic wrap or foil. Store it in the fridge for up to 24 hours. When you’re ready to bake, just remove the cover and pop it in the oven. This makes meal prep super easy! Look for a few signs to check doneness. The cheese should be bubbly and golden brown. The edges of the casserole may also get a bit crispy. You can insert a knife in the center; it should feel hot. If it’s hot through and melted, it's ready to eat. Enjoy your delicious Chicken Enchilada Casserole with confidence! For the full recipe, check out the earlier section. This blog post has covered the essentials for making a delicious enchilada casserole. We discussed the key ingredients, from shredded chicken to black beans. I shared step-by-step instructions for the preparation, assembly, and baking. You learned tips to enhance flavor and presentation. We also explored variations, storage tips, and even answered common questions. Try these ideas to create your own tasty dish. Enjoy experimenting with flavors and techniques. Happy cooking!

Chicken Enchilada Casserole Simple and Flavorful Dish

Looking for a dinner recipe that’s both simple and full of flavor? My Chicken Enchilada Casserole is just that! With

Older posts
Newer posts
← Previous Page1 … Page8 Page9 Page10 … Page47 Next →

dsad

© 2025 savoryspiral • Built with GeneratePress

Our Policies

  • Copyright Policy
  • Cookie Policy
  • GDPR Policy
  • Privacy Policy
  • Disclaimer
  • Terms Of Use

More Information

  • Home
  • About
  • Contact
  • Appetizers
  • Dessert
  • Dinner
  • Drinks
©2025, savoryspiral About Back To Top