Skip to content
DisclaimerTerms Of UseGDPR PolicyCookie Policy

savoryspiral

  • Home
  • Drinks
  • Appetizers
  • Dinner
  • Dessert
  • About
  • Contact
  • Privacy Policy
DisclaimerTerms Of UseGDPR PolicyCookie Policy

Charlotte

To create the perfect arancini with marinara sauce, gather these ingredients: - 2 cups cooked risotto (preferably leftover, cooled) - 1/2 cup mozzarella cheese, cut into small cubes - 1/4 cup grated Parmesan cheese - 1/2 teaspoon garlic powder - 1/2 teaspoon dried oregano - 1/2 teaspoon salt - 1/4 teaspoon black pepper - 1 cup all-purpose flour - 2 large eggs, beaten - 2 cups breadcrumbs (preferably panko for extra crunch) - Vegetable oil for frying - 2 cups marinara sauce (store-bought or homemade) Each ingredient plays a key role in the flavor and texture of the dish. The leftover risotto gives a creamy base, while the cheeses add richness. Garlic powder and oregano provide warmth and depth. The balance of salt and pepper enhances the overall taste, making every bite delightful. When you gather these ingredients, you set the stage for a tasty experience. The breadcrumbs create a crispy outer layer, while the marinara sauce offers a tangy dip for your arancini. Use the Full Recipe to guide you through the cooking process and make this dish shine. Enjoy every step! Start by gathering your ingredients. In a large bowl, mix 2 cups of cooled risotto with 1/2 cup of mozzarella cubes and 1/4 cup of grated Parmesan. Add 1/2 teaspoon of garlic powder, 1/2 teaspoon of dried oregano, 1/2 teaspoon of salt, and 1/4 teaspoon of black pepper. Stir everything together until combined well. This mixture is the heart of your arancini. Now, take about 2 tablespoons of the risotto mixture in your hands. Roll it into a ball, pressing firmly to make it hold together. Repeat this step until you have 12-15 arancini balls ready. Each should be about the size of a golf ball. Make sure they look nice and round. Set up a breading station for your arancini. Place 1 cup of all-purpose flour on one plate. Pour 2 large beaten eggs into another plate. In a third plate, add 2 cups of breadcrumbs. Take each arancini ball and roll it in the flour first. Make sure to shake off any extra flour. Then, dip it into the beaten eggs, coating it well. Finally, roll the ball in the breadcrumbs, ensuring it is fully covered. This process gives the arancini a crispy crust. Heat vegetable oil in a deep skillet over medium-high heat. You want enough oil to cover half of the arancini balls, about 2-3 inches deep. Once the oil is hot, carefully place the arancini into the pan. Fry them in batches so you don’t overcrowd the pan. Cook each side for about 3-4 minutes until they turn golden brown and crispy. Use a slotted spoon to transfer them to a paper towel-lined plate to remove excess oil. While they fry, warm up 2 cups of marinara sauce in a saucepan over low heat. Serve the arancini hot with the marinara sauce on the side for dipping. Enjoy your crispy delight with every bite! To get that crispy outside, use panko breadcrumbs. They make a great crunch. When you fry, heat your oil to the right temperature. If the oil is too cold, the arancini will soak up oil and become greasy. A good test is to drop a bit of bread in the oil. If it sizzles right away, it's ready. Fry in small batches to keep the oil hot and the balls crispy. Using leftover risotto makes this dish easy and tasty. The cold risotto holds its shape better when forming balls. It also saves time. If you don’t have leftover risotto, make a fresh batch and cool it first. This dish is a great way to use up any risotto you might have. Want to add more flavor? Mix in herbs like fresh basil or parsley. You can also add sun-dried tomatoes for a pop of taste. If you like heat, a pinch of red pepper flakes can spice things up. When serving, pair arancini with marinara sauce. This adds a rich, tangy flavor that complements the crispy balls. For the full recipe, check the earlier section. {{image_2}} You can make cheese-stuffed arancini for a gooey surprise. Start with the basic risotto mixture. Then, take a small amount and flatten it in your hand. Place a cube of mozzarella in the center. Gently mold the risotto around the cheese, sealing it well. This way, when you bite in, the melted cheese oozes out. It adds extra flavor and delight! If you want to mix it up, try veggie or meat-filled arancini. You can add chopped spinach, roasted peppers, or even sautéed mushrooms to the risotto. For meat lovers, ground meat, like beef or sausage, works well. Just cook the filling first and let it cool. Then, mix it with the risotto. This option brings a tasty twist to your dish! There are great ways to make gluten-free arancini. Instead of all-purpose flour, use gluten-free flour. You can also swap breadcrumbs for crushed rice cereal or gluten-free panko. These swaps keep the crunch while making it safe for gluten-sensitive folks. Remember to check your ingredients to ensure they are gluten-free. If you have leftover arancini, store them in an airtight container. Keep them in the fridge for up to three days. Make sure they cool down before you store them. This helps keep them crispy. You can also freeze arancini for longer storage. Place them in a freezer-safe bag. They can last for about three months in the freezer. When you're ready to eat, thaw them in the fridge overnight. To reheat arancini, avoid the microwave if you want them crispy. Instead, preheat your oven to 375°F (190°C). Place the arancini on a baking sheet. Bake them for about 10-15 minutes until they are warm and crisp again. Alternatively, you can reheat them in a skillet with a bit of oil over medium heat. This method adds some extra crunch. For marinara sauce, store any leftovers in a separate container. You can keep it in the fridge for up to one week. If you want to store it longer, freeze it in a freezer-safe container. Marinara sauce can last for about three months in the freezer. When ready to use, thaw it in the fridge or heat directly on the stove. Stir occasionally to keep it smooth. Enjoy your arancini with freshly reheated marinara sauce from the Full Recipe! Serve arancini hot. Place them on a pretty plate. Add a small bowl of marinara sauce for dipping. You can also sprinkle fresh basil on top. This adds color and flavor. Pair arancini with a light salad for balance. Yes, you can make marinara sauce ahead of time. Just let it cool, then store it in the fridge. Use it within three days for the best taste. You can also freeze it for longer storage. When ready to use, just thaw and heat it up. Look for a golden brown color on the outside. Cook them for about 3-4 minutes on each side. You can also cut one open to check. The inside should be warm and gooey with cheese. Enjoy them fresh from the fryer! In this blog post, we covered how to make crispy arancini using leftover risotto. We went over the ingredients, step-by-step instructions, and fun variations. You learned tips for frying and storing, so your arancini stay tasty. Remember, these treats can fit any taste. They are fun to make and great for sharing. With your new skills, impress your friends with delicious arancini at your next meal! Enjoy cooking!

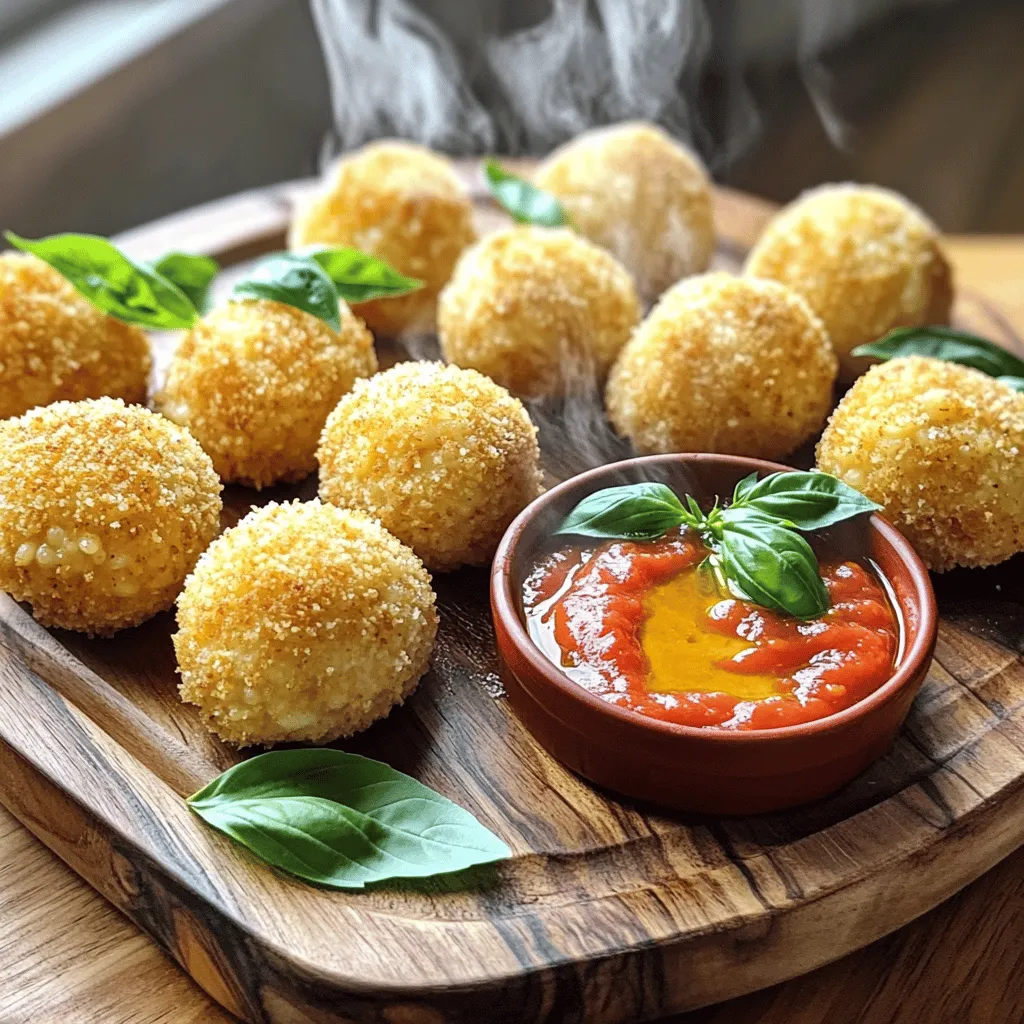
Arancini with Marinara Sauce Exquisite Flavor Pairing

Discover the magic of arancini paired with rich marinara sauce in this post! I’ll share a simple recipe that elevates

- 500g beef flank steak, thinly sliced - ¼ cup cornstarch - ½ teaspoon baking powder - 2 tablespoons soy sauce - 1 tablespoon sesame oil - 1 teaspoon garlic powder - 1 teaspoon ginger powder - 1 red chili, finely sliced (adjust for spice) - 1 bell pepper (any color), thinly sliced - 1 onion, thinly sliced - 2 green onions, chopped - Optional: Sesame seeds for garnish To make crispy chilli beef, start with fresh and high-quality beef. The flank steak has great flavor and cooks well. Thinly slice the beef against the grain for tenderness. Cornstarch and baking powder help create that crispy texture. Soy sauce and sesame oil add depth to the flavor. You can adjust the spice by changing the amount of red chili you use. Bell peppers and onions add color and sweetness to the dish. The green onions and sesame seeds are perfect for garnishing. They bring a nice crunch and a fresh taste. For the full recipe, follow the steps to enjoy this delightful meal. - Prepare the beef with marinade ingredients and let it rest. - Heat vegetable oil in a skillet or wok. Start by mixing the sliced beef in a bowl. Add cornstarch, baking powder, soy sauce, sesame oil, garlic powder, and ginger powder. Toss it well to coat all the beef pieces. Let it rest for about 15 minutes. This step helps the beef absorb the flavors and tenderize. While the beef marinates, heat the vegetable oil in a large skillet over medium-high heat. You want the oil hot enough to fry but not smoking. - Fry marinated beef until golden brown and crispy, ensuring batches do not overcrowd. Carefully add the marinated beef to the hot oil in batches. Do not overcrowd the pan. Fry each batch for about 2-3 minutes until golden brown and crispy. Once cooked, remove the beef and set it on paper towels to drain excess oil. This keeps it crispy. - Stir-fry sliced onion and bell pepper until softened, then add chili. In the same skillet, add your sliced onion and bell pepper. Stir-fry them for about 2-3 minutes until they start to soften. Then, add the sliced red chili to the pan. Stir for another minute to release its heat and flavor. - Return crispy beef to the skillet, toss with fried vegetables, and season. Now, return the crispy beef to the skillet with the vegetables. Toss everything together so the beef mixes well with the onions and peppers. Season with salt and pepper to taste. This step enhances the dish's overall flavor. - Transfer to a serving platter and garnish with green onions and sesame seeds. Once combined, transfer the crispy chili beef to a serving platter. To finish, garnish with chopped green onions and sesame seeds if you like. This adds color and a nice crunch to the dish. You can find the full recipe for more detailed instructions. To make your crispy chilli beef amazing, choose high-quality beef flank steak. This cut has the right texture for frying. Next, heat your oil until it's hot. You can test this by dropping in a small piece of beef. If it sizzles, you're ready. Also, avoid overcrowding the pan. Fry in small batches to ensure each piece gets crispy. If you overcrowd, the beef may steam instead of fry. Add more depth to your dish by experimenting with spices. Try cumin or paprika for a unique twist. These spices can bring new flavors to your beef. You can mix them into the marinade or sprinkle them in while stir-frying. Just a little can go a long way, so start with a small amount. Crispy chilli beef tastes best with a side. Serve it with steamed rice or noodles. The rice will soak up the sauce, adding more flavor. Noodles are an excellent base, too. You can even add some steamed vegetables for a balanced meal. This way, you enjoy a complete dish that is both tasty and satisfying. {{image_2}} You can make crispy chilli beef even hotter by adding more red chilies. A dash of chili oil also works great for extra heat. This spicy twist will excite your taste buds and give the dish a nice kick. Adjust the heat to your liking. If you love spice, don’t hold back! If you want a lighter meal, try using chicken or tofu instead of beef. These options are leaner and still very tasty. You can also use less oil when frying. This way, you can enjoy the crispy texture without the extra calories. It’s a great way to enjoy the dish while keeping it healthy. For a plant-based twist, swap out the beef for eggplant or cauliflower. Both vegetables soak up flavors well and have a nice texture. Cut them into bite-sized pieces and follow the same steps. You’ll end up with a delicious vegetarian version that everyone will love. This option is perfect for those who want a meat-free meal. Store any leftovers of crispy chilli beef in an airtight container in the refrigerator. It will stay fresh for up to 3 days. This helps keep the flavors intact while preventing spoilage. Make sure the container is sealed well to avoid any unwanted odors. When it's time to enjoy your leftovers, reheat them in a skillet over medium heat. This method helps maintain the crispiness of the beef. Stir gently to ensure even heating and avoid making the beef soggy. If you want to save some for later, freeze portioned crispy chilli beef for up to 1 month. Place it in a freezer-safe container or bag. When you're ready to eat, you can reheat it directly from frozen. This way, you still get that delightful crunch! For the full recipe, check the earlier section. Enjoy your cooking! Adjust the amount of red chili or omit altogether. You can also add a bit of sugar. This helps balance the heat and adds a nice sweetness. If you want a milder taste, you can use bell peppers instead of chili too. Yes, sirloin or ribeye can work as alternatives. These cuts are tender and will still fry up nice and crispy. Just make sure to slice them thinly for the best results. It pairs well with steamed rice, noodles, or a simple salad. The rice soaks up the sauce, and the noodles add a fun texture. A salad can add a fresh crunch to your meal. Yes, but it's best to fry the beef just before serving for optimal crispiness. You can prepare the marinade and veggies ahead of time. This way, you save time when you cook. This dish is a popular Indo-Chinese recipe, known for its bold flavors and crispy texture. It blends Indian spices with Chinese cooking techniques. This mix makes it a favorite at many restaurants. For a full, detailed recipe, check out the Full Recipe section. This blog covered how to make crispy chilli beef with easy steps and tips. You learned about the main ingredients, including beef flank steak, soy sauce, and cornstarch. I shared cooking methods for perfect crispiness and flavor. You also discovered tasty variations and storage advice. Crispy chilli beef is a fun dish to make and enjoy. Try out different spices and ingredients to make it your own. Enjoy your cooking adventure!

Crispy Chilli Beef Simple and Flavorful Recipe

Welcome to my kitchen! If you crave a dish that’s both crispy and full of flavor, look no further than

To make a tasty Maple Balsamic Tofu Sandwich, you need a few key ingredients: - 1 block (14 oz) firm tofu, pressed and drained - 3 tablespoons balsamic vinegar - 2 tablespoons pure maple syrup - 1 tablespoon soy sauce - 1 teaspoon garlic powder - 1 teaspoon onion powder - Salt and pepper to taste - 4 slices whole grain bread - 1 avocado, sliced - 1 cup fresh spinach leaves - ½ cup roasted red peppers (jarred or homemade) - Olive oil for grilling These ingredients come together to create a sandwich that is both savory and sweet. The tofu absorbs the flavors of the balsamic vinegar and maple syrup, making it rich and delicious. You can make your sandwich even better by adding some extras. Here are a few ideas: - Sliced cucumbers for crunch - Fresh herbs like basil or cilantro - A sprinkle of feta cheese for creaminess - Sriracha or hot sauce for a kick Feel free to mix and match these add-ins. They can make the sandwich more fun and exciting! You can find most of these ingredients at your local grocery store. Look in these sections: - Tofu: Usually in the refrigerated aisle near dairy products. - Balsamic vinegar and maple syrup: Found in the condiment aisle. - Fresh produce: Check the fruits and vegetables section for avocados, spinach, and peppers. - Bread: Look in the bakery section for whole grain options. If you want organic or specialty items, local health food stores are a great choice. They often carry unique ingredients that can enhance your sandwich. For the full recipe, check the previous section. Start by slicing your pressed tofu into 1-inch thick slabs. This thickness helps the tofu cook well and hold its shape. Pat the slabs dry with a clean towel. This step is key. Removing moisture allows the tofu to absorb more flavor. Next, grab a medium bowl. Whisk together balsamic vinegar, pure maple syrup, soy sauce, garlic powder, onion powder, salt, and pepper. This mix will be your marinade. Place the tofu slabs in the bowl. Make sure they are fully coated. Let the tofu soak in this goodness for 20-30 minutes. Flip the slabs halfway through to get even flavor. Heat a non-stick skillet or grill pan over medium heat. Add a drizzle of olive oil to the pan. When the pan is hot, add the marinated tofu slabs. Cook them for about 4-5 minutes on each side. Look for a golden brown color and a slight crispness. Toast your whole grain bread slices while the tofu cooks. You want them golden and crisp too. Now it's time to assemble your sandwich. On one slice of bread, layer half of the sliced avocado. Add a generous amount of fresh spinach leaves next. Place the crispy tofu slab on top, then add roasted red peppers. Top with another slice of bread. Press down gently to hold it all together. If you want, grill the sandwich in the skillet for 2 minutes on each side. This adds a warm and crispy touch. Finally, slice the sandwich in half diagonally and serve it right away. Enjoy this tasty, healthy meal! For more details, check out the full recipe. To get crispy tofu, start with firm tofu. Press it well. This removes extra water. Cut it into thick slabs. Pat these slabs dry with a towel. Next, marinate your tofu. The marinade adds flavor and helps with crispiness. Cook the tofu in a hot pan. Use a little olive oil to achieve that golden brown color. Flip the slabs often. This ensures even cooking on both sides. When grilling tofu, choose medium heat. This allows the outside to brown while the inside stays moist. Use a grill pan if you have one. It gives great marks and flavor. Brush the pan lightly with olive oil. Place the marinated tofu slabs on the grill. Do not overcrowd the pan. Leave some space for air to circulate. Grill for about 4-5 minutes per side. Look for a nice golden color. This shows the tofu is ready. You can get creative with your tofu sandwiches. Serve on whole grain bread for extra fiber. Add fresh spinach, sliced avocado, and roasted red peppers for color and taste. Consider adding spicy mustard or hummus for a flavor kick. Cut your sandwich in half for easy eating. Serve it with sweet potato fries or a light salad. This makes a perfect meal. You can find the full recipe linked above to guide you through the process. {{image_2}} This sandwich is already vegan, but you can make it even more hearty. Try using tempeh instead of tofu. Tempeh has a nutty flavor and adds great texture. You can also swap the whole grain bread for a gluten-free option, like chickpea flour bread. Add a spread of hummus for extra creaminess. To make this sandwich gluten-free, pick gluten-free bread. Many stores offer tasty options. Check labels to ensure they are certified gluten-free. You can also use lettuce wraps instead of bread. This gives a fresh twist and cuts down on carbs while keeping it light. Want to amp up the flavor? Add some spice! A pinch of cayenne pepper in the marinade brings heat. You can include fresh herbs like basil or cilantro for brightness. If you love heat, try adding sliced jalapeños to the sandwich. For a smoky note, use smoked paprika in the marinade. These simple tweaks make your Maple Balsamic Tofu Sandwich even more enjoyable. For the full recipe, check out the complete steps above. If you have extra Maple Balsamic Tofu Sandwiches, store them in the fridge. Wrap each sandwich tightly in plastic wrap or foil. This keeps the bread from getting soggy. You can also use a reusable container. Make sure it closes well to keep air out. Leftovers should be eaten within two days for the best taste. When you are ready to eat your leftover sandwich, you want it warm and tasty. The best way to reheat it is on a skillet. Heat the skillet over medium heat. Place the sandwich in the skillet and cover it with a lid. This helps heat the tofu inside without burning the bread. Heat for about 3-4 minutes on each side. You can also use a toaster oven for a crispier finish. For the best storage, use airtight containers. Glass containers are great because they do not hold odors. If you use plastic, choose BPA-free options. Be sure to let the tofu cool down before putting it in the container. This prevents condensation, which can make the sandwich soggy. For longer storage, you can freeze the marinated tofu separately. Just thaw it in the fridge before cooking. For the full recipe, check out the Maple Balsamic Tofu Sandwich section. Marinating the tofu takes about 20 to 30 minutes. During this time, the tofu absorbs all the tasty flavors. I recommend flipping the tofu halfway through to ensure even marination. If you have more time, you can marinate it longer for an even bolder taste. Absolutely! You can use any bread you like. Sourdough, ciabatta, or even gluten-free bread work well. Just make sure the bread can hold the filling without falling apart. Toasting the bread adds a nice crunch too. If you want a different protein, consider tempeh or chickpeas. Both options bring great texture and taste. You can also use grilled portobello mushrooms for a hearty alternative. Each substitute will change the flavor slightly, but they will still be delicious! In this article, we explored how to make a tasty maple balsamic tofu sandwich. You learned about key ingredients and where to find them. I provided a step-by-step guide for preparing, marinating, and cooking your tofu. We also discussed tips for crispy tofu and shared variations for different diets. Finally, I covered how to store and reheat leftovers effectively. With this knowledge, you can enjoy a delicious sandwich that's easy to make and customize. Get creative, and happy cooking!

Maple Balsamic Tofu Sandwich Flavorful and Easy Meal

Craving a tasty meal that’s easy to make? The Maple Balsamic Tofu Sandwich is your answer! This sandwich packs amazing

- 1 pound shrimp, peeled and deveined - 2 cups corn kernels (fresh or frozen) - 1 tablespoon olive oil - 1 teaspoon chili powder - 1 teaspoon garlic powder - 1 teaspoon lime zest - 1 tablespoon lime juice - 1/4 cup mayonnaise - 1/4 cup crumbled cotija cheese - 2 tablespoons fresh cilantro, chopped - 1/2 teaspoon smoked paprika - Salt and pepper to taste - Tortilla chips, for serving (optional) Choosing fresh ingredients makes a big difference. Use shrimp that feels firm and smells sweet. For corn, fresh is best, but frozen works well too. Olive oil gives a nice flavor and helps cook the shrimp evenly. You can swap shrimp for chicken or tofu if you want. Both options cook well and take on flavors nicely. If you need a dairy-free version, use vegan mayonnaise. For extra spice, try adding jalapeños or other peppers to the mix. By knowing these swaps, you can make this dish fit your needs. Feel free to experiment with what you have. This recipe is flexible and fun to adapt. For the full recipe, check out the details in the cooking section. First, you need to heat a large skillet over medium heat. Add one tablespoon of olive oil. Wait for the oil to shimmer before adding the shrimp. For the shrimp, use one pound, peeled and deveined. Season the shrimp with one teaspoon of chili powder, one teaspoon of garlic powder, lime zest, salt, and pepper. It’s important to coat the shrimp evenly. Cook the shrimp for about 3-4 minutes, turning them occasionally. They should turn pink and opaque. Once done, remove the shrimp from the skillet and set them aside. In the same skillet, add two cups of corn kernels, fresh or frozen. Sauté the corn for about 5-6 minutes. You want them to caramelize and heat through. This will give the corn a sweet and rich flavor. After that, reduce the heat to low. Add 1/4 cup of mayonnaise, one tablespoon of lime juice, and 1/2 teaspoon of smoked paprika to the corn. Mix in half of the crumbled cotija cheese as well. Stir everything well and heat for 2-3 minutes until combined. Now it’s time to mix the shrimp back in. Gently combine the shrimp with the corn sauce in the skillet. Heat everything through for a minute. For a beautiful presentation, serve the shrimp and corn sauce in a decorative bowl. Top it with the remaining cotija cheese and chopped fresh cilantro. You can serve this dish with tortilla chips for an extra crunch. This dish is colorful and packed with flavor. You can follow these steps for a delightful meal. For the complete recipe, be sure to check [Full Recipe]. - Avoiding overcooking shrimp: Cook shrimp for just 3-4 minutes. They turn pink when done. If you cook too long, they get tough. Keep an eye on them! - Ideal heat levels for cooking: Use medium heat. This helps shrimp cook evenly. High heat can burn them, while low heat can make them rubbery. - Additional spices for flavor depth: Try adding cayenne for heat or cumin for warmth. A pinch of smoked paprika adds a nice touch too. Experiment to find your favorite mix! - Adding texture with garnishes like avocado or nuts: Chop fresh avocado for creaminess. Toasted nuts add crunch. Both make the dish more appealing and tasty. - Serving suggestions and plating techniques: Use a colorful bowl to serve. Layer the shrimp and corn sauce for a nice effect. Place tortilla chips around for extra flair. - Garnishing ideas for an appealing look: Add lime wedges and fresh cilantro on top. This not only looks good but also adds freshness to each bite. For the full recipe, check out Shrimp Delight with Mexican Street Corn Sauce . {{image_2}} You can easily switch up the shrimp in this dish. Try chicken or tofu instead. These proteins absorb flavors well, just like shrimp. For seafood lovers, scallops or fish can work. Use what you have on hand. If you want a vegetarian version, use jackfruit or chickpeas. Both add great texture and flavor. You can also swap mayonnaise for vegan mayo. This keeps the dish creamy and rich without the dairy. To change the flavor, add new spices or herbs. Try cumin or oregano for a different twist. Fresh herbs like basil or parsley can brighten the dish. You may also want to add a hint of heat with fresh jalapeños or hot sauce. Adjust the spice to suit your taste. Different regions have their own versions of this dish. In some areas, you might find lime and cilantro mixed in with the corn sauce. In others, they might add more cheese or spices. Explore these variations to keep things exciting. Pair this dish with simple sides. Rice or a fresh salad works well. You can also serve it in tacos or wraps. This makes the meal fun and easy to eat. If you want crunch, serve with tortilla chips. You can dip them in the sauce for extra flavor. This dish also looks great on a platter. Serve it family-style for a casual meal. Add lime wedges and extra cilantro for a pop of color. You’ll impress your guests with both the taste and the look of it! For the full recipe, check out Shrimp Delight with Mexican Street Corn Sauce. To keep shrimp and corn sauce fresh, place them in an airtight container. Make sure the shrimp cool completely before sealing. This helps prevent moisture buildup. Store the dish in the fridge. It should stay good for 3 to 4 days. Reheat shrimp and corn sauce gently to keep them tender. Use a skillet over low heat. Stir often to avoid burning. You can also use the microwave. Heat in short bursts, stirring in between. Pair reheated leftovers with rice or a fresh salad for a full meal. To freeze this dish, first let it cool completely. Then, transfer it to a freezer-safe container. Use a vacuum sealer if you have one. This helps prevent freezer burn. The dish can be frozen for up to 2 months. For thawing, place it in the fridge overnight. Reheat using the skillet method to keep the texture nice. Enjoy your meal later with the same great taste! For the full details on how to make this dish, check out the Full Recipe. Making Shrimp with Mexican Street Corn Sauce takes about 20 minutes. You will need 10 minutes to prep and about 10 minutes to cook. This makes it a quick and tasty option for any meal. Yes, you can make this dish ahead of time. Cook the shrimp and corn sauce, then store them separately in the fridge. When you are ready to eat, just heat them up together. This keeps the shrimp juicy and the sauce creamy. If cotija cheese is hard to find, you can use feta cheese. It has a similar salty and crumbly texture. You can also use queso fresco or even shredded Parmesan for a different but tasty flavor. The dish can have a mild spice level. It uses chili powder, which adds flavor without too much heat. If you like it spicier, consider adding diced jalapeños or more chili powder to your liking. To make the recipe gluten-free, ensure that any sauces you use are gluten-free. The main ingredients, shrimp, corn, and cotija cheese, are gluten-free. You can serve it with gluten-free tortilla chips or skip them altogether for a lighter dish. For the full recipe, check out the details above. You learned how to make a tasty shrimp dish with Mexican street corn sauce. We covered essential ingredients, step-by-step cooking tips, and fun variations. Ensuring your shrimp are not overcooked is key, and seasoning makes a big difference. Play with spices and substitute ingredients to make it your own. Enjoy serving this on busy nights or at gatherings. With proper storage, you can also enjoy it later. Dive in and start cooking this delicious dish today!

Mouthwatering Shrimp with Mexican Street Corn Sauce

Get ready to spice up your dinner with my Mouthwatering Shrimp with Mexican Street Corn Sauce! This dish combines juicy

- 2 cups cooked mac and cheese - 1 cup breadcrumbs (preferably panko) - 1/2 cup all-purpose flour - 2 large eggs, beaten - 1 teaspoon garlic powder - 1 teaspoon onion powder - 1 teaspoon smoked paprika - Salt and pepper to taste - Olive oil spray - Air fryer - Mixing bowls - Baking tray When you gather your ingredients, make sure to use your favorite mac and cheese recipe. The better the mac and cheese, the tastier the balls! I love using panko breadcrumbs. They give a nice crunch. The spices add great flavor and aroma. You will need an air fryer for this recipe. It cooks the balls quickly and keeps them crispy. Mixing bowls help you prepare the coating and beat the eggs. A baking tray is useful for forming the balls before cooking. Once you have everything ready, you're set to make these crispy treats! Check out the Full Recipe for all the steps. 1. Chill the mac and cheese: Place your cooked mac and cheese in the fridge. Let it chill for at least one hour. This makes it firm and easier to handle. 2. Form the mac and cheese balls: Once chilled, scoop out about one tablespoon of mac and cheese. Roll it into a ball using your hands. Repeat this step until you shape all the mixture into 12 to 15 balls. 1. Prepare the coating station: Set up three bowls. In the first bowl, mix flour with salt, pepper, garlic powder, onion powder, and smoked paprika. In the second bowl, beat the eggs. Pour breadcrumbs into the third bowl. 2. Roll and coat the balls: Take each mac and cheese ball. First, roll it in the seasoned flour. Next, dip it in the beaten eggs. Lastly, coat it with breadcrumbs. Make sure each ball is fully covered. 1. Preheat the air fryer: Set your air fryer to 375°F (190°C). Let it preheat for about five minutes. 2. Air fry the mac and cheese balls: Lightly spray the air fryer basket with olive oil. Place the mac and cheese balls in a single layer. Be sure they are not touching. Spray the tops lightly with olive oil too. 3. Cooking: Cook the balls for 8 to 10 minutes. Flip them halfway through. They should be golden brown and crispy when done. You may need to cook in batches if your air fryer is small. 4. Serving suggestions: Let the balls cool slightly after cooking. Serve warm with marinara sauce, ranch dressing, or any dip you like. To get that perfect crispy texture, make sure to chill your mac and cheese before you form the balls. This step helps hold their shape. Aim for a chilling time of at least one hour. When air frying, set your air fryer to 375°F (190°C). This temperature cooks the balls evenly and gives them a golden color. Cook them for about 8 to 10 minutes, flipping halfway through for even crispness. One common mistake is not chilling the mac and cheese. If you skip this step, the balls may fall apart when you fry them. Another mistake is overcrowding the air fryer. Make sure to leave space between each ball. This allows the hot air to circulate and cook the balls evenly, giving you that desired crunch. To boost the flavor, consider adding spices or herbs to your mac and cheese mix. A pinch of cayenne pepper can add heat, while fresh herbs like parsley or chives can brighten the flavor. You can also use different types of cheese. Mixing sharp cheddar with creamy mozzarella can create a delightful flavor contrast. Experimenting with these options will make your mac and cheese balls even more delicious. For the full recipe, check out the Crunchy Air Fryer Fried Mac and Cheese Balls. {{image_2}} You can easily make these mac and cheese balls gluten-free. Use gluten-free breadcrumbs and flour. Many brands offer great options, so check your local store. For cheese, feel free to swap out your favorite kinds. Cheddar is classic, but mozzarella or gouda works well too. Each choice will give a unique taste. Want to spice things up? Add crispy bacon bits or chopped jalapeños to the mix. Both will give your treats a kick. You could also add veggies like spinach or bell peppers for extra nutrients. Pair your mac and cheese balls with tasty sauces. Marinara sauce is a classic choice. Ranch dressing or spicy aioli also work wonders. If you want to make your own sauce, try mixing sour cream with herbs or yogurt with hot sauce. These add flavor and fun to your snacks. For the full recipe, check out the link provided. To keep your mac and cheese balls fresh, follow these steps: - Refrigeration: Place leftovers in an airtight container. Store them in the fridge for up to 3 days. This helps maintain flavor and texture. - Freezing for Longer Storage: For longer storage, freeze the mac and cheese balls. Lay them on a baking sheet and freeze for about 1 hour. Once firm, transfer them to a freezer-safe bag. They can last up to 3 months in the freezer. To enjoy these tasty treats again, reheating is key. Here are my best methods: - Best Methods to Retain Crispiness: The air fryer is the best choice. It brings back that crunch. Preheat the air fryer to 375°F (190°C). - Time and Temperature Recommendations: Place the frozen or refrigerated balls in the air fryer. Cook for about 5-7 minutes, shaking halfway through. You want them hot and crispy again. Can I use store-bought mac and cheese? Yes, you can use store-bought mac and cheese if you are short on time. Just make sure it is firm after cooling. This helps form better balls. How do I know when they are done cooking? Your mac and cheese balls are done when they are golden brown. They should feel crispy on the outside. Use a fork to check if they are hot inside. Can I bake these instead of air frying? Yes, you can bake them. Set your oven to 400°F (200°C). Bake for about 15-20 minutes. Check often to ensure they do not burn. How to adjust cooking times for different air fryer models? Every air fryer is different. Start with the suggested time and check early. If they seem undercooked, add a few more minutes. What should I do if my mac and cheese balls fall apart? If they fall apart, chill them longer before cooking. You can also add a bit more flour to help bind them. This will keep them together during cooking. You now have a tasty way to enjoy mac and cheese. We covered the ingredients, how to shape the balls, and air-frying tips. Remember to chill the mac and cheese for the best texture. Experiment with flavors and sauces to match your taste. Store leftovers properly to retain crispness. With these steps, you can enjoy a delightful snack anytime. Dive in and savor your delicious creation. Enjoy cooking and sharing with others!

Air Fryer Fried Mac and Cheese Balls Crispy Treats

Craving a snack that’s cheesy, crispy, and oh-so-satisfying? Look no further! In this post, I’ll show you how to make

- 9 lasagna noodles - 1 lb large shrimp, peeled and deveined - 1 cup unsalted butter (split into ½ cup and ½ cup) - 6 cloves garlic, minced - 2 cups ricotta cheese - 1 cup grated Parmesan cheese - 2 cups shredded mozzarella cheese - 1 cup fresh spinach, chopped In this dish, lasagna noodles form the base, holding everything together. The shrimp and garlic bring a burst of flavor. The cheese and spinach blend adds creaminess and color. - Salt and pepper - 1 teaspoon red pepper flakes - 1 tablespoon lemon juice Salt and pepper enhance the taste of every layer. Red pepper flakes add a kick, while lemon juice brightens the dish. - Fresh parsley, chopped - Additional grated cheese Garnishing with fresh parsley brings a pop of color. Extra cheese on top makes each slice look mouthwatering. For the full recipe, check the details above to create this flavorful dish. To start, boil a large pot of salted water. Add your lasagna noodles. Cook them according to the package instructions until they are al dente. This usually takes about 8 to 10 minutes. Once cooked, drain the noodles. To prevent sticking, lay them flat on a clean surface. You can also drizzle a bit of oil over them. This will help keep them separate. Next, take a large skillet and melt ½ cup of butter over medium heat. Add the minced garlic and red pepper flakes. Stir them for about one minute until you smell the garlic. Now, add your shrimp. Cook until they turn bright pink, which takes about 2 to 3 minutes. Don’t forget to stir in the lemon juice. This adds a fresh taste! Season with salt and pepper to enhance the flavor. Now it’s time to put everything together. Grab a 9x13-inch baking dish. Start by spreading a thin layer of the shrimp and garlic mixture on the bottom. Place three lasagna noodles on top. Next, spread half of the ricotta mixture over the noodles. Follow this with half of the shrimp mixture. Sprinkle a layer of mozzarella cheese on top for that gooey goodness. Repeat this layering: noodles, ricotta, shrimp, and mozzarella. For the final layer, place three noodles on top again. Spread the remaining shrimp mixture over the last layer. Then, sprinkle the rest of the mozzarella and any leftover Parmesan cheese on top. To finish, dot the top with the remaining ½ cup of butter, cut into small pieces. Now, cover the dish with aluminum foil and bake it at 375°F for 25 minutes. After that, remove the foil and bake for another 15 to 20 minutes. You want the top to be golden and bubbly. Once done, let it cool for 5 to 10 minutes before slicing. Enjoy your delicious Garlic Butter Shrimp Scampi Lasagna! For the complete recipe, check the [Full Recipe]. Using fresh ingredients makes a big difference. Fresh shrimp tastes better than frozen. They have a nice texture and flavor. Always choose fresh garlic over powder. The aroma will fill your kitchen. Adjust spice levels to fit your taste. If you like heat, add more red pepper flakes. For milder flavors, cut down on the spice. You can also squeeze in extra lemon juice for zest. The right cheese blend can improve your dish. Mix mozzarella, Parmesan, and ricotta for a creamy texture. I suggest using whole milk ricotta for extra creaminess. You can also add a bit of cream to the ricotta. This will make each bite rich and smooth. Adding a touch of cream enhances the overall flavor. Cook the lasagna noodles just right. Follow the package instructions for al dente. Overcooked noodles can turn mushy. To avoid sogginess, layer your ingredients carefully. Don’t add too much sauce. This keeps the layers from becoming wet and messy. Make sure to let the lasagna cool before slicing. Cooling helps the layers hold together better. For the full recipe, check out the complete instructions. {{image_2}} You can switch up the seafood in this dish. Try scallops or crab for a new taste. If you want a vegetarian option, use mushrooms or artichokes instead of shrimp. These substitutes keep the dish flavorful while meeting your needs. Herbs and spices can change the whole dish. Basil and thyme add a nice twist. You can also add a bit of smoked paprika for depth. Another great option is to add zucchini or bell peppers. They add texture and extra nutrients. Pair this lasagna with a fresh salad or garlic bread. A crisp Caesar salad balances the rich flavors. If you prefer a one-pot meal, cook everything in the same pan. Layer the ingredients and bake them together for an easy cleanup. For the full recipe, check out the details above. To store leftovers, let the lasagna cool first. Cover it tightly with plastic wrap or foil. This helps keep moisture in and prevents drying. Place the lasagna in the fridge. It can stay fresh for up to three days. Always reheat only what you plan to eat. To maintain freshness, use an airtight container. This can help keep out air and odors. If you have sauce left over, store it separately. It stays fresh longer that way. You can freeze Garlic Butter Shrimp Scampi Lasagna before or after baking. If freezing before baking, wrap it tightly in plastic wrap and then foil. It will last up to three months. To freeze after baking, let it cool completely first. Then, follow the same wrapping steps. For reheating, thaw the lasagna overnight in the fridge. Preheat your oven to 375°F (190°C). Cover the dish with foil to keep moisture in. Bake for about 30 minutes or until heated through. You can also microwave it, but be careful not to overcook it. In the fridge, your lasagna will last about three days. After that, it may lose flavor and texture. If you notice any mold or an off smell, toss it right away. Signs of spoilage include a change in color or texture. If the cheese looks dry or the shrimp appears slimy, do not eat it. Always trust your senses when it comes to food safety. Garlic Butter Shrimp Scampi Lasagna is a tasty twist on two classic dishes. It combines layers of creamy ricotta, shrimp, and garlic butter sauce with rich cheeses. Each bite offers a burst of flavor and comfort. The blend of shrimp, garlic, and buttery goodness creates a unique dish you will love. Yes, you can prep this dish in advance. Cook the noodles and shrimp ahead of time. Mix the ricotta filling and layer the lasagna in a baking dish. Cover it tightly with plastic wrap and store it in the fridge. You can bake it later. Just add a few extra minutes to the baking time for a cold dish. To make this dish less rich, you can reduce the amount of butter and cheese. Use half the butter in the shrimp mixture. For the cheese, try using low-fat mozzarella or ricotta. You can also add more veggies like spinach or zucchini to balance the flavors. This keeps the dish tasty without all the richness. Yes, you can make this recipe gluten-free. Use gluten-free lasagna noodles instead of regular ones. Many brands offer great options that work well. Be sure to check the package instructions for cooking times. This way, you can enjoy the same delicious flavors without gluten. This blog post covers how to make a delicious Garlic Butter Shrimp Scampi Lasagna. We explored the key ingredients like lasagna noodles, shrimp, cheese, and spinach. I shared seasoning tips to boost flavor and garnishes for visual appeal. You learned step-by-step instructions, including how to prep noodles and cook shrimp perfectly. I also included suggestions on variations and storage tips to keep your dish fresh. Remember, cooking should be fun and creative. Don’t hesitate to customize this lasagna to suit your taste. Enjoy each bite!

Garlic Butter Shrimp Scampi Lasagna Flavorful Delight

Welcome to a taste adventure with my Garlic Butter Shrimp Scampi Lasagna! This dish combines the best of seafood with

To make the perfect cinnamon roll cake, gather these items: - 2 cups all-purpose flour - 1 cup granulated sugar - ½ cup unsalted butter, softened - 1 cup milk - 2 large eggs - 1 tablespoon baking powder - 1 teaspoon vanilla extract - 1 teaspoon salt - 2 tablespoons ground cinnamon - ½ cup brown sugar - 1 cup powdered sugar (for glaze) - 2 tablespoons milk (for glaze) If you need to swap some items, here are good options: - Use whole wheat flour for a healthier option. - Coconut oil can replace unsalted butter for a dairy-free option. - Almond milk works well instead of regular milk. - Flax eggs can substitute for regular eggs; use 1 tablespoon of flaxseed meal and 3 tablespoons of water per egg. - You can use a sugar substitute if you want to reduce sugar intake. You will need a few tools to make this cake: - A large mixing bowl - A 9x13 inch baking pan - A whisk for mixing - A measuring cup and spoons - A knife for swirling the batter - A toothpick to check doneness - A cooling rack for resting the cake These ingredients and tools will help you create a delightful cinnamon roll cake! For the full recipe, check the details above. First, gather all your ingredients. You will need: - 2 cups all-purpose flour - 1 cup granulated sugar - ½ cup unsalted butter, softened - 1 cup milk - 2 large eggs - 1 tablespoon baking powder - 1 teaspoon vanilla extract - 1 teaspoon salt - 2 tablespoons ground cinnamon - ½ cup brown sugar - 1 cup powdered sugar (for glaze) - 2 tablespoons milk (for glaze) Next, preheat your oven to 350°F (175°C). Grease a 9x13 inch baking pan. In a large mixing bowl, cream the softened butter and granulated sugar. Mix until it’s light and fluffy. Add the eggs and vanilla, and beat until combined. Then, slowly mix in the milk until the batter is smooth. In another bowl, whisk the flour, baking powder, and salt. Gradually add this to the wet mixture. Stir until just combined. Now, in a small bowl, mix the ground cinnamon and brown sugar for the cinnamon-sugar mix. Pour half of the batter into the greased baking pan. Spread it evenly. Next, sprinkle half of the cinnamon-sugar mixture on top of the batter. Pour the rest of the batter over this layer. Sprinkle the remaining cinnamon-sugar mixture on top. Use a knife to swirl the mixtures slightly for a marbled look. Bake in the preheated oven for 30-35 minutes. Check if it’s done by inserting a toothpick in the center. If it comes out clean, it’s ready! While the cake bakes, prepare the glaze. Mix the powdered sugar with 2 tablespoons of milk until it’s smooth and pourable. Once the cake is out of the oven, let it cool in the pan for about 10 minutes. Then, drizzle the glaze over the cake. For the best presentation, cut the cake into squares. Serve on a nice platter and add extra glaze and a sprinkle of cinnamon. Enjoy your homemade cinnamon roll cake! To get a fluffy cake, start with room temperature butter. Cream it well with sugar until it looks light. This mix adds air, which helps the cake rise. Next, don’t overmix the batter once you add the dry ingredients. Stir just until you see no flour. Overmixing can make the cake dense. Lastly, make sure your baking powder is fresh. Old baking powder won’t rise well and can ruin your cake. If your cake sinks in the middle, you might have added too much liquid. Check your measurements carefully. If the cake is dry, you may have overbaked it. Use a toothpick to test when it’s done. If it comes out clean, it's ready. Also, if the edges brown too fast, cover them with foil. This way, the middle can finish baking without burning. Serve your cinnamon roll cake warm for the best taste. Cut it into squares and place them on a nice plate. Drizzle extra glaze over each piece for a sweet touch. You can also sprinkle a little cinnamon on top for extra flavor. Pair it with coffee or tea to make it even better. For a fun twist, add a scoop of vanilla ice cream on the side. Enjoy it fresh for the best flavor and texture! For the full recipe, check out the Cinnamon Roll Cake Delight! {{image_2}} You can add nuts or fruits to make your cinnamon roll cake more exciting. Chopped walnuts or pecans add a nice crunch. If you love fruits, try adding chopped apples or berries. Just fold them into the batter before baking. This will give your cake extra flavor and texture. The glaze can change the whole vibe of your cake. You can keep it simple with a basic glaze made from powdered sugar and milk. If you want something special, try adding vanilla or almond extract. For a richer taste, mix in cream cheese for a tangy twist. You can even swirl in some melted chocolate for a decadent touch. To make your cake more unique, think about adding spices or extracts. A bit of nutmeg can deepen the flavor. You can also mix in orange zest for a fresh twist. If you want a caramel flavor, stir in some caramel sauce into the batter. All these options can help you create your own signature cinnamon roll cake. For the full recipe, check out the steps I provided above. Store leftover cinnamon roll cake in an airtight container. This keeps it fresh and moist. If you do not have a container, wrap the cake tightly with plastic wrap. Place it in the fridge to extend its life. It can last up to five days in the fridge. Room temperature is fine for one to two days, but the fridge is best. You can freeze this cake for later use. First, let the cake cool completely. Then, slice it into pieces. Wrap each piece in plastic wrap tightly. Place the wrapped pieces in a freezer bag. Remove as much air as you can before sealing. The cake can stay fresh in the freezer for up to three months. Label the bag with the date for easy tracking. To reheat, remove the cake from the fridge or freezer. If frozen, let it thaw in the fridge overnight. Preheat your oven to 350°F (175°C). Place the cake on a baking sheet. Heat for about 10 to 15 minutes. You can also microwave a piece for about 30 seconds. Add some glaze on top after reheating for extra sweetness. Enjoy every bite! Yes, you can make this cake ahead of time. Bake it the day before. Let it cool and store it in an airtight container. It keeps well for up to three days. Just remember to glaze it before serving for that fresh taste. To check if the cake is done, use a toothpick. Insert it in the center of the cake. If it comes out clean, the cake is ready. If you see wet batter, bake it a few more minutes. This cake should have a nice golden top when done. Yes, you can make a vegan version. Swap the eggs for flax eggs or applesauce. Use almond milk or soy milk instead of regular milk. For the butter, you can use coconut oil or vegan butter. This way, you still get a delicious cake without any animal products. We explored the key ingredients, including swaps, tools, and methods needed for success. You learned step-by-step how to prepare, bake, cool, and glaze your cake. Tips for a fluffy texture and serving ideas helped boost your baking skills. Variations, storage methods, and answers to common questions offered more insights. Now you have the tools and knowledge to create a delicious Cinnamon Roll Cake that impresses everyone. Get ready to bake and enjoy!

Cinnamon Roll Cake Simple and Delicious Recipe

Craving a warm, gooey cinnamon roll but short on time? I’ve got the perfect solution: Cinnamon Roll Cake! This simple

For a great Soya Chunks Manchurian, you need: - 1 cup soya chunks - 1/2 cup all-purpose flour - 2 tablespoons cornstarch - 1 teaspoon ginger-garlic paste - 1/2 teaspoon chili powder - 1/2 teaspoon black pepper - 1 teaspoon salt - 1/4 cup water (adjust as needed) - Oil for frying - 1 tablespoon oil (for sauce) - 1 small onion, chopped - 1 bell pepper, diced - 2 green chilies, slit - 2 tablespoons soy sauce - 2 tablespoons tomato ketchup - 1 tablespoon vinegar - 1 teaspoon sugar - 1 tablespoon chopped spring onions (for garnish) You can add extra ingredients for more taste: - 1 teaspoon sesame oil for a nutty flavor - 1/2 teaspoon garlic powder for a deeper garlic taste - A pinch of red pepper flakes for added heat - Chopped cilantro for fresh flavor Soya chunks are a great source of protein. Each serving gives you: - Calories: About 220 - Protein: 15g - Carbohydrates: 30g - Fat: 8g - Fiber: 5g This dish is a tasty and healthy choice. You can enjoy it while watching your diet. Start by soaking 1 cup of soya chunks in hot water. Let them sit for 15-20 minutes. This helps them get soft. Once they are ready, drain the water. Squeeze out any extra water from the chunks. This step is key for the best texture. In a mixing bowl, add 1/2 cup of all-purpose flour, 2 tablespoons of cornstarch, and 1 teaspoon of ginger-garlic paste. Next, add 1/2 teaspoon of chili powder, 1/2 teaspoon of black pepper, and 1 teaspoon of salt. Mix these dry ingredients well. Gradually add about 1/4 cup of water to the mix to form a thick batter. The batter should be smooth and not too runny. Heat 1 tablespoon of oil in a separate pan over medium heat. Add 1 small chopped onion and sauté until it turns translucent. Then, add 1 diced bell pepper and 2 slit green chilies. Cook these for 2-3 minutes until soft. Next, stir in 2 tablespoons of soy sauce, 2 tablespoons of tomato ketchup, 1 tablespoon of vinegar, and 1 teaspoon of sugar. Mix everything well and let it cook for 2 minutes. Finally, add the fried soya chunks to the sauce and toss them to coat. Cook for another 2-3 minutes, then remove from heat. Garnish with 1 tablespoon of chopped spring onions. For the full recipe, check the recipe section above. Enjoy your delicious Soya Chunks Manchurian! Frying the soya chunks just right makes a big difference. Heat the oil to medium-high before frying. This helps the chunks become crispy. If the oil is not hot enough, the chunks will absorb too much oil. Fry in small batches to avoid crowding. This ensures even cooking and crispiness. Drain the fried chunks on paper towels to remove excess oil. You can control the heat in Soya Chunks Manchurian easily. If you prefer it milder, reduce the chili powder. You can also remove the seeds from green chilies. For more heat, add extra chili powder or use spicier chilies. Always taste as you go. This helps you find the perfect balance for your palate. Presentation adds to the dish's appeal. Serve the Soya Chunks Manchurian on a large platter. Garnish it with chopped spring onions for color. A small bowl of chili sauce on the side adds a nice touch. You can pair it with steamed rice or noodles. This makes a complete meal. For a fun twist, serve it in lettuce wraps for a crunchy bite. Enjoy your flavorful creation! {{image_2}} You can easily boost the nutrition of soya chunks Manchurian. Adding fresh veggies makes it healthy and colorful. Try adding carrots, peas, or broccoli. These veggies not only add vitamins but also nice textures. Chop them into small pieces and sauté with the onions. This makes the dish more fun and tasty. If you need a gluten-free version, you can swap the all-purpose flour. Use rice flour or chickpea flour instead. These flours work well and keep the batter crisp. Just ensure that the soy sauce is gluten-free too. This way, everyone can enjoy this delicious dish without worry. For spice lovers, make a spicy version of soya chunks Manchurian. You can add more chili powder or use fresh chopped green chilies. You can also toss in some red chili flakes for an extra kick. This adds heat and flavor to the sauce. Serve this spicy dish with rice or noodles for a complete meal. Feel free to explore these variations and make the recipe your own! For the full experience, check out the Full Recipe. To keep your Soya Chunks Manchurian fresh, store it in an airtight container. Let it cool first. Place it in the fridge if you plan to eat it within 2-3 days. If you're storing for longer, consider freezing it. When you're ready to enjoy your leftovers, reheat them in a pan. Use low to medium heat. Add a splash of water to prevent sticking. Stir until heated through. You can also microwave it, but the texture may change slightly. To freeze your Soya Chunks Manchurian, let it cool completely. Place it in a freezer-safe container. It can last up to 2 months in the freezer. When ready to eat, thaw in the fridge overnight before reheating. This helps retain flavor and texture. For the best experience, try to consume it sooner rather than later. The best way to cook soya chunks is by soaking them in hot water. Soak them for 15 to 20 minutes until soft. Drain and squeeze out excess water to remove any bitterness. After that, you can fry, sauté, or add them to any dish. For recipes like Soya Chunks Manchurian, frying gives a nice crunch. Yes, you can make Soya Chunks Manchurian in advance. Prepare the soya chunks and sauce separately. Store them in airtight containers in the fridge. When you're ready to serve, reheat the sauce and toss in the fried soya chunks. This keeps them crispy and fresh. To make Soya Chunks Manchurian healthier, use less oil for frying. You can also bake the soya chunks instead of frying them. Swap all-purpose flour for whole wheat flour for added fiber. Add more vegetables to the sauce to boost nutrition. This way, you keep the flavor while making it a bit healthier. For a complete guide, check the Full Recipe. Soya Chunks Manchurian offers a tasty blend of flavors and nutrition. We explored main and optional ingredients, along with vital nutrition info, to make the dish shine. I shared simple steps for preparation, frying, and sauce creation. Tips for frying, adjusting spiciness, and serving round out the mix. Feel free to get creative with variations, storage tips, and answers to common questions. Enjoy making this dish, knowing it’s easy and flexible for your taste!

Soya Chunks Manchurian Flavorful and Easy Recipe

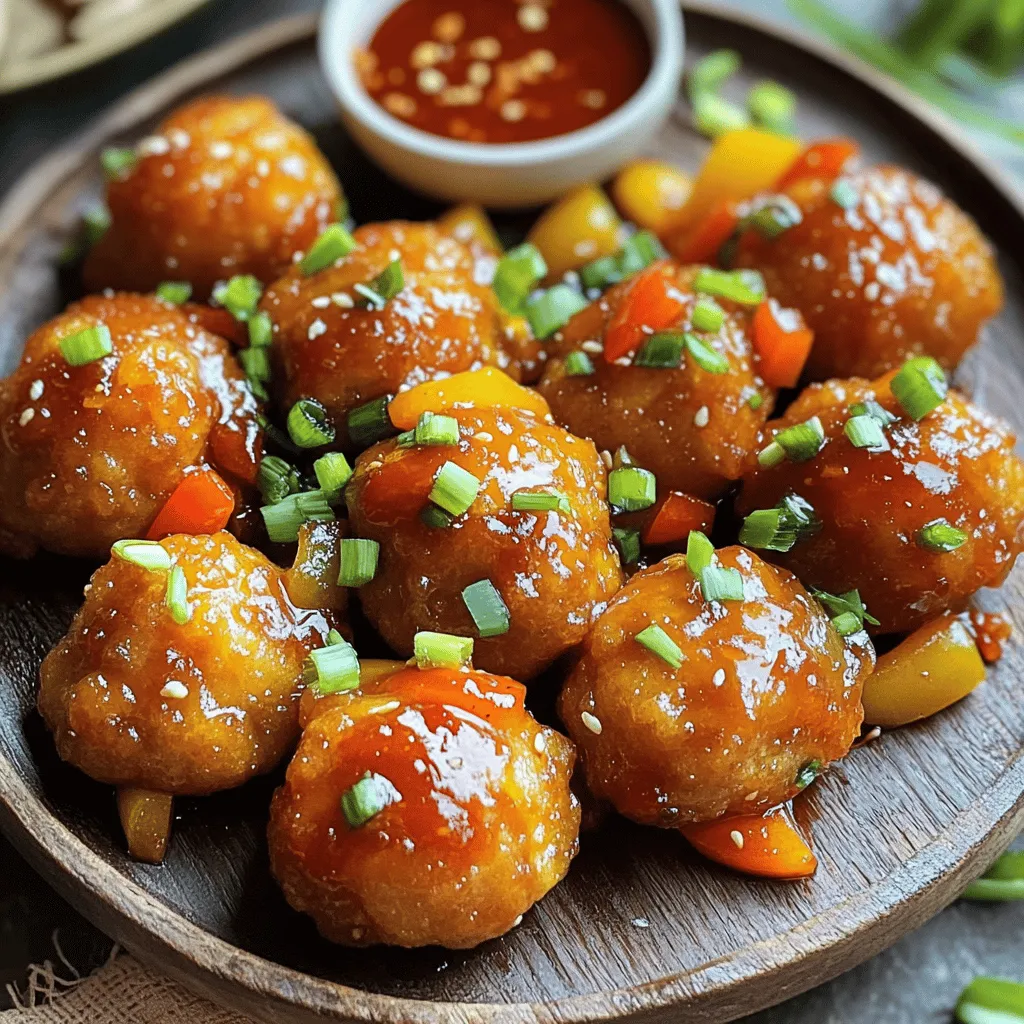
Looking for a tasty dish that’s easy to make? Soya Chunks Manchurian is your answer! This meat-free delight packs amazing

To make easy candied cashews, you need a few simple items. Here’s the complete list of ingredients: - 2 cups raw cashews - 1 cup granulated sugar - 1/2 cup water - 1 teaspoon vanilla extract - 1/2 teaspoon sea salt - 1/4 teaspoon ground cinnamon - 1 tablespoon coconut oil (for greasing) These ingredients come together to create sweet and crunchy treats. The raw cashews give a nice base, while sugar and water make a syrup. Adding vanilla extract brings warmth, and sea salt balances the sweetness. Ground cinnamon adds cozy flavor. Don't forget to grease your baking sheet with coconut oil! This helps the cashews not stick. For the full recipe, check out the section above. Enjoy making these delightful snacks! - Lining the baking sheet: Start by placing parchment paper on a baking sheet. This step keeps the cashews from sticking. You want a smooth surface for easy removal later. - Greasing the parchment paper: Next, take coconut oil and lightly grease the paper. Use a paper towel or your fingers to spread it evenly. This will help the cashews slide off when they are done. - Combining ingredients: In a medium saucepan, mix granulated sugar, water, vanilla extract, and ground cinnamon. This blend will create a sweet syrup. - Dissolving the sugar: Place the saucepan over medium heat. Stir the mixture until the sugar completely dissolves. This step is key to getting a nice, smooth coating on the cashews. - Coating the cashews: When the sugar mixture boils, add the raw cashews. Stir them well to coat each nut with the syrup. Make sure every cashew gets a good amount of the sweet mix. - Adjusting heat and cooking time: Lower the heat to medium-low. Continue cooking while stirring often for about 8-10 minutes. The mixture will thicken as it cooks. Keep an eye on this to avoid burning. - Crisping and cooling: Once the cashews look well-coated and the syrup thickens, remove the pan from heat. Quickly sprinkle sea salt over the cashews. Stir them to mix in the salt. - Breaking apart clumps: Pour the candied cashews onto your prepared baking sheet. Spread them out in a single layer. Let them cool for about 20-30 minutes. Once they cool, break apart any clumps to enjoy your sweet snack! For the full recipe, check out the [Full Recipe] section. To get the best texture for your candied cashews, focus on the syrup's consistency. The syrup should be thick but not too hard. Stir your mixture often to keep it smooth. When cooking, aim for a time of about 8-10 minutes. This allows the nuts to coat well without burning. Keep an eye on the cashews as they cook. You want them to be crunchy but not overdone. You can easily enhance the flavor of your candied cashews. Consider adding spices like nutmeg or ginger for a warm kick. You could also try a pinch of cayenne for some heat. If you prefer different sweeteners, maple syrup or honey can work too. Just adjust the amounts to keep the balance right. Each choice offers a unique twist to the taste. When it comes to serving, think about how you present your candied cashews. Use a decorative bowl to create a visual feast. You might add a sprinkle of edible glitter for a fancy touch. For an extra treat, serve them with dark chocolate for dipping. This simple addition can elevate your snack to a new level. Enjoy these cashews as a sweet snack or a topping for ice cream. {{image_2}} To make a sweet and spicy mix, you can add cayenne pepper or chili powder. Use about 1/4 teaspoon to start. This kick will balance well with the sugar. You can also add more cinnamon for warmth. Taste the mix and adjust to find your perfect balance. If you want a nut-free version, try using pumpkin seeds or sunflower seeds. These seeds give a nice crunch. Use the same cooking method as the cashews. You may need to adjust the cooking time slightly, as seeds can cook faster than nuts. To make this recipe vegan, just use a plant-based sugar. Some sugars are processed with animal products. Choose one that fits your needs. For sugar-free options, you can try erythritol or stevia. These will change the taste a bit, but they work well for a sweet treat. To keep your candied cashews fresh, store them in an airtight container. Glass jars or plastic containers work well. Make sure you seal them tightly. This helps to keep out air and moisture. If you have a lot, consider using a vacuum-sealed bag. This method removes air and helps them last longer. When stored properly, candied cashews can last up to two weeks. After that, they may lose their crunch. Look for signs of spoilage, like changes in color or texture. If they feel soft or have an off smell, toss them out. Freshness is key for the best taste. If your cashews become soft, don’t worry! You can revive them easily. Preheat your oven to 350°F (175°C). Spread the cashews in a single layer on a baking sheet. Bake for about 5 to 10 minutes. Keep an eye on them to avoid burning. Once done, let them cool before enjoying. This method brings back their crunch! For the full recipe, check out the [Full Recipe]. Yes, you can use roasted cashews. They add a nice crunch. However, they may not absorb the syrup as well as raw cashews. This may change the texture a bit. If you choose roasted cashews, reduce the cooking time slightly. To cut the sweetness, reduce the sugar amount. Try using 3/4 cup of sugar instead of 1 cup. You can also add a pinch of sea salt for balance. Adding spices like cayenne or smoked paprika can enhance flavor without extra sugar. To reheat, use an oven. Preheat it to 350°F (175°C). Spread the cashews on a baking sheet. Heat for about 5-10 minutes until warm. Stir them halfway through to ensure even heating. This helps restore their crispiness. Absolutely! You can add spices to change the flavor. Try adding nutmeg for warmth or cardamom for a sweet touch. A dash of chili powder creates a sweet and spicy combo. Experiment with your favorite spices to make it unique! Candied cashews are easy to make, starting with raw cashews and a few ingredients. You line your baking sheet and prepare your sugar mixture. After coating the cashews, cooking time is crucial for the right texture. You can add spices for flavor and even try nut-free options. Store them properly to keep them fresh, and use the re-crisping method if they get soft. Now, go ahead and enjoy your tasty treats!

Easy Candied Cashews Sweet and Simple Snack Recipe

Are you ready to enjoy a sweet and crunchy treat? These Easy Candied Cashews are a breeze to make and

- 1 sheet of refrigerated puff pastry, thawed - 2 tablespoons unsalted butter, melted - 1/4 cup granulated sugar - 1 tablespoon ground cinnamon - 1 egg (for egg wash) - Optional: powdered sugar for dusting You might not have puff pastry at home. You can use crescent roll dough instead. It works well and gives a nice taste. If you want to change the sugar, try brown sugar for a deeper flavor. Coconut sugar is a nice option too. It adds a hint of caramel. When choosing puff pastry, look for brands with few ingredients. Quality matters! Always check for freshness dates. Fresh spices are key for the best taste. Ground cinnamon should smell strong and sweet. If it doesn't, get fresh spices for better flavor. - Preheat your oven to 400°F (200°C). Line a baking sheet with parchment paper. - On a lightly floured surface, roll out the puff pastry sheet. This helps to smooth it out. - Brush the melted butter evenly over the surface of the pastry. This adds flavor and helps the sugar stick. - In a small bowl, mix the granulated sugar and ground cinnamon. Sprinkle this mixture over the buttered pastry. - Bake until the twists are golden brown. This usually takes about 12-15 minutes. - Check for doneness by looking for a puffed, crispy texture. If they are too light, give them more time. These steps make it easy to create sweet cinnamon twists. For the full recipe, check out the details above. Enjoy the process! To make your cinnamon twists perfect, keep these tips in mind: - Ensuring even twists: As you twist the strips, make sure they are tight and even. This helps them cook well and look great. If they are too loose, they may not hold their shape. - Avoiding sogginess: Ensure your oven is hot enough before baking. A hot oven helps the pastry puff up and stay crisp. If you brush on too much butter, it can make them soggy. Use just enough to coat the surface. These twists are great on their own, but you can elevate them: - Pairing with dips: Serve your twists with chocolate or caramel dips for a fun touch. These add flavor and make each bite special. - Presentation ideas for parties: Arrange the twists on a colorful platter. Add some fresh fruit or a sprinkle of powdered sugar on top. This makes them eye-catching and delicious. Learn what not to do when making these treats: - Overbaking vs. underbaking: Keep an eye on your twists while they bake. If they bake too long, they can burn. If not long enough, they may be doughy. Aim for a golden brown look. - Using too much filling: When spreading the cinnamon sugar, less is more. Too much filling can leak out while baking and create a mess. Just a light sprinkle gives great flavor without the fuss. {{image_2}} You can easily switch up the flavors in your sweet cinnamon twists. Here are some fun ideas: - Adding nuts or chocolate chips: Chopped nuts like pecans or walnuts add crunch. You can also sprinkle chocolate chips for a sweet surprise. - Using different spices: Try nutmeg for warmth or cardamom for a unique twist. These spices mix well with cinnamon and add depth. If you need to adjust for dietary needs, don't worry! Here are great options: - Vegan alternatives: Use plant-based butter and skip the egg wash. Your twists will still taste amazing! - Gluten-free options: Swap out the puff pastry for gluten-free dough. Ensure all other ingredients are labeled gluten-free. You can make your cinnamon twists in various sizes to fit any occasion: - Mini twists vs. larger portions: Cut smaller strips for bite-sized snacks. Larger twists can be great for sharing at parties. - Making bite-sized cinnamon snacks: Roll small pieces of dough into balls, then twist. This makes for easy, fun treats that everyone will love! To keep your sweet cinnamon twists fresh, store them in an airtight container. The ideal storage is at room temperature. This helps maintain their flaky texture. Avoid exposing them to moisture, as this can make them soggy. If you have leftover twists, stack them gently to avoid crushing. You can freeze these twists before or after baking. If you freeze them before baking, place the twisted strips on a baking sheet. Freeze them until solid, then transfer to a freezer bag. This way, you can bake them fresh later. If you freeze them after baking, let them cool completely. Store them in an airtight container or freezer bag. To thaw, place the frozen twists in the fridge overnight. For quick thawing, you can leave them at room temperature for about an hour. Reheat any baked twists in an oven at 350°F (175°C) for about 10 minutes for a crispy finish. These delightful twists last about 2 to 3 days at room temperature. If stored properly, they can last up to a month in the freezer. Watch for signs of spoilage, like a change in smell or texture. If they feel hard or dry, they may not taste good anymore. Enjoy your sweet cinnamon twists while they are fresh! You can use either frozen or homemade puff pastry. Frozen pastry is easy and saves time. Look for a high-quality brand that has no artificial ingredients. Homemade puff pastry gives you control over the ingredients and texture, but it takes more time and skill. Choose based on your comfort level. Both options work well for sweet cinnamon twists. Yes, you can prepare the twists ahead of time. You can assemble them and then refrigerate them before baking. Just cover them with plastic wrap to keep them fresh. You can also freeze the unbaked twists. Place them on a baking sheet and freeze until firm. Then, transfer them to a freezer bag. When you're ready, bake straight from the freezer. Just add a couple of extra minutes to the baking time. To reheat leftover twists, preheat your oven to 350°F (175°C). Place the twists on a baking sheet. Heat for about 5 to 10 minutes or until warm. This method keeps the twists crispy. You can also microwave them for a quick fix, but they may get soft. For the best texture, stick with the oven. Enjoy your warm, sweet cinnamon twists even after the first day! This guide shows you how to make delicious cinnamon twists from scratch. We covered essential ingredients, including puff pastry and sugar tips. I shared easy instructions for preparation, baking, and common pitfalls to avoid. You can try fun variations like adding nuts or using dairy-free options. Don't forget storage advice for leftovers. With these tips, you’ll impress friends and family with your baking. Enjoy your tasty twists!

Quick and Easy Sweet Cinnamon Twists Recipe Delight

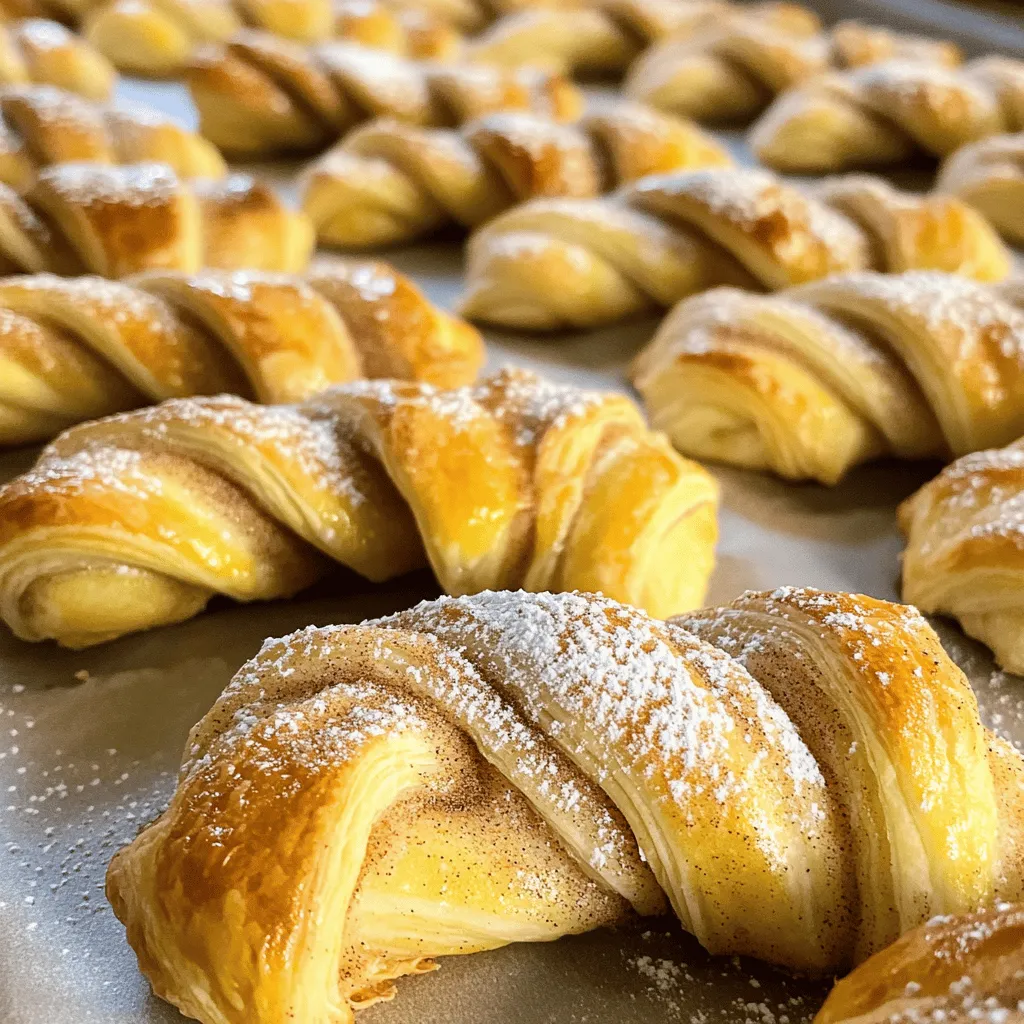
Looking for a delightful snack that’s both quick and easy? You’ve come to the right place! My Sweet Cinnamon Twists

Older posts
Newer posts
← Previous Page1 … Page49 Page50 Page51 Next →

dsad

© 2025 savoryspiral • Built with GeneratePress

Our Policies

  • Copyright Policy
  • Cookie Policy
  • GDPR Policy
  • Privacy Policy
  • Disclaimer
  • Terms Of Use

More Information

  • Home
  • About
  • Contact
  • Appetizers
  • Dessert
  • Dinner
  • Drinks
©2025, savoryspiral About Back To Top