Skip to content
DisclaimerTerms Of UseGDPR PolicyCookie Policy

savoryspiral

  • Home
  • Drinks
  • Appetizers
  • Dinner
  • Dessert
  • About
  • Contact
  • Privacy Policy
DisclaimerTerms Of UseGDPR PolicyCookie Policy

Charlotte

When making stuffed bell peppers with quinoa, you need to gather fresh and colorful ingredients. Here’s what you will need: - 4 large bell peppers (any color) - 1 cup quinoa, rinsed - 2 cups vegetable broth - 1 small onion, diced - 2 cloves garlic, minced - 1 cup black beans, drained and rinsed - 1 cup corn (fresh or frozen) - 1 teaspoon cumin - 1 teaspoon smoked paprika - ½ teaspoon chili powder - Salt and pepper to taste - 1 cup diced tomatoes (fresh or canned) - 1 tablespoon olive oil - ½ cup shredded cheese (cheddar or Mexican blend) - Fresh cilantro, for garnish These ingredients offer a nice mix of flavors and nutrients. Quinoa provides protein and fiber. Black beans add more protein and heartiness. The spices bring warmth and depth to the dish. Using fresh vegetables ensures that your meal is both tasty and healthy. Don't forget to check out the Full Recipe for detailed steps on how to incorporate these ingredients into a delicious meal! - Preheat your oven to 375°F (190°C) and lightly grease a baking dish with olive oil. - In a pot, combine 1 cup of rinsed quinoa and 2 cups of vegetable broth. Bring it to a boil, then lower the heat. Cover the pot and let it simmer for about 15 minutes until the quinoa is fluffy. - Heat 1 tablespoon of olive oil in a skillet over medium heat. - Add 1 small diced onion and cook for 3-4 minutes until it turns translucent. Then, add 2 minced garlic cloves and sauté for another minute until you smell the aroma. - Stir in 1 cup of drained black beans, 1 cup of corn (fresh or frozen), 1 cup of diced tomatoes, 1 teaspoon of cumin, 1 teaspoon of smoked paprika, ½ teaspoon of chili powder, and salt and pepper to taste. Cook everything for about 5 minutes. - Mix the cooked quinoa into this vegetable blend. Stir well to combine, adjusting the seasoning as needed. - Slice the tops off 4 large bell peppers and remove the seeds and membranes. Place the peppers upright in the prepared baking dish. - Fill each pepper generously with the quinoa mixture. Top each pepper with ½ cup of shredded cheese. - Cover the baking dish with foil and bake for 25 minutes. - After that, remove the foil and bake for an additional 10 minutes until the cheese is melted and bubbly. This method will help you create a colorful and tasty meal. For the full recipe, don’t forget to check back for more tips! - Rinsing quinoa before cooking: Always rinse quinoa under cold water. This step removes bitterness from the seeds. Simply place quinoa in a fine-mesh strainer and run it under cold water for a minute. This small task makes a big difference in taste. - Checking for doneness: Quinoa cooks quickly. After about 15 minutes, it should look fluffy. The grains will also have a small tail, which is the germ. If you see this, it’s ready! - Tips on seasoning adjustments: Adjust the spices to your taste. If you like heat, add more chili powder. For a smoky flavor, increase the smoked paprika. Always taste as you go to find your perfect mix. - Fresh herbs or spices to add: Fresh herbs like cilantro or parsley can brighten the dish. Add them right before serving for the best flavor. You can also toss in some fresh lime juice for a zesty kick. - Covering with foil vs. baking uncovered: Start by covering the baking dish with foil. This traps steam and helps cook the peppers evenly. After 25 minutes, remove the foil to brown the cheese. - Testing for doneness: Use a fork to pierce a pepper. If it is soft but not mushy, it’s done. You want a slight bite, not a mushy texture. This ensures your stuffed peppers are delicious! {{image_2}} You can mix things up with different beans. Try kidney beans or pinto beans. Both add great taste and texture. For a veggie boost, add spinach or zucchini. These veggies cook well and add nutrition. Spice blends can change the whole dish. Try adding curry powder or Italian herbs. They give new life to your stuffed peppers. If you want to skip cheese, use nutritional yeast. It adds a cheesy flavor without dairy. Serve your stuffed peppers with a tasty sauce. A dollop of sour cream or salsa works well. For a complete meal, add a side salad or some crusty bread. This makes your meal more filling and fun. To keep your stuffed bell peppers fresh, let them cool first. Then, place them in an airtight container. This helps keep moisture in and prevents them from drying out. You can store them in the fridge for up to four days. If you want to save them longer, freezing is a great option. The best way to reheat stuffed peppers is in the oven. Preheat the oven to 350°F (175°C). Place the peppers in a baking dish and cover with foil. Heat for about 20 minutes. This keeps the peppers moist and helps the cheese melt nicely. You can also microwave them for a quicker option, but they might lose some texture. To freeze stuffed bell peppers, prepare them as usual but do not bake. Wrap each pepper tightly in plastic wrap and place them in a freezer-safe bag. They can stay frozen for up to three months. When you want to eat them, thaw in the fridge overnight. Then, bake them at 375°F (190°C) for about 30 minutes. This reheating restores their flavor and texture nicely. For more details, check the Full Recipe. Yes, you can prepare stuffed peppers ahead of time. Make the filling and stuff the peppers. Store them in the fridge for up to two days. When ready, just bake them. This saves time on busy nights. If you don't have quinoa, you can use rice or couscous. Both options work well. Cook them according to package instructions before adding them to the filling. You can also try lentils for a different texture. The peppers are done when they are tender and the cheese is bubbly. You can check by inserting a fork into the side. If it goes in easily, they are ready. Keep an eye on the cheese; it should be golden and melted. Yes, stuffed bell peppers are a healthy meal. They are packed with vegetables, protein, and fiber. Quinoa adds nutrients, while beans offer extra protein. This dish is low in calories and high in flavor, making it a great choice for a balanced diet. Absolutely! You can add cooked ground turkey, beef, or chicken to the filling. Just brown the meat in the skillet before mixing it with the vegetables and quinoa. This adds richness and makes the dish even heartier. For the full recipe, check the earlier section. You learned how to make stuffed bell peppers with a simple ingredient list and clear steps. We covered tips for cooking quinoa and enhancing the flavor of your dish. You can customize the recipe with different beans or veggies. Remember to store leftovers correctly and follow reheating tips for the best taste. Stuffed peppers offer a healthy meal option, whether you stick to the original recipe or add meat. Enjoy creating this delicious and fun dish for any occasion!

Stuffed Bell Peppers with Quinoa Flavorful Healthy Meal

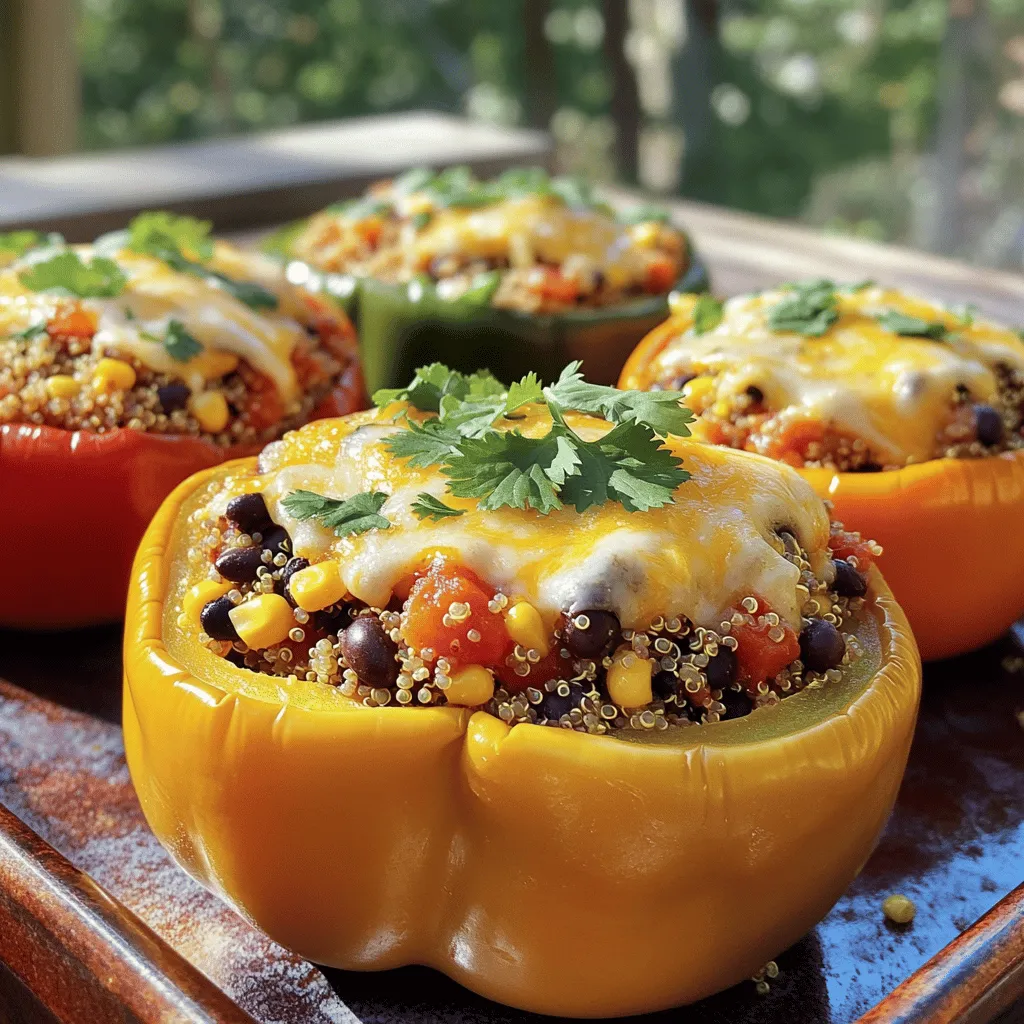
Are you looking for a meal that’s both tasty and good for you? Stuffed bell peppers with quinoa are a

To make this rich and creamy mousse, you need a few key ingredients. Here’s what you’ll need: - 2 ripe avocados, peeled and pitted - 1/2 cup unsweetened cocoa powder - 1/4 cup pure maple syrup (or honey) - 1/4 cup almond milk (or any milk of choice) - 1 teaspoon vanilla extract - A pinch of sea salt These ingredients blend together to create a smooth and decadent dessert. The avocados provide a creamy base, and the cocoa powder adds that rich chocolate flavor. The maple syrup adds sweetness while the vanilla extract gives a nice aroma. Don’t forget the sea salt! It enhances all the flavors. After you make the mousse, you can make it even better with some fun toppings. Here are a few ideas: - Whipped coconut cream - Fresh berries (like strawberries or raspberries) - Shaved dark chocolate These toppings add extra flavor and a nice look. The whipped coconut cream gives a light texture, while fresh berries add a fruity twist. Shaved dark chocolate brings a touch of elegance. This dessert is not only tasty but also healthy! Here’s a quick look at the nutrition: - Calories: About 200 per serving - Fat: Healthy fats from avocados - Carbohydrates: Low, thanks to natural sweeteners - Fiber: High, due to the avocados This mousse is a great treat. It is vegan and packed with nutrients. You get a dessert that feels rich without the guilt. If you want the full recipe, check out the details above. To start, gather your ingredients. You need: - 2 ripe avocados, peeled and pitted - 1/2 cup unsweetened cocoa powder - 1/4 cup pure maple syrup (or honey) - 1/4 cup almond milk (or any milk of choice) - 1 teaspoon vanilla extract - A pinch of sea salt Next, place the ripe avocados, cocoa powder, maple syrup, almond milk, vanilla extract, and sea salt into a food processor. This step brings all the flavors together. Blend everything on high speed until the mixture becomes smooth and creamy. Scraping down the sides helps get the perfect blend. After blending, taste the mousse. You might want it sweeter, so add more maple syrup if needed. Blend again to mix in any extra sweetener. The goal is a rich, creamy texture. A good mousse should be thick yet light. If the mousse feels too thick, add a tiny bit more almond milk. This will help achieve that silky consistency you want. Once you have the perfect texture, it’s time to serve. Transfer the mousse into individual serving bowls or glasses. Cover them up to keep the flavors fresh. Now, place the bowls in the fridge for at least 30 minutes. Chilling helps the mousse set properly. As it cools, the flavors deepen, making each bite more delightful. Enjoy your delicious Chocolate Avocado Mousse! For more details, check the Full Recipe. When choosing avocados, look for ones that feel slightly soft when you press them gently. A ripe avocado should have a dark green skin. If the skin is too hard, it is not ready to use. If it feels mushy, it may be overripe. To speed up ripening, place your avocados in a paper bag with a banana. The ethylene gas from the banana helps them ripen faster. Always check for brown spots on the skin, as these can mean the fruit is bad inside. To make your chocolate avocado mousse taste even better, add a splash of espresso. The coffee enhances the chocolate flavor without overpowering it. You can also add a pinch of cinnamon or cayenne pepper for a unique twist. For a smoother texture, blend the mixture longer until it is silky. Adding a bit more almond milk can also help create a creamier mousse. Don’t forget to taste your mousse before serving to ensure it is just right! A common mistake is using unripe avocados. They can make the mousse taste bitter and chunky. Always ensure your avocados are ripe. Another mistake is not blending enough. If you don’t blend long enough, the mousse may be gritty. Also, avoid using sweeteners that are too strong, like agave syrup, as they can alter the taste. Finally, don't skip the chilling step. Refrigerating the mousse makes the flavors richer and gives it a better texture. For more culinary tips, check out the Full Recipe for this delightful treat! {{image_2}} You can easily make vegan chocolate avocado mousse. Just stick to the main ingredients. The recipe already uses avocados and cocoa powder, which are both plant-based. You need to use maple syrup for sweetness instead of honey. This swap keeps it vegan-friendly. The texture will still be creamy and rich. You won’t miss the dairy at all. If you want a sugar-free version, try using a natural sweetener. Stevia or erythritol works great. Just remember to adjust the amount to your taste. You can also skip the sweetener altogether if you like a more intense chocolate flavor. The mousse will still taste amazing, even without added sugar. You can mix in different flavors to make your mousse unique. For a minty twist, add a few drops of peppermint extract. If you prefer something fruity, orange zest gives a bright taste. You can even try spices like cinnamon or chili powder for heat. Experimenting with flavors can make your mousse even more exciting. Check out the Full Recipe for ideas on how to make these variations. You can store leftover chocolate avocado mousse in the fridge. First, place it in an airtight container. This helps keep it fresh and full of flavor. Make sure to cover it well to prevent it from picking up other smells in the fridge. The mousse can last up to three days when stored properly. If you want to freeze the mousse, divide it into small portions. Use freezer-safe containers or bags to keep each portion fresh. Remove as much air as possible to prevent freezer burn. The mousse can last for about one month in the freezer. When you’re ready to enjoy it, thaw it in the fridge overnight. Chocolate avocado mousse tastes best when fresh but can still be enjoyed later. If stored in the fridge, eat it within three days. For the best flavor, serve it cold. Before serving, feel free to add toppings like whipped coconut cream, fresh berries, or shaved dark chocolate. This can make each bite even more delightful. For the full recipe, check out the section above. Yes, you can use other sweeteners. Honey, agave nectar, or coconut sugar work well. Each sweetener adds a unique flavor. You might need to adjust the amount based on sweetness level. Taste as you mix to find what you like best. If you don't have almond milk, try coconut milk or oat milk. Both will keep the mousse creamy. Soy milk or regular dairy milk will also work. Pick the milk that fits your taste and diet best. Yes, chocolate avocado mousse is healthy! It uses ripe avocados, which are full of good fats. The cocoa powder offers antioxidants. Plus, you get natural sweetness from maple syrup or honey. This dessert is guilt-free and nutritious. The mousse needs at least 30 minutes to set. This chill time helps it become smooth and creamy. For best flavor, let it sit longer if you can. It tastes even better after a few hours in the fridge. Absolutely! This mousse is great for making ahead of time. You can prepare it a day in advance. Just store it in the fridge. Cover it well to keep it fresh. When you're ready, add your toppings and enjoy! In this post, we explored how to make chocolate avocado mousse. We covered essential ingredients, step-by-step instructions, and helpful tips. You learned about variations like vegan and sugar-free options. We also discussed how to store leftovers to keep them fresh. Remember, this mousse is not just tasty; it’s also a healthy treat. Enjoy making this delicious dessert and impress everyone with your skills. Happy cooking!

Chocolate Avocado Mousse Decadent Healthy Dessert

Are you ready to indulge in a dessert that’s both rich and healthy? Chocolate avocado mousse is your answer. This

- 1 lb boneless, skinless chicken breasts - 1 tablespoon olive oil - 1 onion, chopped - 2 cloves garlic, minced - 1 bell pepper, diced (red or green) - 1 can (14.5 oz) diced tomatoes with green chilies - 4 cups chicken broth - 1 can (15 oz) black beans, rinsed and drained - 1 cup corn (fresh, frozen, or canned) - 2 teaspoons ground cumin - 1 teaspoon chili powder - Salt and pepper to taste - 1 lime, juiced - Tortilla chips, for serving - Fresh cilantro, chopped, for garnish - Avocado slices, for garnish When I make my Easy Chicken Tortilla Soup, I start with these key ingredients. The chicken brings protein and heartiness, while the olive oil adds a rich flavor. Chopped onion and minced garlic provide a strong base. Diced bell pepper adds crunch and color. Then, I add the canned tomatoes with green chilies. They give the soup a nice kick. Chicken broth helps blend all the flavors. The black beans and corn add texture and sweetness. Ground cumin and chili powder bring warmth and depth. I always season my soup with salt, pepper, and the juice of a fresh lime. This balance of flavors makes the soup come alive. For garnishes, I love using crispy tortilla chips, fresh cilantro, and creamy avocado slices. These toppings add layers of flavor and a lovely finish. Check out the Full Recipe for step-by-step instructions to create this warming dish! - In a large pot, heat olive oil over medium heat. - Add chopped onion and cook until translucent, about 3-4 minutes. I love starting my soups with a good onion base. The smell fills the kitchen and sets the stage for a warm meal. The key is to keep stirring so the onion cooks evenly. You want it soft, not brown. - Stir in minced garlic and bell pepper; cook for another 2-3 minutes. - Add chicken breasts, diced tomatoes, broth, black beans, corn, cumin, and chili powder. Once the onion is ready, garlic and bell pepper join the mix. They add layers of flavor. After a quick stir, it’s time to add the chicken. I prefer fresh chicken breasts for the best taste. The diced tomatoes bring a nice acidity, while the broth adds depth. The black beans and corn give texture. Don’t forget the cumin and chili powder; they pack a punch! - Bring to a boil, reduce heat, and simmer for 20-25 minutes. - Remove chicken from pot, shred using two forks, and return to the pot. Now, we let it simmer. This step is crucial. Simmering allows all the flavors to blend and the chicken to cook through. After 20-25 minutes, the chicken is tender. I love using two forks to shred the chicken right in the pot. This keeps everything juicy and flavorful. For the full recipe, check out the details above. Enjoy the warm comfort of this easy chicken tortilla soup! - Use fresh ingredients for optimal taste. Fresh veggies and herbs shine in this soup. - Adjust seasoning with salt, pepper, and lime juice to taste. A squeeze of lime adds brightness. - Monitor the heat to prevent burning. A steady simmer keeps flavors from getting bitter. - Use low-sodium broth for better control over salt levels. This helps you season just right. - Use a stand mixer with a paddle attachment for quick shredding. It saves time and effort. - Shred while chicken is still warm for easier handling. Warm chicken is much easier to pull apart. For the full recipe, refer to the earlier section. Enjoy your cooking! {{image_2}} You can switch things up with the protein in your Easy Chicken Tortilla Soup. - Use shredded rotisserie chicken for quicker prep. This saves time and adds great flavor. - Swap chicken for diced tofu or beans for a vegetarian version. Both options add protein and texture. To make your soup even tastier, consider these flavor boosts. - Add a splash of hot sauce or jalapeños for an extra kick. This will wake up your taste buds. - Incorporate additional veggies like zucchini or corn for more texture. These add color and nutrition to your dish. You can also play with the style of your soup. - Transform it into a creamy soup by adding sour cream or cheese. This makes it rich and smooth. - Serve as a chili-style dish by thickening with masa harina. This gives your soup a hearty feel. For a detailed guide, check the Full Recipe. Store leftover soup in an airtight container for up to 3-4 days. This keeps the flavors fresh. Allow soup to cool before refrigerating for best results. Cooling helps prevent bacteria growth. Freeze soup in portions for easy meal prep later. I like to use freezer bags. Lay them flat to save space. When you're ready to eat, defrost in the refrigerator overnight before reheating. This is safe and keeps the soup tasty. To reheat, use the stovetop over medium heat. Add water or broth to thin if needed. Stir often to heat evenly. You can also use the microwave. Heat in short intervals and stir in between. This prevents hot spots and keeps the soup from boiling. Add more chili powder or include fresh jalapeños during cooking. You can start small and taste as you go. This way, you control the heat. Spice levels can change based on personal taste, so adjust to what feels right for you. Yes, canned chicken can be used for convenience, but fresh is recommended for best flavor. It adds a richer taste and better texture. If you are in a hurry, canned chicken works well. Just drain and rinse it before adding to the soup. Serve with crusty bread, a side salad, or additional tortilla chips. A squeeze of lime on top also brightens the flavors. Each side adds a nice touch to the meal, making it more filling and exciting. Replace chicken with extra beans and use vegetable broth instead of chicken broth. You can try black beans or kidney beans for protein. Add in some extra veggies like corn or zucchini for a heartier soup. Yes, as long as the broth and canned ingredients are labeled gluten-free. Always check the labels to be sure. This makes it a safe choice for those with gluten sensitivities. Enjoy without worry! This blog post covered the key ingredients needed for easy chicken tortilla soup and how to prepare it step by step. I shared tips to enhance flavor and various options for modifications, including vegetarian choices. Keep these instructions in mind as you cook. Experiment with ingredients and flavors to make this dish your own. Enjoy making a warm, tasty meal that you can share with loved ones. This soup is sure to become a kitchen favorite!

Easy Chicken Tortilla Soup Comfort in Every Bowl

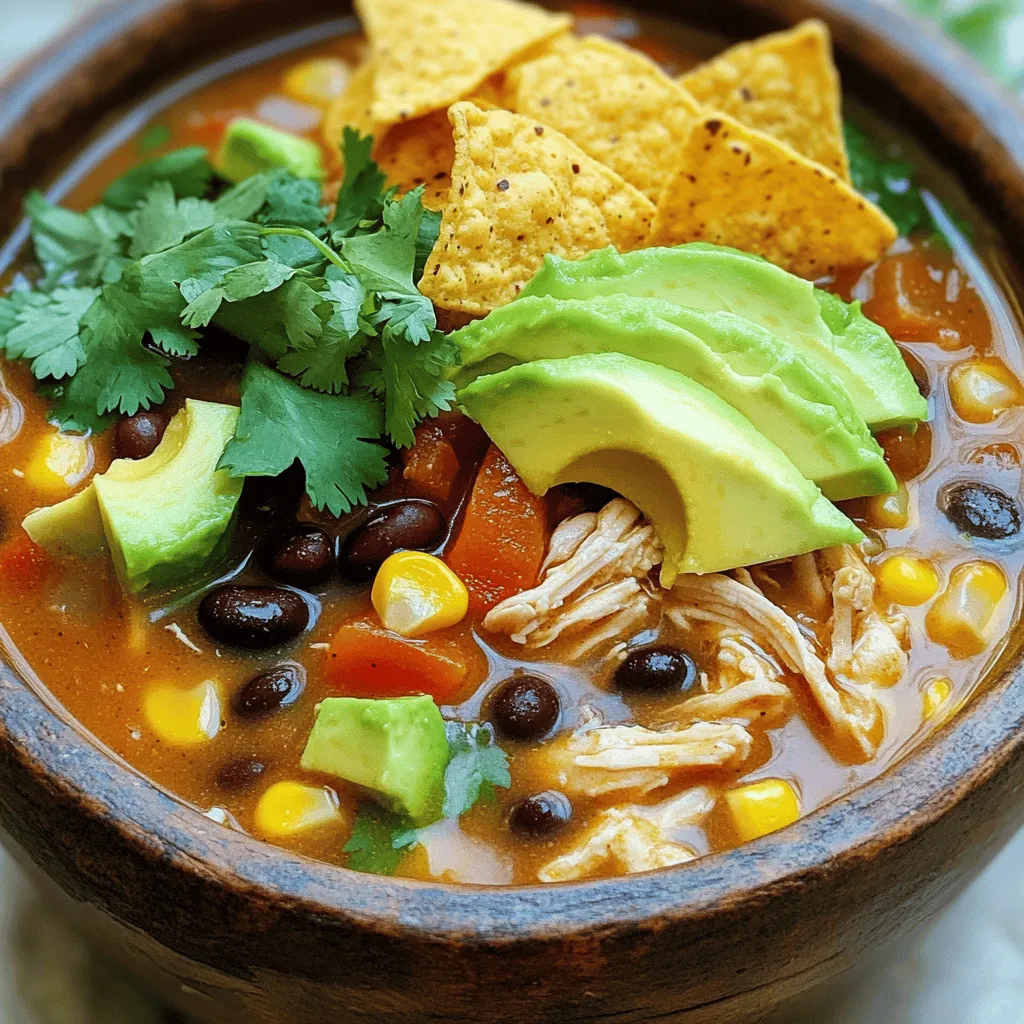
Welcome to comfort food heaven with my Easy Chicken Tortilla Soup! This warm, tasty dish is packed with flavor and

- 2 cups fresh or frozen ravioli (cheese or spinach filling) - 2 tablespoons olive oil - 1 small onion, finely chopped - 3 cloves garlic, minced - 8 ounces cremini mushrooms, sliced - 1 cup heavy cream - 1/2 cup vegetable broth - 1/4 cup grated Parmesan cheese - 1 teaspoon dried thyme - Salt and pepper to taste - Fresh parsley, chopped (for garnish) When I make my ravioli with mushroom cream sauce, I start with simple ingredients. The ravioli can be fresh or frozen, and I prefer cheese or spinach filling. The rich flavor comes from a mix of olive oil, onions, and garlic. Cremini mushrooms add depth to the sauce. Heavy cream gives the dish a smooth texture, while vegetable broth brings balance. Parmesan cheese adds a salty kick. Dried thyme rounds out the flavor. I always adjust the salt and pepper to suit my taste. - Substitute with gluten-free ravioli - Add spinach or other greens for extra nutrition - Include chicken or sausage for protein If you want to mix it up, try gluten-free ravioli. Adding fresh spinach or greens boosts nutrition. For more protein, toss in chicken or sausage. Each variation keeps the dish fun and fresh. For the full recipe, check out the detailed steps to create this comforting meal. - Boil a large pot of salted water. - Add the ravioli and cook according to package instructions. - Drain the ravioli and reserve a small cup of pasta water. Cooking the ravioli is simple. Make sure the water is boiling before adding the pasta. It helps keep the ravioli from sticking together. Follow the package instructions for cooking time. Once cooked, drain them carefully. Don’t forget to keep some pasta water. This water can help adjust the sauce later. - Sauté onions and garlic in olive oil. - Incorporate cremini mushrooms and cook until golden brown. - Add cream, broth, Parmesan, and thyme; let simmer. Start by heating olive oil in a large skillet. Add the finely chopped onion and let it cook for a few minutes. The onion should turn soft and clear. Then, stir in the minced garlic. Cook for just a minute until it smells great. Next, add the sliced cremini mushrooms. Let them cook until they are golden brown. This takes about 5 to 7 minutes. Now, pour in the heavy cream and vegetable broth. Stir everything together and add the grated Parmesan cheese and dried thyme. Bring the sauce to a gentle simmer for about 5 minutes. This helps the flavors mix well. - Season with salt and pepper. - Fold in ravioli and serve with parsley garnish. Once the sauce thickens slightly, taste it. Add salt and pepper until it’s just right. If the sauce seems too thick, add a little reserved pasta water. Now, gently fold the cooked ravioli into the sauce. Make sure they are well coated. Heat everything for another minute. Finally, plate the ravioli and add a generous scoop of sauce on top. Garnish with freshly chopped parsley for a nice touch. For the full recipe, check out the details above. Enjoy your creamy mushroom-magic ravioli! - Avoid overcooking the ravioli for perfect texture. Cooking ravioli takes just a few minutes. Follow the package instructions closely. Overcooked ravioli can be mushy and lose their shape. Keep an eye on them, and taste a piece to check if they're ready. - Use a high-quality Parmesan cheese for the best flavor. Good Parmesan adds a rich, nutty taste to your sauce. Look for aged cheese that crumbles easily. Freshly grated cheese melts better and enhances the dish. - Best paired with a crisp white wine. A nice white wine, like Pinot Grigio, complements the creamy sauce. The wine’s acidity cuts through the richness of the dish. It makes each bite even more delightful. - Suitable for romantic dinners or family gatherings. This meal is a crowd-pleaser, perfect for special nights. Its creamy sauce and comforting ravioli create a warm atmosphere. Serve it with a side salad for a complete meal. Enjoy the smiles around the table! {{image_2}} You can easily change this meal to fit your diet. If you're vegan, try using plant-based cream and cheese. This swap keeps the dish creamy while making it dairy-free. For a low-carb option, use zucchini noodles instead of ravioli. Simply spiralize the zucchini and cook it lightly. This gives you a fresh taste without the carbs. Want to add more flavor? A pinch of nutmeg brings warmth to the sauce. It pairs well with the mushrooms. You can also play with herbs like basil or oregano. Adding these can brighten the dish and make it even more delicious. Don't be afraid to experiment; find what you love! After you enjoy your meal, store leftover ravioli and sauce in an airtight container. They will stay fresh for up to 3 days. Make sure to cool them down before sealing. This way, you can savor the flavors again without waste. If you have uncooked ravioli, freeze them for later use. You can cook them straight from frozen. This is a great way to save time on busy days. For cooked ravioli in sauce, you can store them for up to 2 months. Place the ravioli in the sauce in a freezer-safe container. Just remember to label it, so you know what’s inside. When you’re ready to enjoy, thaw in the fridge overnight and reheat gently. For more details, check the Full Recipe. Refrigerate in an airtight container for up to 3 days. This keeps it fresh and safe to eat later. Yes, fresh or frozen store-bought ravioli works well. It saves time and still tastes great. A crisp white wine like Pinot Grigio or Sauvignon Blanc enhances the dish. The bright notes balance the creaminess. This blog post covered a delicious mushroom cream sauce for ravioli. You learned which ingredients to use and how to prepare the dish step by step. Tips for perfection and serving suggestions were included to enhance your meal. Feel free to adjust the recipe with variations to suit your taste. Whether for a cozy dinner or a family gathering, this dish is sure to impress. Enjoy making this meal and savor the rich flavors!

Ravioli with Mushroom Cream Sauce Simple Comfort Meal

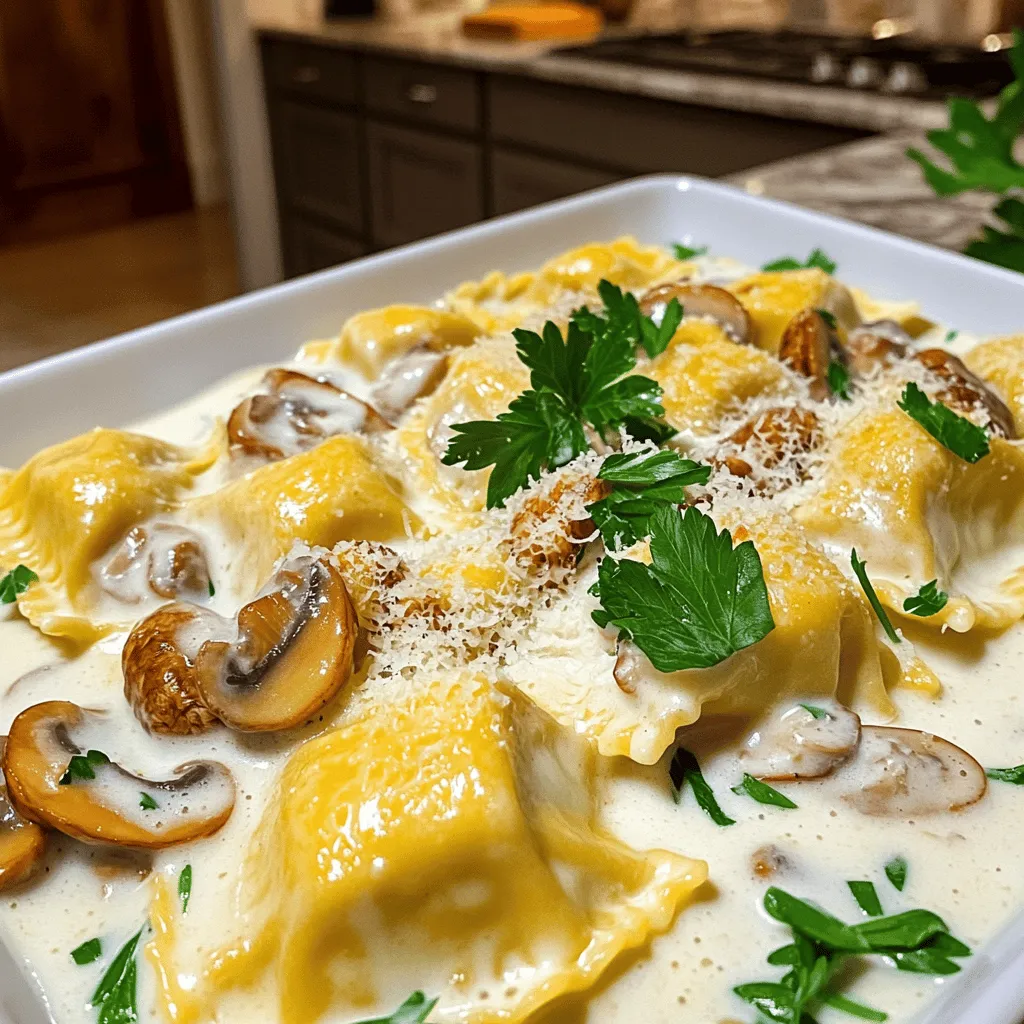
Looking for a simple comfort meal that warms your heart? Try my Ravioli with Mushroom Cream Sauce! This dish packs

- 1 cup cooked chicken, shredded - 1 cup Alfredo sauce (store-bought or homemade) - 1 cup shredded mozzarella cheese - 1 package puff pastry (2 sheets), thawed - 1/2 cup fresh spinach, chopped - 1/4 teaspoon garlic powder - 1/4 teaspoon black pepper - 1 egg, beaten (for egg wash) - Fresh parsley, chopped (for garnish) - Alternative proteins: You can use turkey, ham, or even shrimp instead of chicken. Each option gives a unique taste to the puffs. - Vegan cheese options: Look for dairy-free mozzarella or cashew-based cheeses. They melt nicely and add flavor. - Homemade Alfredo sauce ingredients: If you want to make your own sauce, use butter, heavy cream, garlic, and Parmesan cheese. This blend creates a rich flavor that enhances the puffs. These ingredients come together to create the perfect balance of creamy and crispy. You can mix and match based on what you have at home. By following the Full Recipe, you can make these delicious puffs easily. 1. Preheat the oven and prepare baking sheet: Start by preheating your oven to 400°F (200°C). This step ensures your puffs bake evenly. Line a baking sheet with parchment paper. This prevents sticking and makes cleanup easy. 2. Combine filling ingredients in a bowl: In a medium bowl, mix together your filling. Add 1 cup of shredded chicken, 1 cup of Alfredo sauce, and 1 cup of shredded mozzarella cheese. Toss in 1/2 cup of chopped spinach, 1/4 teaspoon of garlic powder, and 1/4 teaspoon of black pepper. Stir well until all ingredients blend smoothly. 1. Rolling out the pastry: Place your thawed puff pastry sheets on a lightly floured surface. Use a rolling pin to flatten them a bit. This helps make the pastry more even for cutting. 2. Cutting into square shapes: Cut each pastry sheet into 3-inch squares. You should get about 12 squares from both sheets. Keep the squares as uniform as you can for even baking. 1. Filling the pastry squares: Take about a tablespoon of the chicken Alfredo mixture and place it in the center of each pastry square. Do not overfill; this keeps them from leaking during baking. 2. Sealing the puffs: Fold the corners of each square over the filling to create a pouch. Pinch the edges firmly to seal. Make sure there are no gaps; this keeps the filling inside. 3. Applying egg wash and baking: Brush each pouch with the beaten egg. This gives them a nice golden finish while baking. Place the puffs on your prepared baking sheet. Bake them in your preheated oven for 20-25 minutes. They should turn golden brown and puff up beautifully. For the full recipe, check out [Full Recipe]. Enjoy your cooking! To get the best puff, you need to avoid soggy bottoms. Here are my top tips: - Use parchment paper: Always line your baking sheet with parchment paper. This helps with air circulation and keeps the bottoms from getting wet. - Preheat your oven: Make sure your oven is fully heated before you place your puffs inside. A hot oven makes them rise better. - Don’t overfill: If you add too much filling, the puffs may not cook evenly. Stick to about a tablespoon of filling for each puff. For a golden, crispy outer layer, follow these steps: - Brush with egg wash: Before baking, brush each puff with a beaten egg. This gives them a nice shine and helps achieve that golden color. - Bake on the middle rack: This ensures even cooking. If they are too close to the top or bottom, they may brown too quickly. - Keep an eye on them: Every oven is different. Check your puffs a few minutes before the time is up to avoid overbaking. When serving Chicken Alfredo Puffs, the right dips or sides can make a big difference: - Creamy ranch or blue cheese dressing: These pair well with the rich flavors of the puffs. - Fresh veggies: Serve with a side of crunchy carrot sticks or celery for a nice contrast. - Simple salad: A light salad can balance the heaviness of the puffs. For presentation, try these garnishing ideas: - Chopped fresh parsley: A sprinkle on top adds color and freshness. - Serve on a platter: Arrange the puffs on a nice platter for a more appealing look. - Add a drizzle: A light drizzle of extra Alfredo sauce around the puffs adds flair. These tips will help you enjoy your Chicken Alfredo Puffs even more. For a complete guide, be sure to check the Full Recipe! {{image_2}} You can mix up the flavors in your Chicken Alfredo Puffs easily. Adding different cheeses can change the taste. Try sharp cheddar for a tangy kick or creamy fontina for richness. You can also blend two or more cheeses for a unique twist. Incorporating herbs and spices is another fun way to add flavor. A bit of Italian seasoning brings a warm taste. Fresh basil or thyme can also boost the dish. A sprinkle of red pepper flakes adds a slight heat. Get creative and make it your own! For those who need gluten-free options, look for gluten-free puff pastry. Many brands offer this, allowing you to enjoy the puffs without worry. Just check the label to make sure it fits your needs. If you're looking for vegetarian alternatives, swap out the chicken for mushrooms or spinach. Adding cooked lentils gives a nice texture and protein. You can also use a mix of veggies like bell peppers and zucchini for a colorful filling. Enjoy experimenting with these changes! To keep your Chicken Alfredo Puffs fresh, store them in an airtight container. This helps prevent them from drying out. Place them in the fridge right after they cool down. They stay tasty for about 3 days, but the sooner you eat them, the better they taste! You can freeze Chicken Alfredo Puffs for later. First, let them cool completely. Then, place them on a baking sheet in a single layer. Freeze the puffs for about an hour. After that, transfer them to a freezer bag. Make sure to squeeze out the air before sealing. To reheat frozen puffs, preheat your oven to 375°F (190°C). Place the puffs on a baking sheet and bake for 15-20 minutes until warm and crispy. Enjoy them just like when they were fresh! For the full recipe, check out the details above. Can I make these puffs ahead of time? Yes, you can make these puffs ahead of time. Prepare the filling and fill the pastry squares. Then, store them in the fridge for up to 24 hours before baking. This way, you save time when you want to serve them. Just remember to brush them with the egg wash before baking. What can I serve with Chicken Alfredo Puffs? Chicken Alfredo Puffs pair well with many sides. You can serve them with a fresh salad or a light soup. Dipping sauces like marinara or ranch add a nice touch too. These options enhance the meal and keep it fun. Can I use different sauces or fillings? Absolutely! You can switch up the sauces and fillings. Try using pesto, barbecue sauce, or even buffalo sauce. You can also mix in veggies like mushrooms or bell peppers. The key is to keep the filling balanced and flavorful. Why are my puffs not rising? If your puffs are not rising, check the puff pastry. It needs to be cold when it goes into the oven. Warm pastry won’t puff as well. Also, avoid overcrowding the baking sheet. Give each puff space to expand. How do I fix a messy filling? To fix a messy filling, make sure to not overfill the puffs. Stick to about a tablespoon of filling per square. If the filling spills out, it can ruin the puff. You can also seal them tightly to help keep the filling inside. You can create delicious Chicken Alfredo Puffs with simple ingredients and easy steps. This dish is perfect for any occasion and allows for many tasty variations. Remember to experiment with flavors and adjust for dietary needs. Store leftovers properly to enjoy later. Whether it’s a family meal or a party snack, these puffs will impress and satisfy. Enjoy your cooking journey and make these puffs a favorite in your kitchen!

Homemade Chicken Alfredo Puffs Simple and Tasty Treat

Are you craving a delicious snack that’s easy to make? These Homemade Chicken Alfredo Puffs are the perfect treat! With

For a memorable meal, you need key ingredients that shine. Here’s what you’ll need: - 2 ribeye steaks (about 1 inch thick) - 8 oz large shrimp, peeled and deveined - 4 tablespoons unsalted butter, divided - 4 cloves garlic, minced - 1 tablespoon fresh parsley, chopped - 1 teaspoon paprika - Salt and pepper to taste - Lemon wedges for serving These ingredients provide the base for a dish that impresses. Seasonings can elevate your steak and shrimp. I recommend: - Sea salt for a cleaner taste - Freshly cracked black pepper for a warm kick - Paprika for a hint of smokiness You can sprinkle chopped parsley on top. It adds color and freshness. Want to take your dish further? Consider these optional ingredients: - A splash of white wine for depth - A dash of red pepper flakes for heat - Fresh herbs like thyme or rosemary for a fragrant boost These ingredients can add layers to your meal. You can mix and match based on your taste. For the full details on how to prepare this dish, check out the Full Recipe. Start by gathering all your ingredients. This will make cooking easier and faster. You need: - 2 ribeye steaks (about 1 inch thick) - 8 oz large shrimp, peeled and deveined - 4 tablespoons unsalted butter, divided - 4 cloves garlic, minced - 1 tablespoon fresh parsley, chopped - 1 teaspoon paprika - Salt and pepper to taste - Lemon wedges for serving Next, take the ribeye steaks out of the fridge. Let them sit at room temperature for about 30 minutes. This step helps the meat cook more evenly. While waiting, season both sides of the steaks with salt, pepper, and paprika. This adds great flavor! Now, it’s time to cook the steaks. Heat a large skillet over medium-high heat. I prefer using a cast iron skillet for the best results. Add 2 tablespoons of butter and let it melt. Once the butter is hot, carefully add the seasoned steaks. Sear each side for about 4 to 5 minutes for a medium-rare steak. If you like your steak more cooked, adjust the time accordingly. After cooking, remove the steaks from the skillet. Place them on a plate and cover them loosely with foil. Let them rest for a few minutes. This helps keep the juices inside. In the same skillet, add the remaining 2 tablespoons of butter. Allow it to heat up until it’s bubbly. Then, add the minced garlic. Sauté it for about 30 seconds until it smells amazing. Now, add the shrimp to the skillet. Cook them for about 3 to 4 minutes. Turn the shrimp halfway through so they cook evenly. When they turn pink and opaque, they are ready. Season the shrimp with salt, pepper, and chopped parsley for a burst of flavor. Finally, plate the rested steaks and arrange the garlic butter shrimp on top or next to them. Drizzle any leftover garlic butter over the dish for extra taste. Serve with lemon wedges for a zesty kick. For the complete recipe, check out the Full Recipe. To get your steak just right, start with room temperature meat. Let the ribeye sit out for 30 minutes. Season every side with salt, pepper, and paprika. For medium-rare, aim for 4-5 minutes on each side. Use a meat thermometer for best results. A temperature of 130°F gives you that perfect pink center. Remember to let the steak rest after cooking. This helps keep all the juices inside. Garlic butter is the star here. Use unsalted butter for better control over salt. Melt two tablespoons in your skillet before cooking the steaks. This adds a rich base flavor. After cooking the steaks, use the same skillet for the shrimp. Add more butter and minced garlic. Sauté for about 30 seconds until fragrant. This will create a delicious aroma and a rich sauce for your shrimp. Presentation matters, especially on Valentine's Day. A rustic wooden board or elegant plates work well. Place the rested steak on the plate, then add the garlic butter shrimp on top. Drizzle leftover garlic butter from the skillet over the dish. This enhances both flavor and looks. Garnish with fresh parsley for a pop of color. Add lemon wedges on the side for a zesty touch. Candles on the table can set a romantic mood. For the full recipe, visit the details shared earlier. {{image_2}} If you want a twist on this dish, try different proteins. Chicken or scallops work great here. Use chicken breast or thighs for a lighter meal. Scallops add a sweet taste and cook quickly. Adjust cooking times based on the protein you choose. Chicken needs more time, while scallops take less. This way, you keep the dish exciting and fresh. You can cook the steak and shrimp in a skillet or on a grill. The skillet gives you a nice sear and keeps the flavors in. Use a cast iron skillet for the best results. Grilling adds a smoky taste that many love. If you grill, make sure to oil the grates to prevent sticking. Each method brings different flavors, so choose what you like most. Experiment with various herbs and spices to change the dish's taste. Fresh thyme or rosemary can add depth. For a spicy kick, try red pepper flakes or a dash of hot sauce. You can also drizzle a sauce on top. A simple lemon butter sauce brightens the dish. No matter how you choose to flavor it, the goal is to make it your own. Use your creativity to impress your loved one. For the full recipe, check out the Valentine's Day Garlic Butter Steak and Shrimp. To keep your steak and shrimp fresh, place them in an airtight container. Make sure to cool them first to avoid steam buildup. You can store leftovers in the fridge for up to three days. Label the container with the date for easy tracking. If you think you won't eat them soon, freezing is a good option. When reheating, use low heat to avoid drying out the steak and shrimp. You can use a skillet or microwave. If using a skillet, add a bit of butter or broth to keep them moist. Heat for a few minutes until they are warm. If using a microwave, cover the dish with a damp paper towel. This helps keep moisture in. Always check the internal temperature; it should reach 165°F. Freezing is a great way to save extra portions. Wrap the steak and shrimp tightly in plastic wrap and then place them in a freezer bag. Remove as much air as possible. This helps prevent freezer burn. You can freeze them for up to three months. To thaw, place them in the fridge overnight before reheating. This keeps them juicy and flavorful. For the full recipe, check out the details above. I love to serve garlic butter steak and shrimp with a few tasty sides. Simple sides enhance the dish without stealing the show. Here are some great options: - Garlic mashed potatoes - Roasted asparagus - Steamed broccoli - Creamy coleslaw - A fresh garden salad These sides add flavor and color to your plate. They also balance the richness of the steak and shrimp. I recommend cooking this dish fresh for the best taste. But, you can prepare some parts ahead. For example, you can season the steaks a few hours in advance. This allows the flavors to soak in. You can also peel and devein the shrimp ahead of time. Store them in the fridge until you are ready to cook. A good wine can elevate your meal. For garlic butter steak and shrimp, I suggest a nice red wine. A Cabernet Sauvignon works well. It pairs nicely with the steak's richness. If you prefer white wine, try a Chardonnay. Its buttery notes match the garlic butter sauce. Enjoying the right wine can make your dinner even more special! In this post, we covered how to make garlic butter steak and shrimp. We discussed key ingredients, seasonings, and added flavors that elevate the dish. I shared step-by-step instructions for cooking perfect ribeye steaks and shrimp. We also explored various cooking methods, presentation tips, and even storage advice. Try this recipe for a tasty, romantic dinner. Experiment with flavors and enjoy great meals.

Valentine’s Day Garlic Butter Steak and Shrimp Delight

Valentine’s Day is the perfect time to impress your loved one with a special meal. Imagine tender ribeye steak and

- 1 lb beef flank steak, thinly sliced - 2 cups broccoli florets - 1 red bell pepper, sliced - 3 cloves garlic, minced - 1-inch piece of ginger, grated - 3 tablespoons soy sauce - 1 tablespoon oyster sauce (optional) - 1 tablespoon cornstarch - 2 tablespoons vegetable oil - 1 tablespoon sesame oil - Cooked jasmine rice, for serving - Sesame seeds and sliced green onions, for garnish Gather these items for a quick and tasty meal. The beef flank steak gives a tender bite. Broccoli and red bell pepper add color and nutrition. Garlic and ginger bring warmth and zest. Soy sauce adds a savory touch. If you want, add oyster sauce for extra depth. Cornstarch helps thicken the sauce and makes it glossy. Oils enhance the flavors and help with cooking. For serving, jasmine rice pairs well with stir-fry. Sprinkle sesame seeds and green onions for a nice finish. For the full recipe, check out "Broccoli Bliss Beef Stir-Fry". - Combine beef with soy sauce, cornstarch, and sesame oil. - Let marinate for at least 15 minutes. Marinating the beef is key for flavor. The soy sauce adds saltiness, while the cornstarch helps create a nice sear. Adding sesame oil gives it a nutty taste. This step makes a huge difference in the final dish. - Heat vegetable oil in a wok or large skillet. - Cook beef for 2-3 minutes until browned. - Remove beef from pan. Use a hot wok or skillet for best results. This high heat helps to brown the beef quickly. Don’t overcrowd the pan, or the beef will steam instead of sear. Once browned, take it out to keep it tender. - Sauté garlic and ginger in the same pan. - Add broccoli and red bell pepper, stir-fry for 3-4 minutes. - Return beef to the pan and combine with sauces. The garlic and ginger add a strong aroma. Stir-fry the broccoli and bell pepper until they are bright and crisp. This only takes a few minutes. Then, mix the beef back in with the veggies. Drizzle in any leftover marinade or sauces for added flavor. For the full recipe, check out the Broccoli Bliss Beef Stir-Fry section. For a great stir-fry, choose beef flank steak. It has the perfect texture and flavor. You can also use sirloin or ribeye. Slice your beef thinly against the grain. This makes it tender and easy to chew. Use a sharp knife for clean cuts. Aim for slices about 1/4 inch thick. Stir-frying is fast and requires high heat. Make sure your pan is hot before adding oil. Use vegetable oil for high smoke points. Add the beef in one layer. This helps it brown evenly. Cook for just a few minutes. Remove the beef before adding veggies. To keep your vegetables crisp, do not overcook them. Stir-fry broccoli and bell peppers for 3-4 minutes. They should stay bright and crunchy. You can customize your dish using different sauces. Try teriyaki or hoisin for a sweet twist. Add chili paste or fresh peppers for heat. Want more crunch? Toss in some chopped nuts or sesame seeds. Feel free to add extra veggies, too. Snow peas, carrots, or bok choy work well. Don’t hesitate to experiment with spices, like black pepper or five-spice powder. For the full recipe, check out Broccoli Bliss Beef Stir-Fry. {{image_2}} You can switch the beef for chicken or tofu. Chicken cooks well and absorbs flavors nicely. Tofu is a great choice for a plant-based meal. Just press it to remove extra water. You can also try seafood like shrimp. Shrimp cooks quickly and adds a sweet taste. Feel free to add more veggies to your stir-fry. Carrots, snap peas, and bell peppers work great. You can also use seasonal veggies. In spring, try asparagus or peas. In fall, add sliced mushrooms or bok choy for fresh flavors. If you need a gluten-free meal, use tamari instead of soy sauce. This keeps the flavor without the gluten. For a vegan version, replace beef with tempeh or extra tofu. You can also skip the oyster sauce to keep it plant-based. To keep your beef and broccoli stir-fry fresh, store it in the fridge. Use an airtight container to prevent moisture loss. It will stay good for 3 to 4 days. Label the container with the date to track freshness. Avoid stacking heavy items on top, as this can squish your stir-fry. You can freeze beef and broccoli stir-fry for longer storage. Start by cooling it completely before freezing. Place it in a freezer-safe bag or container. Make sure to remove excess air to avoid freezer burn. Your stir-fry can last up to 3 months in the freezer. For thawing, place it in the fridge overnight for best results. You can also use the microwave on low power for a quick thaw. To reheat without losing texture, use a skillet over medium heat. Add a splash of water or broth to keep it moist. Stir often to heat evenly. Avoid the microwave if you can, as it can make the beef tough. Check your stir-fry often to avoid overcooking. Enjoy your delicious meal again! To add spice, consider these options: - Red pepper flakes: Just a pinch can bring heat. - Sriracha sauce: Mix it in for a tangy kick. - Chili paste: Adds depth and spiciness. - Fresh chilies: Slice and stir them in while cooking. These spices work well with the beef and broccoli, enhancing the dish's flavor. Here are some great side dishes: - Jasmine rice: Soft and fluffy, perfect for soaking up sauce. - Noodles: Lo mein or rice noodles complement the stir-fry. - Spring rolls: Crispy rolls add a fun crunch. - Stir-fried rice: Mix in some eggs and veggies for variety. These options can create a complete meal that satisfies everyone. Yes, you can prepare this dish ahead of time. Here are some tips: - Marinate the beef: Do this the night before for more flavor. - Chop vegetables: Pre-cut broccoli and peppers to save time. - Cook and store: Make the stir-fry and refrigerate for up to three days. Reheat gently on the stove for the best texture. For the complete cooking instructions, check out the "Broccoli Bliss Beef Stir-Fry" [Full Recipe]. This will guide you through each step for a delicious meal. Beef and Broccoli Stir-Fry is simple and tasty. You learned about the key ingredients, like flank steak, broccoli, and red bell pepper. The cooking method, from marinating the beef to stir-frying, keeps flavors fresh. I shared tips for choosing the best cuts, making it gluten-free, and more. Now, you can enjoy this dish any night. Try new veggies or proteins to make it your own. A great stir-fry is all about your taste!

Beef and Broccoli Stir-Fry Flavorful Meal in Minutes

Craving a quick, tasty meal? Beef and Broccoli Stir-Fry delivers big flavor in just minutes! This dish combines tender beef,

- 1 lb fresh shrimp, peeled and deveined - 1 pre-made pie crust (9-inch) - 1 cup heavy cream - 1/2 cup diced tomatoes - 1/2 cup corn (frozen or fresh) - 1/4 cup chopped green onions - 2 cloves garlic, minced - 1 teaspoon Old Bay seasoning - 1 teaspoon lemon juice - Salt and pepper to taste - 1/4 cup shredded cheddar cheese (optional) - Fresh parsley for garnish Florida Shrimp Pie is a great dish for any meal. You need fresh shrimp for the best taste. When you buy shrimp, look for shrimp that smell like the ocean. The pie crust makes it easy to prepare. You can use a store-bought crust to save time. In this recipe, heavy cream gives the pie a rich flavor. The diced tomatoes add a nice touch of color and taste. Adding corn makes it sweet and crunchy. Green onions bring a fresh, mild flavor to the mix. Garlic adds an aromatic element that everyone loves. Old Bay seasoning gives the pie its unique taste. This spice blend has a mix of flavors that scream coastal dining. Lemon juice adds brightness, making all the flavors pop. Lastly, don't forget salt and pepper to enhance everything. Feel free to add shredded cheddar cheese on top for extra flavor. It melts perfectly and gives a creamy finish. Fresh parsley as a garnish adds a lovely touch to your dish. You can find the Full Recipe at the end of this article. Enjoy cooking and tasting this delightful dish! - Preheat your oven to 375°F (190°C). - Take your pre-made pie crust and place it in a pie dish. - In a skillet, melt a small amount of butter over medium heat. - Add minced garlic and sauté for about 1 minute. This brings out the flavor. - Toss in the peeled shrimp. Cook them until they turn pink, about 3-5 minutes. - Once cooked, remove the shrimp from heat and set them aside. - Grab a large mixing bowl. Combine the heavy cream, diced tomatoes, corn, and chopped green onions. - Add the Old Bay seasoning, lemon juice, salt, and pepper. Stir until mixed well. - Gently fold in the cooked shrimp, ensuring they are evenly spread throughout the mixture. - Pour the shrimp and cream mixture into your prepared pie crust. - If you like cheese, sprinkle shredded cheddar on top. It adds a nice touch! - Place the pie in the oven and bake for 30-35 minutes. Look for a golden top and a set middle. - Let the pie cool for about 10 minutes before slicing. This helps it hold together. This recipe is simple and full of flavor. You can find the full recipe in the article. Enjoy your cooking! Using fresh shrimp makes a big difference. Fresh shrimp has a sweet taste and firm texture. I recommend buying shrimp from a trusted fish market. If fresh shrimp is not available, frozen shrimp is a good choice. Just make sure to thaw them properly. To avoid a soggy crust, you can blind-bake your pie crust first. This means baking it without the filling. Just place some parchment paper with pie weights in the crust. Bake for about 10 minutes at 375°F (190°C). Let it cool, then add your shrimp filling. This simple step helps keep your crust crisp and tasty. Florida Shrimp Pie pairs well with light sides. A fresh salad with mixed greens is a great choice. You can also serve it with steamed vegetables for a healthy touch. To enhance the flavors, try adding garnishes. A sprinkle of fresh parsley adds color and freshness. You can also use lemon wedges for a zesty kick. These little touches make your dish look and taste amazing. If you want the full recipe, check out the [Full Recipe]. {{image_2}} You can easily swap shrimp for other seafood. Crab or lobster works great too. These swaps give your pie a new taste. If you want a lighter option, use scallops. They cook fast and blend well. If you need a dairy-free version, you can replace heavy cream. Use coconut milk or almond milk instead. They add a nice flavor and keep it creamy. You can also try cashew cream for a rich texture. To make your shrimp pie pop, consider adding spices. A dash of cayenne or paprika adds heat. Fresh herbs like dill or parsley brighten the dish. You can mix in some thyme for a warm taste. Feel free to customize the vegetables based on what you have. Bell peppers, zucchini, or spinach all work nicely. Just chop them small so they mix well with the shrimp. This way, you can enjoy different flavors each time! After you enjoy your Florida Shrimp Pie, let it cool down. Cooling helps keep flavors fresh. Leave it on the counter for about 10 minutes. Then, cover it well with plastic wrap or foil. This keeps the pie from drying out. For long-term storage, use an airtight container. You can also use a glass or plastic food storage box. Make sure it seals tightly to keep air out. Store the pie in the fridge for up to three days. If you want to save it longer, consider freezing it. To reheat your Florida Shrimp Pie, keep the texture nice and flaky. The best method is to use the oven. Preheat your oven to 350°F (175°C). Cover the pie with foil to keep moisture in. Heat for about 20 to 25 minutes. You can also use a microwave. If you choose the microwave, slice the pie into pieces. Heat each slice for about 1 to 2 minutes. Check if it is warm enough. Be careful, as the pie can get hot quickly. Storing and reheating your shrimp pie correctly helps it taste great each time! For the full recipe, refer to the earlier sections. Florida Shrimp Pie is a tasty dish made with fresh shrimp and cream. It is baked in a pie crust. This pie mixes local flavors and seafood. It shows Florida's rich coastal culture. Many families enjoy it for gatherings and special meals. Yes, you can freeze Florida Shrimp Pie. To freeze, let it cool completely. Wrap the pie tightly in plastic wrap. Then, place it in a freezer bag. It can stay in the freezer for up to three months. To thaw, move it to the fridge overnight. Bake it again before serving to warm it up. Making a homemade pie crust is easy. Here’s a quick recipe: - 1 1/4 cups all-purpose flour - 1/2 teaspoon salt - 1/2 cup unsalted butter, chilled and diced - 3 to 4 tablespoons cold water 1. In a bowl, mix flour and salt. 2. Add diced butter. Use a fork or pastry cutter to mix until crumbly. 3. Stir in cold water, one tablespoon at a time, until the dough forms. 4. Shape the dough into a ball. Wrap it in plastic wrap. 5. Chill in the fridge for at least 30 minutes before rolling out. This crust will give your pie a great taste! For the full recipe of Florida Shrimp Pie, check out the recipe section above. In this blog post, I covered how to make a delicious Florida Shrimp Pie. We talked about all the key ingredients and followed simple steps for cooking and baking. I shared tips to perfect your pie and offered tasty variations. You can enjoy this dish with your family and friends. Remember, use fresh shrimp for the best taste. This meal is fun to make and even better to share. Now, grab your ingredients and start cooking! Your kitchen will smell amazing.

Florida Shrimp Pie Delicious and Simple Recipe Guide

If you crave a dish that’s both easy to make and full of flavor, Florida Shrimp Pie is for you.

The Taco Bell Beefy Melt Burrito is a tasty treat. It has seasoned beef, cheese, and beans wrapped in a soft tortilla. Each bite gives a warm and satisfying flavor. The blend of cheddar and Monterey Jack cheese creates a creamy texture that melts in your mouth. You also get a hint of spice from the taco seasoning. The burrito is filling and perfect for lunch or dinner. One Beefy Melt Burrito packs a punch of nutrition. It typically contains around 450 calories. You get protein from the beef and cheese. The fiber from the beans helps keep you full. It also has about 20 grams of fat. If you're watching your sodium, it has a higher count, so consider that. You can find the Beefy Melt Burrito at Taco Bell locations. It usually costs around $2 to $3, depending on where you are. Taco Bell often runs deals, so keep an eye out for specials. You might even catch it as part of a combo meal. It's a popular choice, so it’s often in stock. To make this tasty meal, you will need: - 1 pound ground beef - 1 packet taco seasoning - 1 cup water - 1 cup shredded cheddar cheese - 1 cup shredded Monterey Jack cheese - 4 large flour tortillas - 1 can (15 oz) refried beans - 1/2 cup sour cream - 1/2 cup diced tomatoes - 1/2 cup chopped lettuce - 1/4 cup sliced jalapeños (optional) - Salt and pepper to taste These ingredients create a great Beefy Melt Burrito. Each one plays a key role: - Ground Beef: This adds protein and flavor. - Taco Seasoning: This gives a classic taco taste. - Cheese: Cheddar and Monterey Jack melt well and add richness. - Flour Tortillas: They wrap everything up nicely. - Refried Beans: These add creaminess and fill the burrito. - Sour Cream: This gives a cool touch. - Tomatoes and Lettuce: They add freshness and crunch. - Jalapeños: These offer a spicy kick, if you like heat. You can easily swap out some ingredients: - Ground Beef: Use ground turkey or chicken for a leaner option. - Taco Seasoning: Make your own with chili powder, cumin, and garlic powder. - Cheese: Try pepper jack for more spice or a vegan cheese for a plant-based meal. - Flour Tortillas: Corn tortillas work well too, but they may be more fragile. - Refried Beans: Black beans or pinto beans can replace refried beans. - Sour Cream: Use Greek yogurt for a healthier choice. These ideas can help you customize your Beefy Melt Burrito to fit your taste! First, take a large skillet and heat it over medium heat. Add 1 pound of ground beef. Use a spatula to break the beef apart as it cooks. Keep cooking until it is fully brown. This should take about 7 to 10 minutes. Once done, drain any extra fat from the pan. Next, add 1 packet of taco seasoning and 1 cup of water. Stir the mix well. Let it simmer for about 5 minutes. This makes the beef flavorful and thick. While the beef cooks, grab another small pan. Pour in 1 can of refried beans. Heat the beans over low heat. Stir them every few minutes. You want them warm, not hot. This step is quick and should take about 5 minutes. Warm beans add creaminess to the burrito. Now it’s time to put it all together! Lay 1 large flour tortilla flat on a clean surface. Spread a generous spoonful of the warm refried beans in the center. Next, add a couple of tablespoons of your beef mix on top. Sprinkle a mix of 1 cup of shredded cheddar cheese and 1 cup of shredded Monterey Jack cheese over the beef. Fold the sides of the tortilla inward. Roll it up from the bottom to the top to form a burrito. Repeat this for the rest of the tortillas. You can serve them as they are or grill them. If grilling, heat a skillet over medium heat. Place the burritos in the skillet for 2-3 minutes on each side. You want them golden and crispy. Serve with 1/2 cup of sour cream, diced tomatoes, chopped lettuce, and sliced jalapeños on the side. Enjoy your tasty Beefy Melt Burrito! Check the Full Recipe for more tips. {{image_2}} To make the best burrito, start with warm tortillas. A warm tortilla is easy to fold. Spread refried beans in the middle. This keeps the filling from leaking. Add your beef mix next, then sprinkle cheese on top. Don’t overfill! Leave room to fold. Fold the sides in first, then roll it up tightly. This keeps everything inside. You can control the spice level. For mild, skip the jalapeños. Use regular taco seasoning instead of spicy. If you love heat, add sliced jalapeños inside. Try a spicy salsa on top, too. You can mix hot sauce into the sour cream for a zesty dip. This lets you enjoy your meal just how you like it. Serve your burritos with fresh sides. Diced tomatoes and chopped lettuce add crunch. Sour cream is a must for creaminess. Try adding guacamole for extra flavor. You can pair your burritos with tortilla chips and salsa. This makes for a fantastic meal. For drinks, a refreshing limeade or iced tea goes well. Try these ideas for a tasty spread! You can make a tasty vegetarian version of the Beefy Melt Burrito. Start by swapping the ground beef for a mix of sautéed veggies. Zucchini, bell peppers, and onions work great. You can also add black beans for protein. Use the same taco seasoning to keep that bold flavor. Load up on cheese for a creamy texture. For a simple bean and cheese burrito, use refried beans as the main filling. Spread a thick layer of beans on the tortilla. Add lots of cheddar and Monterey Jack cheese on top. For extra flavor, sprinkle some taco seasoning. Roll it up and enjoy a warm, cheesy treat. If you love heat, try the spicy version of the Beefy Melt Burrito. Use the same beef filling but add chopped jalapeños or crushed red pepper. You can also use pepper jack cheese instead of regular cheese for an extra kick. Serve it with your favorite hot sauce for added spice. These variations are easy to make and still keep the essence of the Beefy Melt Burrito. Don't forget to check out the Full Recipe for more details! The Beefy Melt Burrito has ground beef, refried beans, and cheese. It also has sour cream and diced tomatoes. Taco Bell adds savory taco sauce for extra flavor. The burrito comes wrapped in a flour tortilla, making it easy to eat. A Beefy Melt Burrito has about 440 calories. This number can change based on extra toppings or sides. If you add jalapeños or extra cheese, the calorie count goes up. Yes, you can freeze Beefy Melt Burritos. Wrap them tightly in foil or plastic wrap. Place them in a freezer-safe bag for best results. When you want to eat them, just thaw in the fridge overnight and reheat in the oven or microwave. To reheat, unwrap the burrito and place it on a plate. Microwave it for about 2-3 minutes, or until warm. If you want a crispy texture, grill it in a skillet for 2-3 minutes on each side. The Beefy Melt Burrito contains common allergens like dairy and gluten. It has cheese, flour tortillas, and meat. If you have allergies, make sure to check Taco Bell’s allergen guide. Yes, you can customize your Beefy Melt Burrito! Add guacamole, extra cheese, or different veggies. You can also choose to make it spicy by adding hot sauce or jalapeños. To make a healthier version, use lean ground beef or turkey. You can also add more veggies like bell peppers or zucchini. Use whole wheat tortillas for extra fiber. The Full Recipe above gives you a great starting point! Great sides for the Beefy Melt Burrito include chips and salsa, Mexican rice, or a side salad. You can also serve it with corn or grilled veggies for a balanced meal. The Taco Bell Beefy Melt Burrito is a tasty dish with simple steps to recreate. We covered the ingredients, nutrition facts, and helpful tips for making your burrito shine. You can adjust the spice and explore fun variations, like a vegetarian option. In the end, this burrito is versatile and easy to make at home. Enjoy your cooking journey and don't hesitate to get creative with flavors!

Taco Bell Beefy Melt Burrito Tasty Meal Idea

Are you craving a tasty meal that’s easy to make at home? The Taco Bell Beefy Melt Burrito is the

- 8 oz elbow macaroni - 1 lb ground turkey or beef - 1 small onion, chopped - 1 bell pepper, diced (red or green) These main ingredients form the base of your taco pasta casserole. Elbow macaroni offers a great texture. Ground turkey or beef adds a savory flavor. The onion and bell pepper bring sweetness and crunch. Together, they create a hearty mix. - 1 packet taco seasoning - 1 can (15 oz) black beans, drained and rinsed - 1 can (14.5 oz) diced tomatoes with green chilies - 1 cup corn (frozen or canned) - 1 cup salsa Seasonings are key for this dish. Taco seasoning provides the classic taco taste. Black beans add protein and fiber. Diced tomatoes with green chilies give a slight kick. Corn adds sweetness and color while salsa rounds out the flavors. These ingredients make the casserole both tasty and filling. - 2 cups shredded cheddar cheese - 1/2 cup sour cream - Fresh cilantro, chopped (for garnish) Toppings can elevate your casserole. Shredded cheddar cheese melts beautifully on top. Sour cream adds creaminess and balances the heat. Fresh cilantro gives a burst of freshness. These garnishes not only add flavor but also make your dish look appealing. For the full recipe and detailed instructions, check the [Full Recipe]. Start by boiling water in a large pot. Add salt to the water for flavor. Once the water is boiling, add 8 oz of elbow macaroni. Cook it according to the package until it is al dente. This usually takes about 7 to 9 minutes. Once cooked, drain the macaroni in a colander and set it aside. It needs to cool down a bit before adding it to the mix later. In a large skillet, heat it over medium heat. Add 1 lb of ground turkey or beef to the skillet. Cook it until it is browned, breaking it into small pieces as it cooks. This should take about 5 to 7 minutes. Next, chop 1 small onion and 1 bell pepper. Add them to the skillet once the meat is browned. Sauté these for about 5 minutes until the vegetables are soft. This will bring out their sweet flavors. Now it’s time to add more flavor. Stir in 2 cloves of minced garlic and 1 packet of taco seasoning into the meat and vegetable mix. Cook it for another minute until you can smell the garlic. After that, add 1 can of black beans, drained and rinsed, and 1 can of diced tomatoes with green chilies. Don’t forget to include 1 cup of corn and 1 cup of salsa. Mix everything well and let it simmer for 5 minutes. This helps the flavors blend nicely. Now, in a large bowl, combine the cooked macaroni with the meat mixture. Stir in 1 cup of shredded cheddar cheese and 1/2 cup of sour cream. Season it with salt and pepper to taste. Your Taco Pasta Casserole is almost ready to bake! For the full recipe, check the earlier section. To cook your macaroni perfectly, use a large pot and add salt to the water. Cook it until it's just al dente. This keeps the pasta from becoming mushy in the oven. You can also add a bit of olive oil to the water to prevent sticking. For extra flavor, try adding spices like cumin or paprika. These will give your dish a nice kick. You can also toss in some chopped jalapeños for heat. Fresh herbs like cilantro can brighten the flavors too. To get a bubbly cheese topping, use a mix of cheeses. Cheddar works great, but combining it with Monterey Jack makes it even better. Shred your cheese instead of using pre-packaged. Fresh cheese melts more evenly and gives a better texture. Cover your casserole with foil for the first 20 minutes of baking to keep moisture in. Remove the foil for the last 10 minutes to allow the cheese to brown nicely. For a gluten-free version, swap the elbow macaroni with gluten-free pasta. There are many tasty options available today. Just make sure to follow the cooking times on the package closely. If you want a vegetarian option, replace the ground turkey or beef with lentils or a meat substitute. You can also add more veggies like zucchini or spinach for extra nutrition. This makes the dish hearty and still full of flavor. For the full recipe, check out the complete Taco Pasta Casserole guide. {{image_2}} You can easily switch the pasta type in this dish. For example, use penne or rotini instead of elbow macaroni. Each pasta shape adds its unique twist. If you want to change the protein, ground turkey or beef works well. You can replace it with shredded chicken or even a plant-based option like lentils or black beans. This keeps the dish hearty and satisfying. Kick up the heat by adding chili powder or cayenne pepper. You can also include jalapeños for an extra kick. These spices give the casserole more depth and flavor. Adding vegetables can change the taste profile too. Try bell peppers, zucchini, or spinach. This not only boosts flavor but also adds nutrients. Serve your Taco Pasta Casserole with a fresh side salad. A crunchy coleslaw pairs nicely too. If you have leftovers, get creative! You can turn them into tacos by using tortillas. Just scoop the casserole into a tortilla and add your favorite toppings. This makes a fun meal the next day. For the full recipe, check back to ensure you have all the ingredients ready. Enjoy crafting your own version! To keep your Taco Pasta Casserole fresh, store leftovers in an airtight container. This helps prevent moisture loss and keeps flavors intact. Place the casserole in the fridge right after it cools down. It will last about 3 to 5 days. Always check for any signs of spoilage before eating. You can freeze Taco Pasta Casserole for a quick meal later. To do this, let it cool completely. Then, pack it in a freezer-safe container or wrap it tightly in plastic wrap. It can stay in the freezer for up to 3 months. When you’re ready to eat it, thaw in the fridge overnight. Reheat in the oven at 350°F (175°C) until warmed through. Preparing Taco Pasta Casserole ahead of time saves you stress on busy days. You can cook it and store it in the fridge for up to 3 days. Use clear glass or plastic containers for easy viewing. You can also portion it into individual servings for quick lunches. This makes it easy to grab and go. If you need a sour cream swap, try using Greek yogurt. It gives a nice creaminess. You can also use cottage cheese for a different texture. Cream cheese works too, but make sure to soften it first. Each option adds a unique flavor and texture to your dish. Yes, you can prep this casserole ahead of time. Just follow the recipe until you are ready to bake. Cover it well with foil or plastic wrap. Store it in the fridge for up to 24 hours. When ready to bake, remove the cover and add a few extra minutes to the baking time. This way, you have a tasty meal ready for busy days. The heat level can vary. Taco seasoning adds some spice, but you can adjust it. If you want less heat, use a mild taco seasoning. You can also skip the diced tomatoes with green chilies. For more spice, add jalapeños or a dash of hot sauce. This way, you can make the casserole fit your taste. Taco Pasta Casserole is easy to make and fun to enjoy. It combines elbow macaroni, ground meat, and flavorful spices. Toppings like cheddar cheese and sour cream add the perfect finish. You can adjust ingredients to fit your tastes or dietary needs. Don’t hesitate to try different variations, from pasta types to spice levels. Storing leftovers is simple, making this dish perfect for meal prep. Enjoy making your own version and share it with family and friends. It's a tasty dish that brings everyone together!

Taco Pasta Casserole Hearty and Flavorful Meal

Looking for a meal that’s both hearty and packed with flavor? You’ve come to the right place! Taco Pasta Casserole

Older posts
Newer posts
← Previous Page1 … Page41 Page42 Page43 … Page48 Next →

dsad

© 2025 savoryspiral • Built with GeneratePress

Our Policies

  • Copyright Policy
  • Cookie Policy
  • GDPR Policy
  • Privacy Policy
  • Disclaimer
  • Terms Of Use

More Information

  • Home
  • About
  • Contact
  • Appetizers
  • Dessert
  • Dinner
  • Drinks
©2025, savoryspiral About Back To Top