![Creating a tasty Lemon Basil Pasta Salad starts with the right ingredients. Here’s what you need: - Pasta - 8 oz (about 225g) rotini or fusilli pasta - Vegetables - 1 cup cherry tomatoes, halved - 1 cup cucumber, diced - 1/2 cup red bell pepper, diced - 1/4 cup red onion, finely chopped - Dressing Components - 1/4 cup extra virgin olive oil - 3 tablespoons lemon juice - 1 teaspoon lemon zest - Salt and pepper to taste - Garnishes - 1/2 cup fresh basil leaves, chopped - 1/4 cup feta cheese, crumbled These ingredients blend together to create a vibrant and fresh dish. Each bite bursts with flavor. The pasta provides a hearty base. The veggies add color and crunch. The dressing brings a zesty brightness. And the basil and feta finish it off with a touch of creaminess. For the full recipe, check out the details provided earlier. By choosing fresh and high-quality ingredients, you ensure the best taste and presentation. Let’s get cooking! Cooking Pasta To start, you need to cook the pasta. Boil water in a large pot. Add a pinch of salt for flavor. Cook the pasta until it is al dente, about 8 to 10 minutes. Stir it occasionally so it does not stick. Once done, drain the pasta and set it aside. Cooling the Pasta After draining, rinse the pasta under cold water. This stops the cooking process and cools it down quickly. Spread the pasta on a large plate or baking sheet. Let it sit for a few minutes while you prepare the other ingredients. Combining Vegetables In a large mixing bowl, combine the cooled pasta with your vegetables. Add the halved cherry tomatoes, diced cucumber, red bell pepper, and red onion. Make sure to mix gently so the pasta does not break. Preparing the Dressing In a small bowl, whisk together the extra virgin olive oil, lemon juice, and lemon zest. Add salt and pepper to taste. Whisk until the dressing is smooth and well combined. This bright lemon dressing adds a fresh flavor. Tossing Ingredients Pour the dressing over the pasta and vegetables. Toss gently to coat everything. Be careful not to break the feta cheese. Add the chopped basil last, mixing lightly to keep the flavors intact. Chilling the Salad Cover the bowl with plastic wrap or a lid. Refrigerate the salad for at least 30 minutes. This allows the flavors to blend together. Before serving, give the salad a gentle toss and adjust seasoning if needed. Enjoy your zesty lemon basil pasta salad! For the full recipe, check out the instructions above. Cooking Time for Pasta Start by cooking your pasta. Use rotini or fusilli for this dish. Boil the pasta until it is al dente. This means it should be firm but not hard. Usually, 8 to 10 minutes is enough. After cooking, drain the pasta and rinse it with cold water. This stops the cooking and cools it down. Balancing Flavors Balancing flavors is key to a great pasta salad. Use fresh ingredients like tomatoes and cucumbers for a crisp taste. The lemon juice adds a tangy kick. Make sure to taste as you mix. Adjust salt and pepper to your liking. If you want more zest, add extra lemon juice or zest. Serving Options Serve your pasta salad in a large, attractive bowl. This makes it easy for guests to help themselves. You can also serve it in individual bowls for a nice touch. Garnishing Ideas Garnish with fresh basil leaves on top. This adds color and freshness. A sprinkle of extra feta cheese gives it a nice finish. For a fun twist, add lemon slices around the bowl. This makes it look appealing and bright. For the full recipe, check out the details above! {{image_2}} Using Different Pasta Shapes You can switch up the pasta shape to make this dish fun. Try penne, farfalle, or even whole wheat pasta. Each shape adds a unique texture. Rotini and fusilli hold the dressing well, but any pasta works. Just remember to cook it al dente for the best bite. Alternative Vegetables Feel free to mix in other veggies you love. Bell peppers add crunch, but you can also use zucchini or broccoli. If you want a little heat, add chopped jalapeños. Fresh corn or peas can bring a sweet note. The key is to balance colors and textures for a vibrant salad. Adding Protein Want to make this salad a full meal? Add protein! Grilled chicken or shrimp pairs well with the lemon flavor. You can also use chickpeas for a vegetarian option. Tofu is another great choice if you want something plant-based. Just ensure the protein complements the fresh ingredients. Alternative Dressings While the lemon dressing is bright, you can try other flavors. A balsamic vinaigrette adds a sweet tang. A creamy dressing, like ranch or yogurt-based, gives a different feel. Experiment with herbs in the dressing too. Cilantro or parsley can enhance the flavors even more. For the complete guide on making this delicious dish, refer to the [Full Recipe]. To keep your lemon basil pasta salad fresh, store it in the fridge. Use an airtight container to seal in flavor. It will stay good for three to five days. You might notice the pasta absorbs some dressing over time. If it looks dry, just add a splash of olive oil or lemon juice before serving. This step helps bring back its fresh taste. If you want to save the salad for longer, freezing is an option. However, I recommend freezing just the pasta and veggies, not the dressing. The dressing can separate and change texture when thawed. To freeze, place the cooled pasta and veggies in a freezer bag. Squeeze out the air and seal it tight. You can freeze it for up to three months. When you're ready to eat, thaw in the fridge overnight. Then, mix in a fresh batch of dressing before serving. This keeps your salad bright and tasty. For the full recipe, check the details above. How long can lemon basil pasta salad be stored? You can store lemon basil pasta salad in the fridge for up to three days. Make sure to keep it in an airtight container. The flavors will blend more as it sits, making it even tastier. Can I use dried basil instead of fresh? Yes, you can use dried basil. However, fresh basil gives the best flavor. If you use dried, cut the amount in half. Dried herbs are stronger, so you need less. What are some protein options to add? You can add grilled chicken, shrimp, or chickpeas for protein. These options mix well with the salad. Just make sure they are cooked and cooled before adding. Is this pasta salad suitable for meal prep? Yes, this pasta salad is great for meal prep. You can make it ahead of time and store it. It keeps well in the fridge and is perfect for lunch or dinner. How can I make it gluten-free? To make it gluten-free, use gluten-free pasta. There are many good options available. You can also check labels on other ingredients to ensure they are gluten-free. For the full recipe, check out the details above. Enjoy your fresh and flavorful lemon basil pasta salad! In this article, we explored how to make a delicious pasta salad. We covered the key ingredients, from pasta and vegetables to dressings and garnishes. The step-by-step instructions guide you through cooking, mixing, and chilling your salad. Tips helped you perfect flavors and presentation. You also learned about variations and storage options. Pasta salad is easy to make and adapt. Enjoy experimenting with flavors and discussing your results!](https://savoryspiral.com/wp-content/uploads/2025/06/d5208444-608a-4ff0-9ffd-df351f62730a.webp)
Lemon Basil Pasta Salad Fresh and Flavorful Dish
Are you ready for a burst of flavor? Lemon Basil Pasta Salad combines fresh ingredients to create a dish that’s
Are you ready for a burst of flavor? Lemon Basil Pasta Salad combines fresh ingredients to create a dish that’s
![- 2 boneless, skinless chicken breasts - 2 tablespoons Cajun seasoning - 8 ounces fettuccine pasta - 1 tablespoon olive oil - 1 red bell pepper, sliced - 1 green bell pepper, sliced - 1 small onion, chopped - 3 cloves garlic, minced - 1 cup heavy cream - 1 cup cherry tomatoes, halved - ½ cup grated Parmesan cheese When you make Cajun chicken pasta, fresh ingredients make a big difference. For the chicken, I like to use boneless, skinless breasts. They cook well and stay juicy. Cajun seasoning adds that warm, spicy kick. I suggest using a mix that you love. Fettuccine pasta is the best choice for this dish. It holds the creamy sauce nicely. Don't forget to cook it until it's al dente. This means it should be firm when you bite into it. In addition to the main items, you will need some colorful veggies. Red and green bell peppers add crunch and sweetness. The onion and garlic bring a great base flavor to the dish. For the sauce, heavy cream is key. It makes the pasta rich and creamy. Add in halved cherry tomatoes for a pop of flavor. Grated Parmesan cheese gives it a nice salty touch. You can find the full recipe above to guide you through the steps. - Marinating the Chicken: Start with your chicken strips. Place them in a bowl and sprinkle the Cajun seasoning over them. Mix well to coat every piece. Let the chicken marinate for about 15 minutes. This step helps the flavors soak in. - Cooking the Pasta: While the chicken marinates, bring a large pot of salted water to a boil. Add the fettuccine and cook it according to the package instructions. Aim for al dente, which means it should be firm but not hard. Once done, drain the pasta and set it aside. Keep a little pasta water for later use. - Sautéing the Vegetables: Grab a large skillet and heat the olive oil over medium heat. When the oil is hot, add the chopped onion. Sauté for 2-3 minutes until it turns translucent. Then, add the minced garlic. Cook for another minute until you smell its lovely aroma. - Cooking the Chicken: Push the sautéed onion and garlic to one side of the skillet. Add the marinated chicken strips to the other side. Cook for about 5-7 minutes until the chicken is browned and cooked through. No one likes undercooked chicken! - Creating the Sauce: Pour the heavy cream into the skillet. Stir well to mix it with the chicken and veggies. Allow it to simmer gently. Next, add the halved cherry tomatoes and grated Parmesan cheese. Stir until the cheese melts and the sauce becomes creamy. - Tossing Everything Together: Now it’s time to combine! Add the cooked fettuccine to the skillet. Toss everything together until well mixed. If the sauce seems too thick, add a splash of the reserved pasta water. Season with salt and pepper to taste. This step brings all the flavors together nicely. For the complete recipe, check out the Full Recipe. - Choosing the right Cajun seasoning For true Cajun taste, pick a seasoning blend with bold spices. Look for paprika, cayenne, garlic powder, and onion powder. You can also make your own blend to suit your taste. - Marinating tips Marinating the chicken is key. Coat the strips with Cajun seasoning and let them rest for at least 15 minutes. This helps the flavors soak in, making your dish even tastier. - Cooking chicken to the right temperature Cook the chicken until it reaches 165°F. Use a meat thermometer for accuracy. This keeps it juicy and safe to eat. - Perfect pasta texture Cook the fettuccine until it is al dente. This means it should be firm to the bite. Do not overcook it, or it will become mushy. Reserve a bit of pasta water to adjust the sauce later. - Garnishing with parsley Fresh parsley adds color and freshness. Chop some and sprinkle it on top before serving. This makes your dish look bright and inviting. - Serving options You can serve Cajun chicken pasta in a deep bowl or on a plate. Pair it with crusty bread or a side salad for a complete meal. {{image_2}} You can easily make Cajun chicken pasta healthier. Swap regular pasta for whole grain or gluten-free options. Whole grain pasta adds more fiber, while gluten-free caters to dietary needs. Consider using low-fat heavy cream or a mix of Greek yogurt and milk. These swaps cut calories but keep the dish creamy and tasty. Want to change things up? You can substitute chicken for shrimp. Shrimp cooks quickly and adds a new flavor. You can also add different vegetables. Try zucchini, spinach, or mushrooms for extra nutrition. These swaps keep the dish fresh and exciting. Adjust the spice level to your taste. Use mild Cajun seasoning for a gentle kick. If you love heat, go for spicy seasoning. You can also enhance flavor with fresh herbs like basil or thyme. They add a nice touch without overpowering the dish. Store your Cajun chicken pasta in an airtight container. This keeps it fresh and prevents odors. Let the pasta cool before sealing it. You can keep it in the fridge for up to three days. To freeze, portion the pasta into smaller containers. This makes it easy to reheat later. Make sure to leave some space in the container for expansion. When ready to eat, thaw it in the fridge overnight. Reheat in a skillet over low heat, adding a splash of cream or water for moisture. In the fridge, your Cajun chicken pasta lasts about three days. In the freezer, it can stay good for up to two months. Always check for any signs of spoilage before eating. Enjoy your flavorful creamy delight! For the full recipe, check out [Full Recipe]. Cajun Chicken Pasta is a rich, creamy dish with bold flavors. It features tender chicken, spicy Cajun seasoning, and colorful veggies. The star of the dish is fettuccine pasta, which soaks up the delicious sauce. You’ll often find bell peppers, onions, and fresh tomatoes added for extra taste and color. The heavy cream brings it all together, making every bite feel like a treat. Yes, you can make Cajun Chicken Pasta ahead of time! Start by cooking the chicken and pasta separately. Mix them together with the sauce right before serving. Store leftovers in an airtight container in the fridge for up to three days. To reheat, use a skillet over low heat. Add a splash of water or cream to keep it moist. Stir often until it's hot. If you love heat, add more Cajun seasoning! You can also throw in some crushed red pepper flakes or diced jalapeños. For a smoky flavor, try adding a dash of hot sauce. Taste your sauce before serving to find the perfect spice level for you. Cajun Chicken Pasta pairs well with garlic bread or a fresh salad. A crisp green salad with a lemon vinaigrette cuts through the creaminess. For drinks, try a chilled white wine or sweet tea. These options balance the spices and enhance your meal. You can find the full recipe [Full Recipe] to create this flavorful dish! In this blog post, we explored the essential ingredients for Cajun Chicken Pasta, including chicken, pasta, and fresh vegetables. We outlined the step-by-step instructions to prepare and cook this dish, along with tips for flavor and presentation. I shared variations to suit different tastes and dietary needs, plus storage info to keep leftovers fresh. Making Cajun Chicken Pasta is easy and fun. With these tips, you can whip up a delicious meal that everyone will love. Enjoy exploring your culinary skills!](https://savoryspiral.com/wp-content/uploads/2025/05/ee49f14a-821a-4b90-8b39-131b18ead7c1.webp)
Get ready to spice up your dinner with my Cajun Chicken Pasta! This creamy delight mixes bold Cajun flavors with

Garlic Parmesan Roasted Cauliflower is a tasty and healthy dish everyone will love. You can whip it up easily with
![- 1 cup green or brown lentils - 1 tablespoon olive oil - 1 medium onion, diced - 2 cloves garlic, minced - 2 carrots, diced - 2 celery stalks, diced - 1 bell pepper (red or yellow), diced - 2 cups kale, chopped (optional) - 1 can (14 oz) diced tomatoes - 4 cups vegetable broth - Spices: ground cumin, smoked paprika, dried thyme - Salt and pepper, to taste - 2 tablespoons lemon juice Gathering these ingredients is key to making a great vegan lentil soup. Lentils bring protein and fiber, making the soup filling. The olive oil adds healthy fat, while the onion and garlic bring depth and aroma. When you add the vegetables like carrots, celery, and bell pepper, you enhance the soup's taste and texture. Kale is optional, but it boosts nutrients and adds color. The spices—cumin, smoked paprika, and thyme—bring warmth and earthiness. The diced tomatoes add sweetness and acidity, while vegetable broth creates a rich base. Finally, a splash of lemon juice right before serving brightens the flavors. This combination makes the soup comforting and delicious. For the full recipe, check the details above. Enjoy cooking! - Heat 1 tablespoon of olive oil in a large pot over medium heat. - Add 1 medium diced onion and sauté until it turns soft, about 5 minutes. - Stir in 2 cloves of minced garlic and cook for another minute until you smell its rich aroma. - Next, add 2 diced carrots, 2 diced celery stalks, and 1 diced bell pepper. - Cook these vegetables for about 5 minutes until they start to soften. This step builds a tasty base for your soup. - Now, stir in 1 cup of rinsed green or brown lentils, 1 can of diced tomatoes with their juices, and 4 cups of vegetable broth. - Add in 1 teaspoon of ground cumin, 1 teaspoon of smoked paprika, and ½ teaspoon of dried thyme. - Bring the mixture to a boil, then reduce the heat to low. Let it simmer for about 30-35 minutes or until the lentils are tender. - If you want to add some greens, stir in 2 cups of chopped kale during the last 5 minutes of cooking. - Season your soup with salt and pepper to taste. Just before serving, add 2 tablespoons of lemon juice for a bright touch. This method creates a hearty and warm vegan lentil soup that you can enjoy with crusty bread or on its own. For more details, check out the Full Recipe. To sauté vegetables, heat olive oil in a pot. Add diced onion first. Cook until soft but not brown. This takes about five minutes. Next, add minced garlic and cook for one minute. This step adds a nice aroma. Now, toss in your carrots, celery, and bell pepper. Cook these for about five more minutes. This softens them and makes the soup tasty. To ensure lentils are tender, rinse them well before cooking. This removes any dust. Add them to the pot with broth and tomatoes. Bring the soup to a boil, then reduce heat. Let it simmer until the lentils are soft, about 30 to 35 minutes. You can swap green or brown lentils for red lentils. Red lentils cook faster and turn mushy, which makes a creamy soup. If you don’t have certain veggies, use what you have. Zucchini, potatoes, or spinach work well too. For spices, feel free to change things up. Try curry powder for a different taste. You can also use fresh herbs like thyme or basil for added flavor. To make your soup even better, consider garnishing it. Fresh herbs, like parsley or cilantro, add color and zest. You can also sprinkle chili flakes for some heat. If you like peppers, add diced jalapeños or serrano peppers. This gives a nice kick to your dish. Just remember to check the spice level as you go! {{image_2}} To make your lentil soup spicier, add some chili powder or crushed red pepper. You can also use fresh jalapeños for a kick. Adjust the heat by adding these ingredients slowly. Taste as you go to find the right balance for your palate. If you want more heat, add them early in the cooking process. For less heat, stir them in just before serving. For a creamy texture, coconut milk works great. You can stir in about a cup of coconut milk toward the end of cooking. This will add a rich flavor and smoothness. To achieve an even creamier soup, blend part of the soup in a blender and mix it back in. This method gives a nice velvety feel to your dish. Adding seasonal vegetables can enhance your soup’s flavor. Try zucchini, spinach, or sweet potatoes. Chop them into small pieces for even cooking. Add these extra veggies about 10 minutes into the cooking time. This way, they stay tender but not mushy. You can also adjust the cooking time based on your veggie choice to ensure everything is well-cooked. For the full recipe, check out the [Full Recipe]. To keep your vegan lentil soup fresh, cool it first. Once cooled, pour it into airtight containers. Label each container with the date. This soup stays good for about 4 to 5 days in the fridge. If you want to save some for later, freezing is great. Divide the soup into single portions before freezing. Use freezer-safe bags or containers to prevent freezer burn. This soup lasts up to 3 months in the freezer. When you're ready to eat, take a portion out. Thaw it overnight in the fridge or use the microwave for a quick thaw. Reheat your soup on the stove for best results. Use low heat and stir often to keep the flavors alive. If the soup seems thick, add a splash of vegetable broth or water. This will help you get the right consistency. Enjoy your warm bowl of comfort! To make your lentil soup thicker, you can use a few tricks. - Blend a portion of the soup. - Add more lentils while cooking. - Stir in mashed potatoes or pureed beans. These methods help create a creamy texture without adding cream. Blending part of the soup makes it smooth and thick. You can mash some cooked lentils too, which adds body. Yes, you can use canned lentils for this soup. Canned lentils save time. They are already cooked, so you skip the soaking and long cooking time. However, fresh lentils have better flavor and texture. Canned lentils may also have added salt. Be sure to drain and rinse them before adding to your soup. This helps reduce extra sodium. Lentils are very healthy. They are full of protein and fiber. A cup of cooked lentils has about: - 18 grams of protein - 16 grams of fiber - Important vitamins and minerals like iron and folate Eating lentils can support heart health and help with digestion. They also keep you full longer, making them great for weight management. You can easily make this vegan lentil soup in a slow cooker. 1. Start by sautéing the onion and garlic in a pan. 2. Transfer them to the slow cooker. 3. Add all the other ingredients, including lentils, tomatoes, and broth. 4. Cover and cook on low for 6-8 hours or on high for 3-4 hours. This method allows the flavors to blend well. You can still add kale in the last 30 minutes of cooking. Enjoy your delicious soup! For the full recipe, check out the details above. This blog post covered how to make a hearty vegan lentil soup. We explored key ingredients, cooking steps, and tips for flavor and storage. You can customize this soup to fit your taste. Whether you want it spicy or creamy, there's a version for everyone. Remember, storing leftovers properly can save time and keep flavors fresh. Enjoy making this easy dish, and don’t hesitate to experiment with spices and veggies. Your next meal could be a delightful bowl of warmth and nutrition.](https://savoryspiral.com/wp-content/uploads/2025/05/071e0085-2ae8-47bf-8154-48e593100832.webp)
If you’re looking for a warm, satisfying dish, look no further! This Vegan Lentil Soup is packed with flavor and

Welcome to the world of Blueberry Lemon Pancakes! If you love a fresh, zesty twist on breakfast, this recipe is
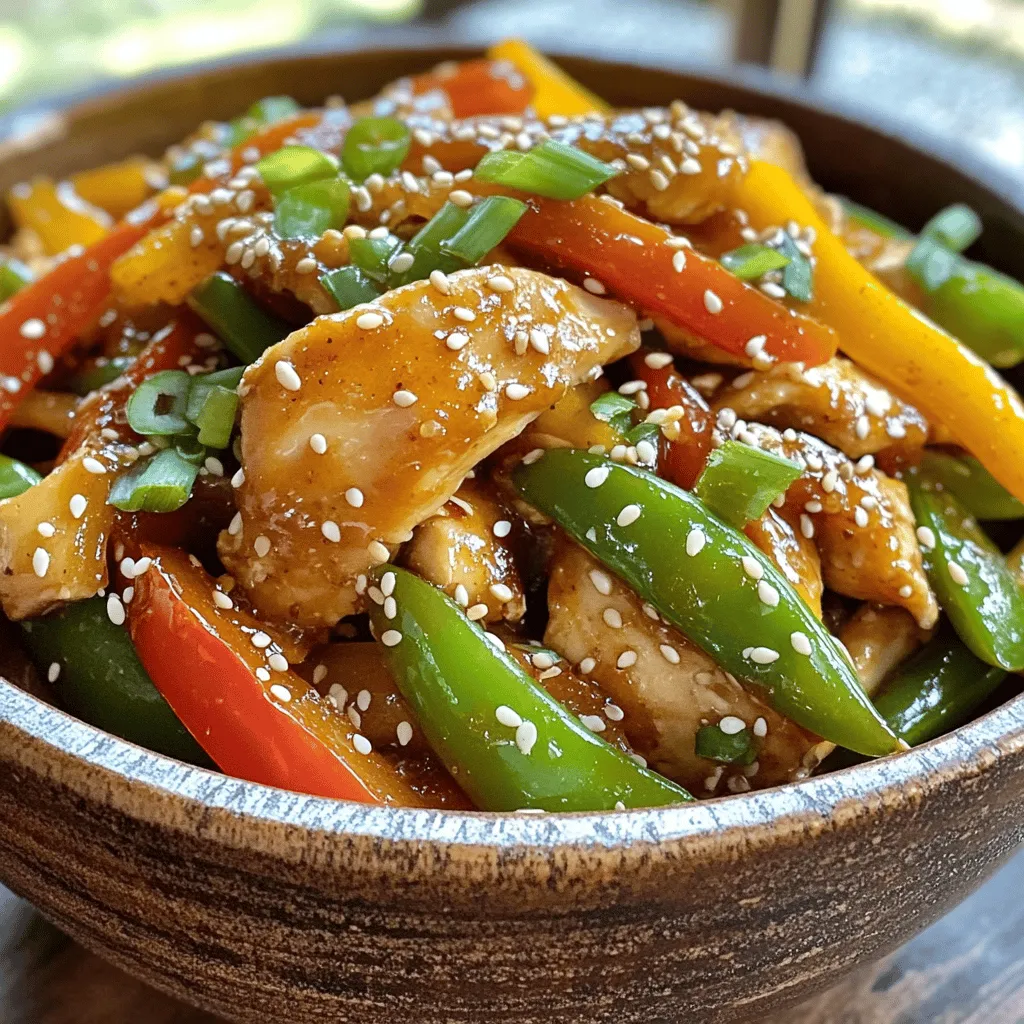
Craving a meal that packs a punch? The Sweet and Spicy Chicken Stir Fry hits the mark! This dish blends
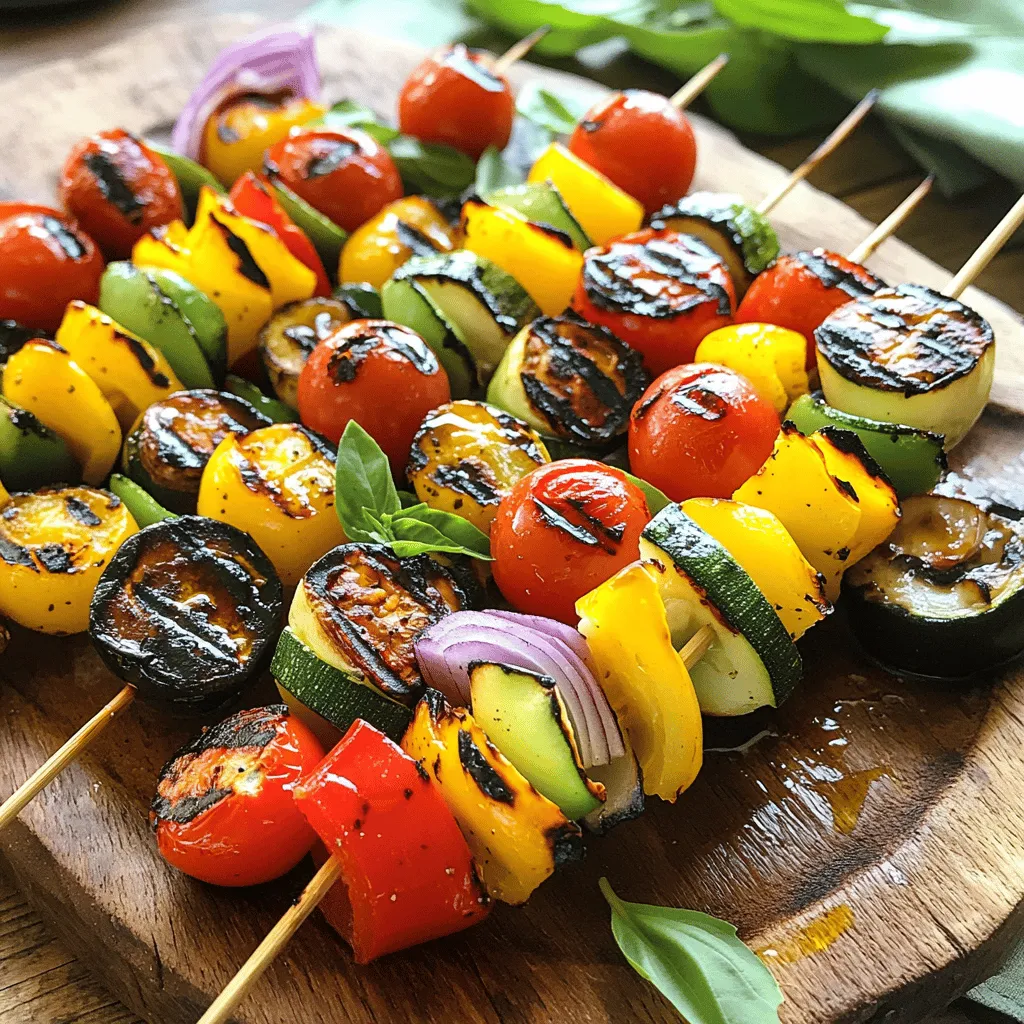
Looking for a simple way to enjoy fresh veggies? Grilled vegetable skewers are the answer! This easy recipe packs flavor
![To make Coconut Rice with Mango, you need these simple ingredients: - 1 cup jasmine rice - 1 cup coconut milk - 1 cup water - 1/4 teaspoon salt - 1 ripe mango, peeled and diced - 2 tablespoons shredded coconut (preferably unsweetened) - 1 tablespoon maple syrup or honey (optional) - 1 tablespoon lime juice - Fresh mint leaves for garnish When making this dish, fresh ingredients shine. Look for ripe mangoes at the store. They are sweet and juicy. Use coconut milk from a can for rich flavor. Jasmine rice is easy to find. Keep pantry staples like salt and syrup at home. These ingredients make the dish taste great. Choosing the right mango is key for flavor. Here’s how to tell if a mango is ripe: - Color: Look for a mango that has a yellow or red hue. - Feel: Gently squeeze the mango. It should feel slightly soft but not mushy. - Smell: A ripe mango has a sweet, fruity smell at the stem end. Always pick mangoes that feel heavy for their size. This means they are juicy. If you find hard mangoes, let them ripen at room temperature. Enjoy the sweet taste of ripe mango in your dish. For the full method, check the Full Recipe. Start by rinsing the jasmine rice. Place it in a fine mesh strainer. Run cold water over it until the water runs clear. This step is key. It removes excess starch. Removing starch keeps the rice light and fluffy. In a medium saucepan, combine the rinsed rice, coconut milk, water, and salt. Stir to mix everything well. Place the saucepan over medium heat. Watch for the mixture to start boiling gently. Once it boils, reduce the heat to low. Cover the saucepan with a lid. Let it simmer for 15 minutes. This allows the rice to absorb the liquid fully. After 15 minutes, remove it from heat. Let it sit covered for another 5 minutes. Fluff the rice with a fork. Stir in the shredded coconut. While the rice cooks, it’s time for the mango. Peel the ripe mango and dice it into small cubes. In a bowl, combine the mango with lime juice. If you like, add maple syrup or honey for sweetness. Toss gently to coat the mango. To serve, spoon the coconut rice onto plates. Top each serving with the lime-infused mango pieces. Finish with fresh mint leaves for garnish. This adds a bright touch and a pop of color. Enjoy this delightful Coconut Rice with Mango! For the full recipe, click here. To make perfect coconut rice, start with the right rice. I recommend jasmine rice. It has a lovely aroma and a slightly sticky texture. Rinse the rice well. This removes extra starch and prevents clumps. Use a medium saucepan for even cooking. Combine the rinsed rice, coconut milk, water, and salt in the saucepan. Bring it to a gentle boil over medium heat. Once boiling, reduce the heat to low. Cover the pan and let it simmer for 15 minutes. Wait patiently as the rice absorbs the liquid. After 15 minutes, remove it from heat but keep it covered for another 5 minutes. This step makes the rice fluffy and light. You can boost the flavor of coconut rice in simple ways. Try adding lime juice for a zesty kick. Fresh herbs like cilantro or mint can add freshness. You can also mix in spices like cinnamon or cardamom for warmth. If you like sweetness, add a little maple syrup or honey. Unsweetened shredded coconut gives a nice texture. This mix of flavors makes the dish more exciting and delicious. Many people make mistakes when cooking coconut rice. One common mistake is not rinsing the rice. Skipping this step can lead to gummy rice. Another mistake is using too much liquid. Stick to the 1:1 ratio of rice to liquid. If you cook the rice too long, it becomes mushy. Always check the rice near the end of cooking time. Lastly, don't forget to let it sit after cooking. This resting time helps the rice become fluffy. Follow these tips to enjoy a great coconut rice experience. For the full recipe, check out the [Full Recipe]. {{image_2}} You can swap mango for many other fruits. Pineapple adds a sweet and tangy flavor. Try using diced kiwi for a unique twist. Fresh berries like strawberries or blueberries give a pop of color and taste. Each fruit changes the dish, making it fun to try new things. To keep this recipe vegan, use maple syrup instead of honey. Coconut milk is already dairy-free, which is great. You can use any plant-based sweetener if you want extra sweetness. If you do not have jasmine rice, use basmati rice for a nice flavor. Coconut rice with mango is perfect for many events. Serve it as a side dish at summer barbecues. It works well for birthday parties or tropical-themed events. You can also enjoy it as a light dessert after dinner. This dish fits in anywhere, making it a go-to choice. You can keep leftover coconut rice in an airtight container. Let it cool first. Store it in the fridge for up to three days. If you want to keep it longer, freezing is a great option. When you reheat coconut rice, add a splash of water. This keeps it moist. Use the microwave or a pot on the stove. If using the stove, heat on low and stir often. This helps the rice warm up evenly. You can freeze coconut rice and mango together. Just place the rice in a freezer-safe bag. Add the mango pieces on top. Make sure to remove as much air as possible. This way, the flavors stay fresh. You can freeze it for up to three months. When ready to eat, thaw in the fridge overnight. Then, reheat as needed. Enjoy your delicious dish again! Yes, you can use brown rice. Brown rice has more fiber and nutrients. However, it takes longer to cook. You will need to adjust the water and cooking time. Generally, use two cups of water and cook for about 40-45 minutes. This change will give your coconut rice a nuttier flavor and a chewier texture. Yes, you can make coconut rice with mango in advance. Cook the rice and store it in the fridge for up to three days. For the best taste, wait to add the mango until you're ready to serve. This keeps the mango fresh and bright. Just reheat the rice gently before serving. Coconut rice with mango pairs well with many dishes. Think grilled chicken or shrimp for a nice contrast. You can also serve it with spicy curries, which balance the sweet coconut flavor. For a vegetarian option, try it with roasted vegetables or tofu. The creamy rice complements these dishes beautifully. For the full recipe, please [Full Recipe]. Coconut rice paired with ripe mango is delicious and easy to make. We covered how to choose the best ingredients, prepare the rice, and serve it nicely. I shared tips to enhance flavors and avoid common mistakes. You can also explore fun variations for different meals and occasions. In the end, this dish is versatile and can impress anyone. Enjoy making coconut rice with mango, and share your results!](https://savoryspiral.com/wp-content/uploads/2025/05/48989e7e-794b-4d92-bbb5-9c568bcb4256.webp)
If you’re craving a tropical treat that’s easy to make, you’re in luck! This Coconut Rice with Mango recipe combines
Are you ready to take your pasta experience to the next level? Today, I’ll show you how to make delicious
![- 2 boneless, skinless chicken breasts - 2 tablespoons olive oil - 1 teaspoon garlic powder - Salt and pepper to taste - 4 cups mixed salad greens (spinach, arugula, and romaine) - 1 cup cherry tomatoes, halved - 1/2 cucumber, sliced - 1/4 red onion, thinly sliced - 1/4 cup walnuts, toasted - 1/4 cup feta cheese, crumbled - 3 tablespoons honey - 2 tablespoons Dijon mustard - 1 tablespoon apple cider vinegar - 2 tablespoons olive oil - Salt and pepper to taste When preparing this honey mustard chicken salad, each ingredient plays a key role. The chicken brings protein and flavor. Use boneless, skinless chicken breasts for easy cooking. Olive oil adds moisture and helps with grilling. Garlic powder gives a subtle kick. Don't forget salt and pepper to enhance all the flavors. For the salad, I love mixed greens. Spinach, arugula, and romaine create a fresh base. Cherry tomatoes burst with sweetness. Cucumber adds crunch, while red onion offers a sharp bite. Toasted walnuts add texture, and feta cheese gives a salty touch. The honey mustard dressing ties everything together. Honey offers a sweet note, while Dijon mustard adds tang. Apple cider vinegar provides acidity, balancing the flavors. Olive oil helps blend the dressing, and salt and pepper are essential for taste. Check out the Full Recipe for a complete guide to this delightful dish! 1. Preheat your grill or grill pan over medium heat. This step is key. A hot grill gives the chicken great marks and flavor. 2. In a small bowl, mix 2 tablespoons of olive oil, 1 teaspoon of garlic powder, salt, and pepper. Brush this mixture over the chicken breasts. This marinade adds depth to the chicken. 1. Grill the chicken for about 6-7 minutes on each side. Make sure it is fully cooked and the juices run clear. This timing helps keep it juicy. 2. After grilling, let the chicken rest for 5 minutes. Resting helps the juices stay inside when you slice it. 1. In a large bowl, mix 4 cups of mixed salad greens, 1 cup of halved cherry tomatoes, 1/2 sliced cucumber, 1/4 thinly sliced red onion, 1/4 cup of toasted walnuts, and 1/4 cup of crumbled feta cheese. This mix brings color and crunch. 2. In another bowl, whisk together 3 tablespoons of honey, 2 tablespoons of Dijon mustard, 1 tablespoon of apple cider vinegar, 2 tablespoons of olive oil, salt, and pepper. This dressing ties everything together. 3. Slice the grilled chicken and add it to the salad bowl. 4. Drizzle the honey mustard dressing over the salad and toss gently. Make sure all the ingredients get coated. You can find the full recipe at the end of this article. Enjoy this fresh and tasty delight! To grill chicken breasts perfectly, follow these steps: - Marinate: Use a mix of olive oil, garlic powder, salt, and pepper to coat the chicken. This adds flavor and keeps the meat juicy. - Preheat: Always preheat your grill. A hot grill sears the outside and locks in moisture. - Timing: Grill each side for about 6-7 minutes. This usually cooks the chicken fully. To check for doneness, cut into the thickest part. The juices should run clear. If they are pink, cook longer. Let the chicken rest for 5 minutes before slicing. This helps retain the juices. To make your honey mustard dressing just right, adjust the sweetness and tang to your taste: - Sweetness: If you prefer it sweeter, add more honey. For less sweetness, cut back on honey. - Tang: For a tangy kick, increase the Dijon mustard or add a splash of apple cider vinegar. You can also use alternative dressings to switch things up. Try a balsamic vinaigrette or a yogurt-based dressing for a creamy twist. Garnishing your salad makes it look stunning: - Add Color: Use extra cherry tomatoes or sprinkle more feta cheese on top. - Textures: Toss in additional toasted walnuts for crunch. For serving suggestions: - Casual Lunch: Serve in large bowls for a relaxed meal. - Special Occasion: Present it on a beautiful platter to impress guests. Follow these tips to elevate your Honey Mustard Chicken Salad to a fresh and tasty delight. For the full recipe, check out the complete instructions. {{image_2}} You can easily switch the protein in your honey mustard chicken salad. Instead of grilled chicken, try grilled shrimp. Shrimp cooks quickly and adds a nice, sweet flavor. Just grill the shrimp for about 2-3 minutes per side until they turn pink. If you prefer a plant-based option, use tofu. Press the tofu to remove excess water, then cube it. Marinate with your favorite spices, then grill or sauté until golden. Make this salad your own by adding seasonal vegetables. In spring, toss in sweet peas or asparagus. In summer, try bell peppers or zucchini. You can also change the nuts and cheese. Instead of walnuts, use sliced almonds or pecans. For cheese, swap feta for goat cheese or even blue cheese for a punch of flavor. Every change brings a new taste, making each salad unique and fun. Don’t be afraid to play with the dressing! Use local honey for a fresh twist. Flavored mustards, like spicy or sweet varieties, can change the taste profile. You can also explore other dressings. A balsamic vinaigrette or ranch can create a different vibe. Enjoy experimenting to find your favorite blend. For the full recipe and more ideas, check out the [Full Recipe]. To keep your honey mustard chicken salad fresh, store any leftovers in an airtight container. This helps to prevent moisture loss and keeps flavors intact. You should eat the salad within three days for the best taste and safety. If you added dressing, use the salad within two days. You can freeze grilled chicken if you have extra. Wrap each piece tightly in plastic wrap. Place the wrapped chicken in a freezer-safe bag. This way, it stays fresh for up to three months. When you’re ready to eat, thaw the chicken in the fridge overnight. Reheat it in a pan over medium heat until hot. Meal prepping can save you time during the week. Chop your salad ingredients in advance and store them separately. Keep greens, veggies, nuts, and cheese in different containers. Assemble your salads each day to keep them fresh. This way, you can enjoy a tasty salad without much effort. For the full recipe, check out the complete guide. Yes, you can make this salad ahead of time. To prep, grill the chicken and chop the veggies. Store the chicken and veggies in separate containers in the fridge. This way, the salad stays fresh. You can mix the dressing in advance too. Just keep it in a jar. When you are ready to eat, toss everything together. This keeps the greens crisp and tasty. If you want to swap out honey, use maple syrup or agave nectar. Both add sweetness. Maple syrup has a bit more flavor, while agave is milder. You can also use brown sugar mixed with water for a syrup. Just remember, these alternatives may change the taste slightly. Keep this in mind when you mix them into your dressing. Yes, this salad is great for meal prep! Store all ingredients separately for best freshness. Keep the greens in a dry container. This helps them stay crisp. The chicken should go in a sealed container. It can last about three to four days in the fridge. You can assemble the salad each day for lunch or dinner. Just don’t forget to add the dressing right before you eat! This blog post covered a tasty honey mustard chicken salad. You learned about key ingredients, like juicy chicken and fresh greens. I shared steps to grill chicken and mix the salad with a sweet dressing. Tips helped ensure the chicken is perfect every time. You also found ways to customize the meal and store leftovers right. Enjoy making this easy salad. It offers great flavor and healthy options. Try different ingredients to find your favorite mix. Happy cooking!](https://savoryspiral.com/wp-content/uploads/2025/05/4fbd47ed-cafc-4850-a252-42136aacfcce.webp)
Looking for a fresh and tasty delight? My Honey Mustard Chicken Salad is your answer! With vibrant greens, juicy chicken,
