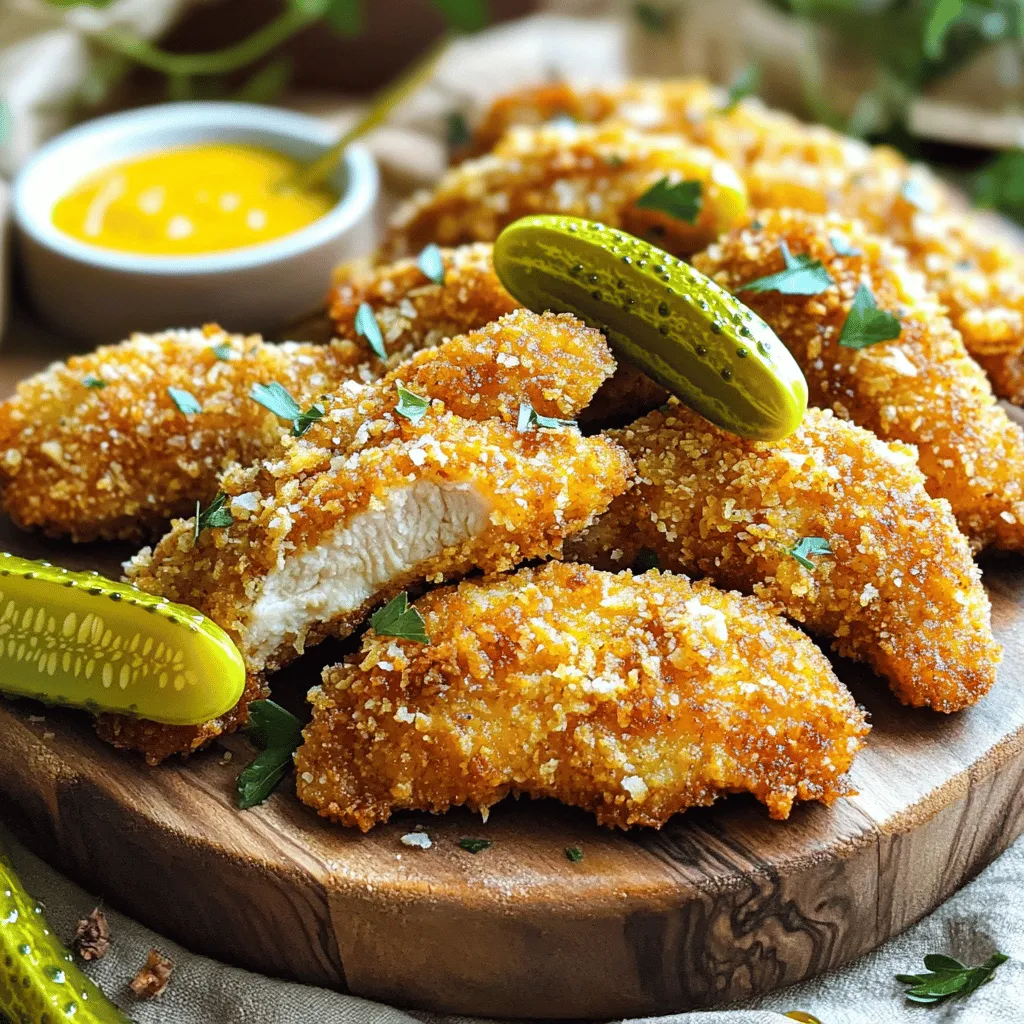
Pickle Brined Chicken Tenders Juicy and Flavorful Meal
Are you ready to take your chicken tenders to a whole new level? Pickle brined chicken tenders are not just
Are you ready to take your chicken tenders to a whole new level? Pickle brined chicken tenders are not just
![- 1 cup rolled oats - 1/2 cup unsalted pistachios, roughly chopped - 1/2 cup dried cherries, chopped These main ingredients form the base of your Cherry Pistachio Granola Bars. Rolled oats provide fiber and energy. Chopped pistachios add crunch and protein. Dried cherries bring sweetness and antioxidants. - 1/4 cup honey or maple syrup - 1/4 cup almond butter (or peanut butter) Sweeteners and binders are vital for texture. Honey or maple syrup adds natural sweetness. Almond butter or peanut butter helps hold everything together. Both also add healthy fats. - 1/4 teaspoon sea salt - 1/2 teaspoon vanilla extract - 1/4 teaspoon cinnamon (optional) - 1/4 cup mini dark chocolate chips (optional) Flavor enhancers elevate the taste. Sea salt balances sweetness. Vanilla extract gives a warm note. Cinnamon adds a cozy spice. Optional dark chocolate chips offer a fun twist. You can mix and match these ingredients based on your taste. For the full recipe, check out the detailed instructions. 1. First, preheat your oven to 350°F (175°C). 2. Line an 8x8 inch baking pan with parchment paper. Leave some paper hanging over the edges. This helps lift the bars out later. 3. In a large bowl, mix 1 cup rolled oats, 1/2 cup chopped pistachios, and 1/2 cup chopped dried cherries. 4. Add 1/4 teaspoon sea salt and, if you like, 1/4 teaspoon cinnamon. Stir well to combine. 1. Next, pour 1/4 cup almond butter and 1/4 cup honey into a small saucepan. 2. Warm over low heat for about 2-3 minutes. Stir until smooth. 3. Add 1/2 teaspoon vanilla extract to the warm mixture. Mix well. 4. Pour this warm mixture over the dry ingredients in the bowl. Stir until everything is coated. 5. If you want, fold in 1/4 cup mini dark chocolate chips for a sweet touch. 1. Now, transfer the mixture into the lined baking pan. Press it down firmly. Use a spatula or your fingers to make it even. 2. Bake for 15-20 minutes until the edges turn lightly golden. 3. Remove from the oven and let it cool in the pan for about 10 minutes. 4. After cooling, use the parchment paper to lift out the bars. Place them on a wire rack to cool completely. 5. Once cool, slice into bars and store them in an airtight container for up to one week. These Cherry Pistachio Granola Bars are a great blend of chewy and crunchy. This quick and easy recipe makes for a perfect snack or breakfast option. For the complete recipe, refer to the [Full Recipe]. You can switch up the nut butter. Try sunflower seed butter or cashew butter. This keeps your bars tasty and safe for those with nut allergies. For sweeteners, you can use agave syrup or brown rice syrup. Each option adds a unique flavor while keeping the bars sweet. To get the right texture, press the mixture firmly into the pan. Use a spatula or your hands. A tight pack helps the bars hold their shape. If your bars crumble, they likely did not stick together enough. Make sure to press down well before baking. Spices can boost the flavor of your bars. Add a pinch of nutmeg or ginger for warmth. You can also mix in seeds like chia or flaxseed for extra crunch. Feel free to add coconut flakes or dried apricots. These will give your bars a fun twist while keeping them delicious. {{image_2}} You can easily make these bars vegan. Just replace honey with agave syrup. This swap keeps the bars sweet and sticky. Also, ensure you use vegan chocolate chips if you add them. This way, everyone can enjoy these tasty treats. To make these bars gluten-free, check all ingredients carefully. Look for oats that are certified gluten-free. You can also try other grains like quinoa flakes or buckwheat for a different texture. These options offer a great taste while keeping it gluten-free. If you need a nut-free version, swap out the pistachios. Use seeds like sunflower or pumpkin seeds instead. This change still provides crunch and flavor. For the nut butter, try using sunbutter. It adds creaminess without nuts, making it safe for those with allergies. You can find the Full Recipe above to get started on these variations! To keep your cherry pistachio granola bars fresh, I suggest using airtight containers. These containers help lock in moisture and prevent them from getting stale. You can also wrap each bar in parchment paper before placing them in the container. This way, they stay together and are easy to grab on the go. When stored at room temperature, these granola bars last about one week. If you want to keep them longer, freezing is a great option. Simply wrap individual bars in plastic wrap and place them in a freezer bag. They can last up to three months in the freezer. Just thaw them in the fridge or at room temperature when you're ready to enjoy one. These granola bars are tasty on their own, but you can get creative! Try serving them with yogurt or fruit for a quick breakfast. They also pair well with a warm cup of tea or coffee. For a fun twist, break them into pieces and sprinkle them over ice cream for a crunchy topping. Enjoy the versatility of these delicious bars! Yes, you can swap cherries for other dried fruits. Here are some great ideas: - Dried cranberries - Dried apricots - Raisins - Dried blueberries - Dried figs These fruits add their unique flavor and sweetness, making your bars just as tasty. To make these granola bars nut-free, follow these tips: - Replace pistachios with seeds like sunflower or pumpkin seeds. - Use sunbutter instead of almond or peanut butter. - Check the labels on all ingredients to ensure they are nut-free. This way, you can enjoy a safe and delicious snack. Cherries and pistachios are packed with nutrition. Here’s a quick overview: - Cherries: High in antioxidants, they may reduce inflammation and improve sleep. - Pistachios: Rich in protein and fiber, they support heart health and weight management. Combining these ingredients makes for a tasty snack that fuels your body. Check the Full Recipe for more! In this post, we explored how to make delicious granola bars using simple ingredients. You learned about the main ingredients like oats, pistachios, and dried cherries. We also covered sweeteners, flavor enhancers, and step-by-step baking instructions. You can customize your bars with fun variations or substitutions. Remember, proper storage keeps them fresh. Enjoy your tasty snacks, and feel free to experiment with new ingredients. Making your own granola bars is a fun, easy way to enjoy healthy snacks anytime!](https://savoryspiral.com/wp-content/uploads/2025/07/af0a828e-6475-4566-a8e8-da9d8396a154.webp)
Looking for a delicious yet healthy snack? You’ll love these Cherry Pistachio Granola Bars! Packed with wholesome ingredients, they make
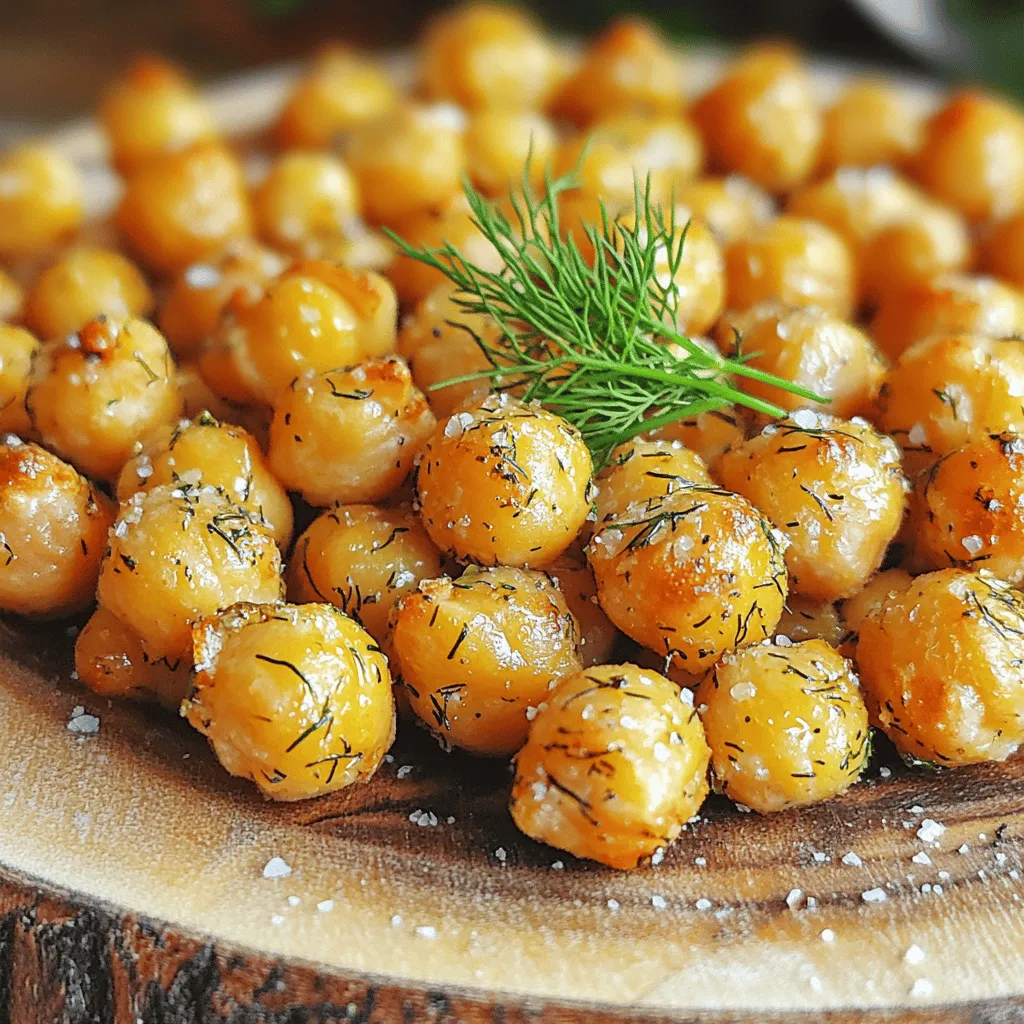
Looking for a fun and tasty snack? Try Dill Pickle Roasted Chickpeas! This crunchy delight combines the bold flavor of
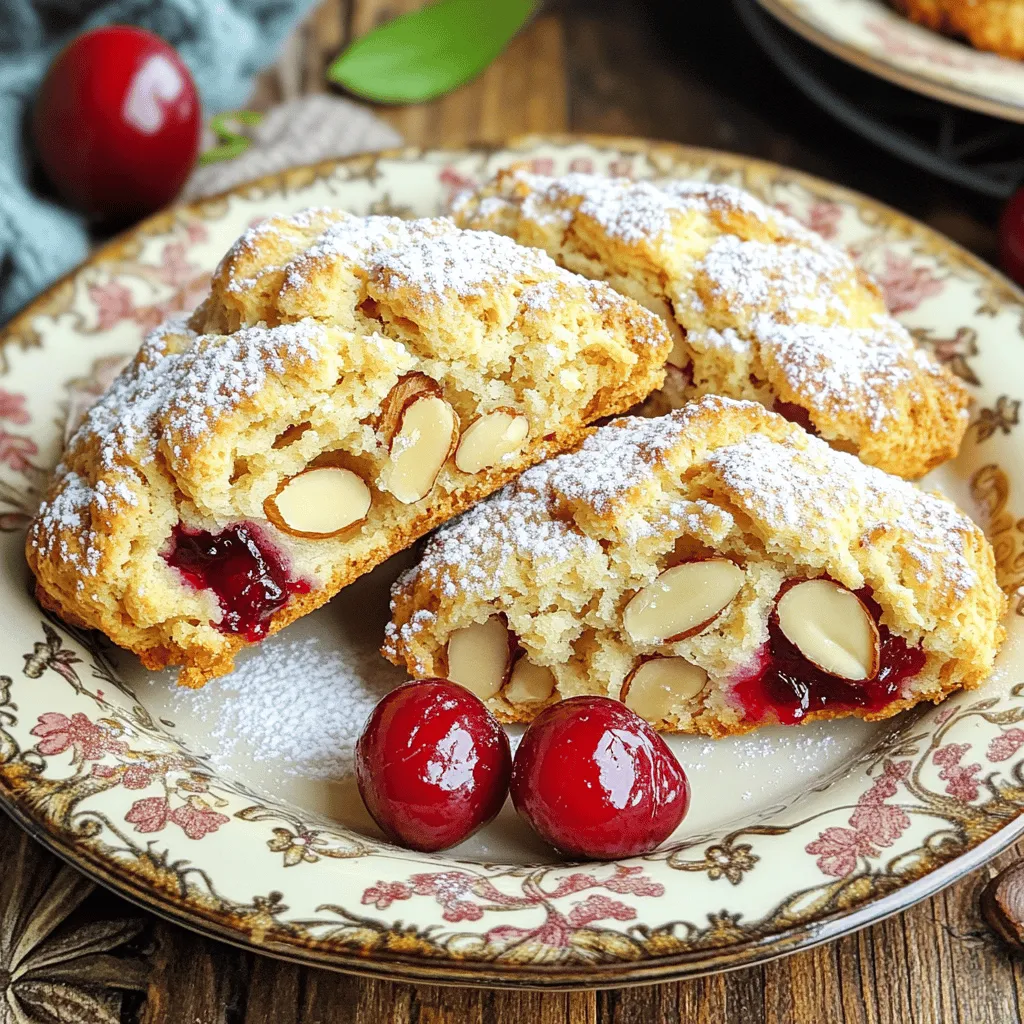
Do you crave a sweet treat that’s both simple and delicious? My Cherry Almond Scones recipe is just what you
![- 2 ripe avocados - 2 cups cooked chicken, shredded - 1/2 cup dill pickles, finely chopped - 1/4 cup red onion, finely diced - 1/4 cup Greek yogurt - 2 tablespoons Dijon mustard - 1 teaspoon garlic powder - 1 tablespoon fresh dill (or 1 teaspoon dried dill) - Salt and pepper to taste - 1 tablespoon lemon juice - Optional: paprika or cayenne pepper When making my pickle chicken salad stuffed avocados, I focus on fresh ingredients. First, I grab ripe avocados. Their soft texture makes them perfect for stuffing. Next, I use shredded chicken. You can use leftover chicken or rotisserie chicken for ease. The star of the show? Dill pickles! Their tangy crunch adds a delightful twist. I also include red onion for some bite. Greek yogurt serves as a creamy base. It makes the salad rich without being too heavy. Dijon mustard adds a nice zip. Don’t forget the seasonings! Garlic powder and fresh dill elevate the flavor. A squeeze of lemon juice brightens the dish. Finally, I add salt and pepper to taste. If you like a little heat, sprinkle some paprika or cayenne pepper on top. This adds color and a kick! For the full recipe, check out the detailed instructions. Enjoy every bite of this tasty treat! - Slice avocados in half and remove the pit. - Scoop out a bit of flesh for more filling space. First, take your ripe avocados. Cut them down the middle. Twist to separate the halves. Use a spoon to scoop out the pit. Be careful not to cut yourself. Then, gently scoop out a little of the green flesh. This gives you more room for the chicken salad. Save that extra scoop in a small bowl. You’ll mix it into the salad later. - Combine all ingredients in a mixing bowl. - Mix until well combined and season. Now, grab a mixing bowl. Add in the shredded chicken, chopped dill pickles, and diced red onion. Next, add in the Greek yogurt and Dijon mustard. Sprinkle in the garlic powder and fresh dill. Don't forget the lemon juice and that reserved avocado flesh! It all blends together nicely. Mix well until it’s all combined. Taste it and add salt and pepper as you like. You want it to burst with flavor! - Spoon the chicken salad mixture into avocado halves. - Optional: Sprinkle paprika or cayenne pepper on top. Time to fill those avocado halves! Use a spoon to scoop the chicken salad into each half. Pack it in generously, so they are nice and full. For a little extra flair, you can sprinkle paprika or cayenne pepper on top. This adds a fun pop of color and a bit of spice. Your Pickle Chicken Salad Stuffed Avocados are now ready to serve! Check out the Full Recipe for more details. To select the perfect avocados, look for ones that feel slightly soft when gently squeezed. Avoid any with dark spots or wrinkles. A ripe avocado should have a rich green color under the skin. If you find firm avocados, let them ripen at room temperature. This process usually takes a few days. Once ripe, store them in the fridge to slow down further ripening. You can easily customize your chicken salad. Try adding diced celery for a crunchy bite. Bell peppers also add color and sweetness. For a twist, include chopped apples or nuts for texture. You can replace chicken with tuna or chickpeas for a different flavor. Feel free to adjust the amount of pickles to suit your taste. This recipe is versatile and allows for many delicious changes. Stuffed avocados pair well with a fresh salad or crispy tortilla chips. You can also serve them with a light soup for a filling meal. For drinks, consider iced tea or a sparkling lemonade. These options balance the richness of the avocado and chicken salad. Enjoy your dish with friends for a fun, casual gathering. For the full recipe, check out the [Full Recipe] link. {{image_2}} You can easily substitute chicken with other proteins. Tuna works well in this dish. It adds a nice flavor and texture. Chickpeas are also a great choice for a plant-based option. They give a hearty feel while keeping it healthy. Try these swaps for a fun twist! Add different spices or herbs to change up the taste. For a fresh kick, include cilantro or parsley. You can also sprinkle in some smoked paprika for depth. A dash of hot sauce can give it a spicy edge. Feel free to experiment with your favorite flavors. To make this recipe low-carb, you can skip the Greek yogurt. Instead, use avocado or sour cream for creaminess. You can also replace the chicken with shredded turkey, which is lower in carbs. Using less avocado flesh in the recipe helps keep it light too. Enjoy these options without losing the great taste! To store leftover pickle chicken salad stuffed avocados, place them in an airtight container. This keeps the avocados fresh and prevents browning. If you have extra filling, store it separately to maintain texture. You can refrigerate for up to two days. I do not recommend freezing stuffed avocados. The texture changes when frozen. The creamy avocado may become mushy when thawed. However, you can freeze the chicken salad filling for up to a month. Thaw it in the fridge before serving. When stored properly in the fridge, stuffed avocados last about two days. The filling stays good for up to three days. Always check for signs of spoilage, like bad smells or discoloration. Enjoy your delicious dish while it’s fresh! For the full recipe, check the main article. If you need a creamy base, you can try sour cream. It adds a nice tang. Another good option is mayonnaise. It gives a rich taste, too. For a lighter choice, consider using cottage cheese. Blend it for a smoother texture. You can also use plant-based yogurt if you prefer dairy-free options. Each choice will bring a unique flavor to your pickle chicken salad. To check if an avocado is ripe, gently press the skin. It should feel soft but not mushy. Look for a dark green or black color. If the avocado is still green, let it ripen on your counter. To speed up ripening, place it in a brown bag with a banana. This traps ethylene gas and helps the avocado soften faster. Yes, you can prep stuffed avocados ahead of time. However, keep the avocado and filling separate until you are ready to eat. This keeps the avocado from browning and the filling fresh. You can mix the pickle chicken salad a day before. Just store it in an airtight container in the fridge. When ready to serve, scoop the mixture into the avocado halves. Enjoy your tasty treat! For the full recipe, check out the details above. You now have a delicious recipe for pickle chicken salad stuffed in avocados. We covered the main and additional ingredients, easy steps to prepare, and tips for picking ripe avocados. Don't forget the fun variations, from protein swaps to low-carb options. Store leftovers properly for later enjoyment, and feel free to customize to your taste. Enjoy this refreshing dish as a meal or snack!](https://savoryspiral.com/wp-content/uploads/2025/07/65cb2043-91e6-4488-bb6b-6770f148fd94.webp)
Have you ever tasted the magic of stuffed avocados? Today, I’m sharing a delightful treat: Pickle Chicken Salad Stuffed Avocados!
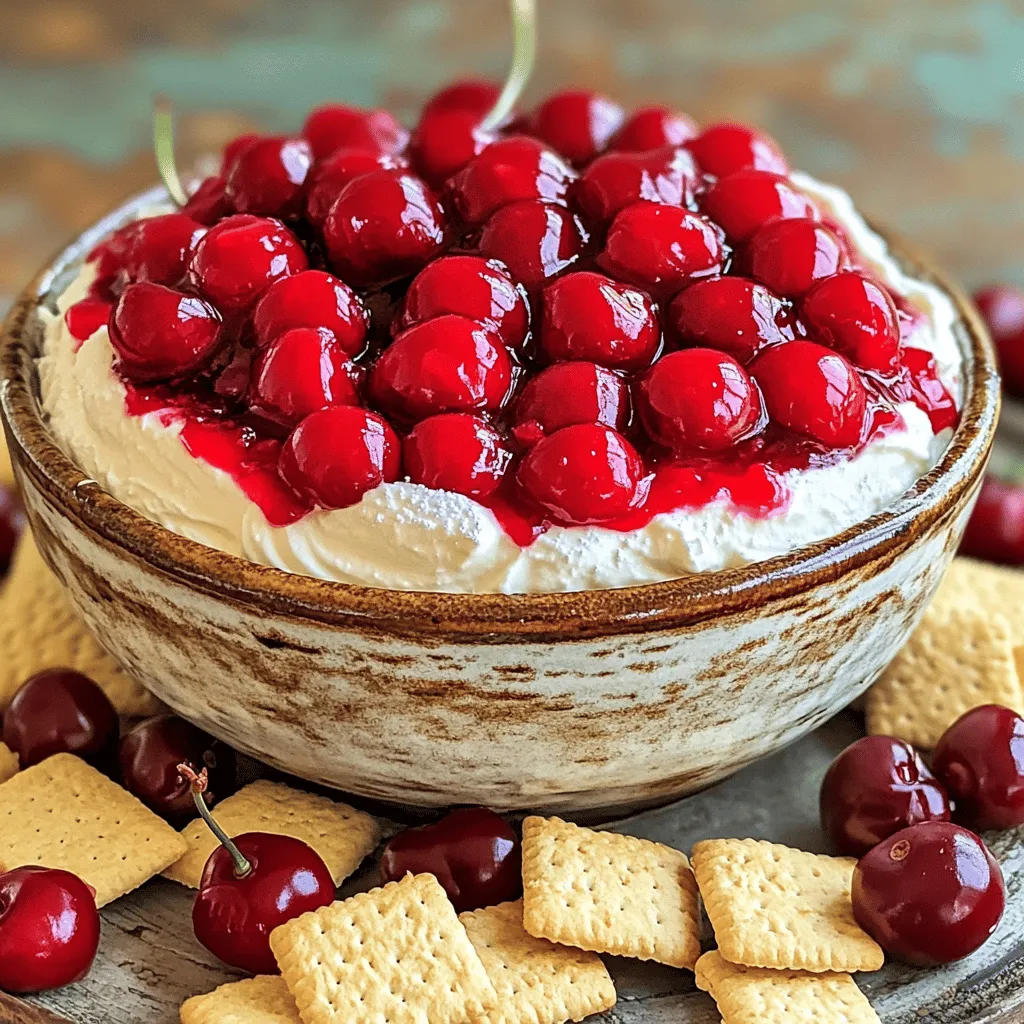
If you crave a sweet treat that’s quick and easy, try my Cherry Cheesecake Dip! This recipe combines rich cream
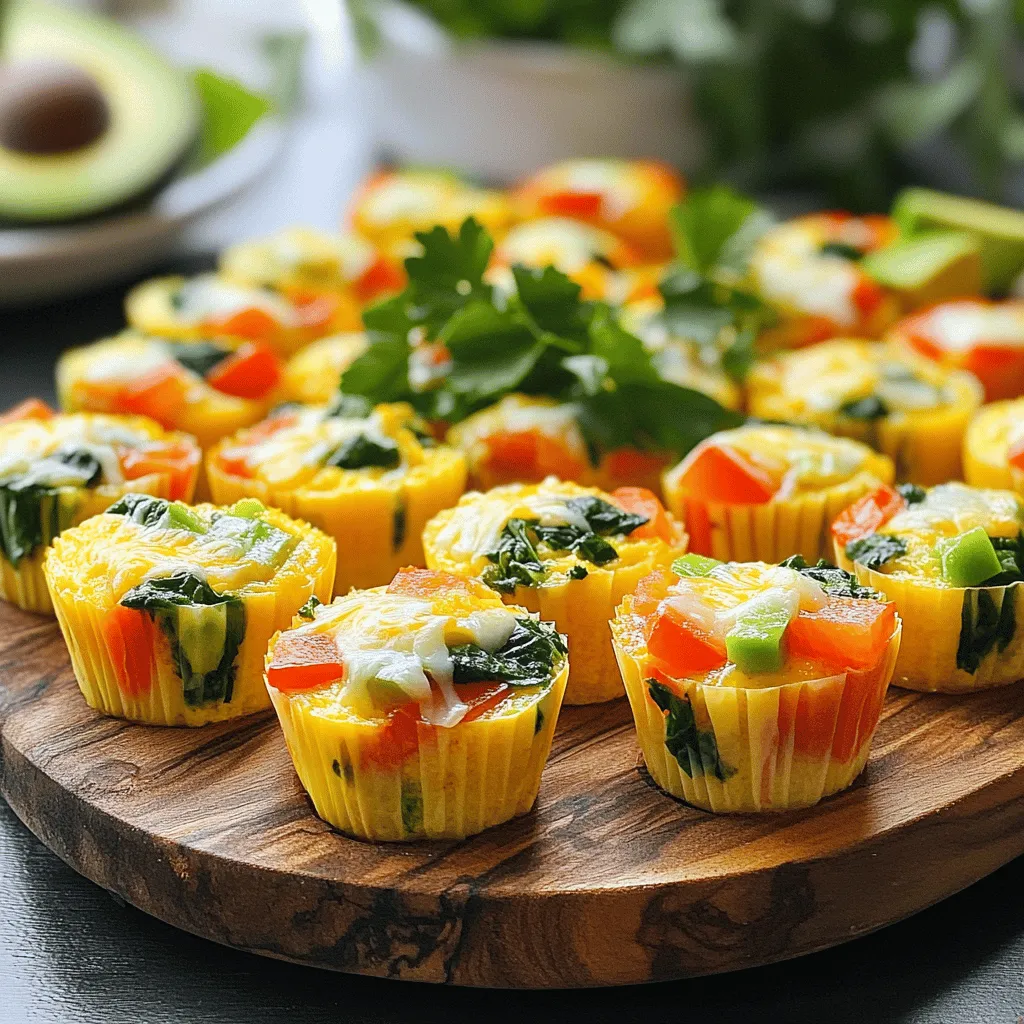
Looking for a quick, tasty breakfast? Try my Keto Egg Muffin Cups! They’re easy to make and loaded with fresh
![To make chocolate chip banana bread, you need simple ingredients. Here is the list: - Ripe bananas - Coconut oil - Brown sugar - Egg - Vanilla extract - Baking soda - Salt - All-purpose flour - Dark chocolate chips - Optional walnuts Using ripe bananas is key. They should have brown spots. This ripeness brings out the sweet flavor. Coconut oil adds moisture and a hint of coconut taste. Brown sugar adds depth and rich sweetness. Don't forget the egg! It helps bind everything together. Vanilla extract gives a nice aroma. Baking soda makes the bread rise. Salt enhances all the flavors. All-purpose flour is the base of our bread. Dark chocolate chips bring joy to every bite. If you like nuts, add walnuts for crunch. This is the full recipe for a delightful treat. 1. Preheat your oven to 350°F (175°C). Grease a 9x5 inch loaf pan with coconut oil or line it with parchment paper. 2. In a mixing bowl, take 3 ripe bananas and mash them until they are smooth. Then, add 1/3 cup of melted coconut oil and mix well. 3. Next, stir in 1/2 cup of brown sugar, 1 beaten egg, and 1 teaspoon of vanilla extract. Make sure everything is mixed together nicely. 4. Sprinkle 1 teaspoon of baking soda and a pinch of salt over the banana mixture. Gently mix it in. 5. Fold in 1 cup of all-purpose flour. Be careful not to overmix; it’s okay if there are a few lumps. 6. Now, gently mix in 1/2 cup of dark chocolate chips and 1/4 cup of chopped walnuts, if you want some crunch. 7. Pour the batter into the prepared loaf pan and smooth out the top with a spatula. 8. Bake for 50-60 minutes. Use a toothpick to check if it’s done; it should come out clean. 9. Once baked, let the bread cool in the pan for about 10 minutes. Then, move it to a wire rack to cool completely. You can find the full recipe [here]. To make great chocolate chip banana bread, start with ripe bananas. Look for bananas with brown spots. They are sweeter and softer. This ripeness gives your bread a rich flavor and moist texture. You can also freeze ripe bananas for later use. Just thaw them and mash when ready to bake. Do not overmix the batter. Mix until just combined. Overmixing makes the bread tough. A few lumps in the batter are okay. This keeps your bread soft and tender. I love serving this bread warm. Spread a little butter on top for a tasty treat. You can also drizzle honey over each slice. It adds a sweet touch that pairs well with chocolate. For a fun presentation, try garnishing with cocoa powder. A few extra chocolate chips on top look nice too. You can even add fresh fruit like sliced strawberries or bananas for color. One mistake I see often is adding too many chocolate chips. While chocolate is great, too many can overpower the bread. Stick to half a cup for the best balance. Another mistake is not allowing the bread to cool. Let it cool in the pan for about 10 minutes. Then, transfer it to a wire rack. This helps avoid a soggy bottom and keeps the texture perfect. {{image_2}} To make gluten-free chocolate chip banana bread, you can use alternative flours. Here are some great options: - Almond flour - Oat flour - Coconut flour - Gluten-free all-purpose flour When using these flours, keep these tips in mind: - Add a binder: Use xanthan gum or ground flaxseed to help bind the bread. - Adjust liquid: Some gluten-free flours absorb more liquid, so you may need to add a bit more wet ingredients. If you want a vegan version, replacing eggs is easy. Here are some egg replacement ideas: - 1/4 cup applesauce - 1/4 cup mashed banana (extra) - 1 tablespoon ground flaxseed mixed with 2.5 tablespoons water (let sit for 5 minutes) For vegan-friendly ingredients, use: - Plant-based butter or coconut oil - Dairy-free chocolate chips - Non-dairy milk like almond or soy You can change the taste of your chocolate chip banana bread with some fun mix-ins. Here are a few ideas: - Add spices: A teaspoon of cinnamon or nutmeg gives warmth and depth. - Incorporate nuts or seeds: Chopped walnuts, pecans, or sunflower seeds add crunch. You can find the full recipe for Choco-Banana Bliss Bread in the previous sections. Enjoy experimenting! To keep your chocolate chip banana bread fresh, store it in an airtight container. This protects it from air and moisture. You can also wrap it tightly in plastic wrap. Keep it at room temperature for up to three days. For longer storage, place it in the fridge. The cold air slows down spoilage. However, this can dry out the bread. If you notice it getting dry, warm it slightly before eating. Freezing your banana bread is a great way to keep it fresh for longer. To freeze, first let the bread cool completely. Then, wrap it tightly in plastic wrap. After that, place it in a freezer bag or container. Label it with the date. You can freeze the bread for up to three months. When you're ready to eat it, take it out and let it thaw at room temperature. For a quicker option, you can microwave individual slices for about 15-20 seconds. Enjoy your moist and tasty treat any time! For the full recipe, check out the steps above. To keep your chocolate chip banana bread moist, use ripe bananas. The riper the bananas, the more moisture they add. Also, don't overmix the batter when adding flour. Overmixing can make the bread tough. Another tip is to use melted coconut oil, which adds fat and moisture. You can also cover the bread with foil during baking after the first 30 minutes to prevent it from drying out. Yes, you can replace coconut oil with other oils. Common alternatives include vegetable oil, canola oil, or melted butter. Each oil has a different flavor, so choose one that fits your taste. Olive oil can work, but it may change the bread's flavor profile. Stick to neutral oils for the best results. The best bananas for banana bread are very ripe ones. Look for bananas with brown spots or even fully brown skins. These bananas will be sweeter and softer. Avoid green bananas, as they lack the needed sugar and moisture. You can also use frozen overripe bananas; just thaw and mash them before using in the recipe. Chocolate chip banana bread lasts about 3 to 4 days at room temperature. Store it in an airtight container to keep it fresh. If you want to keep it longer, freeze it. Properly wrapped, it can last for up to 3 months in the freezer. Just remember to thaw it at room temperature when you’re ready to enjoy it. To sum up, you can create a delicious chocolate chip banana bread with ripe bananas and simple ingredients. Follow the easy steps for mixing and baking. Remember to keep tips in mind for the best results. Explore variations if you want something new. Proper storage keeps it fresh longer. Enjoy warm slices or get creative with toppings. With practice, you'll master this tasty treat. Happy baking!](https://savoryspiral.com/wp-content/uploads/2025/07/0d7f392c-1790-40de-a75a-6ee35cfc47aa.webp)
If you love warm, soft, and sweet treats, you need to try my Chocolate Chip Banana Bread. It’s moist, tasty,
. Using fresh and high-quality ingredients makes a big difference. Focus on ripe cherry tomatoes and crisp cucumbers. Look for firm bell peppers and bright green parsley. The best olives are plump and flavorful. For feta, choose a block over crumbles for better texture. Always check labels on canned chickpeas. Look for low sodium options for better health. Marinating is key for flavor. After mixing your salad, let it sit for at least 15 minutes. This allows the chickpeas and veggies to soak up the dressing. Use a covered bowl or wrap it tightly. Room temperature works best for marinating. If you have time, chill it in the fridge for about an hour. This enhances all the flavors even more. Presentation makes your meal more appealing. Serve the salad in colorful bowls for a fun touch. Add a sprinkle of extra feta on top. A few parsley leaves can add a nice pop of green. Drizzle a little more olive oil before serving. You can also add a wedge of lemon on the side for a fresh squeeze. This brings brightness to the dish. For the full recipe, check out the details above. {{image_2}} You can boost your Greek chickpea salad by adding grilled chicken or tofu. Both options add protein and flavor. For chicken, grill it until it's golden brown. Slice it thin and mix it in. For tofu, press it to remove extra water, then grill or sauté until crispy. Add the protein on top of the salad. This makes it heartier and more filling. Feel free to swap in seasonal veggies. If zucchini is fresh, add diced zucchini for crunch. In the winter, roasted sweet potatoes work well too. You can even try adding radishes for a peppery bite or corn for sweetness. Using what's in season keeps your salad fresh and exciting. While the olive oil and vinegar dressing is classic, you can change it up. Try a lemon-tahini dressing for a nutty flavor. A yogurt-based dressing adds creaminess. You can also use balsamic vinegar for a touch of sweetness. These alternatives keep your salad lively and allow you to explore different tastes. For the full recipe, check out the details above! To keep your Greek chickpea salad fresh, place it in an airtight container. You can store it in the fridge for about three days. Make sure to cover the salad well. This helps prevent it from absorbing other smells in the fridge. If you notice extra moisture, drain it a little before serving. Meal prep makes life easier. Prepare the salad components separately. Store the chickpeas, veggies, and dressing in different containers. When ready to eat, mix them together. This keeps the salad crisp. It also lets the flavors stay bright. You can prep your Greek chickpea salad bowls for up to five days. You can freeze chickpeas, but avoid freezing the whole salad. Freezing changes the texture of veggies and feta. If you have leftover chickpeas, freeze them in a single layer on a tray. Once frozen, move them to a freezer bag. They last up to six months. When you want to use them, thaw in the fridge overnight. For the full recipe, check out the Greek Chickpea Salad Bowls section above. Yes, you can make Greek Chickpea Salad Bowls ahead of time. This salad tastes even better after sitting for a while. The flavors marry and create a delightful taste. I suggest making it a few hours before serving. Just keep it in the fridge. Add the feta just before serving for the best texture. If you need a substitute for feta cheese, try using goat cheese or tofu. Crumbled goat cheese gives a similar tangy taste. Tofu can work well for a dairy-free option. Just crumble it and add it to your salad. For a nutty flavor, you can also try using cashew cheese. Yes, this recipe can be made vegan. Simply omit the feta cheese or replace it with a vegan alternative. The salad remains fresh and tasty without it. Chickpeas provide protein and keep the meal filling. You still get all the great flavors from the veggies and dressing. Chickpeas are a great source of protein and fiber. They help keep you full and satisfied. They also contain essential vitamins and minerals like iron, magnesium, and folate. Eating chickpeas may support heart health and help with digestion. Plus, they are low in fat, making them a healthy choice. To prepare chickpeas from scratch, start by soaking dried chickpeas overnight. Rinse them and put them in a pot with fresh water. Bring the water to a boil, then reduce heat and simmer for about an hour. Check them for tenderness. Once cooked, drain and use them in your salad. You can find the Full Recipe for Greek Chickpea Salad Bowls in the article. This blog post covered how to create delicious Greek Chickpea Salad Bowls. We went through the main ingredients and how to make the dressing. You learned tips for marinating and serving your salad. We also discussed fun variations and how to store your bowls. In conclusion, making this dish is easy and fun. Enjoy getting creative with toppings and flavors. Your healthy meals can be tasty and colorful all week long.](https://savoryspiral.com/wp-content/uploads/2025/07/303227bf-fbd7-4de9-8c23-e0990c05b0d1.webp)
If you’re craving a meal that bursts with flavor and is easy to make, look no further! Greek Chickpea Salad
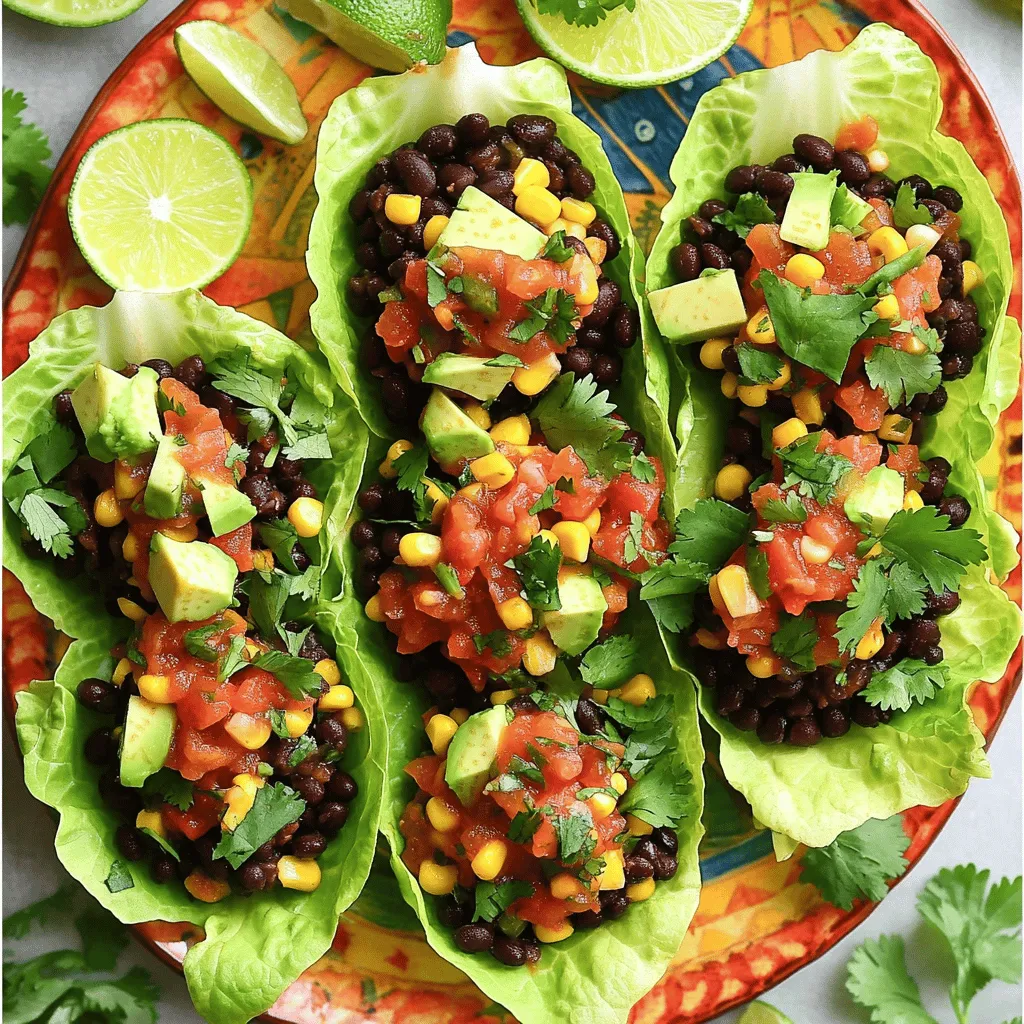
Are you ready to spice up your dinner routine? Vegan Taco Lettuce Wraps offer a fresh, flavorful meal that’s as
