Skip to content
DisclaimerTerms Of UseGDPR PolicyCookie Policy

savoryspiral

  • Home
  • Drinks
  • Appetizers
  • Dinner
  • Dessert
  • About
  • Contact
  • Privacy Policy
DisclaimerTerms Of UseGDPR PolicyCookie Policy

Charlotte

To make tasty Chicken Caesar Wraps, you need simple ingredients. Here is what you will need: - 2 cups cooked chicken breast, shredded - 1 cup romaine lettuce, chopped - 1/2 cup Caesar dressing (homemade is best) - 1/4 cup grated Parmesan cheese - 1/4 cup cherry tomatoes, halved - 4 large tortillas or wraps - Freshly cracked black pepper to taste - Optional: Croutons for added crunch These ingredients are easy to find. You can use any cooked chicken. Leftover chicken works well. If you want a fresh taste, make your own Caesar dressing. It adds a unique flavor. The romaine lettuce gives a nice crunch. Parmesan cheese adds a rich taste. Cherry tomatoes bring a pop of color and sweetness. You can use any type of tortilla or wrap. Whole wheat or spinach wraps are great options. Don't forget the black pepper! It enhances the flavors. If you like extra crunch, add croutons. They can make your wraps fun to eat. You can find all these ingredients in your local store. Check your pantry for what you already have. For the full recipe, refer to the main article. Combining ingredients Start by taking a large mixing bowl. Add 2 cups of shredded chicken. Then, toss in 1 cup of chopped romaine lettuce. Pour in 1/2 cup of Caesar dressing. If you want a special touch, use homemade dressing. Sprinkle in 1/4 cup of grated Parmesan cheese. Mix everything well until it's all coated. Finally, add 1/4 cup of halved cherry tomatoes. Gently fold them in. Season with freshly cracked black pepper to taste. If you love crunch, toss in some crushed croutons now. Assembling the wrap Grab a large tortilla or wrap. Lay it flat on a clean surface. Spoon some of the chicken Caesar mixture into the center. Make sure not to overfill. Fold in the sides of the tortilla. Then roll it up tightly from the bottom. This keeps all the tasty filling inside. Slicing and serving tips After making all the wraps, you can slice each one in half diagonally. This gives a nice look! If you want, secure each half with a toothpick. Serve the wraps on a colorful plate. For an extra touch, sprinkle more Parmesan on top and add some cherry tomato halves for decoration. You can also serve a little Caesar dressing on the side for dipping. Enjoy your tasty Chicken Caesar Wraps! For more detailed instructions, refer to the Full Recipe. To make the best wraps, start with homemade Caesar dressing. Combine olive oil, lemon juice, garlic, Dijon mustard, and Parmesan cheese. This mix gives your wraps a fresh taste. You can find many easy recipes online. Next, choose the right tortillas. Large, soft tortillas work best. Whole wheat adds extra fiber. You can also try spinach or sun-dried tomato tortillas for added flavor. These choices make your wraps more colorful and fun. For meal prep, keep things quick. Cook extra chicken during your week. Store it in the fridge for easy use. You can also prepare the dressing ahead of time. Mix all your ingredients in one bowl; it saves time. Lastly, assemble your wraps right before eating. This keeps the lettuce crisp. If you have leftovers, store them in an airtight container. Enjoy your Chicken Caesar Wraps fresh and tasty! For the full recipe, check out the details above. {{image_2}} Chicken Caesar wraps are so versatile! You can change them to match your tastes. Here are some fun and easy ideas. - Vegetarian versions: You can skip the chicken and use grilled veggies instead. Try zucchini, peppers, or mushrooms. Add some chickpeas for protein. This keeps the wrap filling and tasty. - Gluten-free alternatives: If you're avoiding gluten, use gluten-free tortillas. They work just as well as regular ones. You can also use lettuce leaves as wraps. This cuts carbs and adds crunch. - Adding extra veggies: Want to boost nutrition? Toss in some spinach, cucumbers, or carrots. Add these to the mix before wrapping. They bring color and taste to each bite. These variations let you enjoy Chicken Caesar wraps any way you like! Feel free to mix and match as needed. For the full recipe, check out the details above. You can keep your leftover Chicken Caesar Wraps fresh with proper storage. - Refrigeration tips: Wrap each Chicken Caesar Wrap tightly in plastic wrap or place them in an airtight container. Store them in the fridge. They will stay good for up to three days. - Freezing options and duration: If you want to keep them longer, you can freeze the wraps. Wrap each one in foil or freezer-safe wrap. Place them in a freezer bag. They can last up to three months in the freezer. - Best practices for reheating: To reheat, take a wrap from the fridge or freezer. If frozen, let it thaw in the fridge overnight. Heat it in a pan over low heat for about 5-7 minutes, flipping once. This keeps the wrap warm and soft without drying it out. You can also use a microwave for quick reheating, but it can make the wrap soggy. Remember, always check for freshness before eating. Enjoy your Chicken Caesar Wraps fresh and tasty! For the complete recipe, check out the Full Recipe. Can I use rotisserie chicken? Yes, rotisserie chicken works great in these wraps. It saves time and adds flavor. Just shred the chicken and mix it in with the other ingredients. You can enjoy a tasty meal in no time. How many calories are in a Chicken Caesar Wrap? A Chicken Caesar Wrap has about 400 to 500 calories. This can change based on your ingredients. For a lighter option, use less dressing or skip the croutons. What side dishes pair well with Chicken Caesar Wraps? Many sides go well with these wraps. Try a fresh fruit salad or some crunchy veggie sticks. You can also add a light soup or a side of chips for a fun crunch. These pairings make your meal complete and satisfying. For the full recipe, check out the detailed steps above. Enjoy your cooking! Chicken Caesar wraps are easy to make and tasty. You need simple ingredients like chicken, lettuce, and Caesar dressing. Follow the steps to combine and assemble, ensuring perfect wraps every time. Use our tips to make your own dressing and choose the best tortillas. Try variations like vegetarian or gluten-free options for added flair. Store leftovers properly to enjoy them later. These wraps are versatile and fun! Now you can enjoy a quick meal that satisfies your taste and diet preferences.

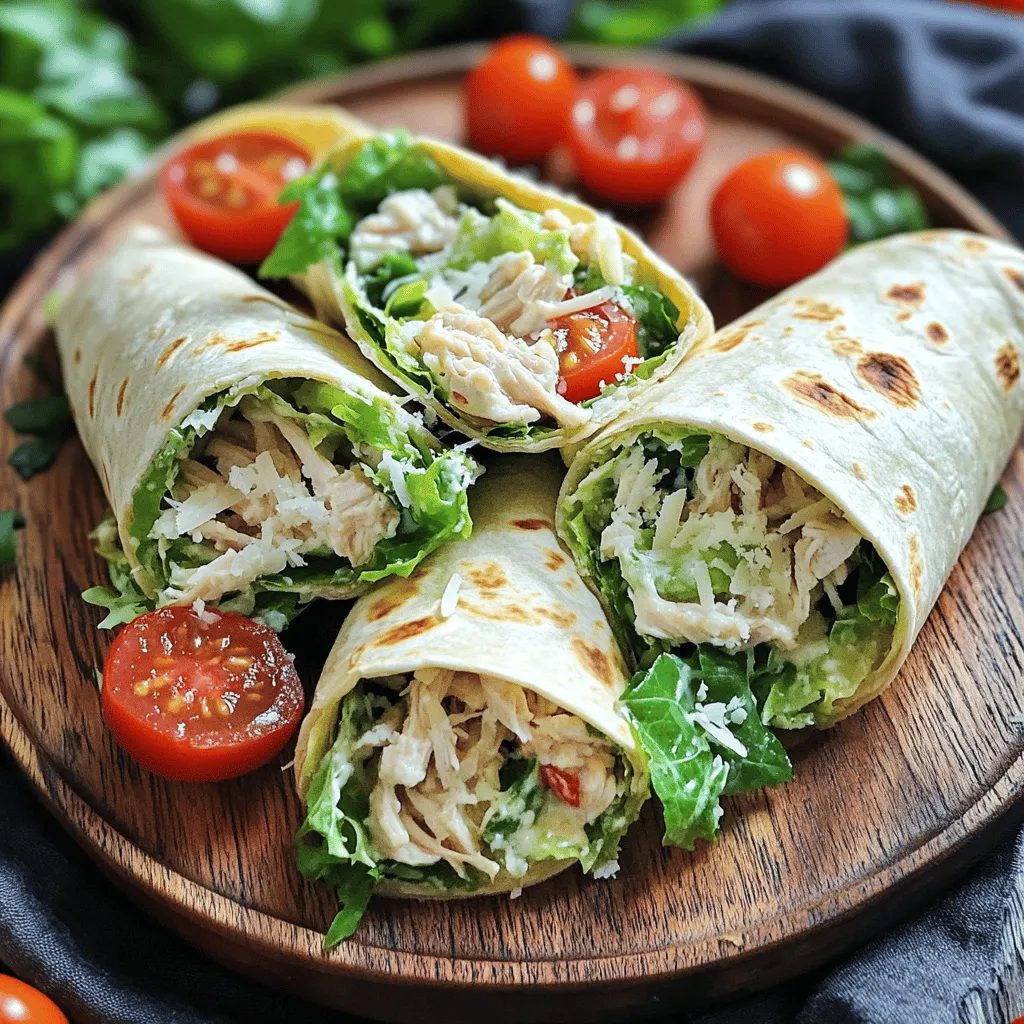
Tasty Chicken Caesar Wraps Easy and Quick Recipe

Are you craving something quick and tasty for lunch? Look no further than these Chicken Caesar Wraps! In just a

- 1 can chickpeas - Greek yogurt or vegan yogurt - Tahini, mustard, lemon juice For the base of my chickpea salad sandwich, I always use one can of chickpeas. You can find these in most grocery stores. I drain and rinse them well to remove excess salt. I then add Greek yogurt or vegan yogurt for creaminess. This adds a nice tang and moisture to the salad. Tahini brings a nutty flavor, while mustard gives a delightful kick. I finish with fresh lemon juice to brighten the dish. - Celery, red onion, carrot - Optional: avocado, tomato, spinach or lettuce Next, I chop my veggies. Celery adds crunch, red onion brings sweetness, and a grated carrot adds color. I love adding sliced avocado and tomatoes for a creamy and juicy touch. Spinach or lettuce leaves add freshness and make the sandwich look vibrant. These veggies not only enhance flavor but also boost nutrition. - Whole grain bread options - Alternative bread choices for variations Choosing the right bread makes a big difference. I prefer whole grain bread for its nutty taste and health benefits. However, you can try sourdough, rye, or even gluten-free bread. The key is to find a bread that can hold the filling without falling apart. A good toast adds a warm crunch to the sandwich, making each bite satisfying. For the full recipe, you can find it [here](#). To start, you need to mash the chickpeas. Use a fork or potato masher to break them down. Aim for a mix of smooth and chunky bits. This texture gives the salad a nice bite. Next, mix in the yogurt, tahini, and seasonings. Add 1/4 cup of Greek yogurt, 2 tablespoons of tahini, 1 tablespoon of Dijon mustard, and 1 tablespoon of lemon juice. Stir until everything is well combined. Now, stir in your vegetables. Add the finely chopped celery, red onion, and grated carrot. Season with salt and pepper to taste. Adjust the lemon juice and mustard if you want more tang. Now it’s time to toast the bread. Use four slices of whole grain bread and toast them until golden brown. This adds crunch and helps hold the filling. Once the bread is ready, spread a generous amount of the chickpea salad on two slices. Top the salad with fresh spinach or lettuce leaves. You can also add sliced avocado and tomato for extra flavor. Finally, place the other two slices of toasted bread on top to form your sandwiches. Cut them in half if you like. For serving, consider pairing your sandwich with sides like chips or pickles. These add extra crunch and flavor. To make your meal look great, plate the sandwiches neatly. You can add a few extra greens on the side for color. For the complete recipe, please refer to the [Full Recipe]. To keep your chickpea salad fresh, store it in the fridge. Use an airtight container to keep moisture out. It stays tasty for about three days. If you make a sandwich, eat it within a day for the best taste. When you assemble your sandwich, toast the bread first. This helps it hold up better against moisture. Spread the chickpea salad on the bread just before eating. This keeps the bread from getting soggy. You can adjust flavors easily. Adding spices like cumin or paprika brings warmth. Fresh herbs like cilantro or parsley add brightness. Want it spicier? Add a pinch of cayenne or some chopped jalapeños. For a creamier texture, mix in a little more yogurt or mashed avocado. If you want to prepare ahead, make the chickpea salad two days in advance. Store it in the fridge and keep the bread separate. Pack each sandwich in a container. Glass or BPA-free plastic works best. This keeps them fresh and easy to grab on busy days. Looking for more ideas? Check out the [Full Recipe] for inspiration! {{image_2}} You can switch up the chickpeas in your salad. Try using black beans or lentils. Both give a nice taste and texture. Black beans are creamy, while lentils are hearty. You’ll get a different flavor and still pack in the protein you need. Adding nuts or seeds works great too. Chopped walnuts or sunflower seeds add crunch and healthy fats. They also make your sandwich feel more filling. Think about what you enjoy most! To change the flavor, try different dressings. Vegan mayo gives a rich creaminess. An avocado spread is also creamy and adds a fresh taste. Both options can make your chickpea salad sing! You can also add seasonal vegetables. Fresh cucumbers or bell peppers add color and crunch. If it’s summer, ripe tomatoes can brighten your dish. Don’t hesitate to get creative with what you find at the market! If you need a gluten-free meal, there are many choices. Look for gluten-free bread like rice or almond flour bread. These options hold up well and keep your sandwich tasty. You can use alternative ingredients too. Instead of bread, try lettuce wraps. They’re light and fresh. You can even use large slices of cucumber as a base. The possibilities are endless! For the full recipe, visit the [Full Recipe]. To store leftover chickpea salad, put it in a bowl. Cover it tightly with plastic wrap or a lid. You can keep it in the fridge for up to three days. This way, it stays fresh and tasty for your next meal. Can you freeze the chickpea salad? Yes, you can freeze it! Just place it in a freezer-safe container. Leave some space at the top for expansion. When you're ready to eat it, thaw it in the fridge overnight. For the best storage, use airtight containers. Glass containers work great, but plastic ones are fine too. Make sure the lid seals well. This helps keep out air and moisture, which can spoil your salad. Yes, you can make chickpea salad sandwiches ahead of time. To prepare them in advance, follow these steps: - Make the salad: Prepare the chickpea salad according to the recipe. - Store separately: Keep the salad and bread in separate containers. This keeps the bread from getting soggy. - Chill: Store the salad in the fridge for up to three days. When you are ready to eat, simply toast the bread and assemble the sandwich. You can enhance the taste of your chickpea salad with these common additions: - Fresh herbs: Add parsley, cilantro, or dill for a burst of freshness. - Spices: Try cumin, paprika, or garlic powder for extra depth. - Crunchy elements: Include chopped pickles or bell peppers for texture. - Creaminess: Extra yogurt or a dollop of vegan mayo can boost flavor. Feel free to experiment with these ingredients to find your favorite combination! Yes, this recipe is vegan-friendly. You can use: - Vegan yogurt instead of Greek yogurt. - Ensure tahini and mustard are free from animal products. All the ingredients work well for a plant-based diet. Enjoy a tasty meal without any animal products! To reduce calories while keeping flavor in your chickpea salad sandwich, consider these tips: - Use less yogurt: Cut down on the amount of yogurt you add. - Skip the bread: Serve the salad in lettuce wraps instead. - Limit oils: Avoid adding extra oils or dressings. - Choose low-calorie bread: Opt for thin-sliced or low-calorie bread varieties. These simple changes can help you enjoy your sandwich without the extra calories. Don't worry, the taste will still be great! The chickpea salad sandwich is easy to make and delicious. We covered the key ingredients, from chickpeas to yogurt and veggies. I shared step-by-step instructions on how to prepare this meal. You learned tips for storage and various tasty options you can try. In summary, this recipe is versatile and healthy. You can customize it to fit any diet. Enjoy your sandwiches fresh, and don’t hesitate to experiment with flavors. Happy cooking!

Chickpea Salad Sandwich Fresh and Flavorful Delight

Welcome to a world of taste with my Chickpea Salad Sandwich! This fresh and flavorful delight is perfect for lunch

To make churro cheesecake bars, you need some simple ingredients. Here’s what you’ll need: - 1 ½ cups all-purpose flour - ½ teaspoon baking powder - ½ teaspoon cinnamon - ½ teaspoon salt - ½ cup unsalted butter, softened - 1 cup brown sugar, packed - 1 large egg - 1 teaspoon vanilla extract - 8 oz cream cheese, softened - ½ cup granulated sugar - 1 teaspoon lemon juice - 1 tablespoon cinnamon sugar (for topping) These ingredients come together to create a sweet, creamy treat. The combination of cream cheese and brown sugar gives a rich flavor. The cinnamon adds warmth and spice, making each bite feel special. When you pick your ingredients, quality matters. Use fresh cream cheese for the best texture. Softened butter mixes better, so let it sit out before you start. For the flour, all-purpose works great. If you want to make it gluten-free, you can find a suitable blend. Each ingredient plays a role in the final taste. Follow the Full Recipe for the exact steps to create these delicious bars. 1. Preheat your oven to 350°F (175°C). 2. Line an 8x8-inch baking pan with parchment paper. Leave some paper overhang for easy removal. 3. In a medium bowl, mix together the flour, baking powder, cinnamon, and salt. Set this bowl aside. 4. In a large bowl, beat the softened butter and brown sugar with an electric mixer. Mix until it turns light and fluffy; this takes about 2-3 minutes. 5. Add the large egg and vanilla extract to the butter mixture. Beat until everything is fully combined. 6. Gradually add the dry mixture to the wet mixture. Mix until just combined; do not overmix. 7. Spread half of the batter into the prepared baking pan. Smooth it out evenly. 8. In another bowl, beat the softened cream cheese, granulated sugar, and lemon juice until smooth and creamy. 9. Spread the cream cheese mixture evenly over the layer of batter in the pan. 10. Drop spoonfuls of the remaining batter on top of the cream cheese layer. Gently swirl with a knife to create a marbled effect. 11. Bake in the preheated oven for 30-35 minutes. The edges should be golden brown, and a toothpick in the center should come out clean. 12. When done, remove from the oven and sprinkle the top with cinnamon sugar right away. 13. Let the bars cool in the pan for at least 30 minutes. Use the parchment paper to lift them out. 14. Cut into bars and serve warm or at room temperature. For the full recipe, check the earlier section. Enjoy making these churro cheesecake bars; they are sure to impress! To achieve the perfect texture in your churro cheesecake bars, you must pay close attention to mixing. Start by creaming the butter and brown sugar well. This step adds air, making the bars light. When you mix the dry ingredients with the wet, stop as soon as they blend. Overmixing can lead to tough bars. Aim for a soft batter that is just combined. For a stunning presentation, use a decorative plate. Cut the bars into neat squares. A sprinkle of cinnamon sugar on top adds a nice touch. You can also serve them with a dollop of whipped cream. This adds both flavor and flair. A drizzle of chocolate sauce pairs well with the bars, enhancing their richness. Adjusting the sweetness can make a big difference. If you like a sweeter bar, add a bit more granulated sugar. For a bolder cinnamon flavor, don't be shy with the cinnamon in the batter and the topping. You can also experiment with adding a pinch of nutmeg. This can elevate the flavor and make your bars even more delightful. For the Full Recipe, check the earlier sections. {{image_2}} You can easily change the flavor of churro cheesecake bars. Adding chocolate chips makes them even more delicious. Just mix in about half a cup before spreading the batter. You can also try different cream cheese flavors. Strawberry or pumpkin spice cream cheese can create a fun twist. If you need gluten-free options, you can swap the all-purpose flour. Use a gluten-free flour blend to make the crust. For those who are dairy-free, try using almond or coconut cream cheese. Both options work great and taste amazing. Seasonal flavors can make your churro cheesecake bars special. For fall, make pumpkin spice churro cheesecake bars. Just add pumpkin puree and spice to the cream cheese mix. In summer, add lemon zest for a fresh and bright flavor. This small change makes the bars taste light and refreshing. For the full recipe, check out the link above! You can freeze or refrigerate the unbaked churro cheesecake bar mixture. If you plan to freeze it, wrap the bowl tightly with plastic wrap. This helps keep out air and moisture. You can freeze the mixture for up to three months. When you are ready to bake, thaw it in the fridge overnight. If you refrigerate the mixture, use it within two days. Place it in an airtight container to keep it fresh. This way, you can have a quick dessert ready to bake! The best way to store baked churro cheesecake bars is in an airtight container. You can keep them at room temperature for up to two days. If you want them to last longer, place them in the fridge. They will stay fresh for about five days when refrigerated. Make sure to let the bars cool completely before storing. This helps prevent sogginess. If you have leftovers, place parchment paper between the layers in the container. This keeps them from sticking together. To reheat churro cheesecake bars, use the oven for the best texture. Preheat your oven to 300°F (150°C). Place the bars on a baking sheet and cover them with foil. Reheat for about 10-15 minutes. You can also use the microwave if you are in a hurry. Heat each bar for 15-20 seconds at a time. Keep an eye on them so they do not get too hot. Enjoy your leftovers warm or at room temperature! They taste great either way. For an extra treat, add a sprinkle of cinnamon sugar on top before serving. What is the origin of churro cheesecake bars? Churro cheesecake bars blend two beloved treats: churros and cheesecake. Churros come from Spain, while cheesecake has roots in ancient Greece. This dessert combines their best parts into one tasty bar. Can I use low-fat cream cheese? Yes, you can use low-fat cream cheese. It will still taste great. Just keep in mind that the texture may be slightly different. How do I know when the bars are done baking? The bars are done when the edges turn golden brown. Insert a toothpick into the center. If it comes out clean, your bars are ready. Can I double this recipe? Yes, you can double this recipe. Use a larger baking pan, such as a 9x13-inch size, to fit all the batter. Adjust the baking time if needed. What can I substitute for brown sugar? If you don't have brown sugar, use granulated sugar mixed with a bit of molasses. You can also use coconut sugar or honey for a different flavor. Why are my bars not rising? If your bars do not rise, make sure the baking powder is fresh. Also, check if you mixed the batter enough to incorporate air. What to do if the cream cheese filling is too runny? If the cream cheese filling is too runny, chill it for a while. A cold filling holds its shape better. You can also add more cream cheese to thicken it up. This blog post covered how to make delicious churro cheesecake bars. You learned the key ingredients, clear steps, and helpful tips for perfecting your bake. I also shared tasty variations and storage tips. With this guide, you can create treats that impress everyone. Trust your skills, and have fun in the kitchen. Enjoy your baking journey and explore new flavors!

Churro Cheesecake Bars Irresistible Dessert Treat

Get ready to indulge in a dessert that’s a true treat for your taste buds! These Churro Cheesecake Bars combine

- 4 boneless, skinless chicken breasts - 1/3 cup honey - 1/3 cup Dijon mustard - 2 tablespoons apple cider vinegar - 1 tablespoon olive oil - 2 garlic cloves, minced - 1 teaspoon dried thyme - Salt and pepper, to taste - Fresh parsley, chopped (for garnish) The main ingredients create a sweet and tangy base. Honey brings the sweetness, while Dijon mustard adds a nice kick. Apple cider vinegar helps balance the flavors. I use boneless chicken breasts for tenderness and quick cooking. The additional ingredients enhance the taste. Olive oil keeps the chicken moist. Garlic adds depth, and thyme offers a lovely herbal note. A bit of salt and pepper boosts the overall flavor. Finally, fresh parsley gives a pop of color and freshness when you serve. For the full recipe, visit the Honey Mustard Chicken Delight page. Enjoy cooking! - Preheat the oven to 375°F (190°C). - In a bowl, mix honey, Dijon mustard, apple cider vinegar, olive oil, garlic, thyme, salt, and pepper. Whisk until smooth. - Place the chicken breasts in a bag or dish. Pour the marinade over the chicken. Make sure each piece gets coated. Seal the bag or cover the dish. Let it marinate in the fridge for at least 30 minutes. For more flavor, marinate for up to 2 hours. - Take the chicken out of the marinade, but save the marinade for later. - Put the chicken in a baking dish. Bake it for 25-30 minutes. The chicken is done when its internal temperature reaches 165°F (75°C). - While the chicken bakes, take the reserved marinade. Pour it into a small saucepan. Bring it to a boil over medium heat. Let it simmer for about 5 minutes until it thickens a bit. - Once the chicken is done, brush the thickened glaze over each piece. Put the chicken back in the oven for another 5 minutes to set the glaze. - You can find the full recipe in the earlier section. To get the best flavor from your honey mustard chicken, marination is key. Follow these tips: - Use a resealable bag: This helps the marinade coat the chicken evenly. - Marinate longer: For maximum flavor, let the chicken sit for at least 2 hours. If you have time, overnight is even better. - Keep it cool: Always marinate in the fridge. This keeps the chicken safe and fresh. Cooking chicken well can be tricky. Here are some tips to ensure even cooking: - Check the temperature: Cook the chicken until it reaches 165°F (75°C). Use a meat thermometer for accuracy. - Don’t crowd the pan: Space out the chicken in the baking dish. This helps it cook evenly. - Baste for moisture: Brush the chicken with the glaze halfway through cooking. This helps keep it juicy. Want to add a twist to your honey mustard chicken? Try these ideas: - Add spices: Mix in some paprika or cayenne for a kick. - Herbs are your friends: Fresh rosemary or basil can add great flavor. - Citrus zest: Grate some lemon or orange zest into the marinade. This brightens up the dish. For a complete guide, check the Full Recipe to create this delicious meal with ease. {{image_2}} You can easily switch ingredients in this recipe. Use maple syrup instead of honey for a unique twist. If you don’t have Dijon mustard, try yellow mustard or whole grain mustard. These options change the flavor while keeping it delicious. You can also try agave nectar for a lighter sweetness. You have choices for cooking honey mustard chicken. Baking is popular, but grilling adds a smoky flavor. If you grill, marinate the chicken as usual. Preheat the grill to medium heat. Cook for about 6-8 minutes on each side. Use a meat thermometer to check for an internal temperature of 165°F (75°C). Pair your honey mustard chicken with tasty sides. Wild rice or quinoa works great as a base. Roasted vegetables like carrots and broccoli add color and nutrients. You can also serve it with a fresh salad or garlic bread. For a fun twist, serve with sweet potato fries. Don't forget to drizzle extra glaze on top for added flavor! To store your honey mustard chicken, let it cool first. Place it in an airtight container. You can keep it in the fridge for up to three days. This keeps the taste fresh. If you want to keep the sauce, store it separately. This way, it won’t make the chicken soggy. If you want to freeze the chicken, wrap it tightly in plastic wrap. Then, place it in a freezer-safe bag. It can last up to three months in the freezer. When you want to eat it, just thaw it in the fridge overnight. This helps keep the flavor intact. To reheat honey mustard chicken, use the oven or microwave. In the oven, preheat to 350°F (175°C). Place the chicken in a baking dish and cover it with foil. Bake for about 15-20 minutes. This keeps it moist. In the microwave, use a microwave-safe plate. Heat for 1-2 minutes, checking every 30 seconds. Add a splash of water to keep it juicy. Marinating the chicken takes at least 30 minutes. For the best flavor, aim for 2 hours. This allows the honey and mustard to soak in well. You will taste the difference! Yes, you can make honey mustard chicken ahead of time. Cook the chicken and let it cool. Store it in the fridge for 3 to 4 days. You can also freeze it for up to 3 months. Just make sure to thaw it in the fridge before reheating. Honey mustard chicken goes well with many sides. Here are some popular choices: - Roasted vegetables - Wild rice - Mashed potatoes - Steamed broccoli - Salad with a light dressing These sides add flavor and color to your meal. You can use bone-in chicken for this recipe. However, cooking times will be longer. Bone-in chicken takes about 40 to 50 minutes to cook through. Use a meat thermometer to check. The internal temperature should reach 165°F (75°C). Enjoy experimenting with different cuts! This blog post covered how to make honey mustard chicken. We explored main ingredients, step-by-step instructions, and tips for the best results. You learned about variations and storage info to keep your chicken fresh. In the end, this dish is simple, tasty, and perfect for any meal. Enjoy experimenting with flavors and methods to make it your own. You’ll impress family and friends with your cooking skills!

Honey Mustard Chicken Tasty and Simple Recipe

Are you ready to impress your family with a dish that’s both tasty and easy to make? This Honey Mustard

- 1 cup creamy peanut butter - 1 cup granulated sugar - 1 cup packed brown sugar - 1 large egg - 1 teaspoon vanilla extract - 1 teaspoon baking soda - ½ teaspoon salt - 1 ½ cups all-purpose flour These ingredients bring the magic to Peanut Butter Blossoms. Creamy peanut butter adds rich taste. The sugars ensure sweetness and a chewy texture. The egg binds it all together, while the vanilla gives a warm flavor. Baking soda helps the cookies rise, and salt balances the sweetness. All-purpose flour makes the dough smooth and easy to work with. - Different types of chocolate kisses - Nuts, sprinkles, or sea salt You can mix it up with optional ingredients. Try dark chocolate or even caramel kisses for a twist. Adding nuts gives a nice crunch. Sprinkles make them festive, while a sprinkle of sea salt enhances the flavor. - Mixing bowls - Baking sheet and parchment paper To get started, gather your equipment. You need mixing bowls to combine the ingredients. A baking sheet lined with parchment paper makes for easy cleanup. This setup helps your cookies bake evenly and prevents sticking. For the full recipe, check the section above. First, preheat your oven to 350°F (175°C). This is key for baking. While the oven heats, line a baking sheet with parchment paper. This helps prevent sticking and makes cleanup easy. Next, you’ll need a large mixing bowl. In it, combine 1 cup of creamy peanut butter, 1 cup of granulated sugar, and 1 cup of packed brown sugar. Mix until it’s all blended and creamy. It should look smooth and thick. Now, add 1 large egg, 1 teaspoon of vanilla extract, 1 teaspoon of baking soda, and ½ teaspoon of salt to the peanut butter mix. Stir well until everything is combined. Gradually add 1 ½ cups of all-purpose flour. Mix until a smooth dough forms. This part is fun; you’ll feel the dough come together nicely. Now, it’s time to form the dough balls. Take about 1 tablespoon of dough and roll it into a ball, about 1 inch wide. Roll each ball in granulated sugar to coat it. This gives the cookies a sweet sparkle. Once rolled, place the sugar-coated dough balls on the prepared baking sheet. Make sure to leave about 2 inches between each ball. They will spread as they bake. Bake your cookies in the preheated oven for 10-12 minutes. Watch for the edges to turn lightly golden. This means they are ready. When you take the baking sheet out of the oven, press a chocolate kiss into the center of each cookie right away. The cookie will crack around the edges, which is perfect! Let the cookies cool on the baking sheet for about 5 minutes. Then, transfer them to a wire rack to cool completely. This cooling step ensures they keep their shape and flavor. Enjoy your Peanut Butter Blossoms! For the full recipe, check out the detailed steps above. Measuring ingredients correctly is key. Use dry measuring cups for flour and sugar. For peanut butter, a liquid measuring cup works best. This ensures your dough has the right texture. To get the perfect cookie texture, mix the dough just until combined. Overmixing makes cookies tough. You want them soft and chewy. Chill the dough for 30 minutes before baking. This helps the cookies hold their shape. One big mistake is overmixing the dough. This makes cookies dense. Underbaking is another issue. Cookies should be slightly golden around the edges. They will continue to bake after you take them out. Don't forget to space your cookies on the baking sheet. Leave about 2 inches between each ball. This stops them from merging into one giant cookie. These cookies pair well with milk or hot cocoa. For a fun twist, serve them with ice cream. They are also great to share at parties. Display your cookies on a festive plate. Add a few chocolate kisses on the side. This makes them look extra special for holidays or gatherings. If you want to impress, try the Full Recipe for more details. {{image_2}} You can switch up the chocolate kiss on top of your cookies. Dark chocolate kisses work well for a richer taste. You can also try flavored kisses, like caramel or mint. These small changes add fun to your cookies. You might even try using other candies, like Reese's Pieces or M&Ms, for a colorful touch. If you need gluten-free options, you can use gluten-free flour instead of all-purpose flour. Make sure to check the flour's label to ensure it is safe for your diet. For vegan substitutions, replace the egg with a flaxseed or chia seed mixture. Mix one tablespoon of flaxseed meal with three tablespoons of water and let it sit for a few minutes. This mixture helps bind the ingredients just like an egg. Want to add more flavor? You can mix in spices like cinnamon or nutmeg into the dough. Just a pinch can elevate the taste. Adding chocolate chips or dried fruits can also add texture and sweetness. Both options make your cookies even more delightful. Experimenting with these variations makes your Peanut Butter Blossoms unique and tasty. For the full recipe, check out the details above. To keep your Peanut Butter Blossoms fresh, store them at room temperature. Use an airtight container. This helps keep the cookies soft and tasty. Place a layer of wax paper between layers of cookies to avoid sticking. Do not stack them too high. They can last up to one week this way. If you want to save some for later, freezing is a great option. Place the cookies in a freezer-safe bag or container. Make sure to remove as much air as possible. They can stay frozen for about three months. When you're ready to eat them, take out the cookies and let them thaw at room temperature. If you want them warm, pop them in the microwave for a few seconds. Peanut Butter Blossoms can last about a week at room temperature. If you freeze them, they can last up to three months. Check for signs of spoilage like an off smell or hard texture. If they feel dry or crumbly, it's time to toss them. Enjoy these delightful treats while they are fresh! For the full recipe, check out the provided link. To keep your Peanut Butter Blossoms fresh, store them in an airtight container. Place a piece of wax paper between layers of cookies to prevent sticking. They stay good for about a week at room temperature. For longer storage, freeze them. Wrap each cookie in plastic wrap and place them in a freezer-safe bag. They can last for up to three months. When you're ready to eat them, thaw the cookies at room temperature. Yes, you can make Peanut Butter Blossoms without eggs. Use a mashed banana or applesauce instead. For each egg, use 1/4 cup of applesauce or 1/2 a mashed banana. This change keeps the cookies moist but may make them softer. The taste will still be delicious, but the texture might be a bit different. Peanut Butter Blossoms stand out due to their signature chocolate kiss on top. Regular peanut butter cookies do not have this chocolate addition. The kiss adds a sweet and creamy contrast to the salty peanut butter. The dough is also rolled in sugar before baking, giving it a nice crunch. This extra step makes them special and fun to eat. You can swap regular sugar for coconut sugar or a sugar substitute. Use whole wheat flour instead of all-purpose flour for added fiber. You can also try natural peanut butter, which has less sugar. For a nut-free option, use sunflower seed butter. Adding oats can also boost nutrition. These changes help make the cookies healthier while still being tasty. For more detailed steps, check the Full Recipe. This blog post covered all you need to know about making Peanut Butter Blossoms. We discussed main ingredients, optional add-ins, and necessary tools. You learned step-by-step instructions for baking, tips for best results, and variations to try. We also shared storage options and answered common questions. You can easily impress others with these cookies. They are simple yet delicious and adaptable. Use this guide to create your own unique Peanut Butter Blossoms. Baking brings joy, so enjoy the process!

Peanut Butter Blossoms Delicious Cookie Recipe

Craving a sweet treat that’s fun to make? Look no further than Peanut Butter Blossoms! These classic cookies combine creamy

For the Rainbow Veggie Skewers, you need vibrant vegetables that not only taste great but also look stunning. Here’s what you’ll use: - 1 red bell pepper, cut into 1-inch pieces - 1 orange bell pepper, cut into 1-inch pieces - 1 yellow zucchini, sliced into rounds - 1 green zucchini, sliced into rounds - 1 cup cherry tomatoes - 1 small red onion, cut into wedges - 1 cup mushrooms, halved Each vegetable adds its own flavor and texture. The red and orange bell peppers bring sweetness. The zucchinis add a nice crunch. Cherry tomatoes burst with juice when you bite into them. Red onion gives a mild bite, while mushrooms provide a hearty touch. The marinade plays a key role in making these skewers flavorful. Here’s what you’ll need: - 3 tablespoons olive oil - 1 teaspoon garlic powder - 1 teaspoon dried oregano - 1 teaspoon smoked paprika - Salt and pepper to taste Mix these ingredients to create a simple yet tasty marinade. The olive oil helps the veggies cook well on the grill and adds richness. Garlic powder brings great flavor without the fuss of chopping garlic. Oregano and smoked paprika add depth and warmth. To finish, you’ll want some fresh herbs. Use: - Fresh parsley, chopped (for garnish) Adding parsley at the end not only makes the dish look pretty, it also gives a fresh taste. This bright green herb enhances the colors of the skewers and adds a final touch of flavor. For the full recipe, check [Full Recipe]. Enjoy making these colorful and tasty Rainbow Veggie Skewers! Start by washing all your veggies. Use a sharp knife for chopping. Cut the red and orange bell peppers into 1-inch pieces. For the zucchini, slice it into thick rounds. Halve the cherry tomatoes and cut the red onion into wedges. For mushrooms, just halve them. Now, grab your skewers. Arrange the veggies on them in a colorful pattern. Alternate colors and shapes for a fun look. Aim for 4 to 5 pieces per skewer. This makes it easy to cook and eat. In a large bowl, mix olive oil, garlic powder, oregano, and smoked paprika. Add salt and pepper to taste. Whisk it all together until it blends well. This mix packs a punch of flavor! Pour the marinade over your veggies. Toss them gently to coat every piece. This step is key for flavor. Let them sit for a few minutes so the veggies soak up the goodness. Preheat your grill to medium heat. This helps the skewers cook evenly. Place your veggie skewers on the grill. Cook them for about 10 to 12 minutes. Remember to turn them every few minutes. This ensures they grill nicely on all sides. Once they are tender and have those lovely grill marks, take them off the heat. Let them cool for a couple of minutes. This makes them easier to handle. For the full recipe, check the details above! To get nice grill marks, follow these tips: - Preheat your grill to medium heat. This helps the veggies cook evenly. - Place the skewers on the hottest part of the grill. This gets those perfect lines. - Turn the skewers every few minutes. This ensures all sides get a nice char. To avoid burning the veggies, remember these points: - Cut your veggies into even pieces. This helps them cook at the same rate. - Use oil in your marinade. This adds flavor and reduces sticking. - Keep an eye on the skewers. Remove them when they start to get tender. For a stunning display at parties, try these ideas: - Arrange the skewers on a large platter. This makes a colorful centerpiece. - Garnish with fresh herbs. Parsley or basil adds a nice touch. Pair your skewers with dips or sauces to enhance flavor: - Try a yogurt-based dip for creaminess. - A spicy salsa can add a fun kick. Rainbow veggie skewers offer many nutritional perks: - Each vegetable brings unique vitamins and minerals. - Bell peppers are high in vitamin C, great for your immune system. - Zucchini is low in calories and high in fiber, helping digestion. Encouraging a colorful plate is vital for health: - A variety of colors means a mix of nutrients. - Eating a rainbow of veggies can help prevent disease. For more details, check the Full Recipe for Rainbow Veggie Skewers. {{image_2}} You can mix up your skewers with seasonal veggies. Try using asparagus in spring or eggplant in summer. These choices add unique flavors and textures. You can also add fruits for a sweet twist. Pineapple and peaches work great. Their sweetness pairs well with the savory veggies. You can change the taste with different marinades. Try adding cumin or chili powder for a spicy kick. These spices can make your skewers pop with flavor. You can also mix in citrus juice or vinegar. Lemon or lime juice brightens the taste. Vinegar adds a nice tangy touch. If you want to cook indoors, the oven works well. Preheat your oven to 400°F. Arrange the skewers on a baking sheet. Roast them for about 20 minutes. This method makes them tender and flavorful. You can also broil the skewers for a quicker option. Broil them for 6 to 8 minutes, turning halfway. Enjoy the grilled look and taste without a grill! For the full recipe, check out the Rainbow Veggie Skewers. To keep your Rainbow Veggie Skewers fresh, place them in an airtight container. This will help prevent moisture loss and keep the flavors intact. You can store them in the fridge for up to three days. Make sure to let them cool down before sealing. If you want to save some skewers for later, freezing works well. First, wrap each skewer in plastic wrap. Then, place them in a freezer bag. You can freeze the skewers for up to three months. When you're ready to eat, thaw them overnight in the fridge. To heat them up, grill or bake them until warm. To make quick meals, prep your skewers in advance. You can chop the veggies and marinate them a day before grilling. Store them in the fridge until you're ready to cook. This helps you save time on busy days. You can also pair these skewers with grains or salads for a complete meal. To make Rainbow Veggie Skewers, follow these basic steps: 1. Choose your veggies: Use vibrant options like bell peppers, zucchini, and cherry tomatoes. 2. Prep the veggies: Cut the vegetables into bite-sized pieces. This helps them cook evenly. 3. Make the marinade: Mix olive oil, garlic powder, oregano, smoked paprika, salt, and pepper in a bowl. 4. Coat the veggies: Toss your chopped vegetables in the marinade until they are well-covered. 5. Thread onto skewers: Alternate the colors and types of veggies on skewers for a colorful look. 6. Grill: Cook on a preheated grill for 10-12 minutes, turning them for even cooking. For a complete guide, check the Full Recipe. Yes, you can use different vegetables! Here are some great substitutes: - Carrots: Cut into thin sticks. - Broccoli: Use small florets for texture. - Eggplant: Slice into cubes for a unique flavor. - Bell peppers: Swap colors for variety. - Fruits: Add pineapple or peaches for a sweet twist. These options keep your skewers fresh and fun with the seasons! Pair these skewers with delicious sides and sauces: - Rice or quinoa: These grains soak up flavors well. - Dips: Try hummus, tzatziki, or a yogurt sauce. - Salad: A light green salad adds freshness. - Grilled proteins: Serve with chicken, shrimp, or tofu for a full meal. These combinations round out your meal and delight your guests. Rainbow Veggie Skewers can last up to 3 days in the fridge. Here’s how to store them: - Keep them in an airtight container: This helps prevent drying out. - Separate cooked from raw: Store cooked skewers apart from fresh veggies. - Reheat gently: Warm them up in a skillet or microwave, but avoid overcooking. Following these tips keeps your leftovers tasty and fresh! Absolutely! Rainbow Veggie Skewers are perfect for vegan diets. They are: - Plant-based: Made entirely from vegetables and spices. - Nutritious: Packed with vitamins and minerals. - Low in calories: Great for those watching their intake. These skewers fit well into a healthy lifestyle and cater to many dietary needs. The best way to cook Rainbow Veggie Skewers is grilling. Here’s how it compares to oven roasting: - Grilling: - Adds smoky flavor. - Cooks quickly due to high heat. - Creates attractive grill marks. - Oven Roasting: - Good for colder weather. - Allows for even cooking. - Easy to set and forget. Both methods work well, but grilling gives a more vibrant taste. Choose what fits your mood! In this post, we explored how to make colorful Rainbow Veggie Skewers. We covered ingredients, from vibrant vegetables to tasty marinades. I shared step-by-step instructions, grilling tips, and serving ideas. Remember to mix things up with different veggies and marinades. These skewers are not just fun to make, but they’re also healthy. Enjoy your cooking and get creative with variations. These skewers can bring joy to any meal!

Rainbow Veggie Skewers Packed with Flavorful Goodness

Looking to add some color and flavor to your meals? Rainbow Veggie Skewers are your answer! Packed with fresh vegetables

To make Nutella stuffed pancakes, you need simple ingredients. Here’s what to gather: - 1 cup all-purpose flour - 2 tablespoons sugar - 1 tablespoon baking powder - 1/2 teaspoon salt - 1 cup milk - 1 large egg - 2 tablespoons melted butter - 1/2 cup Nutella (or any chocolate-hazelnut spread) - Butter or oil for cooking - Powdered sugar and sliced strawberries for serving (optional) These ingredients blend to create a fluffy pancake with a sweet surprise inside. You don’t need fancy equipment to cook these pancakes. Here’s what I recommend: - Large mixing bowl - Whisk - Non-stick skillet or griddle - Measuring cups and spoons - Spatula - Teaspoon for Nutella Using these tools makes the cooking process easy and fun. While Nutella stuffed pancakes taste great on their own, you can add some extra flair. Here are a few ideas: - Powdered sugar for a sweet dusting - Sliced strawberries for freshness - Whipped cream for creaminess - Chopped nuts for crunch Feel free to get creative with your toppings. Each addition can make your pancakes feel unique! For the complete recipe, check the Full Recipe section. To start, gather your ingredients. You will need flour, sugar, baking powder, salt, milk, egg, and melted butter. In a big bowl, whisk the flour, sugar, baking powder, and salt together. Mix until everything is well combined. In a separate bowl, pour in the milk, crack the egg, and add the melted butter. Stir this mixture until it is smooth. Now, slowly add the wet mix to the dry mix. Stir gently to combine. It's okay if there are a few lumps. This keeps the pancakes light and fluffy. Heat a non-stick skillet over medium heat. Add a little butter or oil to coat the pan. For each pancake, pour about 1/4 cup of batter into the skillet. Wait until the pancake starts to bubble on the surface, which takes about 2-3 minutes. This shows it is ready for stuffing. Take a teaspoon of Nutella and spoon it gently into the center of the pancake. Next, add another 1/4 cup of batter on top of the Nutella. This covers it completely. Cook for another 2-3 minutes until the bottom is golden brown. Carefully flip the pancake over and cook for another 2-3 minutes until both sides are a lovely golden color. Repeat this with the rest of the batter and Nutella. Serve warm and enjoy the deliciousness of Nutella stuffed pancakes. For a lovely touch, you can dust with powdered sugar and add fresh strawberries on top. For the complete recipe, check the Full Recipe. To make fluffy pancakes, use fresh baking powder. This helps them rise well. Mix the wet and dry ingredients separately first. Then, combine them gently. Overmixing creates tough pancakes. Aim for a few lumps in your batter. This keeps them soft and tender. When stuffing pancakes with Nutella, timing is key. Pour the batter onto the skillet and wait until bubbles form. This shows the pancake is ready. Place Nutella in the center using a teaspoon. Cover it with more batter. This ensures the Nutella stays inside while cooking. Cook pancakes on medium heat to avoid burning. A non-stick skillet works best for easy flipping. Use a little butter or oil to coat the surface. Flip the pancake when the bottom is golden brown. This usually takes about 2-3 minutes per side. For a nice touch, serve with powdered sugar and fresh fruit. For the full recipe, check out the detailed steps above. {{image_2}} While Nutella is a classic choice, you can try other fillings. Here are some fun options: - Peanut Butter: Spread creamy or crunchy peanut butter for a nutty twist. - Fruit Jam: Use your favorite jam for a fruity flavor. Strawberry or raspberry work well. - Cream Cheese: For a richer taste, mix cream cheese with a bit of sugar. - Chocolate Chips: Add a handful of chocolate chips for extra sweetness. These fillings can make your pancakes unique. Feel free to mix and match! You can still enjoy these pancakes if you follow a gluten-free or vegan diet. Here are some tips: - Gluten-Free Flour: Swap all-purpose flour for a gluten-free blend. Make sure it has a binding agent like xanthan gum. - Milk Alternatives: Use almond milk, soy milk, or oat milk instead of regular milk. - Egg Replacement: Use a flax egg (1 tablespoon of flaxseed meal + 2.5 tablespoons of water) for each egg. - Vegan Butter: Use coconut oil or vegan butter in place of regular butter. These options ensure everyone can enjoy Nutella stuffed pancakes. Want to make your pancakes even better? Here are some easy flavor boosters: - Vanilla Extract: Add a teaspoon of vanilla extract to the batter for extra flavor. - Cinnamon: A pinch of cinnamon can give your pancakes a warm, cozy taste. - Zest: Try adding lemon or orange zest for a fresh twist. - Nutmeg: A sprinkle of nutmeg adds a lovely depth to your pancakes. These enhancements can elevate your breakfast and make it even more delicious. For the full recipe, check the earlier section. Storing leftover Nutella stuffed pancakes is easy. Let them cool to room temperature first. Then, stack them with parchment paper in between. Place the stack in an airtight container. This keeps them fresh and prevents sticking. You can store them in the fridge for up to three days. Reheating pancakes can be quick. You can use a microwave or a skillet. For the microwave, place a pancake on a plate and cover it with a damp paper towel. Heat for about 20-30 seconds. For the skillet, add a tiny bit of butter. Heat each pancake on low for about one minute on each side. This method keeps them fluffy and tasty. Freezing is a great option for future breakfasts. After they cool, place each pancake in a single layer on a baking sheet. Freeze them for about an hour. Once frozen, stack them in a freezer bag or container. Make sure to remove as much air as possible. These can last up to two months in the freezer. When ready to eat, just reheat them straight from the freezer. Enjoy your delicious treat anytime! For the full recipe, check out the details above. Yes, you can make these pancakes without an egg. Use a banana or applesauce instead. One small mashed banana replaces one egg. If you use applesauce, 1/4 cup works well. Both options add moisture and sweetness. Plus, they keep the pancakes fluffy. It’s a great way to enjoy Nutella stuffed pancakes if you have an egg allergy or follow a vegan diet. To prevent Nutella from leaking, use cold Nutella. Cold Nutella thickens and stays put better than warm Nutella. After you pour the pancake batter, let it cook for a bit before adding Nutella. This helps seal it in. Make sure to cover the Nutella completely with batter before flipping. Keep the heat moderate to avoid burning the outside while cooking the inside. You can serve Nutella stuffed pancakes with many tasty items. Powdered sugar adds a nice sweetness. Fresh fruit like strawberries or bananas gives a fresh taste. Whipped cream makes it extra special. You can also drizzle more Nutella on top for a chocolatey boost. For a nutty flavor, try chopped nuts or a sprinkle of sea salt. These options enhance the flavor and make your breakfast a feast! Nutella stuffed pancakes are a treat everyone should try. We covered key ingredients, kitchen tools, and tasty toppings. You now have a step-by-step guide to making and stuffing these pancakes. I shared tips for fluffiness and safe storage. You can even play with flavors or try different diets. Remember, don’t hesitate to get creative with fillings and toppings. Enjoy your cooking and share these pancakes with friends or family. They will love the sweet surprise!

Nutella Stuffed Pancakes Irresistible Breakfast Delight

Imagine starting your day with warm, fluffy pancakes filled with creamy Nutella. Sounds dreamy, right? These Nutella stuffed pancakes are

To make a perfect mushroom risotto, you need simple yet tasty ingredients. Here’s what you need: - 1 cup Arborio rice - 4 cups vegetable broth - 2 tablespoons olive oil - 1 tablespoon unsalted butter - 1 medium onion, finely chopped - 3 cloves garlic, minced - 2 cups mixed mushrooms (button, shiitake, and cremini), chopped - 1/2 cup grated Parmesan cheese (or nutritional yeast for a vegan option) - 1/4 cup fresh parsley, chopped - Salt and pepper to taste - 1 teaspoon truffle oil (optional, for added flavor) These ingredients create a rich and creamy dish that comforts the soul. If you follow a specific diet, you have options. You can swap vegetable broth for chicken broth if you prefer. For a vegan dish, use nutritional yeast instead of cheese. If you can’t find Arborio rice, Carnaroli rice works well too. Now, let’s talk about flavors. Adding spices and herbs can boost your risotto. Consider adding a pinch of thyme or rosemary for a fresh twist. A squeeze of lemon juice can also brighten the dish. With these ingredients, you can make a stunning mushroom risotto. If you want to see more details on this recipe, check out the Full Recipe. First, let’s start with the onion and garlic. Heat 2 tablespoons of olive oil and 1 tablespoon of butter in a large skillet over medium heat. Add 1 finely chopped onion and 3 minced garlic cloves. Cook them for about 3 to 4 minutes. You want the onions to turn soft and clear. This will make your risotto fragrant. Next, add the mushrooms. Use 2 cups of mixed mushrooms like button, shiitake, and cremini. Stir them into the pan. Cook for 5 to 7 minutes until they are tender. You will notice they release moisture. This adds rich flavor to your risotto. Now, it’s time to toast the rice. Add 1 cup of Arborio rice to the skillet. Stir it for about 2 minutes. Look for a slight change in color; the grains should look a bit clear. This step helps to lock in the flavors. After toasting, grab your broth. You need 4 cups of warm vegetable broth. Add it to the rice one ladle at a time. Stir it often. Let the rice absorb most of the liquid before adding more. This process takes about 18 to 20 minutes. The rice will become creamy and tender but still have a slight bite. Once the rice is ready, remove the skillet from the heat. It’s time to add the cheese and seasonings. Stir in 1/2 cup of grated Parmesan cheese or nutritional yeast for a vegan option. Add salt and pepper to taste. You can also drizzle in 1 teaspoon of truffle oil for extra flavor. Let the risotto rest for a couple of minutes. This helps it thicken. Serve it warm in shallow bowls. You can garnish it with fresh parsley and a sprinkle of more cheese. Enjoy your creamy and flavorful Mushroom Risotto! Check the [Full Recipe] for complete details. To make a creamy risotto, stir continuously. This keeps the rice from sticking and helps it cook evenly. Stirring also helps release the starch from the rice. For the best results, always choose Arborio rice. It has the right amount of starch. This type of rice gives the risotto its smooth texture. Using homemade broth makes a big difference. It adds depth and freshness to the dish. If you want to get fancy, try using truffle oil. Just a teaspoon can elevate your risotto to gourmet levels. It adds a rich, earthy flavor that pairs well with mushrooms. One big mistake is overcooking the rice. This can lead to a mushy texture. Aim for al dente rice, which means it should still have a slight bite. Another mistake is skipping the resting period. Letting the risotto sit for a few minutes helps it thicken and improves its flavor. {{image_2}} You can change up the mushrooms in your risotto. Try using a mix of wild mushrooms for a unique taste. Varieties like oyster, chanterelle, or portobello can add depth. Flavored oils can also enhance your dish. A drizzle of garlic-infused oil or truffle oil boosts the flavors. You can even top your risotto with crispy mushroom chips for extra crunch. Want a vegan option? Simply replace the butter and cheese with olive oil and nutritional yeast. This keeps the creaminess while keeping it plant-based. For gluten-free risotto, ensure your broth is gluten-free. You can also swap Arborio rice for gluten-free grains like quinoa. Adjusting for lactose intolerance is easy. Use the nutritional yeast to get that cheesy flavor without dairy. Mushroom risotto pairs well with many side dishes. A fresh green salad adds a nice crunch. You can also serve it with roasted vegetables for balance. For wine, a crisp white like Sauvignon Blanc complements the dish well. If you prefer red, a light Pinot Noir works nicely. These choices create a complete meal that feels special. Enjoy your risotto with these perfect pairings! For the full recipe, check out the Mushroom Medley Risotto section. To store leftover risotto, let it cool first. Place the risotto in an airtight container. You can use glass or plastic containers. Make sure the lid seals well. This keeps the flavors fresh. Store it in the fridge for up to three days. For reheating in the microwave, place the risotto in a microwave-safe bowl. Add a splash of broth or water to keep it moist. Cover with a damp paper towel. Heat in short bursts, stirring in between. This helps it warm evenly. To reheat on the stovetop, put the risotto in a skillet. Add a bit of broth or water. Heat on low, stirring often. This method keeps the risotto creamy. It also helps retain its flavor. To freeze mushroom risotto, pack it in a freezer-safe container. Leave some space at the top for expansion. Seal the container tightly and label it. You can freeze it for up to two months. When ready to eat, thaw the risotto in the fridge overnight. For reheating, use the stovetop method. Add a little broth or water as needed. This keeps it from drying out. Enjoy your creamy dish again! For more details, check the Full Recipe. The best rice for Mushroom Risotto is Arborio rice. This rice has a high starch content. It makes the dish creamy and rich. Arborio rice absorbs flavors well. It also stays firm during cooking. If you want different textures, you can try Carnaroli or Vialone Nano rice. Both are great options for risotto. They offer a similar creamy finish and have their unique taste. Mushroom Risotto lasts about 3 to 5 days in the fridge. Make sure to store it in an airtight container. This helps keep it fresh. Signs of spoilage include an off smell or mold. If you see any of these signs, throw it away. It's always better to be safe with food. You can prepare Mushroom Risotto ahead of time. To do this, cook the risotto as usual. Let it cool to room temperature before storing. For the best taste, heat it gently before serving. Add a splash of broth or water to restore creaminess. This will help keep the flavors fresh and vibrant. For the full recipe, check out the details above. Making mushroom risotto is fun and rewarding. We explored ingredients, from main mushrooms to spices. I walked you through each step, from sautéing to adding cheese. I shared tips for a creamy finish and common mistakes to avoid. You can also try variations and storage tips for leftovers. In the end, this dish can be simple or gourmet. Enjoy customizing it to fit your taste! Cooking should be enjoyable, so don’t be afraid to experiment. With practice, you'll create delicious risotto every time.

Mushroom Risotto Creamy and Flavorful Dish Tonight

Ready to impress your taste buds? This creamy Mushroom Risotto is not just delicious; it’s also simple to make! I’ll

- 4 bone-in, skin-on chicken thighs - 1/4 cup honey - 1/4 cup Dijon mustard - 2 tablespoons apple cider vinegar - 2 cloves garlic, minced - 1 teaspoon paprika - 1 teaspoon dried thyme - Salt and pepper to taste - 2 tablespoons olive oil - Fresh parsley for garnish When you measure ingredients for honey mustard chicken thighs, use standard measuring cups and spoons. For liquids like honey and vinegar, use clear measuring cups for accuracy. With sticky ingredients like honey, spray the cup with a little oil first. This helps the honey slide out easily. For dry ingredients, like spices, level the measuring spoon with a straight edge. This keeps your flavors balanced. If you want to switch things up, you can use maple syrup instead of honey. This gives a nice twist to the flavor. If you don’t have Dijon mustard, yellow mustard works too but will change the taste. You can also add fresh herbs like rosemary or oregano for a different touch. For a spicy kick, add a pinch of cayenne pepper or some hot mustard. These small changes can lead to a whole new dish. Start by patting the chicken thighs dry with paper towels. This helps the skin get crispy. Next, season both sides with salt and pepper. This step adds flavor. Make sure to coat each piece well. You want every bite to taste great. In a mixing bowl, combine the following ingredients: - 1/4 cup honey - 1/4 cup Dijon mustard - 2 tablespoons apple cider vinegar - 2 cloves garlic, minced - 1 teaspoon paprika - 1 teaspoon dried thyme - Salt and pepper to taste Whisk everything together until it blends well. This marinade gives the chicken a sweet and tangy flavor. It also keeps the meat juicy while cooking. Heat 2 tablespoons of olive oil in an oven-safe skillet over medium-high heat. Once the oil is hot, add the chicken thighs skin-side down. Sear them for about 4-5 minutes. Look for a nice golden brown color on the skin. This step seals in the juices and adds crunch. After searing, flip the chicken thighs over. Pour the honey mustard marinade on top. Ensure the chicken is well coated. Now, transfer the skillet to your preheated oven at 400°F (200°C). Bake for 25-30 minutes. Check the internal temperature. It should reach 165°F (75°C) to be safe to eat. Once done, take the skillet out and let the chicken rest for 5 minutes. Garnish with fresh parsley for a pop of color. For the full recipe, check out the section above. To get crispy skin on your chicken thighs, start by patting them dry with paper towels. Dry skin helps it crisp up better. Season the skin with salt and pepper. Searing the chicken skin-side down in a hot skillet is key. Cook it for 4-5 minutes until golden brown. This step locks in the flavor and keeps the skin crunchy. For the best flavor, marinate your chicken thighs for at least 30 minutes. If you have time, marinating for 2 to 4 hours is even better. This allows the honey mustard mix to soak into the meat. You can also marinate overnight in the fridge for a deeper flavor. One mistake is not preheating your oven. Always make sure it is hot before baking. Another error is using too much sauce. Pour just enough to coat the chicken for a balanced taste. Don’t skip letting the chicken rest after cooking. This step helps keep it juicy. Remember, follow the Full Recipe for best results! {{image_2}} Grilling adds a smoky flavor to the chicken. Start by marinating the chicken in the honey mustard mix for at least 30 minutes. This helps the flavor soak in. Preheat your grill to medium-high heat. Place the marinated chicken thighs skin-side down on the grill. Cook for 6-7 minutes per side. Look for nice grill marks and a crispy skin. Ensure the chicken cooks to an internal temperature of 165°F (75°C). Using a slow cooker makes this dish easy and hands-free. Just mix the honey mustard marinade as you normally would. Place the chicken thighs in the slow cooker and pour the marinade over them. Set the slow cooker to low for 6-7 hours or high for 3-4 hours. The chicken will turn tender and juicy. You can also add veggies like carrots or potatoes for a complete meal. For those who like heat, add some spice to your honey mustard mix. You can stir in a teaspoon of hot mustard or a dash of cayenne pepper. If you want more flavor, try adding chili flakes or Sriracha. This will give your chicken a nice kick. Adjust the amount based on your heat preference. Enjoy the spicy twist with your favorite sides. For the full recipe, check out Honey Mustard Chicken Thighs. To store your leftover honey mustard chicken thighs, let them cool first. Place them in an airtight container. You can keep them in the fridge for up to three days. Make sure to label the container with the date. This helps track how fresh your food is. When you are ready to eat the leftovers, you can reheat them easily. Preheat your oven to 350°F (175°C). Place the chicken thighs in an oven-safe dish. Cover the dish with foil to keep the moisture in. Heat for about 15-20 minutes, or until they are warm. You can also use a microwave, but the oven keeps the skin crispy. If you want to save some for later, freezing works well. First, cool the chicken completely. Wrap each thigh tightly in plastic wrap, then place them in a freezer bag. Try to remove as much air as possible. You can freeze them for up to three months. When you are ready to eat, thaw them overnight in the fridge before reheating. For more details on this recipe, check out the Full Recipe. You should cook chicken thighs for about 25 to 30 minutes in the oven. The key is to check the internal temperature. It should reach 165°F (75°C) for safe eating. Cooking times may vary based on your oven and the size of the thighs. Always use a meat thermometer to be sure. Yes, you can use boneless chicken thighs. They cook faster than bone-in thighs. If you use boneless thighs, reduce the cooking time to about 20 to 25 minutes. Check the internal temperature to ensure they are cooked through. The honey mustard flavor will still shine through with boneless thighs. You can serve honey mustard chicken thighs with many sides. Roasted vegetables are a great choice. Mashed potatoes or rice make a good base, too. A fresh green salad adds a nice crunch. Don't forget crusty bread to soak up the extra sauce. You can find the full recipe [here](#)
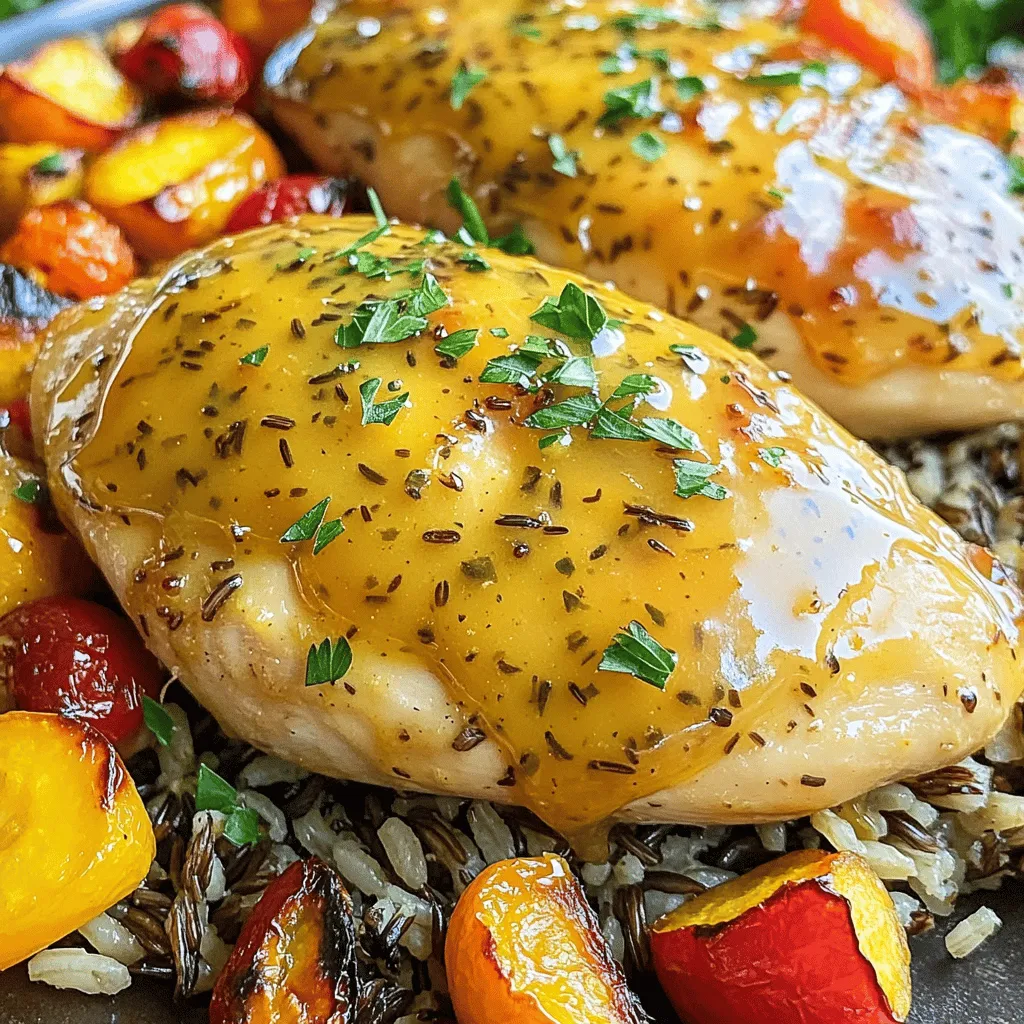
. This post covered how to make delicious honey mustard chicken thighs. I shared the key ingredients, like chicken, honey, and Dijon mustard. I detailed easy steps for prepping, cooking, and variations like grilling or slow cooking. You learned tips for crispy skin and how to store leftovers. Now you can try these recipes, explore variations, and impress your family and friends. Enjoy cooking with these simple steps and have fun making new meals!

Honey Mustard Chicken Thighs Easy and Flavorful Dish

Looking to spice up your dinner routine? Honey Mustard Chicken Thighs offer a simple and tasty way to impress your

- 2 cups cooked jasmine rice (preferably day-old) - 1 cup mixed bell peppers (red, yellow, green), diced - 1 medium carrot, diced - 1 cup green peas (fresh or frozen) - 3 green onions, chopped - 2 cloves garlic, minced - 2 tablespoons soy sauce (low sodium) - 1 tablespoon sesame oil - 1 tablespoon olive oil - 1 teaspoon ginger, grated - Salt and pepper to taste - Fresh cilantro for garnish Using day-old rice is key. It has the right texture and avoids mushiness. Freshly cooked rice can become sticky when fried. The mixed bell peppers add color and sweetness. You can choose any colors you like. Carrots bring a nice crunch. Green peas add a pop of color and nutrition. The green onions give a fresh taste and a bit of spice. Each ingredient plays a role in making this dish vibrant and tasty. Now, let's talk about the flavors. Garlic and ginger add depth. Soy sauce gives umami, a savory flavor that makes it rich. Sesame oil adds warmth and a nutty note. These seasonings balance each other and make the dish shine. Feel free to get creative! You can swap in your favorite veggies or even add nuts for extra crunch. The Full Recipe guides you step-by-step to create this delightful meal. Begin by prepping all your vegetables. Dice mixed bell peppers, carrots, and green onions. Make sure the green peas are ready, whether fresh or frozen. This prep helps the cooking go fast. Heat olive oil in a large skillet or wok over medium-high heat. Once the oil is hot, add minced garlic and grated ginger. Sauté them for about 30 seconds. You want to smell their lovely scent fill your kitchen. Next, add the diced carrots and bell peppers to the pan. Stir-fry for about 3-4 minutes. Cook until the veggies are tender yet still crisp. Then, stir in the green peas. Cook everything for another 2 minutes. Now, push the vegetables to one side of the skillet. Add sesame oil to the empty space. Pour in your cooked rice and break up any clumps. Drizzle soy sauce over the rice. Mix it well with the vegetables so all the flavors blend. Season your dish with salt and pepper to taste. Add the chopped green onions and toss everything together. Remove from heat and garnish with fresh cilantro if you like. For the full recipe, see the section above. Using day-old rice is best for fried rice. It dries out a bit, making it less sticky. Freshly cooked rice can clump together. If you need a gluten-free option, use rice made from brown rice or quinoa. Both work great and add a nice flavor. To take your fried rice to the next level, think about adding extra spices. A pinch of chili flakes can bring heat. If you like a deeper taste, try oyster sauce. It adds umami and richness. You can also mix in a splash of rice vinegar for some tang. Stir-frying is all about high heat. Make sure your skillet or wok is hot before adding oil. This helps create that amazing "wok hei" flavor. Keep the food moving so it cooks evenly. Don’t overcrowd the pan; this can lead to steaming instead of frying. {{image_2}} To make this dish vegan, start by replacing the soy sauce with a vegan option. You can use tamari, which is gluten-free, or a coconut aminos substitute. For the oil, stick with sesame oil and olive oil, as they are both plant-based. If you want a bit of creaminess, try adding a splash of plant-based milk while cooking. This will give your fried rice a nice texture without using any dairy. For a gluten-free version, use gluten-free soy sauce or tamari in place of regular soy sauce. Make sure to check that your sesame oil and any other sauces are also gluten-free. Some brands might add gluten, so it's best to read the labels. You can also use quinoa or brown rice instead of jasmine rice for a gluten-free grain option. If you want to make your vegetable fried rice heartier, consider adding protein. Tofu works great! Press and cube it, then sauté it until it’s golden. Tempeh is another excellent choice, offering a nutty flavor and a great texture. If you prefer meat, diced chicken or shrimp can be added as well. Just cook them first before adding the veggies and rice. This way, you create a filling meal that satisfies. For the full recipe, check out the link above. To keep your leftover vegetable fried rice fresh, store it in an airtight container. It can last for about 3 to 4 days in the fridge. Make sure it cools down to room temperature before sealing it up. This helps prevent moisture buildup, which can make the rice soggy. When you're ready to eat, just take it out and enjoy! If you want to save your fried rice for later, freezing is a great option. First, let the rice cool completely. Then, pack it tightly in a freezer-safe bag or container. Try to remove as much air as possible to avoid freezer burn. It can stay good for up to 3 months. When you’re ready to eat, thaw it in the fridge overnight and reheat it as needed. Reheating fried rice can be tricky, but there are a few good methods. The stovetop works best. Just add a splash of water or broth to a pan and heat it over medium. Stir frequently, so it warms evenly. You can also use a microwave, but cover it with a damp paper towel. This keeps the rice from drying out. Make sure it’s heated all the way through before serving. Yes, you can use various vegetables in your fried rice. This dish is very flexible. You can pick your favorites or whatever you have at home. For example, broccoli, zucchini, or corn are great options. You can even add leafy greens like spinach or bok choy. Using seasonal vegetables can make your dish fresh and tasty. Mix and match to keep it exciting! Vegetable fried rice can last about 3 to 5 days in the fridge. It’s essential to store it in an airtight container. Make sure to cool the rice down before placing it in the fridge. This helps keep it safe and tasty. If you see any change in smell or color, it’s best to throw it away. To keep your fried rice from getting mushy, start with day-old rice. Fresh rice has more moisture. If you must use fresh rice, spread it out on a tray and let it cool. When cooking, use high heat and avoid overcrowding the pan. Stir-fry quickly to keep the rice grains separate. These tips will help you achieve that perfect fried rice texture! Vegetable fried rice is simple to make and full of flavor. You prepare fresh veggies and combine them with day-old rice for the best texture. Use garlic, ginger, and soy sauce for a taste that pops. Remember, you can switch out ingredients or add protein to suit your needs. Store leftovers properly to enjoy more yummy meals later. Now, go ahead and make your own fried rice! It's quick, fun, and delicious.

Vegetable Fried Rice Flavorful and Easy Weeknight Meal

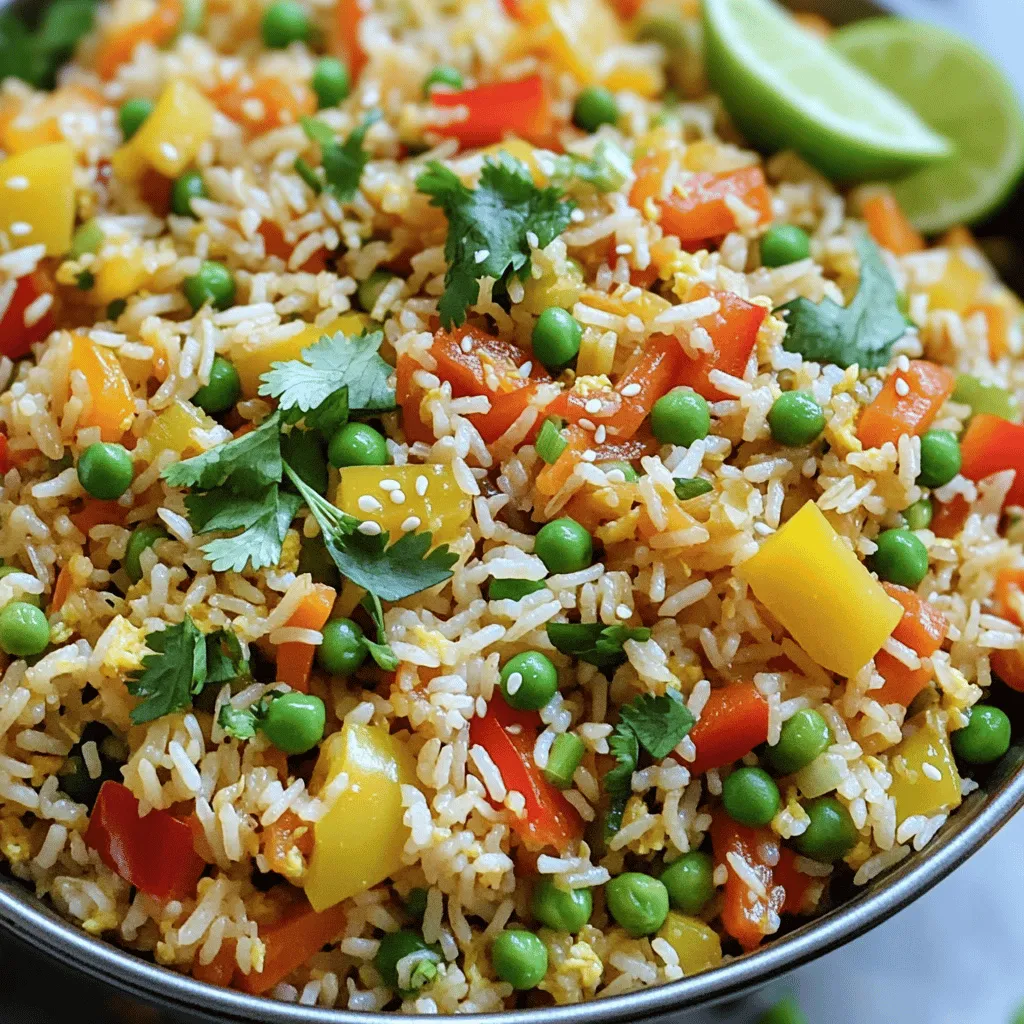
Looking for a quick and tasty dinner? This Vegetable Fried Rice recipe is your answer! With colorful veggies and fragrant

Older posts
Newer posts
← Previous Page1 … Page34 Page35 Page36 … Page49 Next →

dsad

© 2025 savoryspiral • Built with GeneratePress

Our Policies

  • Copyright Policy
  • Cookie Policy
  • GDPR Policy
  • Privacy Policy
  • Disclaimer
  • Terms Of Use

More Information

  • Home
  • About
  • Contact
  • Appetizers
  • Dessert
  • Dinner
  • Drinks
©2025, savoryspiral About Back To Top