Skip to content
DisclaimerTerms Of UseGDPR PolicyCookie Policy

savoryspiral

  • Home
  • Drinks
  • Appetizers
  • Dinner
  • Dessert
  • About
  • Contact
  • Privacy Policy
DisclaimerTerms Of UseGDPR PolicyCookie Policy

Charlotte

To make this dish, you need a few key items: - 2 lbs beef chuck roast, cut into 1-inch cubes - 1 medium onion, diced - 3 cloves garlic, minced - 8 oz mushrooms, sliced - 4 cups beef broth - 1 tablespoon Worcestershire sauce - 2 teaspoons dried thyme - 2 teaspoons paprika - Salt and pepper to taste - 1 cup sour cream - 1 box egg noodles (for serving) These ingredients blend to create a rich and creamy sauce. The beef chuck roast gives you tender bites. The onions and garlic add depth. Mushrooms bring an earthy flavor that makes it all special. You can add a few optional items to boost flavor: - 3 tablespoons cornstarch (for thickening, if desired) - Fresh parsley, chopped (for garnish) Using cornstarch helps thicken the sauce if you like it creamy. The parsley adds a pop of color and freshness. I suggest serving this dish over egg noodles. They soak up the sauce well. You can also pair it with a green salad or steamed veggies. This balance adds freshness to the meal. If you want to impress, finish with a sprinkle of parsley. For the full recipe, check [Full Recipe]. Start by cutting the beef chuck roast into 1-inch cubes. This size helps the meat cook evenly. Next, dice one medium onion and mince three cloves of garlic. Slice eight ounces of mushrooms. All these ingredients add great flavor to the dish. Place the beef, onion, garlic, and mushrooms into a large slow cooker. Pour four cups of beef broth over the meat and veggies. This broth adds moisture and flavor. Then, add one tablespoon of Worcestershire sauce, two teaspoons of dried thyme, and two teaspoons of paprika. Don’t forget to season with salt and pepper to taste. Stir everything together so the flavors mix well. Cover the slow cooker and set it to cook on low for seven to eight hours. If you’re in a hurry, you can cook on high for four to five hours. Once the cooking time is up, check the beef. It should be tender and easy to pull apart. If you want a thicker sauce, mix three tablespoons of cornstarch with a little cold water to make a slurry. Add this to the slow cooker during the last 30 minutes and stir well. After that, remove the lid and stir in one cup of sour cream until it is fully mixed in. Taste and adjust the seasonings if needed. While the stroganoff finishes, cook a box of egg noodles in a separate pot. Drain the noodles and serve the beef stroganoff over them. Top with fresh parsley for a nice touch. For the full recipe, check the link above. To get tender beef, start with a good cut. I like beef chuck roast. Cut it into 1-inch cubes. This size helps it cook evenly. You want to sear the beef before adding it to the slow cooker. Just brown it in a pan for a few minutes. This step adds flavor. It helps lock in juices too. Use low heat and let it cook for a long time. This will make the beef melt in your mouth. To boost flavor, use fresh herbs like thyme and parsley. Fresh herbs make a big difference. Don't skip the Worcestershire sauce. It adds a rich, savory taste. You can also try adding a splash of red wine for depth. For some heat, add a pinch of red pepper flakes. Taste your dish as it cooks. Adjust salt and pepper to your liking. This way, you ensure that the flavors are just right. One mistake is not cutting the beef into even pieces. Irregular sizes cook unevenly. Another common error is adding too much liquid. Stick to the recipe’s beef broth amount. If you want a thicker sauce, add cornstarch at the end. Stir it in well. Remember to wait until the last 30 minutes of cooking for this step. Finally, don’t forget to add sour cream at the end. This gives your dish that creamy finish. For the full recipe, check the details above. {{image_2}} To make a gluten-free beef stroganoff, swap regular egg noodles for gluten-free pasta. You can find many gluten-free options in stores. Also, use gluten-free beef broth and check the Worcestershire sauce for gluten. Most brands are safe, but it’s always good to read labels. For a vegetarian version, replace beef with hearty mushrooms or lentils. You can use portobello mushrooms for a meaty texture. Swap beef broth with vegetable broth or mushroom broth. Add more vegetables like bell peppers or carrots for extra flavor and nutrition. While egg noodles are classic, you can serve this dish over rice or mashed potatoes. For a healthier option, try it on a bed of steamed broccoli or cauliflower rice. Garnish with fresh parsley for a pop of color and taste. You can find the full recipe to explore even more ideas! Store your leftover beef stroganoff in an airtight container. Place it in the fridge. It will stay fresh for about three days. Make sure to let it cool first before sealing. This helps keep the texture right and avoids extra moisture. To reheat, you can use the stove or microwave. If using the stove, warm it on low heat in a pot. Stir often to avoid burning. For the microwave, place it in a safe bowl and cover it. Heat it in short bursts, stirring in between. This ensures even heating. If you want to save it for later, freezing works well. Put the beef stroganoff in a freezer-safe container. Leave some space at the top, as it will expand when frozen. It can last up to three months in the freezer. When ready to eat, let it thaw in the fridge overnight before reheating. For details on making this dish, check the Full Recipe. To make your beef stroganoff creamier, add more sour cream. You can use 1.5 cups instead of 1 cup. Another tip is to stir in some cream cheese. This will give it a rich texture. You can also mix cornstarch with water to thicken the sauce. Add it during the last 30 minutes of cooking. This makes the dish even richer. Yes, you can use other cuts of beef. Flank steak or sirloin are good choices. They cook well and stay tender. Just cut them into small pieces like the chuck roast. Adjust the cooking time if needed. It may cook faster than beef chuck. If you want a substitute for egg noodles, try rice or mashed potatoes. They both work well with the sauce. Zucchini noodles are a great low-carb option too. Use them if you want a healthier dish. Cook them separately and serve the stroganoff on top. Slow cooker beef stroganoff lasts about 3 to 4 days in the fridge. Store it in an airtight container to keep it fresh. Make sure it cools before putting it away. You can also freeze it for up to 3 months. Just thaw it in the fridge before reheating. Enjoy your beef stroganoff again later! For the full recipe, check out the earlier section. In this post, we covered everything about making slow cooker beef stroganoff. We explored the key ingredients, cooking steps, and tips for best results. I shared ways to tweak the recipe for your needs, like gluten-free options and vegetarian swaps. Remember, slow cooking brings out rich flavors, making your meal special. Making this dish is simple and fun, so get cooking and enjoy!

Savory Slow Cooker Beef Stroganoff Easy Family Meal

If you’re looking for a warm and hearty meal that the whole family will love, you’re in the right spot.

- 1 pound Brussels sprouts, halved - 3 tablespoons olive oil - 1 teaspoon garlic powder - 1 teaspoon onion powder - Salt and pepper, to taste - 3 tablespoons honey - 1 tablespoon balsamic vinegar - ¼ cup crumbled feta cheese (optional) - Chopped fresh parsley for garnish Crispy Brussels sprouts with honey need fresh ingredients for the best taste. Start with one pound of Brussels sprouts. Halving them helps with even cooking. You will also need three tablespoons of olive oil. This oil adds flavor and helps achieve the perfect crisp. For seasoning, gather garlic powder, onion powder, salt, and pepper. These spices give your dish warmth and depth. The magic happens with three tablespoons of honey and one tablespoon of balsamic vinegar. This mix creates a sweet glaze that balances the sprouts' natural bitterness. Optional toppings can enhance your dish. I love adding crumbled feta cheese for creaminess. Fresh parsley gives a pop of color and freshness. You can find the Full Recipe for a detailed guide on preparing this dish. 1. Preheating the oven Start by setting your oven to 400°F (200°C). This high heat makes the Brussels sprouts crispy. 2. Mixing ingredients for seasoning In a large bowl, mix the olive oil, garlic powder, onion powder, salt, and pepper. This blend adds great flavor. 3. Combining Brussels sprouts with oil and spices Add the halved Brussels sprouts to the bowl. Toss them well to coat each sprout in the seasoning. 1. Roasting Brussels sprouts Spread the Brussels sprouts on a baking sheet. Make sure they are cut side down. This helps them get extra crispy. Roast them for 20-25 minutes. Look for a golden brown color. 2. Preparing the honey glaze While the sprouts roast, mix honey and balsamic vinegar in a small bowl. This glaze will add a sweet touch. 3. Final roasting for caramelization After the first roast, take the baking sheet out. Drizzle the honey glaze over the sprouts. Toss them gently to coat well. Return the sheet to the oven for another 5 minutes. This step caramelizes the honey. For the full recipe, follow the instructions above to make this delicious dish. Enjoy your crispy Brussels sprouts with honey! To get your Brussels sprouts crispy, pay attention to a few key factors. First, the size of the sprouts matters. Halve them into equal pieces. This helps them cook evenly. Second, the temperature of your oven is crucial. Preheating it to 400°F (200°C) ensures a nice roast. The biggest tip? Always spread the Brussels sprouts in a single layer on your baking sheet. This allows hot air to circulate around each piece. If they overlap, they will steam instead of crisp. No one wants a soggy sprout! To adjust the sweetness of your dish, consider using less honey. You can also try adding a pinch of salt. This helps balance the sweetness. For a fun twist, add a splash of lemon juice. It brightens the flavor without overpowering it. If you want to change up the glaze, consider using maple syrup or agave nectar instead of honey. Both options add a unique taste. Additionally, try using different vinegars. Apple cider vinegar can give a fruity note to the glaze. You can also mix in spices like chili flakes for a kick. These small changes can take your crispy Brussels sprouts to a new level. Use these tips to create your perfect dish! For the full recipe, check out the [Full Recipe]. {{image_2}} You can switch honey for maple syrup or agave nectar. Both add a nice sweetness. Maple syrup gives a unique flavor, while agave is milder. Use them in equal amounts as honey. This change keeps the dish delicious. Experiment with these options to find your favorite. Add nuts or seeds for a crunchy twist. I love using almonds or pumpkin seeds. They boost texture and flavor. You can also try adding pecans or walnuts. Changing the cheese can enhance the taste too. If feta is not your favorite, try goat cheese or Parmesan. These options add creaminess and richness. Mix and match to create your ideal dish! For the full recipe, check out the complete guide on Crispy Brussels Sprouts with Honey. To keep your crispy Brussels sprouts fresh, store them in an airtight container. Let them cool before sealing. This helps keep moisture out. Place a paper towel in the container. It absorbs excess moisture and keeps them crisp. Try to eat them within three days for best flavor. When you reheat Brussels sprouts, use the oven for the best results. Preheat your oven to 375°F (190°C). Spread the sprouts on a baking sheet in a single layer. Heat them for about 10 minutes. This helps restore their crispiness. If you want, you can drizzle a touch of olive oil to enhance flavor. Avoid using the microwave, as it makes them soggy. For the full recipe, check the earlier section. Yes, you can make this recipe vegan. To do this, substitute honey with maple syrup or agave nectar. Both options add sweetness without animal products. If you want to skip the feta cheese, use a vegan cheese or leave it out entirely. This will keep your dish plant-based and still tasty. Brussels sprouts can taste bitter. To reduce this, try a few tricks. First, soak the sprouts in cold water for about 10 minutes before cooking. This helps remove some of the bitterness. Another method is to roast them until they are crispy. The caramelization process naturally sweetens the sprouts, making them more enjoyable. Crispy Brussels sprouts with honey pair well with many main dishes. Consider serving them alongside grilled chicken or roasted pork. They also go great with a hearty quinoa salad or a creamy risotto. These sides complement the sweet and savory flavors of the Brussels sprouts. For the full recipe, check the earlier section. In this post, we explored how to make crispy Brussels sprouts with honey. We covered ingredients, step-by-step instructions, and tips for perfecting texture and flavor. You can easily adjust sweetness and try different toppings. For storage, we discussed the best ways to keep leftovers fresh. Remember, small changes can make a big difference. Embrace the variations and enjoy your cooking journey. Perfecting this dish can bring joy to your table. Happy cooking!

Crispy Brussels Sprouts with Honey Flavorful Delight

If you think Brussels sprouts can’t be a tasty treat, think again! My Crispy Brussels Sprouts with Honey will change

To make a great Margherita pizza, you need just a few essential ingredients. Here’s what you’ll need: - 2 cups all-purpose flour - 1 packet (2 ¼ teaspoons) instant yeast - 1 teaspoon salt - ¾ cup warm water (about 110°F or 43°C) - 1 tablespoon olive oil - 1 cup canned San Marzano tomatoes, crushed - 8 ounces fresh mozzarella cheese, sliced - Fresh basil leaves - Salt and pepper to taste - Extra virgin olive oil for drizzling These ingredients create a simple and fresh pizza. The dough forms the base, while the tomatoes and cheese give it that classic taste. I highly recommend using San Marzano tomatoes for your sauce. Look for brands like Cento or San Marzano Organic. These tomatoes are sweet and rich, making them ideal for pizza sauce. They come from a specific region in Italy, which gives them a unique flavor. Using quality tomatoes makes a big difference in taste. You can add a few optional ingredients to enhance your pizza. Consider these: - Garlic cloves, minced - Red pepper flakes for heat - Oregano or fresh thyme for herbal notes These add-ins can elevate the flavor of your pizza. Play around with them to find your perfect mix. If you want to make your pizza unique, try adding these extra ingredients! To make the dough, start by mixing the flour, instant yeast, and salt in a bowl. Next, slowly add warm water and olive oil. Use a wooden spoon or your hand to mix until it turns into a shaggy dough. This part is fun! Once mixed, transfer the dough to a floured surface. Knead it for about 8 to 10 minutes. You want the dough to be smooth and elastic. This is key for that perfect crust. After kneading, place the dough in a lightly oiled bowl. Cover it with a damp cloth and let it rise in a warm spot for 1 hour. It should double in size. While the dough rises, let’s make the sauce. Grab your canned San Marzano tomatoes. Crush them well in a bowl. You can use a fork or your hands. This gives a fresh taste. Add salt and pepper to taste. This sauce is simple but packed with great flavor. Once the dough has risen, punch it down to release air. Transfer it back to a floured surface. Divide the dough into two equal parts. Roll or stretch one piece into a circle about 10 to 12 inches wide. Now, place the shaped dough on parchment paper. Spread a thin layer of your fresh sauce over it. Leave a small border around the edge. This is where the crust will form. Next, place slices of fresh mozzarella evenly over the sauce. Tuck a few fresh basil leaves among the cheese. Now, carefully move the pizza (with parchment) to the hot pizza stone or baking tray. Bake for 10 to 12 minutes. You want the crust to be golden and the cheese to bubble. When it's done, drizzle a little extra virgin olive oil over the top. Add more basil leaves for a fresh look. Finally, let the pizza cool for a few minutes. Slice it into wedges and enjoy your homemade Margherita pizza! For the full recipe, check out the [Full Recipe]. To make great dough, use high-quality flour. I recommend all-purpose flour for its balance. Mix the dry ingredients first. Then, add warm water slowly. This helps form a soft, smooth dough. Knead it for about 8-10 minutes. You want it elastic and not sticky. Let the dough rise in a warm spot until it doubles. This step is key for the best texture. For true Italian taste, use San Marzano tomatoes. They are sweeter and less acidic. Crush them gently by hand for a rustic sauce. Use fresh mozzarella for creamy richness. Make sure to slice it thinly. Add fresh basil leaves before baking. This enhances the aroma and flavor of the pizza. Preheat your oven to 475°F (245°C) for the best results. If you have a pizza stone, place it inside to heat up. This helps create a crispy crust. Use parchment paper to transfer your pizza easily. Bake for 10-12 minutes. Watch for a golden crust and bubbling cheese. Once done, drizzle with extra virgin olive oil for added flavor. These steps guarantee a delicious homemade Margherita pizza. For more details on the recipe, check out the Full Recipe section. {{image_2}} To make a vegan Margherita pizza, swap the fresh mozzarella with plant-based cheese. Many brands offer tasty vegan cheese that melts well. You can also use cashew cheese for a creamy texture. Use the same tomato base and fresh basil for flavor. This way, you enjoy all the classic tastes without animal products. If you need a gluten-free option, you can make dough with gluten-free flour. Look for blends made for pizza. Follow the same steps in the Full Recipe, but let the dough rise a bit longer. This helps improve the texture. You can also buy pre-made gluten-free pizza crusts for a quick solution. Want to add a twist? Consider topping your pizza with arugula after baking. The peppery taste works great with the cheese. You can also sprinkle some red pepper flakes for heat. Thin slices of prosciutto or fresh figs add a sweet touch. Experimenting with toppings can create new flavors you’ll love! To store leftover pizza, place it in an airtight container. You can also wrap each slice in plastic wrap. This keeps the pizza fresh and tasty. Store it in the fridge for up to three days. If you wrap it well, it won't dry out. For the best reheating method, use a skillet. Place the pizza slice in a cold skillet, then turn on the heat to medium. Cover the skillet with a lid. This method warms the pizza evenly and keeps the crust crispy. It takes about 5-8 minutes. You can also use an oven. Preheat it to 375°F (190°C), then bake the pizza for about 10 minutes. You can freeze pizza dough for later. After kneading the dough, shape it into a ball. Wrap it tightly in plastic wrap, then place it in a freezer bag. Label the bag with the date. The dough can stay in the freezer for up to three months. When you're ready to use it, move the dough to the fridge for 8 hours to thaw. Let it sit at room temperature for 30 minutes before using. This way, you'll always have dough ready for a quick pizza night! The key to a great Margherita Pizza is fresh ingredients. Use high-quality tomatoes, mozzarella, and basil. San Marzano tomatoes bring rich flavor. Fresh mozzarella melts beautifully and adds creaminess. Lastly, fresh basil gives a bright taste. Balance is vital. Each bite should feel fresh and simple. Yes, you can use regular tomatoes. However, San Marzano tomatoes offer unique sweetness and less acidity. If you use regular tomatoes, try to choose ripe ones. They should be juicy and flavorful. You can also add a pinch of sugar to balance acidity. This helps to mimic the taste of San Marzano. To make a crispy crust, use a hot oven. Preheat it to about 475°F (245°C). A pizza stone helps absorb heat. This gives the crust a good crunch. Also, avoid too much sauce and cheese. Less moisture means a crisper crust. Bake until golden brown for the best result. The best oven temperature for baking pizza is between 475°F and 500°F (245°C to 260°C). This high heat cooks the pizza quickly. It helps the crust rise and become crisp. If you have a pizza stone, preheat it with the oven. This ensures the bottom cooks evenly. For more tips, check out the Full Recipe. Making homemade Margherita pizza is fun and simple. You learned about key ingredients, like San Marzano tomatoes and optional flavor boosters. The step-by-step guide gave clear instructions for dough, sauce, and assembly. I shared tips for perfect texture and baking. You can try vegan and gluten-free options to suit your tastes. Storing and reheating leftovers is easy with my tips. Just remember, great pizza starts with good ingredients and practice. Enjoy creating your own masterpiece!

Homemade Margherita Pizza Simple and Flavorful Recipe

Are you ready to make your kitchen burst with flavor? In this blog post, I’ll show you how to craft

To make creamy pesto tortellini, gather these key ingredients: - 12 oz fresh or frozen cheese tortellini - 1 cup heavy cream - 1/2 cup basil pesto (store-bought or homemade) - 1/2 cup grated Parmesan cheese - 1 cup cherry tomatoes, halved - 2 cups spinach, fresh - 2 tablespoons olive oil - 2 cloves garlic, minced - Salt and pepper to taste - Fresh basil leaves for garnish These ingredients blend together to create a rich dish that is both tasty and satisfying. You can use fresh or frozen cheese tortellini in this recipe. Fresh tortellini cooks faster and has a tender bite. It often tastes more delicate. Frozen tortellini is convenient and can be stored longer. It is a great option for a quick meal. Both types work well, so choose what fits your needs. Pesto is the heart of this dish, so quality matters. Store-bought pesto is quick and easy. It saves time and still gives great flavor. However, making homemade pesto can take your dish to the next level. You can control the ingredients, adjust the flavor, and create a fresher taste. If you have the time, I highly recommend trying homemade pesto for this recipe. For the full recipe, you'll see how these ingredients come together to create a delightful meal. Start by boiling water in a large pot. Add salt to the water for flavor. Once it boils, add 12 oz of cheese tortellini. Cook it according to the package instructions. This usually takes about 3-5 minutes. You want the tortellini to be al dente. When done, drain the tortellini and set it aside. Next, grab a large skillet and heat 2 tablespoons of olive oil over medium heat. Add 2 cloves of minced garlic. Sauté for about 1 minute until fragrant. Be careful not to burn the garlic. Add 1 cup of halved cherry tomatoes to the skillet. Cook these for about 3-4 minutes until they soften. Then, stir in 2 cups of fresh spinach. Cook this until the spinach wilts, which takes about 2 minutes. Lower the heat now and pour in 1 cup of heavy cream. Stir continuously to combine. Next, add 1/2 cup of basil pesto to the mix. Blend it well until smooth. Gradually add 1/2 cup of grated Parmesan cheese while stirring. This will help make the sauce creamy. Now, add the cooked tortellini into the skillet. Toss gently to coat the pasta in the creamy pesto sauce. Finally, season with salt and pepper to taste. Cook for another 2-3 minutes to heat everything through. Serve hot, garnished with fresh basil leaves and extra Parmesan if you like. For the complete recipe, see the Full Recipe section above. To get that rich, creamy texture in your creamy pesto tortellini, focus on the cream. I recommend using heavy cream. It blends well with the pesto and coats the tortellini nicely. Heat the cream slowly. This way, it won't curdle or separate. Stir continuously while adding pesto to make it smooth. A little patience here goes a long way. Seasoning is key to elevating your dish. Start with salt and pepper. Taste as you go. The cheese adds saltiness, so be careful not to overdo it. Fresh basil is great for added flavor. You can also use a squeeze of lemon juice for brightness. It balances the richness of the cream and pesto. If your sauce is too thick, add a splash of pasta water. This helps loosen up the sauce without losing flavor. For a thicker sauce, let it simmer a bit longer. Just keep stirring! If you want a lighter dish, swap some of the cream with vegetable broth. This keeps the flavor while making it a bit healthier. For the full recipe, check the earlier sections. {{image_2}} You can easily add protein to creamy pesto tortellini. Chicken, shrimp, or tofu works great. If you choose chicken, use boneless, skinless pieces. Cook them in the skillet before adding the garlic. Shrimp cooks quickly, so add them right after the garlic. For tofu, cube it and sauté until golden brown. This will give your dish extra flavor and make it more filling. Want a dairy-free version? You can replace heavy cream with coconut milk or cashew cream. Both options add creaminess without dairy. Use nutritional yeast instead of Parmesan for a cheesy taste. Make sure your pesto is vegan, too. Check labels or make your own. With these changes, you can enjoy a tasty vegan creamy pesto tortellini. Feel free to add seasonal vegetables to your dish. Zucchini, bell peppers, or asparagus are great choices. Chop them into small pieces and cook them with the garlic. This adds color, flavor, and nutrition. You can also use frozen vegetables if fresh ones aren't available. This way, your creamy pesto tortellini stays fun and fresh with each season. For the full recipe, check out the details above! Storing leftovers is easy. First, let the creamy pesto tortellini cool down. Then, place it in an airtight container. This helps keep it fresh. You can keep leftovers in the fridge for up to three days. Make sure to label it with the date to track freshness. When you're ready to eat, reheating is simple. You can use a microwave or a skillet. For the microwave, place the tortellini in a bowl and cover it. Heat it for one to two minutes, stirring halfway. In a skillet, add a splash of water or cream. Heat on low, stirring gently until warm. If you want to store it longer, freezing works well. Use a freezer-safe container or bag. Portion out servings for easy meals later. Be sure to remove as much air as possible. You can freeze tortellini for up to three months. When you're ready, thaw it overnight in the fridge before reheating. For the full recipe, check out the details above. You can use milk and butter together. Mix 3/4 cup of milk with 1/4 cup of melted butter. This mix works well to create a creamy texture. You may also try coconut cream for a dairy-free option. It adds richness and a hint of sweetness. Yes, you can prepare this dish ahead of time. Cook the tortellini and sauce, then store them separately. Keep the tortellini in the fridge for up to three days. The sauce also lasts for three days in a sealed container. When ready to eat, reheat everything on the stove. Add a splash of cream to the sauce if it thickens. The tortellini is done when it floats to the top of the pot. Cooking time varies. Fresh tortellini usually cooks in 2-4 minutes, while frozen tortellini takes about 5-7 minutes. Always taste a piece to check if it is al dente. It should be tender but still have a slight bite. In this article, I covered how to make a creamy tortellini dish. We explored key ingredients, cooking steps, and tips to perfect your sauce. I shared ideas for variations, including proteins and vegan options. Finally, I provided storage advice to keep your dish fresh. Embrace these ideas to make your cooking fun and easy. You can impress anyone with this recipe! Enjoy the process and share your tasty results. Happy cooking!

Creamy Pesto Tortellini Delightful and Simple Meal

If you’re seeking a delicious, simple meal, look no further than creamy pesto tortellini. This dish is a blend of

To make this delicious soup, gather these ingredients: - 4 large russet potatoes, peeled and diced - 1 medium onion, diced - 2 cloves garlic, minced - 4 cups vegetable broth - 1 cup whole milk - 1 cup shredded cheddar cheese (plus extra for topping) - 1/2 cup sour cream - 1/4 cup green onions, chopped - 1 teaspoon thyme (fresh or dried) - Salt and pepper, to taste - 4 slices turkey bacon, cooked and crumbled (optional for a meaty flavor) - 2 tablespoons olive oil Using fresh ingredients makes a big difference. Choose firm russet potatoes. They have a great texture and flavor. A good onion adds sweetness. Fresh garlic gives a nice kick. For herbs, I recommend using fresh thyme if you can find it. It brings earthiness to the soup. You can make this soup your own! Consider adding: - Cooked crumbled bacon for a smoky taste. - Extra veggies like carrots or celery for more crunch. - Spices like paprika or cayenne for heat. - Different cheeses like gouda or pepper jack for a twist. Feel free to mix and match these options! You will create a soup that fits your taste perfectly. For the full recipe, refer to the earlier section. To start, gather your ingredients. You will need: - 4 large russet potatoes, peeled and diced - 1 medium onion, diced - 2 cloves garlic, minced - 4 cups vegetable broth - 1 cup whole milk - 1 cup shredded cheddar cheese (plus extra for topping) - 1/2 cup sour cream - 1/4 cup green onions, chopped - 1 teaspoon thyme (fresh or dried) - Salt and pepper, to taste - 4 slices turkey bacon, cooked and crumbled (optional for a meaty flavor) - 2 tablespoons olive oil Now, get your pot ready. Heat the olive oil over medium heat. Add the diced onion. Cook until it turns translucent, about 5 minutes. This step builds a great base flavor. Then, stir in the minced garlic and let it cook for one minute. You want that garlic aroma! Next, toss in the diced potatoes and thyme. Stir them together for 2-3 minutes. This helps the potatoes absorb the flavor of the onion and garlic. Now, pour in the vegetable broth. Bring it to a boil, then lower the heat to a simmer. Cover the pot and let it cook for about 20 minutes. You want the potatoes to become tender. Once the potatoes are soft, grab a potato masher or an immersion blender. Blend the soup until you reach your desired consistency. Some like it smooth, while others prefer it chunky. After blending, stir in the whole milk and shredded cheddar cheese. Keep stirring until the cheese melts and mixes well. If the soup feels too thick, just add more milk. You want it creamy but not overly thick. Finally, remove the pot from the heat. Mix in the sour cream until smooth. Season with salt and pepper to taste. If you like a meaty flavor, add the crumbled turkey bacon. Serve your hearty loaded potato soup hot. Top it with extra cheddar cheese, chopped green onions, and a dollop of sour cream if you wish. Enjoy this warm bowl of comfort! To make the best loaded potato soup, start with fresh russet potatoes. They add great texture. Cut them into even pieces for even cooking. Use a mix of fresh herbs for flavor. Thyme pairs well with potatoes and adds depth. Cook onions until they are soft and sweet. This builds a solid base for your soup. When blending, stop when you reach your favorite texture. Some may like it smooth, and others may prefer it chunky. Leftover soup is a treat! You can freeze it for later. Pour the cooled soup into airtight containers. Leave some space at the top for expansion. When ready to eat, thaw it in the fridge overnight. For quick meals, heat it on the stove or microwave. You can also use leftover soup as a sauce for baked potatoes. Just pour it over and sprinkle some cheese on top for a quick meal. One common mistake is adding too much liquid at once. Start with less broth, and add more as needed. This way, you control the soup's thickness. Another mistake is not seasoning enough. Taste as you go and adjust salt and pepper to your liking. Finally, don’t skip the sour cream at the end. It adds creaminess and tang. Follow these tips to ensure your loaded potato soup is a hit every time. For the full recipe, check here. {{image_2}} For a rich twist, add crispy bacon. The saltiness pairs well with the creamy base. Cook four slices of turkey bacon until crispy, then crumble them into your soup at the end. This adds a savory crunch. You can also sprinkle extra bacon on top for a great finish. You can easily make this soup vegan. Replace whole milk with almond milk or coconut milk for creaminess. Use vegetable broth as usual, and skip the cheese and sour cream. Instead, try adding cashew cream for a rich texture. You won’t miss the dairy! Want a kick? Add some heat to your soup. Mix in diced jalapeños or a dash of hot sauce. You can also stir in smoked paprika or cayenne pepper. This gives your soup a bold flavor. Adjust the spices to fit your taste. These tweaks make a big impact! For the full recipe, check the provided link. To keep your loaded potato soup fresh, let it cool first. Then, pour it into an airtight container. Seal it tightly and place it in the fridge. This soup can stay good for about 3-4 days. If you want to enjoy it later, freezing is a great option. When it's time to reheat, take the soup out of the fridge. Pour it into a pot over medium heat. Stir often to keep it from sticking. If the soup seems too thick, add a little milk or broth. Heat until it is hot all the way through. You can also microwave it in a bowl. Heat in short bursts, stirring in between. To freeze loaded potato soup, use a freezer-safe container. Leave some space at the top for expansion. It can last about 2-3 months in the freezer. When you are ready to eat, thaw it in the fridge overnight. Reheat it on the stove or in the microwave. This way, you can enjoy a comforting bowl anytime! For the full recipe, check out the Hearty Loaded Potato Soup section above. Loaded potato soup can last in the fridge for about 3 to 5 days. Make sure to store it in an airtight container. If you want it to last longer, you can freeze it. Just remember to leave out any toppings when freezing. When ready to eat, thaw it in the fridge overnight. Yes, you can make loaded potato soup in a slow cooker! Just follow these steps: - Sauté the onion and garlic on the stove first. - Add all the ingredients to the slow cooker. - Set it on low for 6 to 8 hours or high for 3 to 4 hours. This method gives the soup a rich flavor while you go about your day. If you don’t have sour cream, there are great substitutes. You can use Greek yogurt for a similar tangy taste. Cream cheese also works well if you want a thicker soup. For a dairy-free option, try coconut cream or cashew cream. Each will give the soup a nice twist! For the full recipe of hearty loaded potato soup, check back for all the details! This blog post covered how to make a hearty loaded potato soup. I shared the key ingredients, steps to prepare, and cooking tips. You can customize your soup with different options, like bacon or vegan choices. I also showed how to store, reheat, and freeze leftovers. Remember, the right techniques can make your soup perfect. Now, you can impress friends and family with your delicious dish or enjoy it all on your own!

Loaded Potato Soup Hearty and Comforting Delight

There’s nothing better than a warm bowl of Loaded Potato Soup on a chilly day. This hearty dish is packed

- 2 medium sweet potatoes, peeled and diced - 1 tablespoon olive oil - 1 teaspoon cumin - 1 teaspoon smoked paprika - Salt and black pepper to taste - 8 small corn tortillas - 1 avocado, sliced - 1 cup black beans, rinsed and drained - ½ cup feta cheese, crumbled - 1 cup red cabbage, thinly sliced - Fresh cilantro leaves, for garnish - Lime wedges, for serving I love using sweet potatoes in this recipe. They bring a natural sweetness and creamy texture. The cumin and smoked paprika add warmth and depth. You can adjust salt and pepper to your taste. Corn tortillas are key here. They hold the filling well and add a nice crunch. I prefer small tortillas, as they make for easy handling. Toppings like avocado and black beans make the tacos hearty and nutritious. Feta cheese adds a salty bite. Red cabbage brings a crisp texture and vibrant color. Don’t forget the cilantro! It brightens up the dish. Lime wedges are great for squeezing on top right before you eat. All these ingredients come together for a tasty meal. For the full recipe, be sure to check out the complete guide. - Preheat your oven to 400°F (200°C). This heat helps the sweet potatoes cook well. - In a large mixing bowl, toss the diced sweet potatoes with olive oil, cumin, smoked paprika, salt, and black pepper. Make sure each piece gets a good coating. - Spread the seasoned sweet potatoes in a single layer on a baking sheet. This helps them roast evenly and get nice and crispy. - Roast the sweet potatoes in the oven for 25-30 minutes. Stir them halfway through to ensure they brown nicely. - To check if they are done, poke a piece with a fork. It should feel soft inside. For perfect caramelization, don’t crowd the pan. Space is key. - While the sweet potatoes roast, warm your corn tortillas on a skillet over medium heat. Heat them for about 30 seconds on each side. This makes them soft and easy to fold. - To build your tacos, take a warm tortilla and add a generous spoonful of roasted sweet potatoes in the center. - Top with slices of avocado, black beans, crumbled feta cheese, and red cabbage. - Finish with fresh cilantro leaves on top. Serve with lime wedges for a zesty kick. This step-by-step guide will help you create a delicious plate of roasted sweet potato tacos. For the full recipe, check out the details above! To cut sweet potatoes evenly, start with a sharp knife. Slice off both ends for stability. Then, cut them into slices about half an inch thick. This ensures even cooking, which is key for great flavor. For proper roasting, preheat your oven to 400°F (200°C). Spread the sweet potatoes in a single layer on a baking sheet. Avoid overcrowding, as this can lead to steaming instead of roasting. Stir them halfway to promote even browning. For complementary sides, consider serving your tacos with a fresh salad. A simple slaw made of cabbage and carrots works well. You can also offer a bowl of Mexican rice for extra heartiness. Ideal beverages to pair with these tacos include a light beer or a refreshing lime soda. A crisp white wine can also elevate the meal. To add extra zest, try topping your tacos with pickled onions or a drizzle of hot sauce. A dollop of Greek yogurt can add creaminess and a tangy flavor. For spice lovers, consider adding jalapeños or a sprinkle of chili powder. You can also mix in smoked paprika for a deeper smoky taste. {{image_2}} You can switch out feta cheese for several options. Try goat cheese for creaminess or avocado for a rich texture. If you need a dairy-free option, use cashew cheese or skip cheese altogether. For proteins, black beans are great, but you can also use lentils or chickpeas. If you want meat, grilled chicken or shrimp works well too. Choose what fits your taste best. Adding sweet or savory flavors can change your tacos. If you like sweet, add a drizzle of honey or maple syrup. For savory, try roasted garlic or caramelized onions. Don't hesitate to play with spices. You can use chili powder for heat or coriander for a fresh taste. Each spice brings its unique twist to the dish. For vegan tacos, skip the feta cheese and use more avocado or beans. You can also add nutritional yeast for a cheesy flavor without dairy. If you need gluten-free options, use corn tortillas, which are naturally gluten-free. Check that your spices and beans are also gluten-free to keep everything safe. For health-focused diets, consider reducing the olive oil or using less salt. You can add extra veggies like spinach or bell peppers for more nutrients. Check out the Full Recipe for more ideas! To keep your tacos fresh, store each part separately. Place the roasted sweet potatoes in one container. Use another for the sliced avocado. Keep the black beans, feta cheese, and cabbage in their own containers too. This way, the flavors stay bright and fresh. When stored this way, leftovers can last in the fridge for about 3 to 4 days. Just remember to check for any signs of spoilage before eating. When reheating tacos, I recommend using an oven or skillet. This helps keep the tortillas crispy. Preheat your oven to 350°F (175°C). Place the tacos on a baking sheet and heat for about 10 minutes. In a skillet, warm the tortillas for 30 seconds on each side. Then, add the roasted sweet potatoes and other fillings. This method keeps everything tasty and prevents sogginess. Yes, you can freeze these tacos! To do this, wrap each taco tightly in foil or plastic wrap. Be sure to store them in a freezer-safe bag too. This helps prevent freezer burn. When you want to eat them, thaw overnight in the fridge. Then, reheat in the oven or skillet as mentioned before. This way, you can enjoy your roasted sweet potato tacos even after some time! For the complete process, check the Full Recipe. How do I make roasted sweet potatoes crispy? To make sweet potatoes crispy, cut them into small, even pieces. Toss them with olive oil and spices. Spread them out on a baking sheet. Avoid crowding the pan; this helps them roast better. Roast at 400°F (200°C) until they are golden and crisp. Can I prepare the ingredients in advance? Yes, you can prepare the ingredients ahead of time. Chop the sweet potatoes and store them in the fridge. You can also rinse the black beans and slice the avocado. Just remember to add lime juice to the avocado to stop it from browning. What can I serve with roasted sweet potato tacos? These tacos pair well with a fresh salad or a side of rice. You could also serve them with a dollop of yogurt or a spicy salsa. For drinks, a light beer or a refreshing lemonade works great. What to do if sweet potatoes are undercooked? If your sweet potatoes are undercooked, return them to the oven. Roast them for another 5-10 minutes. Check them often to avoid burning. They should be tender and caramelized when done. How to fix tacos that are falling apart? If your tacos are falling apart, use sturdier tortillas. You can warm them to make them more pliable. Layer the ingredients carefully, starting with the heavier items like beans. This helps keep the structure intact. Calorie count for one serving of tacos One serving of roasted sweet potato tacos has about 350 calories. This includes all the toppings and tortillas. Breakdown of macronutrients per taco Each taco contains roughly: - 10 grams of protein - 15 grams of fat - 50 grams of carbohydrates These numbers can vary based on your toppings and portion sizes. For the complete recipe, check the Full Recipe. Roasted sweet potato tacos bring great flavor and nutrition. We covered key ingredients, from sweet potatoes to black beans. The step-by-step guide makes cooking simple. I also shared tips for great taste and ideas for variations. Remember, you can customize these tacos to fit your diet. Don’t forget storage tips to keep leftovers fresh! Enjoy this dish, and remember to experiment with your favorite flavors. It’s a fun way to make healthy meals at home.

Roasted Sweet Potato Tacos Flavorful and Satisfying Meal

Roasted sweet potato tacos bring together taste, health, and fun. You’ll love how easy these are to make! With just

- 2 ripe avocados, diced - 1 cup sweet corn, cooked or canned (drained) - 1 small red onion, finely chopped - 1 red bell pepper, diced - 1 jalapeño, deseeded and minced (optional for heat) - 1/4 cup fresh cilantro, chopped - 2 tablespoons lime juice - Salt and pepper to taste When making avocado corn salsa, fresh ingredients matter. Start with ripe avocados. These should feel slightly soft when you press them. Sweet corn brings a nice crunch and sweetness. You can use fresh corn or canned corn, but drain it well. Red onion adds a sharp taste. For a milder option, try green onions. The red bell pepper gives color and flavor. If you like heat, add minced jalapeño. Remember to remove the seeds to lower the spice. Cilantro adds a fresh taste. If you dislike cilantro, parsley works too. Lime juice provides acidity and brightens all the flavors. Finally, season with salt and pepper to taste. - Caloric content per serving: About 150 calories - Breakdown of macronutrients: - Fat: 11g - Carbohydrates: 14g - Protein: 3g This avocado corn salsa is not only tasty but nutritious too. Each serving gives you healthy fats from avocados. It also has fiber from corn and veggies. Enjoy this dip guilt-free! For the full recipe, check out the details above. To make Avocado Corn Salsa, start with your avocados. Cut them in half and remove the pit. Use a spoon to scoop the flesh into a medium bowl. Dice the avocados into small pieces. This keeps the salsa chunky and tasty. Next, add the sweet corn. You can use fresh corn or canned corn. If using canned, drain it well. Gently fold the corn into the avocados. You want them mixed but not mashed. Chop the red onion and red bell pepper. Add these to the bowl along with the minced jalapeño if you enjoy some heat. Finally, stir in the chopped cilantro. This adds a fresh taste and color. Now, it’s time to season your salsa. Drizzle the lime juice over the mixture. This brightens the flavors. Sprinkle in some salt and pepper to taste. Mix everything gently. Be careful not to mash the avocados too much. You want a nice texture. To get the best taste, let the salsa sit for about 10 minutes. This allows the flavors to blend and develop. When serving Avocado Corn Salsa, use a colorful bowl. This makes the dish look inviting. Garnish with extra cilantro and a lime wedge on the side for a nice touch. This salsa pairs wonderfully with tortilla chips. The crunch of the chips complements the smooth avocado. You can also serve it with grilled chicken or fish for a fresh side. Enjoy your dip on a hot summer day! To pick the best avocados, look for a few key signs. First, gently squeeze the avocado. It should feel slightly soft but not mushy. If it is hard, it’s not ripe yet. A dark green or black skin can also signal ripeness. If you can find avocados with a little give, you’re on the right track. If avocados are not available, you can try using ripe mango or even a creamy guacamole. These can add a different but tasty flavor to your salsa. To make your salsa even better, consider adding spices or fresh herbs. Chopped garlic or a pinch of cumin can bring a new depth. Fresh herbs like parsley or dill can also add a refreshing touch. If you want to kick up the heat, try adding red pepper flakes or more jalapeño. Adjusting the spice level is simple. Start with a little and taste as you go. You can always add more, but it’s hard to take heat away! Serving your salsa in a colorful bowl makes a big impact. You can add a layer of tortilla chips around the bowl for a fun display. A vibrant platter can also make your salsa pop at any gathering. For garnishing, sprinkle extra cilantro on top. A lime wedge on the side looks great and adds a fresh scent. You can also add slices of jalapeño for a bold touch. Using these tips, your Avocado Corn Salsa will look as stunning as it tastes. {{image_2}} You can choose between grilled corn and canned corn for your salsa. Grilled corn adds a smoky flavor that enhances the taste. It also gives a nice texture. Canned corn is easy and quick. Just drain it before mixing. If you prefer something sweeter, try using fresh sweet corn. You can get creative by adding fruits like mango or pineapple. These fruits bring a sweet twist that pairs well with the creamy avocado. You can also mix in other veggies. Cucumbers add crunch, while tomatoes add juiciness. This makes your salsa even more colorful and tasty. The good news is this recipe fits many diets. It is vegan and gluten-free. If you need to make swaps, you can use lime juice instead of vinegar. You can also replace the salt with a salt-free mix for added flavor without sodium. This makes your Avocado Corn Salsa suitable for everyone. Try these options to enjoy a fresh and healthy dip! To keep your avocado corn salsa fresh, use airtight containers. Glass containers work well. They do not stain and are easy to clean. Plastic containers are also fine, just ensure they seal well. Store the salsa in the fridge. It is best to avoid leaving it at room temperature for a long time. Your avocado corn salsa lasts about 2 to 3 days in the fridge. After that, it may lose flavor and texture. Look for signs of spoilage. If the salsa turns brown or smells sour, it is time to toss it. Fresh ingredients are key for great taste. Always check before serving! To stop avocados from browning, use lime juice. The acid in lime juice slows down oxidation. Squeeze fresh lime juice on the cut avocado right away. Store the salsa in an airtight container. Press plastic wrap directly on the salsa before sealing the lid. This helps keep out air. Yes, you can make this salsa ahead of time. Just prepare it without the avocados. Mix the corn, onion, bell pepper, jalapeño, and cilantro. Then, add lime juice before serving. This keeps the avocados fresh and green. Try to make it no more than a few hours ahead for the best taste. This salsa pairs well with many snacks. Try serving it with tortilla chips for a crunchy bite. You can also use it as a topping for tacos or grilled chicken. It goes great with quesadillas or as a side for your favorite nachos. For a lighter option, enjoy it with fresh veggie sticks! Avocado Corn Salsa is easy to make and packed with flavor. We explored ingredients, preparation, and serving tips. You can enjoy this salsa as a snack or a side dish. Remember to select ripe avocados and adjust flavors to your taste. With these simple steps and variations, you can create a delicious dish that fits your diet. Enjoy making it fresh and sharing it with friends. Happy cooking!

Avocado Corn Salsa Fresh Flavorful Summer Dip

Summer is here, and it’s the perfect time for a fresh and zesty dip! Avocado Corn Salsa bursts with flavor

To make a Spicy Thai Noodle Salad, you need fresh and tasty ingredients. Here’s what you will need: - 200g rice noodles - 1 cup red bell pepper, julienned - 1 cup carrot, julienned - 1 cup cucumber, julienned - 1/2 cup red cabbage, thinly sliced - 1/2 cup fresh cilantro, chopped - 1/4 cup roasted peanuts, crushed - 2 green onions, chopped - 1 tablespoon sesame oil - 3 tablespoons soy sauce - 2 tablespoons lime juice - 1 tablespoon brown sugar - 1 teaspoon chili paste (adjust for heat) - Salt and pepper to taste The rice noodles serve as the heart of this dish. They soak up flavors well. Fresh vegetables like red bell pepper, carrot, cucumber, and red cabbage add crunch and color. Each bite brings a mix of textures. Flavor enhancers make the salad sing. Sesame oil gives a nutty taste. Soy sauce adds umami, while lime juice brightens everything. Brown sugar balances the heat from chili paste. Adjust the chili paste for your spice level. Don’t forget the garnishes! Fresh cilantro adds a fragrant touch. Roasted peanuts add a satisfying crunch. Green onions provide a mild onion flavor. You can find the full recipe at [Full Recipe]. This dish is not just a meal; it’s a burst of flavors. Enjoy making this colorful salad that everyone will love! 1. First, bring a pot of water to a boil. 2. Add the rice noodles to the boiling water. 3. Cook the noodles for about 5 to 7 minutes. Check the package for exact times. 4. After cooking, drain the noodles. 5. Rinse them under cold water. This stops the cooking and keeps them firm. 6. Set the noodles aside while you prepare the salad. 1. While the noodles cook, prepare your veggies. 2. To julienne the red bell pepper, cut it into thin strips. 3. For the carrot and cucumber, slice them the same way. 4. Thinly slice the red cabbage for added crunch. 5. Keep all veggies ready in a bowl for easy mixing. 1. In a small bowl, whisk together the sesame oil, soy sauce, lime juice, and brown sugar. 2. Add the chili paste, salt, and pepper to taste. 3. Taste the dressing and adjust the seasoning. You can add more lime juice or sugar if needed. 1. In a large salad bowl, add the cooked rice noodles and prepared vegetables. 2. Pour the dressing over the salad. 3. Toss everything gently to coat it well. Be careful not to break the noodles. 1. Top the salad with crushed roasted peanuts for a nice crunch. 2. Garnish with fresh cilantro and chopped green onions. 3. For serving, place the salad in a large bowl or on individual plates. 4. Add a lime wedge on the side for an extra touch. For the full recipe, check the detailed instructions above. Enjoy crafting this fresh and flavorful dish! - Adjusting heat levels with chili paste: Start with one teaspoon of chili paste. Taste the salad before adding more. This way, you control the spice. If you love heat, go ahead and add another teaspoon. - Balancing flavors with lime juice and brown sugar: Lime juice gives the salad a nice zing. Brown sugar adds sweetness. Start with two tablespoons of lime juice and one tablespoon of brown sugar. Adjust to your taste. A good balance makes the dish shine. - Best bowls and tools for mixing: Use a large bowl for mixing the salad. A wooden spoon works great for tossing the ingredients gently. This helps keep the noodles intact. - Kitchen gadgets that simplify the process: A julienne peeler makes slicing veggies easy. You can also use a sharp knife for precise cuts. A whisk is key for blending the dressing smoothly. - Overcooking noodles: Follow package instructions for cooking time. Check the noodles a minute early. They should be al dente, not mushy. Rinse them with cold water to stop the cooking. - Failing to chill the salad before serving: Letting the salad chill helps the flavors blend. Cover it and place it in the fridge for at least 10 minutes before serving. This step makes a big difference in taste. {{image_2}} You can easily make this salad vegetarian or vegan. Simply swap out any non-plant-based items. Use soy sauce or tamari for a vegan-friendly option. For protein, add tofu. Press it to remove excess water, then cube and sauté until golden. This adds a nice texture and flavor. You can also try other proteins like chickpeas or edamame for variety. If you need a gluten-free salad, choose rice noodles made without wheat. They cook up perfectly and are delicious. For the sauce, replace soy sauce with coconut aminos. This gives a sweet and savory taste without gluten. Check labels on all ingredients to ensure they are gluten-free. You can change the flavor profile with different herbs and spices. Try adding fresh basil or mint for a twist. If you love heat, toss in crushed red pepper flakes or sriracha. You can also swap out veggies; try snap peas or bell peppers for added crunch. Mixing in fruits like mango or pineapple can add sweetness and freshness. For a full recipe, check [Full Recipe]. To keep your Spicy Thai Noodle Salad fresh, store it in an airtight container. Place it in the fridge within two hours of making it. This helps maintain its crispiness and flavor. I recommend eating the salad within three days. The veggies may lose some crunch after that, but the taste stays good. You can freeze this salad, but it may change texture. The noodles and veggies don’t freeze well. If you want to go this route, I suggest freezing the dressing separately. When ready to eat, thaw the dressing and freshen up the salad with newly chopped veggies. To reheat, gently warm the noodles in a pan over low heat. Avoid using the microwave, as it can make the noodles mushy. Enjoy your tasty meal! Spicy Thai Noodle Salad is a bright and tasty dish. It features rice noodles, fresh veggies, and a zesty dressing. The key flavors come from soy sauce, lime juice, and chili paste. This salad is colorful and full of crunch. Each bite gives a mix of sweet, salty, and spicy tastes. You can easily make it at home with simple ingredients. Serve it as a main dish or a side. Check out the Full Recipe for all the details. Yes, you can meal prep this salad! Start by cooking the noodles and chopping the veggies. You can store the noodles and veggies in separate containers. This keeps them fresh and crisp. Make the dressing ahead of time as well. Just mix everything right before serving to keep the salad from getting soggy. This is a great option for quick lunches or dinners during the week. This salad pairs well with several dishes. You can serve grilled chicken or shrimp for protein. Spring rolls or dumplings make great sides, too. For a lighter option, try a fresh fruit salad. The mix of flavors will enhance your meal. Consider serving a simple cucumber salad for added crunch. The options are endless! If you want a milder salad, there are easy ways to adjust it. Use less chili paste to lower the heat. You can also replace it with a milder sauce if you prefer. Adding more veggies helps balance the spice. Try extra cucumber or cabbage for a fresh taste. Lime juice can also tone down the heat. Adjust the flavors to fit your taste! This blog covered how to make a tasty Spicy Thai Noodle Salad. We discussed all the fresh ingredients, from rice noodles to colorful veggies. I shared step-by-step cooking instructions and tips for perfecting your salad. You learned about gluten-free and vegan options and proper storage tips for leftovers. In closing, this salad is simple, flavorful, and versatile. You can easily adjust it to fit your taste. Enjoy making it and sharing your delicious creation!

Spicy Thai Noodle Salad Fresh and Flavorful Delight

Are you ready for a burst of flavor? This Spicy Thai Noodle Salad is fresh, crisp, and easy to make.

To make your vegan stuffed peppers, gather these fresh ingredients: - 4 large bell peppers (any color) - 1 cup quinoa, rinsed - 2 cups vegetable broth - 1 can (15 oz) black beans, drained and rinsed - 1 cup corn (fresh, frozen, or canned) - 1 small red onion, diced - 2 cloves garlic, minced - 1 teaspoon cumin - 1 teaspoon smoked paprika - 1 teaspoon chili powder - Salt and pepper to taste - 1 tablespoon olive oil - 1 cup diced tomatoes (fresh or canned) - ½ cup fresh cilantro, chopped (optional, for garnish) Each serving of these stuffed peppers offers a healthy boost. Here’s what you get: - Calories: 300 - Protein: 12g - Carbohydrates: 55g - Fiber: 15g - Fat: 6g - Vitamins: High in Vitamin C and A These numbers reflect a balanced meal, full of nutrients to fuel your day. You can easily swap ingredients to fit your tastes or needs: - For quinoa, try brown rice or couscous. - Instead of black beans, use kidney beans or lentils. - Swap corn for diced zucchini or carrots for a different crunch. - Use any herbs you like, such as parsley or basil, instead of cilantro. Feel free to mix and match! This flexibility makes the dish fun and unique each time you make it. For the full recipe, refer to the earlier sections. First, gather all your ingredients. You need bell peppers, quinoa, black beans, corn, and spices. Make sure to rinse your quinoa before cooking. This helps remove a bitter taste. Next, preheat your oven to 375°F (190°C). This way, it’s ready when you need it. To cook the quinoa, combine 1 cup of rinsed quinoa and 2 cups of vegetable broth in a medium pot. Bring it to a boil over medium heat. Once it boils, reduce the heat, cover the pot, and let it simmer for about 15 minutes. The quinoa will absorb all the broth. When it’s done, fluff it with a fork. This step is key for a light texture. Now, let’s prepare the peppers. Cut the tops off of four large bell peppers. Remove the seeds and membranes inside. Place them cut-side up in a baking dish. In a skillet, heat 1 tablespoon of olive oil over medium heat. Add 1 diced red onion and sauté for 3-4 minutes. When the onion is soft and clear, add 2 minced garlic cloves and cook for one more minute. Now, mix in the cooked quinoa, 1 can of black beans, 1 cup of corn, and 1 cup of diced tomatoes. Don’t forget the spices! Add 1 teaspoon each of cumin, smoked paprika, and chili powder. Season with salt and pepper to taste. Stir everything well and cook for another 3-4 minutes until warm. Next, it’s time to stuff the peppers. Take the quinoa mixture and fill each pepper generously. Press down lightly to pack it in. Cover the baking dish with aluminum foil. Bake for 25 minutes, then remove the foil and bake for an extra 10 minutes. This helps the tops brown a bit. After baking, let them cool for a few minutes. If you like, garnish with chopped cilantro before serving. For the full recipe, check the earlier section. Enjoy your meal! To cook the perfect stuffed peppers, choose fresh bell peppers. Look for peppers that are firm and free of spots. Cut off the tops gently and remove the seeds. This step creates a cozy home for your filling. Preheat your oven to 375°F (190°C) for optimal cooking. Cover the peppers with foil while baking. This keeps them moist and tender. Remove the foil for the last 10 minutes to brown the tops. This gives a nice finish. To enhance flavor, use spices like cumin and smoked paprika. These spices add depth to your dish. You can also sauté onions and garlic until soft. This step builds a strong base for your filling. Adding lemon juice or lime zest can brighten flavors too. Feel free to mix in fresh herbs like cilantro. They add freshness and a pop of color. Presentation matters, especially for meals like stuffed peppers. Use a colorful platter to serve your dish. Arrange the peppers neatly and drizzle with olive oil. A sprinkle of fresh cilantro on top adds a lovely touch. You can also add a side salad to brighten the plate. This makes your meal look inviting and delicious. For the full recipe, check out the Vibrant Vegan Stuffed Peppers . {{image_2}} You can switch up the protein in your stuffed peppers. Quinoa is great, but you can also use lentils or chickpeas. These options add a nice texture and flavor. Tofu is another choice; just crumble it and sauté it with the onions. If you prefer soy, try tempeh. It has a unique taste and pairs well with spices. Spices make your stuffed peppers pop with flavor. If you like it hot, add more chili powder or some cayenne. For a milder taste, reduce the amounts of cumin or smoked paprika. You can also try fresh herbs like oregano or basil for a fragrant twist. Adjust the spices to match your taste buds. Vegan cheese can take your dish to the next level. You can sprinkle dairy-free cheese on top before baking. Nutritional yeast also adds a cheesy flavor without the dairy. If you want a creamy texture, use cashew cream. Blend soaked cashews with lemon juice and a bit of water. It makes a great addition to your stuffed peppers. For the full recipe, check out the vibrant vegan stuffed peppers! After you enjoy your vegan stuffed peppers, store any leftovers in an airtight container. Keep them in the fridge for up to four days. This method keeps the peppers fresh and tasty. To reheat, you can use the microwave or oven. If you use the oven, it helps keep the peppers' texture nice. You can freeze stuffed peppers for later meals. First, let them cool completely. Then, wrap each pepper tightly in plastic wrap. Place them in a freezer-safe bag. They can last in the freezer for up to three months. When you are ready to eat, thaw them in the fridge overnight before reheating. For best results, reheat the stuffed peppers gently. If using a microwave, heat them on medium power for about 3-4 minutes. If using an oven, preheat it to 350°F (175°C). Place the peppers in a baking dish covered with foil, and bake for 15-20 minutes. Always check that they are hot all the way through. Enjoy the vibrant flavors of your meal again! For the full recipe, see the section above. Yes, you can prepare vegan stuffed peppers ahead of time. You can stuff the peppers and keep them in the fridge. This makes meal prep easy. Just bake them when you are ready to eat. They can stay fresh for up to two days in the fridge. If you want to freeze them, do that before baking. Wrap them well and store them. They can last for about three months in the freezer. You will know the peppers are done when they are tender. The skin should look slightly wrinkled and the color vibrant. You can check them with a fork. If the fork goes in easily, they are ready. The filling should be hot and bubbling. The total baking time is about 35 to 40 minutes. Keep an eye on them to avoid overcooking. Yes, vegan stuffed peppers can be gluten-free. The main ingredients, like quinoa and beans, are naturally gluten-free. Just be careful with any added ingredients, like sauces or spices. Always check the labels to ensure they are gluten-free. If you want to be extra safe, use certified gluten-free products in your recipe. Enjoy this delicious meal without any worry! This post covered the key ingredients, cooking steps, and helpful tips for making vegan stuffed peppers. You learned how to prepare and cook quinoa, stuff your peppers, and enhance their flavor. We discussed different variations and how to store leftovers properly. By following these steps, your stuffed peppers will be delicious and nutritious. Enjoy your cooking adventure and impress your friends with your tasty, healthy meals!

Vegan Stuffed Peppers Flavorful and Hearty Meal

If you’re looking for a meal that’s both filling and tasty, you’ve found it! My vegan stuffed peppers are a

To make a crispy chickpea Buddha bowl, you’ll need these tasty ingredients: - 1 can (15 oz) chickpeas, drained and rinsed - 2 tablespoons olive oil - 1 teaspoon smoked paprika - 1 teaspoon garlic powder - 1 teaspoon cumin - Salt and pepper to taste - 1 cup cooked quinoa - 1 cup baby spinach - 1 medium avocado, sliced - 1 cup cherry tomatoes, halved - ½ cup shredded carrots - ¼ cup tahini - 2 tablespoons lemon juice - 1 tablespoon maple syrup (optional) - Water (as needed for tahini sauce) You can swap some ingredients if you need to. Here are a few ideas: - Chickpeas: Use any canned beans, like black beans or kidney beans. - Olive oil: Try avocado oil or coconut oil for a different flavor. - Quinoa: Substitute with brown rice or couscous for a hearty base. - Tahini: Sunflower seed butter can work as a nut-free option. - Maple syrup: Honey or agave syrup can also add sweetness. This bowl is not only tasty but also good for you. Here’s why: - Chickpeas: They are high in protein and fiber, which keep you full. - Quinoa: A complete protein, it contains all nine essential amino acids. - Spinach: Rich in vitamins A, C, and K, it's great for your skin and bones. - Avocado: Packed with healthy fats, it supports heart health. - Tahini: Made from sesame seeds, it's a good source of calcium and magnesium. These ingredients come together for a meal that's both nutritious and delicious. Check out the Full Recipe for more! Making a crispy chickpea Buddha bowl is simple and fun. First, gather all your ingredients. You'll need chickpeas, olive oil, spices, quinoa, and fresh veggies. This meal takes about 45 minutes. It serves two, so it’s perfect for a quick dinner or lunch. 1. Preheat the Oven: Start by preheating your oven to 400°F (200°C). Line a baking sheet with parchment paper. This helps the chickpeas crisp up nicely. 2. Prepare Chickpeas: Take one can of chickpeas. Drain and rinse them well. Pat them dry with a kitchen towel. In a bowl, mix the chickpeas with two tablespoons of olive oil. Add one teaspoon of smoked paprika, garlic powder, and cumin. Season with salt and pepper. Make sure every chickpea is coated. 3. Roast Chickpeas: Spread the seasoned chickpeas on the baking sheet in a single layer. Roast them for 25 to 30 minutes. Toss them halfway through for even cooking. They should be golden brown and crispy when done. 4. Prepare Quinoa: While the chickpeas roast, cook one cup of quinoa. Follow the package instructions. Once cooked, fluff it with a fork and set it aside. 5. Make Tahini Sauce: In a small bowl, mix together ¼ cup of tahini and two tablespoons of lemon juice. If you want, add one tablespoon of maple syrup. Slowly add water until the sauce is smooth and drizzling consistency. 6. Assemble the Bowl: In a large serving bowl, start with a base of quinoa. Then, layer on baby spinach, crispy chickpeas, sliced avocado, halved cherry tomatoes, and shredded carrots. 7. Drizzle and Serve: Drizzle the tahini sauce over the top. For extra flavor, sprinkle additional salt and pepper if desired. - Dry Chickpeas Well: Moisture will prevent them from becoming crispy. Use a kitchen towel to ensure they are dry. - Use Parchment Paper: This helps prevent sticking and makes clean-up easier. - Don’t Overcrowd: Give the chickpeas space on the baking sheet. This allows for better air circulation and crispiness. - Experiment with Spices: Try different spices like curry powder or chili powder for unique flavors. For the full recipe, check out the Crispy Chickpea Buddha Bowl details above. To make perfect quinoa, rinse it well before cooking. This removes the bitter coating called saponin. Use two cups of water for every cup of quinoa. Bring the water to a boil, then reduce the heat. Cover and simmer for about 15 minutes. When it’s done, let it sit for five minutes. Fluff it with a fork for a light texture. When you serve your Buddha bowl, layer the ingredients for a beautiful look. Start with a base of quinoa. Add a handful of baby spinach next. Top it with crispy chickpeas, avocado slices, cherry tomatoes, and shredded carrots. Drizzle with tahini sauce for added flavor. You can also sprinkle some sesame seeds or herbs to enhance the presentation. You can easily change the flavor of your Buddha bowl. Want a spicy kick? Add some chili flakes or sriracha to the chickpeas. For a tangy twist, mix lime juice into your tahini sauce. You can also swap out the veggies. Try bell peppers or cucumbers for a crunch. The options are endless, so get creative! For the full recipe, check out the section above. {{image_2}} You can easily make this bowl vegan. The main ingredients are already plant-based. Use chickpeas, quinoa, and lots of veggies. This meal is perfect for vegetarians, too. It gives you protein and nutrients without any meat. Feel free to switch up the toppings. Add roasted sweet potatoes for creaminess. Try kale or arugula for a peppery bite. You can also add nuts or seeds for crunch. Sunflower seeds or pumpkin seeds work great. If you like extra flavor, toss in some olives or pickled onions. The tahini sauce is tasty, but you can try other sauces too. A simple lemon vinaigrette adds zesty flavor. You can also make a creamy avocado dressing. Just blend ripe avocado with lime juice. For a spicy kick, use sriracha or hot sauce. Each sauce gives the bowl a new twist. For the full recipe, check out Crispy Chickpea Buddha Bowl . To keep your crispy chickpea Buddha bowl fresh, store leftovers in an airtight container. You can separate the chickpeas, quinoa, and veggies to maintain texture. Place the bowl in the fridge within two hours of serving. This will help keep everything tasty and safe to eat. When you’re ready to eat, reheat the quinoa and chickpeas in the microwave. Heat them in 30-second bursts until warm. Avoid reheating the fresh veggies, as they taste best cold. You can also drizzle some extra tahini sauce on top for added flavor. - Cooked Quinoa: 3-5 days in the fridge. - Chickpeas: Use within 3-4 days for the best crunch. - Fresh Veggies: Spinach, avocado, and tomatoes should be eaten within 2-3 days. For best results, eat your crispy chickpea Buddha bowl within a few days. This way, you enjoy all the flavors and textures at their best. If you want the full recipe, check out the earlier sections for all the details! You can make crispy chickpeas on the stovetop. Start with a pan over medium heat. Add drained and dried chickpeas. Toss them with oil and spices. Stir often for even cooking. Cook for about 10-15 minutes until they are golden and crispy. This method gives you a tasty crunch, just like the oven. Yes, you can prepare parts of this dish ahead of time. You can cook the quinoa and store it in the fridge. The chickpeas can also be roasted and stored in an airtight container. Keep the tahini sauce separate until you are ready to serve. This way, you keep the bowl fresh and tasty when you are ready to eat. If you need a tahini substitute, try using almond butter or sunflower seed butter. Both options give a creamy texture. You can also use plain yogurt for a tangy flavor. Adjust the amount of lemon juice to balance the taste. Each option makes the sauce rich and delicious, perfect for your bowl. For the full recipe, check the above section. This blog post covered how to make a delicious Buddha bowl. We explored key ingredients and their health benefits. I shared step-by-step instructions to ensure success in cooking. You learned tips for perfecting roasted chickpeas and best practices for quinoa. There are many ways to customize your bowl with various toppings and sauces. Finally, I provided storage tips for your leftovers. With these insights, you'll enjoy healthy meals often and easily. Try different flavors and enjoy!

Crispy Chickpea Buddha Bowl Tasty and Nutritious Meal

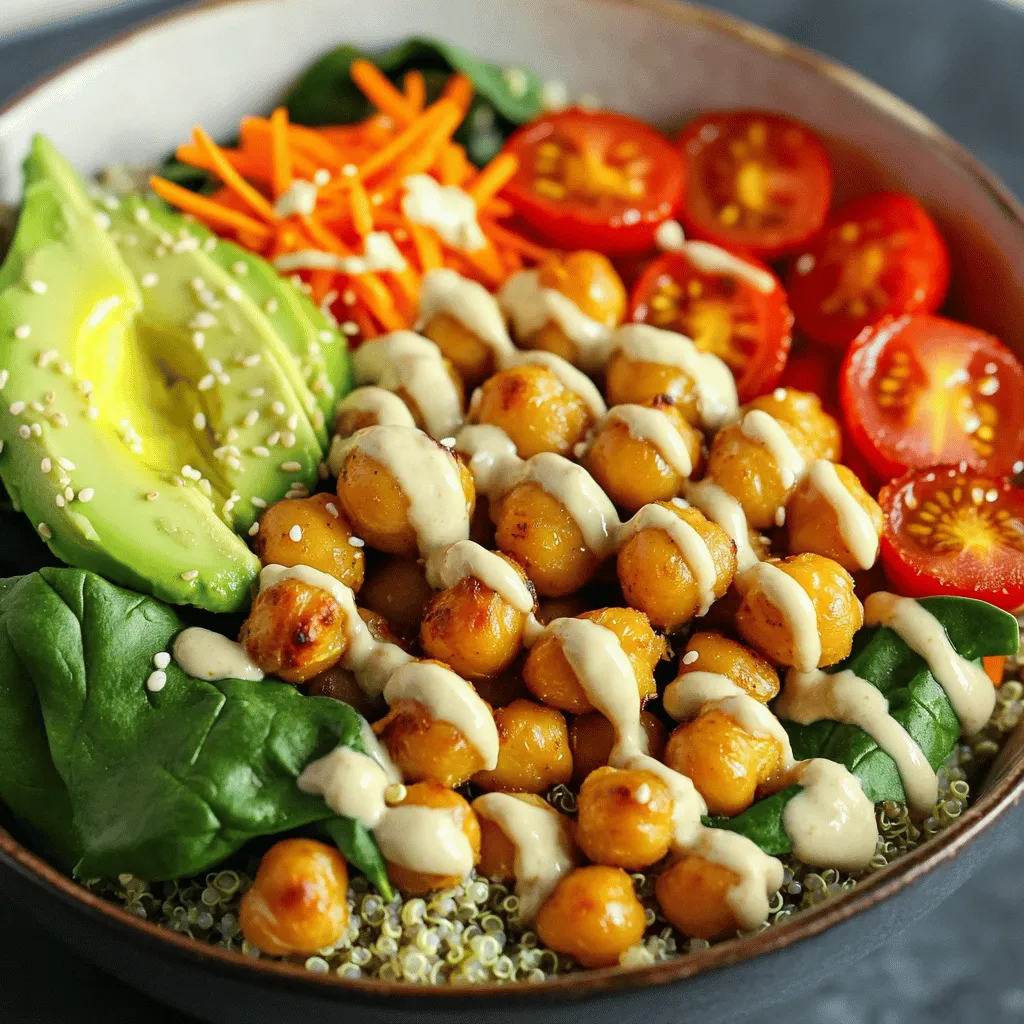
Looking for a meal that’s both tasty and good for you? A Crispy Chickpea Buddha Bowl is just the answer!

Older posts
Newer posts
← Previous Page1 … Page31 Page32 Page33 … Page52 Next →

dsad

© 2025 savoryspiral • Built with GeneratePress

Our Policies

  • Copyright Policy
  • Cookie Policy
  • GDPR Policy
  • Privacy Policy
  • Disclaimer
  • Terms Of Use

More Information

  • Home
  • About
  • Contact
  • Appetizers
  • Dessert
  • Dinner
  • Drinks
©2025, savoryspiral About Back To Top