![Here’s what you need to make Cucumber Avocado Sushi Rolls: - 1 cup sushi rice - 1 1/4 cups water - 2 tablespoons rice vinegar - 1 tablespoon sugar - 1 teaspoon salt - 4 sheets nori (seaweed) - 1 medium cucumber, julienned - 1 ripe avocado, sliced - 1 carrot, julienned - 1 tablespoon sesame seeds (optional) - Soy sauce, for dipping - Wasabi and pickled ginger, for serving Gather these ingredients before you start. Fresh ingredients make the best rolls. Sushi rice is key for that sticky texture. Nori sheets hold everything together, while cucumber and avocado add great flavor. You can also add a carrot for crunch. The sesame seeds sprinkle on top for a nice finish. Don't forget your soy sauce, wasabi, and ginger for dipping and flavor. These ingredients will help you create a light and tasty dish. For the full recipe, check out the detailed instructions in the next section. 1. Rinsing the rice: Start by rinsing the sushi rice under cold water. Keep rinsing until the water runs clear. This step removes excess starch and helps the rice cook better. 2. Cooking the rice: Next, combine the rinsed rice and water in a pot. Bring it to a boil. Once boiling, lower the heat and cover the pot. Let it simmer for 18 to 20 minutes until the water is absorbed. After that, turn off the heat, but keep the pot covered for an extra 10 minutes. This step steams the rice, making it fluffy. 3. Mixing with vinegar: In a small bowl, mix rice vinegar, sugar, and salt. Stir until everything dissolves. Once the rice is cooked, gently fold this mixture into the rice. Spread the rice out to cool it slightly. This gives the rice its distinct flavor. 1. Preparing the bamboo mat: Lay a bamboo sushi mat on a flat surface. Place a sheet of nori on the mat, shiny side down. This setup helps to roll the sushi easily. 2. Spreading rice on nori: With wet hands, take a small amount of sushi rice. Spread a thin layer evenly over the nori. Leave about 1 inch of space at the top edge. This space helps seal the roll later. 3. Adding fillings: In the center of the rice, line up your fillings. Place cucumber, avocado, and carrot. If you want, sprinkle sesame seeds over the top. This adds a nice crunch and flavor. 1. Rolling technique: Start by lifting the edge of the bamboo mat. Roll it forward, tucking the filling in tightly. Keep rolling until you reach the uncovered edge of the nori. 2. Sealing the roll: Wet the edge of the nori with a little water to help seal the roll. Make sure it sticks well. This step prevents the roll from falling apart. 3. Slicing the rolls: Use a sharp knife to slice the roll into bite-sized pieces. Wipe the knife with a damp cloth between cuts. This keeps the edges clean and neat. Making sushi at home is fun and easy. For the full recipe, check out the details above! - Ensuring rice is properly cooked: Perfect sushi rice is key. Rinse the rice to remove extra starch. Cook it until all the water is gone. Let it rest for 10 minutes. This makes the rice sticky and easy to roll. - Use of bamboo mat for rolling: A bamboo mat helps you roll tightly. Place the nori on the mat, shiny side down. Wet your hands to spread the rice evenly. This prevents sticking. Roll it carefully, using the mat to guide you. - Maintaining clean knife cuts: A sharp knife is a must. Wet the knife before cutting. This keeps the sushi from sticking. Clean the blade after each cut for smooth edges. This makes your rolls look nice and neat. - Ideal sauce combinations: Soy sauce is classic for dipping. You can add wasabi for heat. Pickled ginger is great for cleansing your palate. These flavors enhance the fresh taste of your sushi. - Presentation tips: Serve your sushi on a nice plate. Arrange the rolls neatly. Add some colorful veggies on the side. A sprinkle of sesame seeds can make the dish pop. This makes it look as good as it tastes. {{image_2}} You can change up your cucumber avocado sushi rolls by adding different vegetables. Try using bell peppers, radishes, or even sweet potato for a fun twist. Each vegetable adds its own taste and texture. You can also add proteins like crab or shrimp. This makes your rolls more filling and adds a rich flavor to each bite. Spices and seasonings can make your rolls pop. Consider adding a sprinkle of chili flakes for heat. You can also try sesame oil for a nutty flavor. Using flavored rice vinegar can change the taste too. Look for options like herb-infused or citrus-flavored vinegar. These simple changes can turn a basic roll into a gourmet treat. For the Full Recipe, refer back to the main ingredients and instructions. Enjoy experimenting! To keep your cucumber avocado sushi rolls fresh, you need to store them properly. First, wrap each roll tightly in plastic wrap. This helps to keep the air out and moisture in. Next, place the wrapped rolls in an airtight container. This adds another layer of protection. You can store them in the fridge for up to 24 hours. After that, they may lose their crispness. Sushi is best enjoyed fresh, but you can refresh it. To restore the texture, take the rolls out of the fridge. Unwrap them and let them sit at room temperature for about 10 minutes. This will help them soften slightly. If you want to warm them, place the rolls on a microwave-safe plate. Heat them in the microwave for 10-15 seconds on low power. Be careful not to overheat, as this can make them soggy. Enjoy your sushi rolls with soy sauce for a tasty boost! If you want to learn how to make them from scratch, check out the [Full Recipe]. How to prevent the nori from becoming soggy? To keep nori crispy, avoid excess moisture. Use a dry bamboo mat. Spread the rice gently and keep the fillings dry. Wrap the rolls right before serving. This will help maintain the nori’s texture. Can I make sushi rice in advance? Yes, you can make sushi rice ahead of time. Cool it down, then store it in an airtight container. Keep it in the fridge to prevent spoilage. Just remember to let it come to room temperature before using. What are the best substitutes for sushi rice? If you don't have sushi rice, you can try short-grain rice. It has a similar stickiness. You may also use quinoa for a unique twist. Just be sure to adjust the cooking time and water ratio. What tools do I need to make sushi at home? You will need a bamboo sushi mat, a sharp knife, and a rice cooker (optional). A small bowl of water helps to keep your hands wet while you roll. This prevents the rice from sticking. How do I introduce sushi to kids? Start by making sushi fun! Let kids choose their fillings. Use colorful vegetables and simple flavors. You can also make smaller rolls, which are easier for little hands. Encourage them to dip in soy sauce for added fun! Cucumber avocado sushi rolls are simple and fun to make. We covered the ingredients, steps, and some tips for the perfect roll. You learned about storage and variations to try. Each step helps you create tasty sushi at home. Don't be afraid to experiment with flavors. With practice, your skills will improve. Enjoy your sushi journey and impress your friends and family!](https://savoryspiral.com/wp-content/uploads/2025/06/c92b96a6-3696-4fe7-9b14-dd117018d6b3.webp)
Cucumber Avocado Sushi Rolls Easy and Fresh Recipe
If you’ve ever craved fresh, vibrant sushi but thought it was too hard to make, I have great news! Cucumber
If you’ve ever craved fresh, vibrant sushi but thought it was too hard to make, I have great news! Cucumber

Are you ready for a sweet delight that feels indulgent yet healthy? Our Vegan Zucchini Chocolate Cake is not just
![- 2 ripe peaches, diced - 1 small red onion, finely chopped - 1 jalapeño, seeded and minced - 1 red bell pepper, diced - 1 tablespoon fresh lime juice - 1 tablespoon honey - 1/4 cup fresh cilantro, chopped - Salt and pepper to taste How to choose ripe peaches When selecting peaches, look for ones that feel firm but yield slightly to pressure. Their skin should be smooth and fragrant. Avoid peaches with green spots; this means they are not ripe. Selecting the right onion and peppers Choose a red onion that is firm and has smooth skin. For jalapeños, pick peppers that are bright green and have a shiny look. Check for firmness, as soft spots indicate over-ripeness. Importance of fresh herbs Fresh cilantro adds a burst of flavor to your salsa. Look for bright green leaves with no wilting. Fresh herbs enhance the taste and aroma of your dish, making it more enjoyable. For more details, check the Full Recipe. Start by dicing your ripe peaches into small, bite-sized pieces. Use a sharp knife for clean cuts. Next, finely chop the red onion and red bell pepper. This adds crunch and flavor. For the jalapeño, slice it in half and remove the seeds. This keeps the heat down. Finely mince the jalapeño to mix well. Finally, in a small bowl, whisk together the lime juice and honey. This mixture adds a sweet and tangy kick. In a medium bowl, mix the diced peaches, chopped onion, minced jalapeño, and diced bell pepper. Stir gently to avoid mashing the peaches. Next, pour the lime-honey mixture over the fresh ingredients. Toss everything together until it’s well coated. Add the chopped cilantro last. Season your salsa with salt and pepper to your liking. Mix it gently to keep the peaches intact. Peach salsa shines when served with tortilla chips. It also pairs well with grilled chicken or fish. You can spoon it over tacos for added flavor. For the best taste, let your salsa chill in the fridge for about 10-15 minutes. This waiting time allows the flavors to blend beautifully. Enjoy your fresh and vibrant peach salsa! Check out the Full Recipe for more details. To make great peach salsa, balance is key. You want the sweetness of the peaches to shine, but also have a nice tang. Use lime juice for acidity. This combo keeps the salsa fresh and lively. If you like heat, adjust spice levels to your taste. Start with one jalapeño and add more if you want. Remember, some peppers pack a bigger punch than others. Taste as you go to find your sweet spot! Want to cut back on sugar? Try alternative sweeteners. Agave syrup or maple syrup can work well. Just remember to use less, as these sweeteners can be sweeter than honey. First impressions matter. Serve your peach salsa in colorful bowls. Bright colors make the dish pop and look inviting. You can even layer the salsa in a clear glass for a fun look. Garnish adds flair. Use fresh cilantro or a slice of lime on top. You can also sprinkle crumbled feta or avocado for added color and taste. A little extra care goes a long way in making your salsa shine! Fresh ingredients are a must. To ensure your peaches last, store them at room temperature until ripe. Once they are ripe, keep them in the fridge. For the best salsa, time matters. Let the flavors meld by resting the salsa for 10-15 minutes. This helps all the tastes blend perfectly. For longer storage, use an airtight container. Your salsa will stay fresh in the fridge for about three days. Enjoy your peach salsa as soon as you can for the best flavor! For the full recipe, check [Full Recipe]. {{image_2}} You can change peach salsa by adding other fruits. Mango brings a sweet touch. Pineapple adds a tropical vibe. Both fruits mix well with peaches. You can chop them small like the peaches. Citrus fruits like lime or orange add a zing. Their bright flavor lifts the salsa. Try mixing these fruits for fun new tastes. Want your salsa spicier? Use more jalapeños or add hotter peppers. Serrano or habanero can kick up the heat. If you prefer it mild, remove the seeds. You can also mash in some fresh or dried spices. Paprika gives a nice taste without too much heat. Adjust to your liking for the perfect bite. This salsa is easy to make vegan. Replace honey with agave syrup. This keeps the sweetness while being plant-based. You can also add black beans for protein. They add texture and fiber. This makes the salsa heartier and more filling. You can enjoy it as a snack or a meal. You can find the full recipe for peach salsa [here](#). To keep your peach salsa fresh, use an airtight container. This helps seal in flavor and prevents spoilage. Make sure the container is clean and dry before use. After you make the salsa, store it in the fridge. The cold will help preserve its taste and texture. Try to eat your salsa within three days for the best flavor. If you want to save salsa for later, freezing is a great option. Start by placing the salsa in a freezer-safe container or a sturdy plastic bag. Remove as much air as possible to prevent freezer burn. You can freeze peach salsa for up to three months. When you’re ready to use it, thaw the salsa in the fridge overnight. After it's thawed, you can stir it well and add fresh herbs if you like. You can keep peach salsa in the fridge for about three to five days. If you see any changes in color or smell, it might be bad. Mold is another sign that it should be thrown out. Always check for these signs to avoid eating spoiled salsa. To add heat, you can use more jalapeño. Milder peppers like poblano are great too. Try adding a pinch of cayenne pepper for an extra kick. If you like it super hot, use habanero peppers. Always taste as you go. Adjust until it suits your taste! Yes, you can use canned peaches. They save time and are easy to find. However, fresh peaches taste better and have better texture. Canned peaches can be mushy and less flavorful. If you use them, drain the syrup well. This helps keep the salsa fresh. Peach salsa is perfect with grilled chicken or fish. It adds a sweet and spicy touch. You can serve it with tortilla chips for a fun appetizer. Try it on tacos or burritos for a flavor boost. It also works well as a topping for salads! Peach salsa is a fun and fresh dish. We covered key ingredients like peaches, onions, and peppers. Selecting ripe produce is vital for great flavor. You learned how to prep, mix, and serve it well. Remember, balancing sweetness and spice makes a difference. You can also add fruit or adjust the heat. Storing it properly keeps it fresh longer. Enjoy experimenting with variations! Cater this dish to your taste, and impress your friends with your new skills.](https://savoryspiral.com/wp-content/uploads/2025/06/aadc1f0d-d28a-4c8f-a80d-f613952c7ace.webp)
Are you ready to brighten up your meals with a burst of flavor? This Easy Peach Salsa is both refreshing

Are you craving a tasty snack that’s both crispy and healthy? Look no further! Baked Zucchini Tater Tots are the
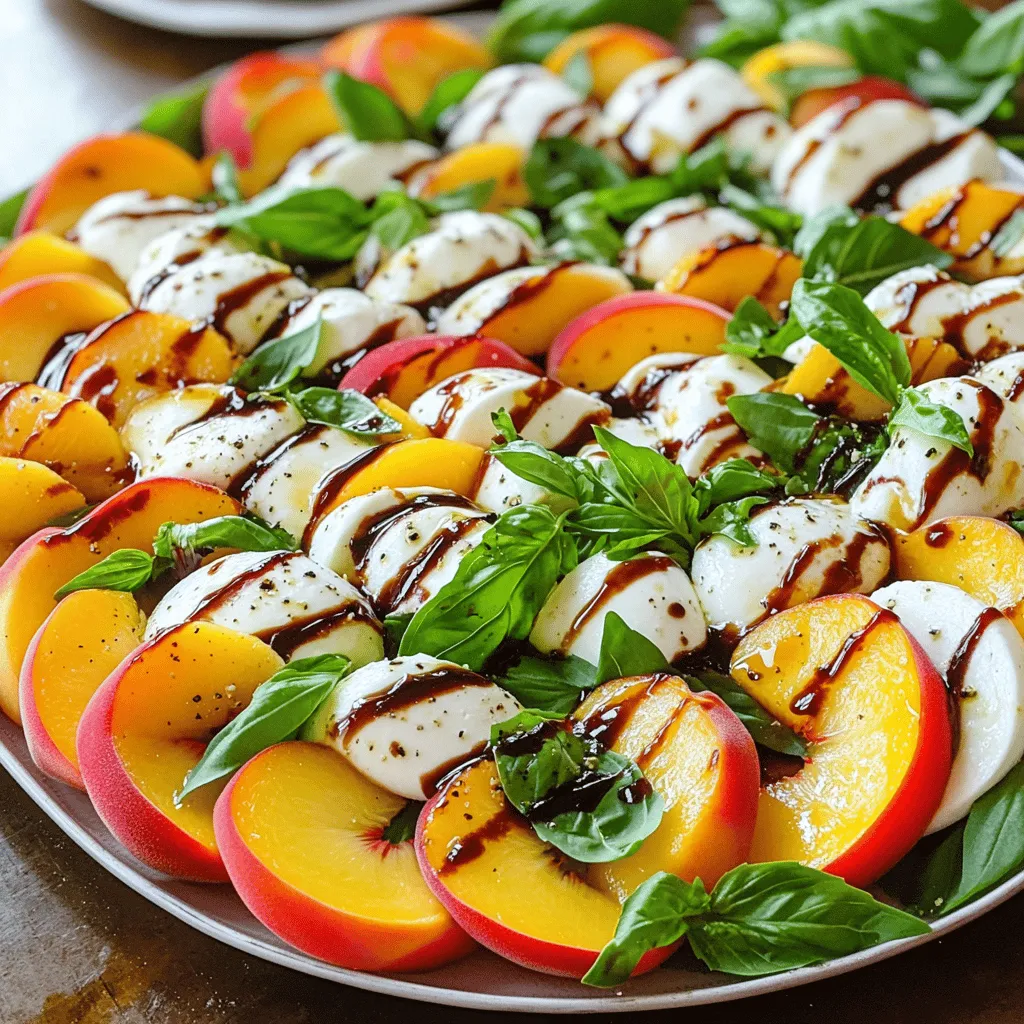
Looking for a bright, fresh dish that screams summer? Try my Summer Peach Caprese Salad! This vibrant salad combines juicy
![- 4 salmon fillets - 1/4 cup soy sauce (low sodium) - 1/4 cup honey - 2 tablespoons rice vinegar - 1 tablespoon sesame oil - 2 cloves garlic, minced - 1 teaspoon fresh ginger, grated - 1 tablespoon cornstarch mixed with 2 tablespoons water (slurry) - 1 tablespoon sesame seeds - 2 green onions, sliced (for garnish) - Cooked rice or quinoa (for serving) - Optional side dishes to complement the salmon When making baked teriyaki salmon, you need good ingredients. Each one adds to the taste. First, the salmon fillets are the star of the dish. Choose fresh, high-quality salmon for the best results. Next, the soy sauce brings saltiness. I like using low-sodium soy sauce. It lets the other flavors shine. Honey adds sweetness and balances the salt. Rice vinegar adds a light tang. Sesame oil gives a nice nutty flavor. The flavor enhancers make the dish pop. Minced garlic brings warmth. Fresh ginger adds a zing. The cornstarch slurry thickens the sauce, making it glossy. Sesame seeds add crunch and a nutty taste. Green onions bring freshness on top. For serving, cooked rice or quinoa pairs well. These grains soak up the teriyaki sauce. You can also add side dishes like steamed veggies or a salad. This makes a complete meal. For the full recipe, check [Full Recipe]. - Preheat the oven to 400°F (200°C). - In a bowl, whisk the teriyaki sauce ingredients. This includes soy sauce, honey, rice vinegar, sesame oil, garlic, and ginger. Mix until smooth. The sauce will be the star of your salmon dish. - Pour half of the teriyaki sauce over salmon fillets. Make sure to coat them well. - Let the salmon marinate for about 15 minutes. This step adds flavor. If you have time, marinating longer is even better. - Place the marinated salmon in the oven. Bake for 12-15 minutes. - Check if the salmon is fully cooked by using a fork. It should flake easily. The fish should be opaque and moist. - For a glossy finish, drizzle the heated, thickened teriyaki sauce over the salmon before serving. You can find all the details in the Full Recipe. Enjoy your cooking! The best internal temperature for salmon is 145°F (63°C). Use a food thermometer to check. Insert the thermometer into the thickest part of the fillet. The fish should be opaque and flake easily. If it looks shiny and raw, it needs more time. You can boost flavor with extra ingredients. Try adding a splash of orange juice or a dash of chili flakes. For a fresh touch, use herbs like cilantro or parsley as garnishes. These add color and taste to your dish. Plating makes your dish shine. Serve salmon on a bed of rice or quinoa. Drizzle extra teriyaki sauce over the top for a glossy look. Add sesame seeds and sliced green onions for a pop of color. This makes your meal inviting and fun to eat. {{image_2}} You can cook teriyaki salmon in different ways. One method is grilling. Grilling gives the fish a nice char. It also adds a smoky taste. For grilling, brush the salmon with teriyaki sauce. Place it on a hot grill for about 4-6 minutes per side. Keep an eye on it to avoid overcooking. Another method is pan-searing. This method gives a crispy skin. Heat a non-stick pan over medium-high heat. Add a little oil and place the salmon skin-side down. Cook for about 4-5 minutes. Flip it and cook for another 3-4 minutes. This method keeps the fish juicy and full of flavor. Sometimes, you might need to change the ingredients. For soy sauce, you can use tamari or coconut aminos. These options are great for people who avoid gluten. For honey, maple syrup or agave nectar works well. These swaps keep the sweet taste. If you want a vegan or vegetarian option, use tofu. Press and cube the tofu, then marinate it in the teriyaki sauce. Bake or grill it the same way. This way, you can enjoy the same great flavors without fish. Pairing salmon with herbs can enhance its taste. Try dill, cilantro, or basil for fresh flavors. Each herb adds a unique twist. You can also use spices like black pepper or red pepper flakes for some heat. Incorporating seasonal sides boosts your meal. In spring, serve with asparagus or peas. In fall, roasted sweet potatoes or Brussels sprouts make a great match. These combos create a colorful and tasty plate. For the full recipe, refer to the Baked Teriyaki Salmon Delight. To store cooked Baked Teriyaki Salmon, let it cool first. Place it in an airtight container. You can keep it in the fridge for up to three days. This helps keep the salmon fresh and tasty. Avoid letting it sit out too long to prevent spoilage. When you’re ready to eat the leftovers, use the oven or the microwave. For the oven, preheat it to 350°F (175°C). Place the salmon on a baking sheet. Cover it with foil to keep the fish moist. Heat it for about 10 minutes. For the microwave, use a microwave-safe plate. Heat the salmon in short bursts of 30 seconds. This helps keep it from drying out. If you want to save Baked Teriyaki Salmon for later, you can freeze it. Wrap each fillet tightly in plastic wrap. Then, place it in a freezer bag. Make sure to remove as much air as you can. The salmon can last up to three months in the freezer. When ready to eat, thaw it in the fridge overnight. Reheat it using the tips above. It takes about 12 to 15 minutes to bake salmon at 400°F. To check if it’s done, use a fork. The fish should flake easily. If it’s still tough, bake it a bit longer. Keep an eye on it to avoid overcooking. Salmon is best when it’s moist and tender. Yes, you can use other fish for this teriyaki recipe. Good options include: - Tilapia - Trout - Mahi-mahi - Cod These fish have a mild flavor and bake well. Adjust the cooking time as needed since different fish may cook faster or slower. You can serve Baked Teriyaki Salmon with many tasty sides. Here are some ideas: - Steamed broccoli - Sautéed green beans - Roasted sweet potatoes - Jasmine rice or quinoa These sides complement the salmon's sweet and savory flavors. Enjoy creating a colorful plate! For the full recipe, check out the earlier section. This article covered all you need to make Baked Teriyaki Salmon. We discussed essential ingredients, cooking methods, and serving ideas. You learned how to marinate, bake, and store salmon properly. Remember, the right techniques ensure your salmon shines at the dinner table. Don't hesitate to experiment with flavors and sides to create your perfect dish. Enjoy making this meal again and again!](https://savoryspiral.com/wp-content/uploads/2025/06/1133874f-79c3-4b54-ab11-88a0fabd89ac.webp)
Are you ready to impress your taste buds with a quick and tasty dish? Baked Teriyaki Salmon combines rich flavors
![To make a tasty Caesar salad, you need some key ingredients. Here’s what you should gather: - 2 large romaine lettuce hearts, chopped - 1 cup homemade croutons - 1/2 cup grated Parmesan cheese - 1/4 cup mayonnaise - 2 tablespoons fresh lemon juice - 1 teaspoon Dijon mustard - 1 clove garlic, minced - 1 teaspoon Worcestershire sauce (optional) - Salt and pepper to taste - Freshly cracked black pepper for serving Each of these parts plays a big role. The romaine gives crunch. The cheese adds richness. The dressing brings it all together with tang and creaminess. You can change things up with some optional ingredients. Here are a few ideas: - Sliced grilled chicken for protein - Crispy bacon for a savory kick - Cherry tomatoes for a pop of color - Avocado for a creamy texture These extras can make your salad more filling or add different flavors. If you run out of something, don’t worry! Here are some easy swaps: - Use Greek yogurt instead of mayonnaise for a lighter dressing. - If you don't have Worcestershire sauce, try soy sauce or balsamic vinegar. - Any hard cheese can replace Parmesan, like Pecorino Romano. These substitutes can help you stick to your recipe without losing taste. For the full recipe, check out [Full Recipe]. To make croutons, preheat the oven to 375°F (190°C). Cut 2-3 slices of bread into cubes. Toss the cubes with olive oil, salt, and garlic powder. Spread them out on a baking sheet. Bake for 10-15 minutes until they turn golden and crisp. Shake the pan halfway through to ensure even cooking. In a medium bowl, combine 1/4 cup of mayonnaise, 2 tablespoons of fresh lemon juice, and 1 teaspoon of Dijon mustard. Add 1 minced clove of garlic and 1 teaspoon of Worcestershire sauce if you like. Season with salt and pepper. Whisk all ingredients together until the mixture is smooth and creamy. This dressing is key to a great Caesar salad. In a large bowl, add the chopped romaine lettuce. Pour the dressing over the lettuce. Toss gently so that all the leaves are coated well. Next, add the homemade croutons and 1/2 cup of grated Parmesan cheese. Toss again lightly to mix everything together. Serve the salad on chilled plates. Finish with a sprinkle of freshly cracked black pepper and more Parmesan if you want. For the full recipe, check out the earlier section. To make great croutons, start with stale bread. Fresh bread can turn soggy. Cut the bread into small cubes. Toss them with olive oil, salt, and garlic powder. Bake them at 375°F (190°C) for 10-15 minutes. Make sure to shake the pan halfway through. This helps them brown evenly. For extra crunch, let them cool before adding to the salad. For a tasty dressing, use fresh ingredients. Fresh lemon juice brightens the flavor. Minced garlic adds a nice kick. If you want a deeper taste, try Worcestershire sauce. Mix all the dressing ingredients well. Let it chill in the fridge for a bit. This allows the flavors to meld together nicely. Don’t forget to taste and adjust salt and pepper as needed. Serve your Caesar salad in chilled bowls. This keeps the salad fresh and crisp. For a pop of color, add a lemon wedge on the side. Sprinkle extra Parmesan cheese on top. This adds a nice finish. For a fun touch, you can lay croutons on top in a fun pattern. This makes the dish look gourmet and inviting. Enjoy the process of making your salad beautiful! For the full recipe, check out the Crispy Classic Caesar Salad 🥗. {{image_2}} Grilled chicken makes a great addition to Caesar salad. It adds protein and flavor. I like to use chicken breast for this. Start by marinating the chicken in olive oil, garlic, and lemon juice for about 30 minutes. Then, grill it until it's cooked through. Slice the chicken and add it on top of your salad. This makes the dish more filling and boosts its taste. Shrimp can bring a fresh twist to your Caesar salad. They cook quickly and are full of flavor. I recommend using large shrimp. Season them with salt, pepper, and a bit of garlic. Sauté them in a pan for about 3-4 minutes or until they turn pink. Toss the cooked shrimp into your salad for a delightful seafood touch. You can easily make this salad vegetarian or vegan. For a vegetarian version, skip the Worcestershire sauce or use one that’s vegetarian. You can also add extra cheese or swap in a creamy dressing made from cashews or avocados. For a vegan Caesar salad, use vegan mayonnaise. It gives you that creamy texture without any animal products. You can also add roasted chickpeas for extra protein and crunch. Explore the Full Recipe for more details on how to make this classic delight! To store leftover Caesar salad, place it in an airtight container. Keep it in the fridge. Eat it within two days for the best taste. The lettuce may wilt if stored too long. To keep it crisp, store the dressing separately. When ready to eat, toss the salad with fresh dressing. For homemade croutons, let them cool completely before storing. Place them in a sealed bag or container. Keep them at room temperature for up to a week. If you want them to last longer, store them in the fridge. Just remember to heat them before serving to regain their crunch. To keep your dressing fresh, store it in a clean jar with a lid. It lasts about a week in the fridge. If you use fresh garlic, it may not last as long. Always shake it well before using. This helps mix the ingredients and brings back the flavor. For the best taste, use it within three days. You can find the Full Recipe for a delicious Caesar salad that includes these tips! A Caesar Salad is special because of its creamy dressing and crispy romaine. It often includes Parmesan cheese and croutons, adding texture and flavor. The key is the dressing, made with mayonnaise, lemon juice, and garlic. This blend creates a rich taste that makes each bite delightful. Yes, you can make a Caesar Salad without anchovies. Some people use capers or olives instead for a salty punch. You can also skip them entirely if you prefer a milder flavor. The rest of the ingredients still shine, ensuring a tasty salad. To keep your lettuce fresh, wash it and dry it well before serving. You can use a salad spinner for this. Store it in a sealed bag with a paper towel to absorb excess moisture. Adding the dressing just before serving also helps keep it crisp. In this blog post, we explored how to make a classic Caesar salad from start to finish. We discussed key and optional ingredients, and even substitutes. I shared step-by-step instructions for croutons, dressing, and tossing everything together. You learned tips for crisp croutons, flavor boosting, and presentation. We also covered tasty variations and how to store leftovers. With these insights, you can create a delicious Caesar salad that suits your taste. Enjoy making it your own!](https://savoryspiral.com/wp-content/uploads/2025/06/11b6c9b5-a969-4b8f-b56f-dfc8e62b9095.webp)
Are you ready to elevate your salad game? Join me as we dive into the world of the Classic Caesar

Are you craving a sweet and easy dessert? You’ll love this No Bake Chocolate Eclair Cake! It’s simple to make
![To make the best ever guacamole, start with fresh, high-quality ingredients. The star of this dish is the avocado. Choose three ripe avocados. They should yield slightly when you press them. This means they are ready to mash. Next, grab one medium tomato. Dice it into small pieces for a fresh burst of flavor. You will also need a small red onion, finely chopped. This adds a nice crunch and sharpness. For some heat, pick one to two jalapeños. Be sure to deseed and mince them well. Why is quantity and quality important? Simply put, it affects taste and texture. Using ripe avocados gives a creamy base. If they are not ripe, your guacamole will be bland. Fresh tomatoes and onions brighten the dish. The right amount of lime juice keeps it zesty. It helps balance the flavors. Trust me, you want fresh ingredients for the best results. Now, let’s talk about tools. You will need a good knife to cut the avocados and vegetables. A cutting board makes prep easy. For mashing, a fork or a potato masher works well. Mixing bowls are also essential for combining your ingredients. If you have a citrus juicer, it helps get all the juice from your lime. These tools make your cooking smooth and simple. Follow the [Full Recipe] for a perfect guide to making this delight! Start by choosing ripe avocados. They should feel soft but not mushy. Cut each avocado in half and remove the pit. Use a spoon to scoop the green flesh into a mixing bowl. This step is crucial for a creamy texture. The right ripeness makes all the difference in taste. Now, grab a fork or a potato masher. Mash the avocados to your liking. Some like it smooth; others prefer a chunky style. You can mix in your other ingredients later, so don’t worry about over-mashing. Aim for a nice balance between creamy and chunky. Next, add the diced tomato, red onion, minced jalapeños, lime juice, and cilantro. Sprinkle in garlic powder or fresh garlic, and mix well. Taste your guacamole. Adjust the seasoning by adding more lime juice, salt, or jalapeños. This is where you personalize it to fit your taste. Serve right away with tortilla chips or as a topping. For the complete recipe, check the Full Recipe section. To make the best ever guacamole, start with ripe avocados. Look for avocados that yield slightly when you press them. They should feel firm but not hard. A dark green or black skin often indicates ripeness. Avoid avocados with deep indentations or brown spots, as these may be overripe. To boost the flavor of your guacamole, use fresh lime juice. Lime adds a bright, zesty note. Fresh cilantro brings earthy tones and a pop of color. For a hint of heat, add minced jalapeños. You can adjust the amount based on your spice preference. Using garlic powder or fresh garlic adds depth. Each ingredient plays a role in creating a balanced taste. Browning is a common issue with guacamole. To keep it fresh, store it in an airtight container. Press plastic wrap directly onto the guacamole’s surface to limit air contact. Adding extra lime juice can also help slow browning. If you see brown spots, gently stir them back in. They won't change the taste much. For the full recipe, check out the Best Ever Guacamole details. {{image_2}} If you love spice, add more jalapeños. Start with one, then taste. If you want more heat, chop up another. You can also add hot sauce for extra kick. Just a few drops can make a big difference. Adjust to your taste, and enjoy the fiery flavor. For a fun twist, mix in some corn and black beans. Use about a half cup of each. This adds a sweet crunch and protein. It also makes your guacamole more filling. You can use frozen corn, just thaw it first. This twist is perfect for parties! Want something different? Try adding fruit like mango or pineapple. Chop them into small pieces and fold them in gently. These fruits add a sweet touch. You can also crumble some feta cheese for a salty bite. Both options give your guacamole a fun twist. For the full recipe, check out the Best Ever Guacamole section above! To keep your guacamole fresh, you need to store it right. Place your leftover guacamole in an airtight container. Press plastic wrap directly onto the surface of the guacamole. This helps keep air out and slows browning. Store it in the fridge for up to two days. If you see some browning, just scrape the top layer off. Your guacamole should still taste great! You can freeze guacamole if you want to save some for later. Scoop the guacamole into freezer-safe bags. Flatten the bags to remove air before sealing. This helps save space and keeps it fresh. You can freeze it for up to three months. When you want to eat it, thaw it in the fridge overnight. Just mix it well before serving. If your guacamole looks a bit brown after storage, don't worry! You can easily revive it. Add a splash of lime juice to brighten the flavor. Stir it well to mix in the juice. If it feels too thick, you can add a tiny bit of water. This helps restore its creamy texture. Enjoy it with chips or on your favorite dishes. For the full recipe, check out the Best Ever Guacamole! The best avocado for guacamole is the Hass avocado. It has a rich, creamy texture and a great taste. When ripe, its skin turns dark and bumpy. This type of avocado mashes easily, making it perfect for guacamole. Look for avocados that yield slightly when pressed. Avoid hard avocados as they won't be ripe. Yes, you can make guacamole ahead of time. However, it may brown quickly due to oxidation. To slow this down, add lime juice and cover it tightly with plastic wrap. Press the wrap directly onto the guacamole to reduce air contact. Store it in the fridge and use it within one day for the best flavor. If your guacamole is too salty, you can fix it easily. Add more mashed avocado to balance the saltiness. You can also mix in some diced tomatoes or a splash of lime juice. These additions will help tone down the salt without losing flavor. Always taste as you go to ensure you get it just right. You learned how to make delicious guacamole from scratch. We discussed choosing fresh avocados and the tools you need. I shared step-by-step instructions for the perfect texture and flavor. Tips for ripeness and storage can improve your guacamole game. Finally, you can explore spicy and unique variations. Now, it's time to grab your ingredients and create your own guacamole masterpiece. Enjoy every bite!](https://savoryspiral.com/wp-content/uploads/2025/06/c46798d0-8e7f-462a-aced-19432788616c.webp)
If you want to make the best ever guacamole, you’re in the right place! With fresh ingredients, simple steps, and
![- 2 boneless, skinless chicken breasts - Seasonings: salt, pepper, garlic powder For this Easy Chicken Parmesan, the main ingredients are simple yet vital. You need two boneless, skinless chicken breasts. These provide a great base for our dish. Seasoning your chicken is key. I like to use salt, pepper, and garlic powder. These add a nice flavor to the chicken. - 1 cup all-purpose flour - 2 large eggs, beaten - 1 cup breadcrumbs (preferably Italian-seasoned) Next, we create a breading station. This is where the fun begins! You need one cup of all-purpose flour. This helps the egg stick to the chicken. Then, take two large eggs and beat them in a bowl. The egg adds moisture and helps the breadcrumbs adhere. Finally, use one cup of breadcrumbs, preferably Italian-seasoned. These give the chicken a nice, crunchy texture. - 1 cup marinara sauce - 1 ½ cups shredded mozzarella cheese - ½ cup grated Parmesan cheese - 2 tablespoons fresh basil, chopped - Olive oil for frying Now, let’s talk about toppings and garnishes. You need one cup of marinara sauce. This adds flavor and moisture to your dish. You’ll also need one and a half cups of shredded mozzarella cheese. This cheese melts beautifully and adds creaminess. Don’t forget half a cup of grated Parmesan cheese for that salty kick! To finish, use two tablespoons of fresh basil, chopped. This brightens up the dish and gives a fresh taste. Lastly, olive oil is essential for frying. It helps create that golden, crispy crust on the chicken. For the full recipe, check out the details above. Happy cooking! 1. Preheat your oven to 375°F (190°C). This will help cook the chicken evenly. 2. Grab your chicken breasts. Season them with salt, pepper, and garlic powder. This adds great flavor. 3. Now, set up your breading station. - Place 1 cup of all-purpose flour in a shallow dish. - In another dish, beat 2 large eggs. - Put 1 cup of breadcrumbs in a third dish. Italian-seasoned breadcrumbs work best. 4. Time to bread the chicken! Dip each chicken breast in the flour first. Make sure it covers all sides. 5. Next, dip the floured chicken into the beaten eggs. Coat it well. 6. Finally, roll the chicken in the breadcrumbs. Ensure it's evenly covered for a nice crunch. 7. Heat about ¼ inch of olive oil in a large skillet over medium heat. Once hot, add the breaded chicken. 8. Cook each side for about 4-5 minutes. You want them golden brown and cooked through. 9. Remove the chicken from the skillet. Place it in a baking dish. 10. Spoon 1 cup of marinara sauce over each piece. Then, sprinkle 1 ½ cups of shredded mozzarella and ½ cup of grated Parmesan cheese on top. 11. Bake in your preheated oven for about 20 minutes. Look for bubbly and golden cheese. 12. When ready, sprinkle 2 tablespoons of fresh basil on top before serving. This method gives you a great Chicken Parmesan with crispy chicken and melty cheese. For the full recipe, you can refer back to the ingredients section! To get crispy chicken, use the right frying method. I recommend shallow frying in olive oil. Heat about ¼ inch of oil in your skillet. Make sure the oil is hot before adding the chicken. This helps create a nice crust. Cook each side for about 4-5 minutes until golden brown. To ensure moist chicken breasts, start with even-sized pieces. This helps them cook evenly. Season your chicken well with salt, pepper, and garlic powder. Let it rest for a few minutes after cooking. This helps keep the juices inside. If you need alternatives for breadcrumbs, try using crushed cornflakes or panko. Both options add great crunch. For cheese, you might use a mix of mozzarella and gouda. This gives a unique flavor twist. For marinara sauce, homemade is best, but jarred works too. You can spice it up by adding red pepper flakes or fresh herbs. Both options make a big flavor difference. Serve your Chicken Parmesan on a bed of spaghetti or steamed veggies. This adds color and texture to the plate. You can also use fresh basil as a garnish. It adds a pop of green and fresh flavor. To make your dish even more appealing, drizzle a bit of olive oil on top. This enhances the look and taste. Pair with a side salad for a complete meal. For the full recipe, check out the [Full Recipe]. {{image_2}} You can make Chicken Parmesan healthier with easy swaps. - Using whole-wheat breadcrumbs: Whole-wheat breadcrumbs add fiber and nutrients. They give a nice crunch while keeping the dish wholesome. - Low-fat cheese options: Choose low-fat mozzarella or Parmesan cheese. This cuts calories without losing flavor. These swaps help you enjoy Chicken Parmesan while staying on track with your health goals. Want to boost the taste? Here are some fun ideas! - Adding herbs and spices: Fresh herbs like oregano or thyme can add a nice touch. Try adding crushed red pepper for heat or a pinch of smoked paprika for a smoky flavor. - Introducing different sauces or toppings: Marinara is great, but you can switch it up! Use pesto or Alfredo sauce for a twist. Top with sautéed mushrooms or spinach for added goodness. These enhancements keep your Chicken Parmesan exciting and full of flavor. There are many ways to cook Chicken Parmesan. Here are two popular methods. - Air fryer version of Chicken Parmesan: The air fryer cooks the chicken fast with less oil. It gets crispy and golden, just like frying, but with fewer calories. Cook it for about 10-12 minutes at 375°F (190°C). - Instant Pot adaptation: The Instant Pot makes cooking easy. You can pressure cook the chicken for about 8 minutes, then add sauce and cheese. Finish it under the broiler to melt the cheese and get a nice crust. These methods make Chicken Parmesan quick and simple to prepare. Check the Full Recipe for more details! To keep your Chicken Parmesan fresh, store it in an airtight container. Place it in the fridge within two hours of cooking. This helps keep it safe to eat. You can store it for up to three days. When you’re ready to eat, just reheat it in the oven for the best taste. If you want to save Chicken Parmesan for later, freezing is a great option. First, let it cool completely. Then, wrap each piece tightly in plastic wrap. Place the wrapped pieces in a freezer bag or container. This will help prevent freezer burn. You can freeze it for up to three months. To reheat, let it thaw in the fridge overnight. Then, bake it at 375°F (190°C) until heated through. To make busy weeknights easier, consider meal prep. You can pre-bread the chicken ahead of time. Just keep the breaded chicken in the fridge for one day. When you’re ready to cook, fry it up quickly. Another idea is to batch cook. Make several servings of Chicken Parmesan at once. You can freeze extras for quick dinners later. This way, you always have a tasty meal ready to go! For the full recipe, check out the instructions above. How do I keep chicken parmesan from getting soggy? To keep chicken parmesan crispy, avoid adding sauce too early. First, cook the chicken until golden. Then, add marinara sauce just before serving. You can also use less sauce and serve it on the side. This way, the chicken stays crunchy. Can I make Chicken Parmesan ahead of time? Yes, you can prepare chicken parmesan ahead of time! Bread the chicken and store it in the fridge. Cook it fresh when ready to eat. You can also bake and then reheat it. Just keep in mind that it may lose some crispiness. What sides go well with Chicken Parmesan? Chicken parmesan pairs well with several sides. Here are some tasty options: - Spaghetti with marinara sauce - Garlic bread - Steamed vegetables like broccoli or green beans - A fresh garden salad with vinaigrette How can I make Chicken Parmesan spicy? To spice up your chicken parmesan, add crushed red pepper flakes to the breadcrumbs. You can also mix in some hot sauce with the marinara. For an extra kick, try pepper jack cheese instead of mozzarella. Why is my cheese not melting properly? If your cheese does not melt, it may be too cold. Ensure it is at room temperature before adding it to the dish. Also, consider using fresh mozzarella for better melting. Bake it long enough to allow the cheese to bubble and brown. What to do if the chicken is overcooked? If your chicken is overcooked, there are a few fixes. You can slice it thin and serve it with extra marinara sauce. This adds moisture and flavor. Another option is to make it into a chicken parmesan sandwich. The sauce will help mask the dryness. This blog post covered everything you need for a delicious Chicken Parmesan. We reviewed the key ingredients, preparation steps, and cooking methods. I shared some tips for crispy, moist chicken and various healthy swaps. Don’t forget the importance of presentation to impress anyone you serve. Cook with confidence. With the right techniques and ideas, you can enjoy a fantastic meal. Enjoy your cooking journey and celebrate every bite of Chicken Parmesan.](https://savoryspiral.com/wp-content/uploads/2025/06/cac57faa-00e1-400b-932d-ade5d4309756.webp)
If you want a hearty meal that’s both tasty and easy, you’ve landed in the right place! This Easy Chicken
