Skip to content
DisclaimerTerms Of UseGDPR PolicyCookie Policy

savoryspiral

  • Home
  • Drinks
  • Appetizers
  • Dinner
  • Dessert
  • About
  • Contact
  • Privacy Policy
DisclaimerTerms Of UseGDPR PolicyCookie Policy

Charlotte

For a great Caprese salad, you need fresh ingredients. Here’s what you need: - 2 large ripe tomatoes, sliced - 1 ball of fresh mozzarella cheese, sliced - 1 cup fresh basil leaves - 2 tablespoons balsamic glaze - 1 tablespoon extra-virgin olive oil - Salt and freshly ground black pepper to taste Using ripe tomatoes is key. They should feel firm but not hard. Fresh mozzarella should be soft and slightly springy. Look for vibrant green basil leaves for the best flavor. You can add more flavors to your salad. Here are some tasty options: - Sliced avocado for creaminess - A sprinkle of red pepper flakes for spice - Pine nuts for crunch - A drizzle of lemon juice for brightness Feel free to experiment! These add-ins can change the salad's taste and texture. Keep your prep simple with the right tools. You will need: - A sharp knife for slicing - A cutting board for a clean workspace - A large platter for serving - Measuring spoons for accurate ingredient amounts Having these tools ready will make your cooking quick and easy. To make a great Easy Caprese Salad, start with fresh ingredients. First, wash the tomatoes and basil leaves well. Take two large, ripe tomatoes and slice them about 1/4 inch thick. Then, grab one ball of fresh mozzarella cheese and slice it into even pieces too. This step sets the stage for a tasty dish. Layering the salad is key to its charm. On a large serving platter, alternate the tomato and mozzarella slices. Overlap them slightly for a nice look. Then, tuck fresh basil leaves between the tomato and mozzarella layers. This adds color and freshness. The goal is to create a feast for the eyes and the taste buds. Once your salad is layered, it’s time for the final touches. Drizzle two tablespoons of balsamic glaze over the salad. Follow that with one tablespoon of extra-virgin olive oil. This adds a rich flavor that makes the salad pop. Next, season with salt and freshly ground black pepper to taste. These small details enhance the overall taste and make your Easy Caprese Salad shine. Let it sit for a few minutes to meld the flavors. For the full recipe, check out the instructions above. When picking tomatoes, look for ripe ones. They should feel firm but not hard. The color should be bright and rich. Heirloom tomatoes work well for their flavor. For mozzarella, choose fresh, soft balls. Look for those packed in water. They should smell milky and clean. This combination brings great taste to your salad. Caprese salad shines at many events. For a picnic, serve it on a platter. You can also make individual cups for easy eating. At dinner parties, pair it with grilled meats. For a light lunch, serve it with crusty bread. It fits well with wine, too. This salad adds a fresh touch to any meal. To keep your salad fresh, serve it right away. Make it just before eating. If you need to prep in advance, keep parts separate. Store mozzarella and tomatoes in the fridge. Add basil and dressing just before serving. This way, flavors stay bright and vibrant. Enjoy every bite of your Easy Caprese Salad! {{image_2}} You can change the flavors in your Caprese salad. Try using heirloom tomatoes for a sweet taste. You can also swap mozzarella for burrata. Burrata adds a creamy texture that makes the salad even richer. For a spicy kick, add sliced jalapeños or red pepper flakes. You might even try adding avocado for creaminess or olives for a briny bite. While balsamic glaze is classic, you can mix it up. Try a lemon vinaigrette for a zesty touch. Just mix olive oil, lemon juice, salt, and pepper. For a sweet option, use a honey mustard dressing. This gives your salad a nice balance of sweet and tangy. You can also use pesto instead of olive oil for a fresh basil flavor. Making Caprese salad on a stick is fun and easy. Just use toothpicks or small skewers. Alternate cherry tomatoes, mozzarella balls, and basil leaves on the stick. Drizzle with your favorite dressing right before serving. This makes a great appetizer for parties or picnics. You can easily grab and enjoy each bite. Check out the Full Recipe for more ideas! To store leftover Caprese salad, cover it tightly. Use plastic wrap or a lid. This keeps air out and helps maintain freshness. If you can, store the salad without the dressing. This way, the salad stays crisp. You can add the balsamic glaze and olive oil just before eating. This keeps the flavors bright and fresh. To keep your tomatoes fresh, store them at room temperature. Do not put them in the fridge. Cold air can change their texture. Store fresh mozzarella in water if you have it. If not, wrap it well in plastic. Keep fresh basil in a jar with water, like flowers. This helps it stay green and fragrant. Reheating Caprese salad isn't ideal, but you can revive it. Take the salad out and let it sit at room temperature for about 10 minutes. This helps the flavors come back. If the salad seems wilted, add fresh basil and a drizzle of olive oil. This gives it a new life. Remember, fresh ingredients make all the difference! For the full recipe, check out the Easy Caprese Salad section. An authentic Caprese salad uses fresh, high-quality ingredients. You need ripe tomatoes, fresh mozzarella, and basil. The colors of red, white, and green represent the Italian flag. Simplicity is key; the salad should shine with these basic flavors. Freshness matters. Always choose seasonal tomatoes and high-quality mozzarella for the best taste. Yes, you can use different cheeses if you like. Burrata adds a creamy touch. Feta brings a tangy flavor. Goat cheese can also work well. However, using fresh mozzarella stays true to the classic style. Feel free to experiment based on your taste preferences! You can store Easy Caprese Salad for up to two days. Keep it in an airtight container in the fridge. The tomatoes may release water, making the salad less crisp. It's best to eat it fresh for the best taste and texture. No, balsamic glaze is not necessary, but it adds a nice sweetness. You can skip it if you prefer. Extra-virgin olive oil alone can enhance the flavors. If you want a tangy flavor, try a splash of lemon juice instead. The choice is yours! This blog post guides you through making an Easy Caprese Salad. We explored fresh ingredients, tools for preparation, and tips for selecting the best produce. You learned how to layer for visual appeal and add unique twists. We covered storage practices and answered common questions to enhance your salad game. Enjoy making this simple dish that shines with fresh flavors. With these tips, you’ll impress your friends and family every time. Happy salad-making!

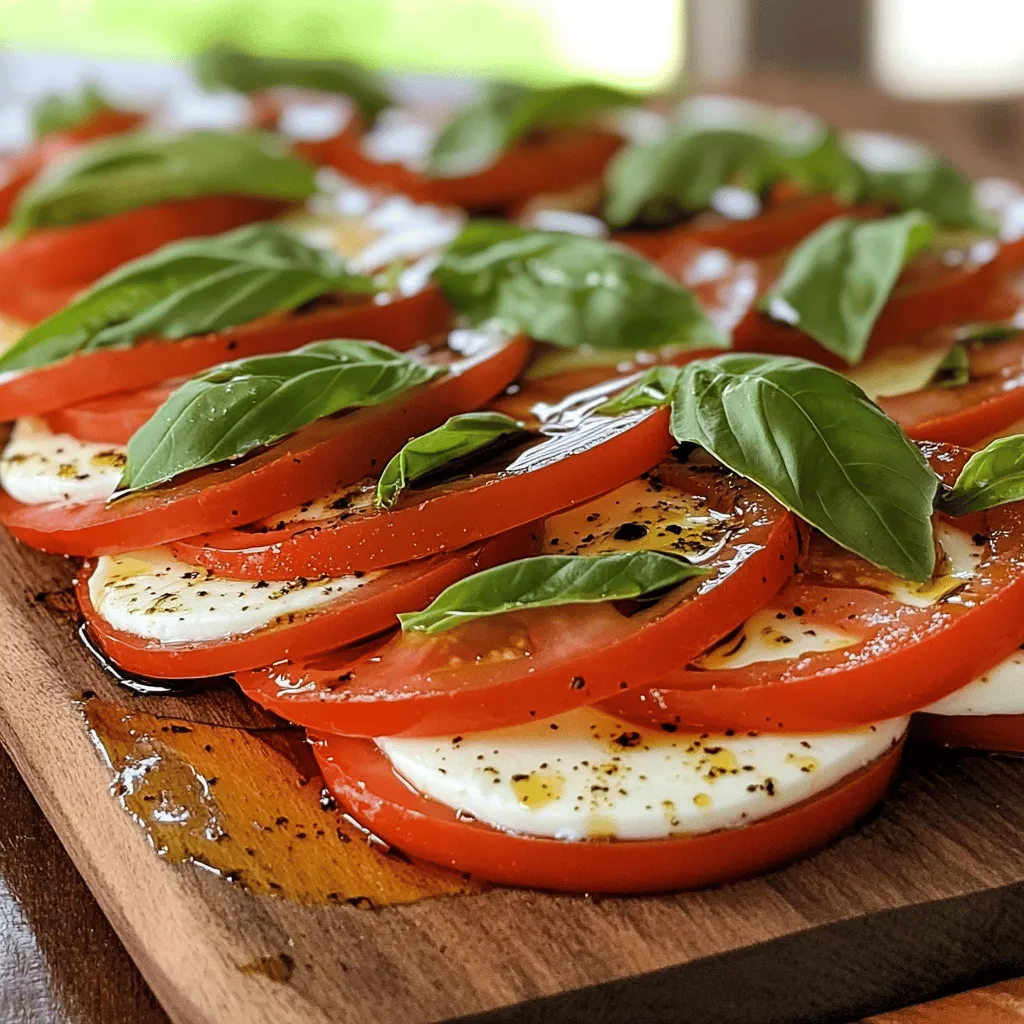
Easy Caprese Salad Simple and Fresh Delight

If you love fresh flavors and easy recipes, you’re in the right place! This Easy Caprese Salad is simple to

This one pan honey garlic chicken is a simple dish. It combines sweet honey and savory garlic. You can make it in just one pan, which cuts down on cleanup time. The dish cooks evenly, with juicy chicken and crisp veggies. You can find the full recipe above. To make this dish, you need a few key items: - 4 chicken thighs (bone-in, skin-on) - 1 cup honey - 4 cloves garlic, minced - 2 tablespoons soy sauce - 1 tablespoon apple cider vinegar - 1 teaspoon ginger, grated - 2 tablespoons olive oil - Salt and pepper to taste - 1 red bell pepper, sliced - 1 cup snap peas - 2 green onions, chopped (for garnish) - Sesame seeds (for garnish) These ingredients give your dish a rich flavor. The chicken stays juicy and tender while roasting. You can customize this meal with extra ingredients. Here are some ideas: - Add chili flakes for heat - Use broccoli or carrots instead of snap peas - Swap honey for maple syrup for a different taste - Include cashews for a crunchy texture Mix and match these options to suit your taste. Enjoy the fun of making this meal your own! Start by gathering your ingredients. You need four chicken thighs, honey, garlic, soy sauce, apple cider vinegar, ginger, olive oil, salt, pepper, red bell pepper, snap peas, green onions, and sesame seeds. Preheat your oven to 400°F (200°C). In a small bowl, mix the honey, minced garlic, soy sauce, apple cider vinegar, and grated ginger. Whisk them until smooth and well combined. Set this mix aside for later. In a large oven-safe skillet, heat two tablespoons of olive oil over medium-high heat. Season the chicken thighs with salt and pepper. Place the thighs in the skillet, skin-side down. Let them sear for about 5-7 minutes until the skin turns golden brown. This step adds flavor. Once golden, flip the chicken over. Pour your honey garlic mixture over the chicken. Make sure each piece is well-coated. Add the sliced red bell pepper and snap peas around the chicken. Gently toss the veggies in the sauce. Now, transfer the skillet to your preheated oven. Roast the chicken for 25-30 minutes. The chicken is ready when it reaches 165°F (75°C) inside. Once done, take the skillet out of the oven. Let the chicken rest for about 5 minutes. This helps lock in the juices. Before serving, garnish the dish with chopped green onions and sesame seeds. Serve this meal hot, and enjoy the tasty flavors. For the complete recipe, check out the Full Recipe section. For this dish, searing the chicken skin-side down gives it a nice crisp. Use medium-high heat to get that golden color. After flipping, pour the honey garlic sauce over the chicken for a rich flavor. Let it cook in the oven to keep the chicken moist. Using an oven-safe skillet is key. You will need a few tools for this recipe: - Large oven-safe skillet - Whisk for mixing sauce - Meat thermometer for checking chicken doneness - Cutting board for chopping veggies These tools make cooking easier and cleaner. One common mistake is not preheating the oven. If the oven is not hot, the chicken won’t cook well. Another mistake is overcrowding the pan. It can steam the chicken instead of roasting it. Lastly, don’t skip resting the chicken after cooking. This allows the juices to settle. For the complete recipe, check the Full Recipe section. {{image_2}} You can change the chicken thighs to chicken breasts. Breasts cook faster, so adjust the time. Instead of honey, try maple syrup for a unique taste. You can also swap soy sauce with tamari for a gluten-free option. If you want a different flavor, use orange juice instead of vinegar. This adds a sweet zing. You can make this dish on the stovetop if you prefer. Sear the chicken in a skillet, then cover it and simmer. Cook on low for about 25 minutes. You can also grill the chicken for a smoky flavor. Just brush the honey garlic sauce on while grilling. An Instant Pot is another great choice. Sauté the chicken, then add the sauce and cook on high pressure for 8 minutes. For a spicy kick, add red pepper flakes to the sauce. You can also mix in fresh herbs like thyme or rosemary for depth. If you like a tangy taste, add more vinegar or a splash of lime juice. To make it richer, stir in some butter just before serving. Each of these changes can bring new life to the dish. Check out the Full Recipe for more ideas on how to customize this meal! After you enjoy your One Pan Honey Garlic Chicken, store leftovers in an airtight container. Make sure to let the chicken cool first. This helps keep the taste fresh. You can keep it in the fridge for up to three days. If you want to enjoy it later, freezing is a great option. When you're ready to eat leftovers, you can reheat them easily. Preheat your oven to 350°F (175°C). Place the chicken in a baking dish and cover it with foil. Heat for about 15-20 minutes or until warm. You can also use a microwave but be careful not to overheat it. This can make the chicken dry. To freeze One Pan Honey Garlic Chicken, wrap it well. Use plastic wrap or freezer bags to remove air. Label the bags with the date. You can freeze it for up to three months. When you're ready to eat, thaw it in the fridge overnight before reheating. Enjoy your tasty meal again! For the full recipe, check out the earlier section. Cooking One Pan Honey Garlic Chicken takes about 45 minutes. You spend 10 minutes prepping the ingredients. The cooking process in the oven takes about 25 to 30 minutes. It’s quick and easy, making it perfect for busy days. The chicken is done when it reaches 165°F inside. Use a meat thermometer for accuracy. Yes, you can use chicken breasts instead of thighs. Chicken breasts cook faster than thighs. They may also dry out if overcooked. I recommend checking the internal temperature at 160°F. This will keep them juicy and tender. Adjust the cooking time to about 20 to 25 minutes in the oven. You can serve One Pan Honey Garlic Chicken with rice or quinoa. These sides soak up the tasty sauce well. Steamed vegetables or a fresh salad are great options too. They add color and nutrition to your meal. You can also serve it with crusty bread to mop up the sauce. Enjoy this dish with your favorite sides for a balanced meal. This blog post covered how to make One Pan Honey Garlic Chicken. We explored the essential and optional ingredients to customize your dish. Next, we walked through preparation steps, cooking techniques, and serving tips. I shared helpful tips, common mistakes, and variations to enhance your meal. Finally, we discussed storage and reheating methods to keep leftovers fresh. Enjoy making this dish your own!

One Pan Honey Garlic Chicken Quick and Easy Meal

Are you ready to whip up a tasty dish in no time? My One Pan Honey Garlic Chicken is quick,

- Overview of Fresh Vegetables Fresh veggies bring color and taste to this dish. I love using: - 2 cups broccoli florets - 1 cup bell peppers (red, yellow, and green), chopped - 1 cup cherry tomatoes, halved - 1 medium zucchini, sliced - 1 medium red onion, cut into wedges These vegetables not only look great but also taste amazing when roasted. Each veggie adds its unique flavor and texture. - Recommended Seasonings Seasoning is key to a great sheet pan dish. Here are the staples: - 4 cloves garlic, minced - 3 tablespoons olive oil - 1 teaspoon dried oregano - 1 teaspoon smoked paprika - Salt and pepper to taste These seasonings enhance the natural tastes of the veggies. Smoked paprika adds a fun twist! - Garnishes and Add-ins You can elevate your dish with simple garnishes. I suggest: - Fresh parsley, chopped (for garnish) Adding fresh herbs at the end brightens the dish. You can also think about adding nuts or cheese for extra texture. For the full recipe, check out the details provided earlier. How to Cut and Prepare Each Vegetable First, wash all your vegetables well. For broccoli, cut the florets into small, bite-sized pieces. Chop bell peppers into strips or squares, depending on your style. Halve the cherry tomatoes for easy roasting. Slice the zucchini into rounds. For the red onion, cut it into wedges. Make sure all pieces are similar sizes for even cooking. Mixing and Coating Techniques In a large bowl, add your prepared veggies. In a separate bowl, mix olive oil, minced garlic, oregano, smoked paprika, salt, and pepper. Pour this mix over the veggies. Use your hands to toss everything together. Make sure each piece is coated well. This helps the flavors stick during roasting. Tips for Evenly Spreading on the Sheet Pan When you spread the veggies, keep space between them. This helps them roast instead of steam. Use a parchment-lined sheet pan to avoid sticking. If your pan is too crowded, the veggies won’t caramelize well. A single layer is best for great results. Ideal Oven Temperature Preheat your oven to 425°F (220°C). This high temperature helps the veggies brown nicely. It gives them a great flavor and texture. Cooking Time Guidelines Roast the veggies for 20-25 minutes. Stir them halfway through for even cooking. Look for a golden-brown color on the edges. This shows they are well-roasted. Signs of Properly Roasted Vegetables Your veggies should be tender and slightly caramelized. If they look shriveled or dry, they may be overcooked. Taste a piece to ensure they are soft but still have a bit of bite. Plating Ideas For serving, arrange the roasted veggies on a big platter. This makes a colorful and inviting dish. You can also keep them in the pan for a casual look. Pairing with Proteins or Grains These roasted veggies go well with many dishes. Serve them with grilled chicken or fish for protein. You can also add them to rice or quinoa for a tasty grain option. Ways to Enhance Flavor Post-Roasting After roasting, you can sprinkle fresh herbs on top. Chopped parsley adds a nice touch. A squeeze of lemon juice can brighten the flavors too. Enjoy your colorful, crunchy creation! For more details, check the Full Recipe. - Importance of Spacing Vegetables Give each veggie room. If they touch, they steam instead of roast. This makes them soggy. Space them out evenly for a nice, caramelized finish. - Adjusting Cook Time for Different Veggies Not all veggies cook the same. Broccoli and bell peppers roast fast. Zucchini and onions take a bit longer. Check your veggies halfway through and stir them. This helps everything cook evenly. - Using Parchment Paper for Easy Cleanup Line your sheet pan with parchment paper. It catches drips and makes cleanup easy. You’ll love how simple it is to wipe down the pan after cooking. - Overcrowding the Sheet Pan Avoid packing too many veggies on the pan. This leads to uneven cooking. If you have a lot, use two pans. Better to roast in batches than to crowd. - Inconsistent Vegetable Sizes Cut your veggies to similar sizes. Small pieces cook faster than big ones. Keeping them even ensures they all roast at the same time. - Ignoring Seasoning Opportunities Don’t skip the seasoning! It’s key for flavor. Toss your veggies with oil and spices before roasting. This gives them a tasty boost and makes them shine in your dish. For the complete recipe, check out the Full Recipe. {{image_2}} For spring and summer, fresh vegetables shine. You can pick: - Broccoli florets - Bell peppers (red, yellow, green) - Cherry tomatoes - Zucchini - Red onion These veggies bring bright colors and flavors to your sheet pan. In fall and winter, root vegetables work well. Try these options: - Carrots - Sweet potatoes - Beets - Parsnips - Butternut squash These hearty veggies add warmth and depth to your dish. You can spice up your roasted veggies in many ways. Here are some blends to try: - Italian seasoning - Taco seasoning - Curry powder - Garam masala Each blend gives a unique taste to your meal. Adding citrus or vinegars can also boost flavor. Use: - Fresh lemon juice - Balsamic vinegar - Apple cider vinegar These brighten the dish and enhance the natural veggie flavors. Prepping ahead makes weeknight meals easy. You can chop your veggies on Sunday. Store them in the fridge in airtight containers. This saves time during the week. If you have leftover roasted veggies, use them in: - Salads - Wraps - Omelets - Grain bowls These ideas help you enjoy your veggies in new ways. For the full recipe, check out the details above! To keep your roasted veggies fresh, store them in the fridge. Place them in an airtight container. They stay good for about three to five days. If you want to keep them longer, consider freezing. Just make sure to use freezer-safe containers. - Refrigeration Guidelines: - Let the veggies cool down first. - Use a clean, dry container. - Label your container with the date. - Best Containers for Storage: - Glass containers with lids work well. - BPA-free plastic containers are also a good choice. - Avoid aluminum foil, as it can react with food. To enjoy your roasted veggies again, reheating is key. You want to warm them without losing that tasty texture. - Best Methods to Reheat Without Losing Texture: - Use the oven for best results. Preheat it to 350°F (175°C). Spread the veggies on a baking sheet and heat for about 10-15 minutes. - Another option is the microwave. Use a microwave-safe plate and cover it with a damp paper towel to keep moisture in. Heat for 1-2 minutes. - Creative Ways to Use Leftovers: - Toss them into a salad for added crunch. - Mix them into a pasta dish for a veggie boost. - Use them in a wrap or sandwich for lunch. These tips help you make the most of your sheet pan roasted veggies! For the full recipe, check out the [Full Recipe]. The best vegetables for roasting are those that hold their shape and flavor. I love using broccoli, bell peppers, cherry tomatoes, zucchini, and red onions. These veggies caramelize well and taste great together. Root vegetables like carrots and sweet potatoes are also excellent choices. They add sweetness and texture to your dish. Yes, you can add protein to your sheet pan meal! Chicken, shrimp, or tofu work great. Just make sure to cut them into similar sizes as the veggies. This way, everything cooks evenly. You can season the protein the same way as the vegetables for extra flavor. To make your roasted vegetables crispy, follow a few simple steps. First, ensure the veggies are dry before seasoning. Moisture can lead to sogginess. Second, use enough oil; this helps with browning. Lastly, spread the veggies in a single layer on the pan. Crowding them will trap steam and prevent crispiness. Yes, you can prepare the veggies in advance! Chop them up and store them in an airtight container in the fridge. They can last for about two days. When you're ready to roast, simply toss them with your seasoning and oil. This saves time on busy weeknights and makes it easy to enjoy this flavorful dish! For the full recipe, check out the Colorful Crunchy Sheet Pan Roasted Veggies! Roasting vegetables is simple and fun. We covered key ingredients, from fresh veggies to spices. I shared how to prepare and roast them to perfection. You learned about serving ideas and storing leftovers. Remember these tips to avoid common mistakes. You can mix things up with seasonal choices and flavor variations. Enjoy experimenting with your meals! Roasted veggies can be a tasty, healthy addition to any dish. Happy cooking!

Sheet Pan Roasted Veggies Flavorful and Easy Recipe

If you’re looking for a quick, tasty way to enjoy veggies, I’ve got you covered! My Sheet Pan Roasted Veggies

- 2 pounds russet potatoes, peeled and cubed - 4 cloves garlic, minced - 1 cup heavy cream - 4 tablespoons unsalted butter - Salt and pepper to taste - ¼ cup chives, chopped (for garnish) - ½ teaspoon garlic powder (optional) When I cook creamy garlic mashed potatoes, I always start with russet potatoes. They have the right starch content. This gives the mash a fluffy texture. Other potatoes, like Yukon gold, can work too. They will give a creamier texture but may be denser. Russet potatoes are my go-to for this dish. They absorb flavors well and turn light when mashed. If you want a different texture, try using red potatoes. They hold their shape better and add a unique bite. For an extra kick, I love to add cheese. Cream cheese or sharp cheddar is great. You could also try sour cream for tanginess. Herbs like thyme or rosemary can add depth to the flavor. Mix in some black pepper for a subtle heat. Start by peeling and cubing the russet potatoes. Place them in a large pot and cover with cold water. I always add a generous pinch of salt at this stage. This helps the potatoes absorb flavor. Using cold water is key because it ensures even cooking. If you start with hot water, the outside cooks too fast. Once the water boils, reduce the heat to medium. Simmer the potatoes for about 15 to 20 minutes. You can test for doneness by using a fork. If it slides in easily, they’re ready. To prevent waterlogged potatoes, avoid overcooking. Drain them well before mashing. While the potatoes cook, melt the unsalted butter in a small saucepan over medium heat. Once melted, add the minced garlic. Cook it for about 2 minutes until fragrant, stirring often so it doesn’t burn. Timing is crucial here; you want the garlic ready when the potatoes finish. After draining the potatoes, return them to the pot. Here, you can choose between a potato masher or a hand mixer. I prefer a masher for a thicker texture. Mash until the potatoes are smooth and creamy. If you want them extra creamy, a hand mixer works well. Just be careful not to over-mix, or they can become gluey. Now it’s time to add the flavor. Pour in the heavy cream and the melted garlic butter. If you’re using garlic powder for extra flavor, add it now. Season with salt and pepper to taste. Stir until everything is well combined. You can adjust the cream to reach your preferred consistency. Enjoy this comforting side dish! For the full recipe, check out the details above. To get the best creamy texture in your mashed potatoes, start with warm ingredients. Use warm heavy cream and melted butter. This helps the potatoes absorb moisture better. If you mix cold cream, it can cool the potatoes, making them dense. Avoid over-mixing your potatoes. When you mash them too much, they can turn gluey. Just mash until smooth, then stop. It’s better to have a few lumps than a gummy texture. Garlic plays a key role in making these mashed potatoes special. It adds a rich, savory taste that balances well with the creaminess. Cook the garlic gently in butter to bring out its sweetness. The longer you cook garlic, the more mellow it becomes. You can add richness by mixing in cheese. Cream cheese, sour cream, or even cheddar will elevate the dish. Try a bit of roasted garlic for a deeper flavor. You can also use fresh herbs like thyme or rosemary for a fresh twist. Creamy garlic mashed potatoes pair well with many proteins. They are great with roast chicken, steak, or grilled fish. These potatoes also complement veggies like asparagus or green beans. For special occasions, think about how you present them. Use a rustic bowl and create a swirl on top with a spoon. Garnish with extra chives and a pat of butter. This adds a nice touch and makes the dish even more inviting. For the full recipe, check out the earlier section. {{image_2}} You can create herb-infused mashed potatoes by adding fresh herbs. Try rosemary, thyme, or parsley. Chop them finely and mix them in at the end. You can also use herb oils for a rich flavor. Drizzle a few teaspoons of herb oil while mashing for a fragrant touch. This adds a nice twist to the classic dish. For a vegan version, swap out the heavy cream with plant-based options. Coconut cream or almond milk works well. Choose plant-based butter instead of regular butter. Brands like Earth Balance make great alternatives. These swaps keep the taste rich while being dairy-free. If you like some heat, add chili flakes for a spicy kick. Start with a small amount and adjust to your taste. Roasting garlic adds depth and sweetness. Just roast a whole bulb until soft, then blend it in. This variation gives a bold flavor that makes the dish exciting. For the full recipe, check out the Creamy Garlic Mashed Potatoes section above. Store leftover mashed potatoes in an airtight container. This keeps them fresh and tasty. You can place the container in your fridge. Mashed potatoes last about three to five days when stored this way. To freeze mashed potatoes, let them cool first. Scoop them into freezer-safe bags or containers. Remove as much air as possible before sealing. This helps prevent freezer burn. When you want to use them, thaw in the fridge overnight. Reheat on the stove or in the microwave. Stir well to keep the texture creamy. You can use leftover mashed potatoes in many fun ways. Mix them into soups for added creaminess. Shape them into patties and fry for tasty potato cakes. You can even add them to casseroles or pies. Each idea puts a new spin on your original dish and reduces waste. To make creamy garlic mashed potatoes, start with russet potatoes. Peel and cube about 2 pounds. Boil them in salted water until fork-tender, around 15 to 20 minutes. While they cook, melt 4 tablespoons of unsalted butter in a pan and add 4 cloves of minced garlic. Cook until fragrant. Once the potatoes are done, drain them and return them to the pot. Mix in the melted garlic butter and 1 cup of heavy cream. Mash until smooth. Finally, season with salt and pepper to taste. For the full recipe, check out the detailed instructions. Yes, you can use different types of potatoes. Each type gives a unique texture. Russet potatoes are fluffy and absorb flavors well. Yukon Gold potatoes are creamier and richer in taste. Red potatoes have a waxy texture, making them less fluffy but still tasty. Choose based on your desired texture! If you want garlic mashed potatoes without cream, use alternatives like chicken broth or vegetable broth. You can also use milk or almond milk for a lighter option. For creaminess, try adding sour cream or Greek yogurt. These options still give a flavorful and smooth result. Creamy garlic mashed potatoes pair well with many dishes. They complement roasted meats like chicken or beef. You can serve them with grilled vegetables for a lighter meal. They also work great with rich sauces or gravies, adding depth to your plate. If your mashed potatoes turn out dry, you can fix them easily. Add a bit of warm milk or broth to moisten them. Stir gently until you reach your desired consistency. If they are still too thick, try adding melted butter or olive oil for richness. This article covered how to make creamy garlic mashed potatoes. We looked at key ingredients, methods, and tips for the best results. You learned about potato types, optional add-ins, and storage ideas. Remember, the right potatoes and careful mashing make a big difference. Enjoy creating your unique dish! Try adding herbs or cheese for extra flavor. With practice, you'll make the perfect mashed potatoes every time.

Creamy Garlic Mashed Potatoes Comforting Side Dish

If you’re looking for a side dish that’s creamy, rich, and packed with flavor, look no further! Creamy garlic mashed

- 1 cup plain yogurt - 1 cup granulated sugar - 1/3 cup vegetable oil - 3 large eggs - Zest of 1 large lemon - Juice of 1 lemon - 2 cups all-purpose flour - 2 teaspoons baking powder - 1/2 teaspoon baking soda - 1/2 teaspoon salt - 1 1/2 cups fresh blueberries - Optional: Powdered sugar for dusting When I make Lemon Blueberry Yogurt Cake, I always start with the right ingredients. The yogurt keeps the cake moist and adds a nice tang. Sugar makes it sweet, while vegetable oil helps it stay tender. Eggs add structure and richness to the cake. Lemon zest and juice brighten the flavor. The zest adds a strong lemon scent, while the juice brings a fresh taste. All-purpose flour is the base for this cake, giving it the right texture. Baking powder and baking soda help it rise, while salt brings out all the flavors. Fresh blueberries are the star of this cake. They burst with juice as you bite into them. You can also dust the cake with powdered sugar for a sweet finish. This simple touch adds a nice look and flavor. - Mixing bowls - Whisk - Spatula - Cake pan - Parchment paper - Toothpick To make this cake, you will need some basic tools. I recommend using mixing bowls for combining your ingredients. A whisk helps mix everything well, while a spatula is great for folding in the blueberries. A cake pan is essential for baking. I like to use parchment paper to make removing the cake easier. Lastly, a toothpick is handy for checking if the cake is done. Just insert it in the center, and if it comes out clean, your cake is ready. For the full recipe, check out the detailed steps to create this delicious treat! 1. Preheat your oven to 350°F (175°C). 2. Grease and flour a 9-inch round cake pan. You can also line it with parchment paper. 3. In a large mixing bowl, combine 1 cup of plain yogurt, 1 cup of granulated sugar, and 1/3 cup of vegetable oil. Mix until it is smooth. 4. Add 3 large eggs one at a time. Beat well after each egg. 5. Stir in the zest and juice from 1 large lemon. Mix until everything is smooth. 1. In another bowl, whisk together 2 cups of all-purpose flour, 2 teaspoons of baking powder, 1/2 teaspoon of baking soda, and 1/2 teaspoon of salt. 2. Gradually add the dry mix to the wet mix. Stir gently until just combined. Be careful not to overmix. 1. Gently fold in 1 1/2 cups of fresh blueberries. Ensure they are evenly mixed into the batter. 2. Pour the batter into the prepared cake pan. Spread it out evenly. 3. Bake for 30-35 minutes. Check if it's done by inserting a toothpick in the center. It should come out clean. 4. Let the cake cool in the pan for 10 minutes. Then, transfer it to a wire rack to cool completely. 5. If you want, dust the top with powdered sugar before serving. Enjoy your Lemon Blueberry Yogurt Cake! For a complete recipe, check the Full Recipe above. - Avoid overmixing the batter. This keeps the cake light and fluffy. Mix just until combined. - Ensure egg temperature is at room temperature. This helps create a smooth batter and better rise. - Best served warm or at room temperature. This enhances the flavor and texture. - Pair with whipped cream or vanilla ice cream. Both add a rich creaminess that complements the cake. - How to dust with powdered sugar. Use a fine sieve to evenly sprinkle sugar on top. It adds a lovely finish. - Adding a lemon glaze for extra flavor. Mix powdered sugar with lemon juice for a tangy topping. Drizzle it over the cake for a bright touch. For the full recipe, check out the details above! {{image_2}} You can switch up the fruits in this cake. Try using raspberries or strawberries. These fruits bring a new taste to your cake. You can also add spices like cinnamon or nutmeg. A pinch of these spices can enhance the flavor. Experiment with combinations to find your favorite mix. For those needing gluten-free options, use almond or coconut flour instead of all-purpose flour. These flours work well and keep the cake moist. If you prefer dairy-free, swap the plain yogurt for a plant-based yogurt. There are many great options that taste just as good. You can make mini cakes or muffins using this recipe. To do this, pour the batter into a muffin tin. Fill each cup about two-thirds full. Bake for about 18-20 minutes. Check with a toothpick to see if they are done. This option is perfect for parties or snacks. You can enjoy them fresh and warm! To keep your Lemon Blueberry Yogurt Cake fresh, store it in the fridge. Wrap the cake well with plastic wrap or foil. You can also place it in an airtight container. This helps keep moisture in and prevents the cake from drying out. The cake will stay good for about five days in the fridge. If you want to save the cake for later, freezing it is a great option. First, let the cake cool completely. Then, slice it into portions. Wrap each slice in plastic wrap tightly. Place the wrapped slices in a freezer bag or airtight container. The cake can last up to three months in the freezer. When you are ready to enjoy it, take a slice out and let it thaw in the fridge overnight. You can also warm it in the microwave for about 15-20 seconds. This brings back its fresh taste. For the full recipe, check out the [Full Recipe]. Can I use frozen blueberries instead of fresh? Yes, you can use frozen blueberries. Just toss them in flour before adding them to the batter. This helps them stay suspended in the cake. Frozen berries may make the batter a bit wetter, so adjust your baking time. How can I make the cake more moist? To add moisture, try using full-fat yogurt or add an extra egg. You can also include a splash of milk or cream in the batter. These tweaks keep the cake soft and tender. What other flavors can I add to the recipe? You can blend in vanilla extract for extra flavor. Almond extract works well too. For a fun twist, try adding a little orange zest or juice. These flavors pair nicely with lemon and blueberries. Why did my cake sink in the middle? Cakes often sink due to overmixing or too much liquid. Make sure you mix just until combined. Check your oven temperature too; if it’s too low, the cake may not rise properly. How can I fix a dry cake? To fix a dry cake, you can brush it with simple syrup. Mix equal parts sugar and water, then heat until the sugar dissolves. Pour it over the cake to add moisture. You can also serve it with whipped cream or yogurt for extra softness. For the full recipe, check out the section above. Enjoy your baking! This recipe offers a simple path to a delightful blueberry cake. You learned the key ingredients, must-have tools, and step-by-step instructions. I shared helpful tips for the best results and ways to make the cake your own. With various options for flavors and dietary needs, there’s something for everyone. Proper storage keeps the cake fresh, and the FAQs answer common questions. Now it’s time to bake and enjoy a delicious treat that fits any occasion. Your blueberry cake awaits, and I can't wait for you to taste it!

Lemon Blueberry Yogurt Cake Fresh and Flavorful Treat

Looking for a dessert that bursts with flavor? My Lemon Blueberry Yogurt Cake is just the treat you need! This

- 2 medium zucchinis, sliced into 1/4-inch thick fries - 1 cup breadcrumbs (preferably panko for extra crunch) - 1/2 cup grated Parmesan cheese - 1 teaspoon garlic powder - 1 teaspoon onion powder - 1 teaspoon Italian seasoning - 1/2 teaspoon salt - 1/4 teaspoon black pepper - 2 large eggs - 1 tablespoon olive oil (for drizzling) Using fresh ingredients is key to this recipe. The zucchinis must be firm and bright. Panko breadcrumbs give a great crunch. Parmesan cheese adds a salty, nutty flavor. The seasonings make the fries even tastier. Garlic powder and onion powder deepen the taste. Italian seasoning brings a nice balance. For binding, eggs help the coating stick. The olive oil drizzled on top adds crispiness. You can also add herbs or spices to the mix if you want. Gathering all these ingredients makes it easy to create crispy Parmesan zucchini fries. The Full Recipe shows you how to combine them for the best results. First, preheat your oven to 425°F (220°C). This step is key for crispy fries. Next, line a baking sheet with parchment paper. This makes cleanup easy and helps the fries cook evenly. In a shallow bowl, mix the breadcrumbs, grated Parmesan cheese, garlic powder, onion powder, Italian seasoning, salt, and black pepper. Stir well to blend all the ingredients. This mixture adds flavor and crunch to the fries. In a separate bowl, whisk the eggs until they are frothy. Take each zucchini fry and dip it into the eggs. Let any extra egg drip off. Then, coat each fry in the breadcrumb mixture. Press gently to ensure the crumbs stick well. Place the coated fries on the prepared baking sheet. Make sure they are in a single layer and not touching. Drizzle olive oil over the fries to help them become golden and crispy. Bake in the preheated oven for about 20-25 minutes. Flip the fries halfway through to ensure an even cook. When they are golden brown and crispy, they are ready to enjoy. For the complete recipe, refer to the Full Recipe. To get that perfect crunch, use panko breadcrumbs. They are lighter and flakier than regular breadcrumbs. This helps your fries turn out crispy. Make sure to coat each zucchini slice well. This step is key for that golden texture. Even oil distribution is important too. Drizzle olive oil over the fries after placing them on the baking sheet. You can also use a spray bottle for even coverage. This ensures every fry gets crispy, not soggy. Pair your crispy zucchini fries with tasty dips. Marinara sauce is a classic choice. Its rich flavor complements the fries well. Ranch dressing is another great option. You can also try garlic aioli for something creamy and flavorful. These dips add fun and flavor to your dish. For a pop of color, use fresh herbs. Chopped parsley or basil looks great and adds flavor. Just sprinkle a little on top after baking. This simple touch makes your dish look fancy and appetizing. Enjoy your crispy Parmesan zucchini fries with style! {{image_2}} You can spice up your crispy zucchini fries with different cheeses. While Parmesan shines, cheddar gives a sharp taste. Mozzarella adds a gooey texture. Each cheese changes the flavor, making your fries unique. Try mixing cheeses for a fun twist. Experiment with combinations that excite your palate! Not a fan of zucchini? You can swap it with other veggies. Eggplant makes a great substitute. It has a similar texture and absorbs flavors well. Sweet potatoes add sweetness and a vibrant color. Carrots or bell peppers also work well. Use whatever you enjoy or have in your kitchen. If you're gluten-free, you can still enjoy these fries! Just use gluten-free breadcrumbs. Many brands offer tasty options that work great. Always check labels to ensure all ingredients meet gluten-free standards. This way, everyone can enjoy crispy fries without worry. For the full recipe, see above. To keep your crispy Parmesan zucchini fries fresh, store them in an airtight container. Place a paper towel at the bottom to absorb moisture. This helps keep fries from getting soggy. Refrigerate them within two hours of cooking. They will stay good for up to three days. Before eating, remember that the fries will lose some crispiness in the fridge. For the best reheating results, use your oven. Preheat it to 400°F (200°C). Spread the leftover fries on a baking sheet in a single layer. Bake for about 10 minutes. This method revives their crunch and warmth. You can also use an air fryer for quick reheating. Just set it to 350°F (175°C) for about 5 minutes. You can freeze uncooked zucchini fries for later. To do this, coat them as per the full recipe. After coating, arrange them on a baking sheet in a single layer. Freeze until solid, then transfer them to a freezer bag. They can last for up to three months! When you’re ready to cook, you can bake them straight from the freezer. Just add a few extra minutes to the baking time. To make crispy Parmesan zucchini fries, follow these key steps: - Start by preheating your oven to 425°F (220°C). This helps achieve that perfect crisp. - Slice 2 medium zucchinis into 1/4-inch thick fries. Thicker cuts may not cook well. - Combine 1 cup of breadcrumbs, 1/2 cup of grated Parmesan, and seasonings in a shallow bowl. The mix adds flavor and crunch. - Whisk 2 large eggs in a different bowl until frothy. This helps the coating stick. - Dip each zucchini fry into the eggs, letting excess drip off. Then, coat it in the breadcrumb mix. Press lightly to help it stick. - Arrange the fries on a lined baking sheet in a single layer. They should not touch each other. - Drizzle 1 tablespoon of olive oil over them. This helps with browning. - Bake for 20 to 25 minutes, flipping them halfway through. Look for a golden brown color. This method ensures your fries turn out crispy and delicious every time. For the full recipe, check the earlier sections. Yes, you can air fry zucchini fries for a quick and healthy option. Here’s how: - Preheat your air fryer to 400°F (200°C). - Follow the same steps for coating your zucchini fries. - Spray the air fryer basket with a light layer of cooking spray. - Place the fries in a single layer in the basket. Avoid overcrowding for better air flow. - Air fry for about 10 to 12 minutes. Shake the basket halfway through for even cooking. - Check for a golden brown color before serving. Air frying gives you that crunch with less oil, making it a great choice. Soggy zucchini fries can happen for a few reasons: - Moisture: Zucchini has a high water content. Make sure to pat them dry before coating. - Coating: If the breadcrumb mixture is too wet, it won't crisp up. Ensure you mix it well. - Crowding: If the fries touch on the baking sheet, they steam instead of bake. Spread them out evenly. - Oven Temperature: If the oven isn't hot enough, they won’t become crispy. Always preheat your oven. By following these tips, you can avoid soggy fries and enjoy a perfect batch every time. In this post, we explored how to make crispy, tasty zucchini fries. We covered the main ingredients, step-by-step instructions, and tips for extra crispiness. Variations offered new ways to enjoy this dish. Remember, panko breadcrumbs make a big difference in texture. You can easily store leftovers or freeze uncooked fries for later. When you follow these steps, you'll enjoy delicious fries every time. Happy cooking!

Crispy Parmesan Zucchini Fries Perfectly Baked Delight

Craving a crunchy snack that’s both tasty and healthy? These Crispy Parmesan Zucchini Fries are your answer! I’ll guide you

- 1 ½ cups all-purpose flour - 1 teaspoon baking powder - ½ teaspoon baking soda - ½ teaspoon salt - 1 teaspoon ground cinnamon - ½ teaspoon ground nutmeg - ½ teaspoon ground ginger - ½ cup granulated sugar - ½ cup brown sugar, packed - ½ cup vegetable oil - 2 large eggs - 1 cup canned pumpkin puree - 1 teaspoon vanilla extract - 4 oz cream cheese, softened - 2 tablespoons powdered sugar - Chopped pecans or walnuts (optional, for topping) Canned pumpkin puree gives these muffins a rich, moist texture. It also adds a nice pumpkin flavor. For spices, ground cinnamon, nutmeg, and ginger create warmth and depth. The sugars balance the spices and give sweetness. Granulated sugar adds lightness, while brown sugar adds moisture and a touch of caramel flavor. Cream cheese brings a creamy surprise in each bite. Mixing it with powdered sugar makes it sweet and smooth. This contrast with the pumpkin muffin is delightful. The vegetable oil keeps the muffins moist, while eggs provide structure. If you're gluten-free, try using a gluten-free flour blend. For a dairy-free version, substitute the cream cheese with a dairy-free cream cheese alternative. You can swap eggs with flaxseed meal mixed with water for vegan muffins. If you're avoiding sugar, use a sugar substitute like stevia or maple syrup, but adjust the liquid in the recipe. These substitutions let you enjoy the muffins while keeping your dietary needs in mind. Each choice can still lead to a delicious treat! Start by gathering all your ingredients. This makes the process smooth and easy. Preheat your oven to 350°F (175°C). Line a muffin tin with paper liners or grease it well. This ensures easy removal later. In a medium bowl, whisk together the flour, baking powder, baking soda, salt, and spices. Set this bowl aside. In a large mixing bowl, mix the granulated sugar, brown sugar, and vegetable oil together. Stir until they blend well. Now, add the eggs, pumpkin puree, and vanilla extract to your sugar mix. Whisk until it is smooth and combined. Gradually fold in the dry mix from the first bowl. Combine gently. You want to keep some lumps; this helps the muffins stay soft. In a small bowl, combine the softened cream cheese and powdered sugar. Mix until creamy and smooth. Fill each muffin liner halfway with pumpkin batter. Then, drop about 1 teaspoon of the cream cheese mix in the center. Top it off with more pumpkin batter until each liner is about ¾ full. If you like, sprinkle chopped pecans or walnuts on top for added crunch. Place the muffin tin in your preheated oven. Bake for 20-25 minutes. Check with a toothpick; it should come out clean. Once baked, let them cool for 5 minutes in the pan. Then, transfer the muffins to a wire rack. For the best taste, serve warm with cream cheese frosting and a sprinkle of cinnamon. This makes a delightful autumn snack. Don't forget to check out the Full Recipe for any steps you may have missed! When making pumpkin cream cheese muffins, there are some common mistakes to watch for. First, do not overmix your batter. If you stir too much, your muffins can become tough. Just mix until you see no dry flour. Second, always measure your ingredients accurately. This is key for the right texture. Using too much flour can make your muffins dense. Lastly, check your oven temperature. If it runs hot, your muffins might burn before they bake through. Mixing and baking these muffins requires a gentle touch. Start by whisking your dry ingredients well. This helps the baking powder and spices spread evenly. In your wet mixture, combine the sugars and oil first. Then add the eggs and pumpkin. This helps create a smooth batter. When filling your muffin liners, use an ice cream scoop for even portions. This will ensure they bake evenly. Bake them at 350°F (175°C) for 20 to 25 minutes. Keep an eye on them; you want a toothpick to come out clean. You can enhance your muffins with easy additions. Try adding chocolate chips for a sweet twist. You can also mix in spices like cloves or allspice for extra warmth. For texture, consider adding chopped nuts. Pecans or walnuts pair nicely with pumpkin. If you want a richer taste, swirl in some extra cream cheese before baking. These small changes can elevate your muffins from good to great. For the full recipe, check the section above! {{image_2}} You can make your pumpkin cream cheese muffins even better with fun add-ins. Chocolate chips are a great choice. They add sweetness and richness. You can also try mixing in chopped nuts, like pecans or walnuts. They give a nice crunch. For a spicier kick, add extra spices. A pinch of cloves or allspice can make a big difference. Mix and match to find your favorite blend! While cream cheese frosting is classic, you can switch it up! Try a maple glaze for a sweet twist. Just mix powdered sugar with maple syrup and a bit of milk. Another option is a simple vanilla frosting. This gives a nice creamy layer that pairs well with pumpkin. If you want a lighter touch, dust the tops with powdered sugar. It's easy and looks pretty! If you want gluten-free muffins, use a gluten-free flour blend. Make sure the blend has a good mix of starches and proteins. For vegan muffins, replace eggs with flaxseed meal mixed with water. Use plant-based milk and swap the cream cheese for a vegan option. These changes keep the flavor and texture while meeting your dietary needs. Enjoy these delicious muffins, no matter your diet! To keep your pumpkin cream cheese muffins fresh, store them in an airtight container. This helps to keep moisture in and prevents them from getting dry. If you stack them, place parchment paper between layers to avoid sticking. They will stay fresh for about three days at room temperature. For longer storage, consider refrigerating them. Just remember to let them cool completely before sealing them up. Freezing is a great way to save muffins for later. First, let the muffins cool down. Wrap each muffin in plastic wrap tightly. Then, place them in a freezer bag or container. This helps keep them fresh and tasty. Your muffins can last up to three months in the freezer. When you're ready to enjoy them, just take out as many as you need. Reheating your muffins can bring back their warm, fresh taste. For best results, use an oven or toaster oven. Preheat it to 350°F (175°C). Place the muffin on a baking sheet for about 10 minutes. This warms them through and keeps them soft. You can also use a microwave. Heat one muffin for about 15-20 seconds. However, be careful not to overheat, or they may become tough. Enjoy your warm muffins with a cup of coffee or tea! You can tell when the muffins are done by using a toothpick. Insert it into the center of a muffin. If it comes out clean or with a few crumbs, the muffins are ready. They should also feel firm and spring back slightly when touched. Check them at 20 minutes, but they may need up to 25 minutes. Yes, you can use fresh pumpkin. Start by roasting a small pumpkin. Cut it in half, scoop out the seeds, and bake it cut side down at 350°F (175°C) for about 45 minutes. Once it's soft, scoop out the flesh and puree it in a blender. Use this fresh puree just like you would canned pumpkin. It adds a nice touch to the muffins. These muffins pair well with many drinks. Try serving them with coffee, tea, or hot chocolate. You can also enjoy them with a dollop of whipped cream or a drizzle of cream cheese frosting. Fresh fruit, like apples or pears, makes a great side, adding a nice crunch. Pumpkin Cream Cheese Muffins stay fresh for about 2-3 days at room temperature. Keep them in an airtight container to prevent them from drying out. If you want to keep them longer, store them in the fridge for about a week. You can also freeze them for up to 3 months. Just thaw them in the fridge overnight before enjoying. These Pumpkin Cream Cheese Muffins are fun to make and tasty to eat. You learned about the key ingredients, tips for perfect muffins, and storage methods. Get creative with add-ins and frostings to make them your own. Remember, avoiding common mistakes can lead to the best results. Store them well for freshness and enjoy them longer. With this guide, you can make muffins that impress your friends and family. Now it’s time to bake and savor your creation!

Pumpkin Cream Cheese Muffins Fresh and Flavorful Treat

Fall is here, and that means it’s pumpkin season! If you love warm, soft muffins that burst with flavor, you’re

To make crispy sweet potato wedges, you'll need a few key items: - Sweet Potatoes - Olive Oil - Seasoning Spices First, choose 2 large sweet potatoes. They should be firm and smooth. Next, grab 3 tablespoons of olive oil. This oil gives the wedges a nice flavor and helps them crisp up. For the seasoning, you will need: - 1 teaspoon garlic powder - 1 teaspoon paprika - 1 teaspoon ground cumin - ½ teaspoon black pepper - ½ teaspoon sea salt Mixing these spices with the oil creates a tasty coating for the wedges. You can add some extra flair to your dish with these optional items: - Fresh Parsley - Dipping Sauce Suggestions Chopped fresh parsley is great for garnish. It adds a pop of color and freshness. For dipping sauces, consider avocado yogurt or spicy mayo. These will enhance the flavor and make your snack even more enjoyable. If you want the full recipe, check it out here. Preheating the Oven Start by preheating your oven to 425°F (220°C). This step is key for crispiness. While the oven heats, you can prep your sweet potatoes. Preparing Sweet Potatoes Rinse and scrub the two large sweet potatoes. Make sure they are clean. Cut each potato in half lengthwise. Then cut each half into wedges about 1-inch thick. This size helps them cook evenly. Mixing the Seasoning Grab a large bowl. In this bowl, mix together 3 tablespoons of olive oil, 1 teaspoon of garlic powder, 1 teaspoon of paprika, and 1 teaspoon of ground cumin. Add ½ teaspoon of black pepper and ½ teaspoon of sea salt. Stir well to blend all the flavors. Baking the Wedges Now, add the sweet potato wedges to the bowl. Toss them until they are well coated with the seasoning mix. Next, spread the wedges in a single layer on a lined baking sheet. Make sure to leave space between each wedge. This helps them crisp up nicely. Bake for 25-30 minutes, flipping them halfway through. They should look golden brown and crispy when done. Garnishing the Wedges Once they are out of the oven, let the wedges cool for a few minutes. This step makes them easier to handle. Sprinkle freshly chopped parsley on top for a pop of color and flavor. Serving Suggestions Serve the hot wedges with your favorite dipping sauce. Options like avocado yogurt or spicy mayo add a nice touch. Enjoy this easy and flavorful snack! For full details, check the Full Recipe. To get that perfect crunch, space your wedges on the baking sheet. If they touch, they will steam instead of crisp. Leave at least half an inch between each piece. This allows hot air to circulate. Flipping the wedges is key too. About halfway through baking, turn them over. This helps both sides brown and get crispy. Set a timer to remind you to flip! You can switch up oils if you want. Avocado oil or coconut oil works great too. Each gives a unique flavor. For seasonings, get creative! Try chili powder for a kick or cinnamon for a sweet touch. You can also use other vegetables. Carrots and zucchini work well! Just cut them to similar sizes. They will cook at the same rate, so they crisp up nicely. For the full recipe, check out the full recipe section above! {{image_2}} Spicy Version You can easily spice up your sweet potato wedges. Add more paprika or cayenne pepper to the seasoning mix. This will give your wedges a nice kick. I love adding red pepper flakes for extra heat. Adjust the spice level to match your taste. You can also dip them in spicy mayo for a creamy contrast. Sweet Variants If you want to try a sweet twist, use cinnamon and a touch of brown sugar. This combo makes the wedges caramelize nicely. You can even drizzle them with honey after baking for a sweet finish. Pair these with a yogurt dip for a tasty treat. Experimenting with these flavors makes each batch unique! Air Fryer Version Using an air fryer gives you a quick and easy option. Simply follow the same steps as above, but place the wedges in the air fryer basket. Cook at 400°F (200°C) for about 15-20 minutes. Make sure to shake the basket halfway through. This method creates a crispy outer layer without a lot of oil. Grilling Option Grilling adds a wonderful smoky flavor. Coat your wedges in oil and spices, then place them on a grill. Cook over medium heat for about 10-15 minutes, turning often. This gives you crispy edges and a soft inside. Plus, the grill marks make them look great on the plate! For the full recipe, check out the earlier section. After enjoying your crispy sweet potato wedges, you might have some leftovers. To keep them fresh, let the wedges cool completely. Place them in an airtight container. Store the container in the fridge. They should last for about 3 to 4 days. If you want to keep them longer, consider freezing them. Just remember, frozen wedges may lose some crispiness when reheated. When it’s time to enjoy your leftovers, you have two great options: the oven or the microwave. - Oven: Preheat your oven to 400°F (200°C). Spread the wedges on a baking sheet in a single layer. Bake for about 10-15 minutes. This method helps them regain their crispiness. - Microwave: If you are in a hurry, use the microwave. Place the wedges on a microwave-safe plate. Heat them in short bursts of 30 seconds. Check them often, so they don’t get too soft. While this method is quicker, it may not keep the wedges as crispy as the oven. For the full recipe, refer to the earlier section. Crispy sweet potato wedges are baked slices of sweet potato. They have a golden, crunchy outside and a soft inside. I coat them with olive oil and spices for flavor. These wedges are easy to make and perfect for snacking. They are a healthier alternative to regular fries. Yes, you can make crispy sweet potato wedges in advance. To do this, bake them as usual and let them cool. Then, store them in an airtight container in the fridge. They will stay fresh for up to three days. When you are ready to eat, just reheat them in the oven for extra crispiness. The good news is that crispy sweet potato wedges are already vegan! The recipe uses olive oil and spices, which are plant-based. You can serve them with vegan dipping sauces like avocado yogurt or spicy mayo. These options taste great and keep the dish fully vegan. Several dipping sauces pair well with sweet potato wedges. Here are a few tasty options: - Avocado yogurt - Spicy mayo - Ketchup - Garlic aioli - Ranch dressing Feel free to create your own or mix and match! For the full recipe, check out the detailed instructions above. In this blog post, I shared how to make crispy sweet potato wedges. We covered essential ingredients, preparation steps, and tips for the best results. You learned how to enhance flavors and tried different cooking methods. Remember to store leftovers properly for later enjoyment. My final thoughts? Sweet potatoes are healthy and fun to cook. Enjoy experimenting with this recipe to make it your own!

Crispy Sweet Potato Wedges Easy and Flavorful Snack

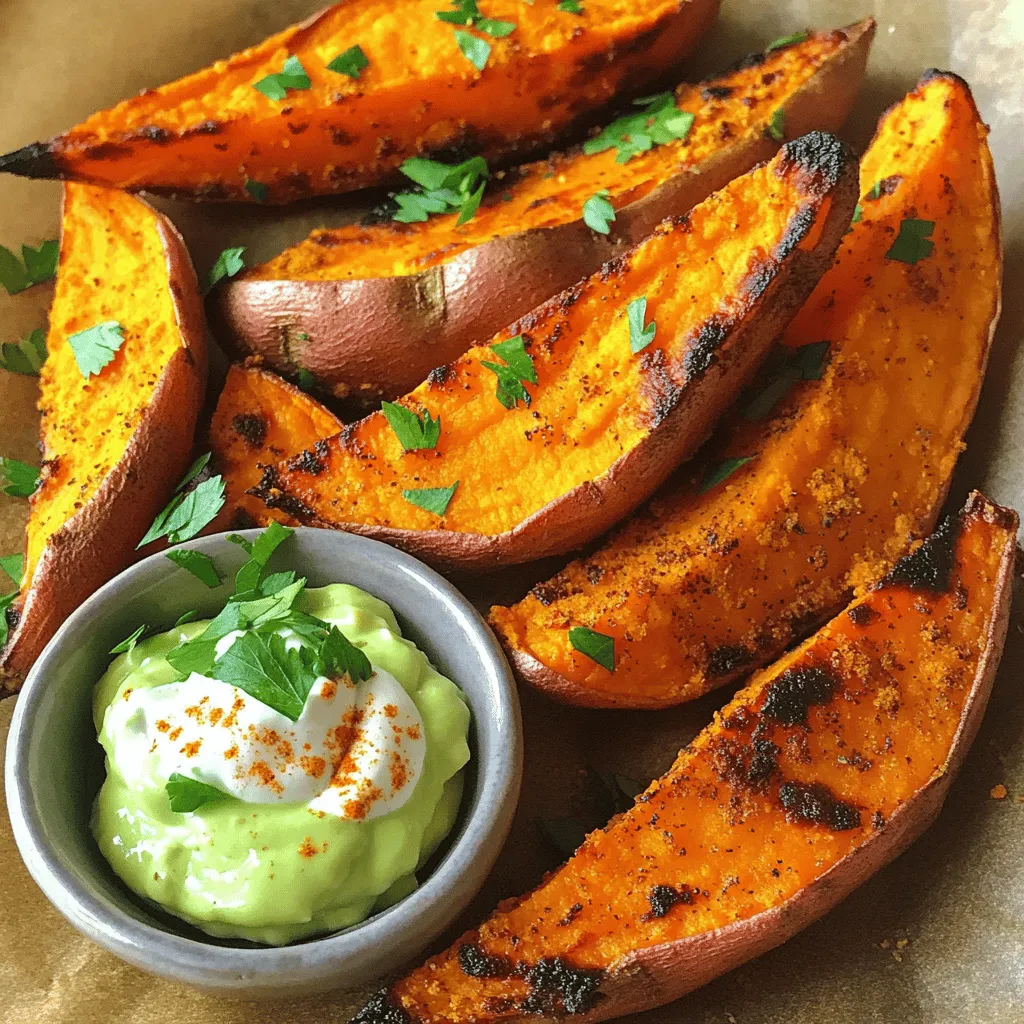
Looking for a quick and tasty snack? Crispy sweet potato wedges are both easy to make and full of flavor.

- 2 cups plain Greek yogurt - 1 cup low-sugar granola - 2 cups mixed berries (strawberries, blueberries, raspberries) - 2 tablespoons honey or maple syrup - 1 teaspoon vanilla extract - 1 tablespoon chia seeds - Fresh mint leaves for garnish Healthy Greek yogurt parfaits are easy to make. You need a few simple ingredients. First, gather your Greek yogurt. This creamy base gives your parfait a rich taste. Next, grab your granola. I recommend low-sugar granola to keep it healthy. Then, choose your mixed berries. Strawberries, blueberries, and raspberries add color and flavor. For a touch of sweetness, add honey or maple syrup. This will enhance the taste without overpowering it. You can also add vanilla extract for extra flavor. Chia seeds are optional. They provide additional fiber and nutrition. Lastly, fresh mint leaves can be a lovely garnish. These ingredients work together to create a nutritious snack. You can mix and match based on your taste. If you want more variety, try different fruits or toppings. You can find the full recipe for these parfaits to get started. To start, mix the Greek yogurt with honey (or maple syrup) and vanilla extract. Stir well until smooth. This mix adds a sweet touch to the creamy yogurt. Next, layer the parfait in serving glasses or bowls. Now, let's layer the parfait! Begin with a layer of yogurt at the bottom. Add about 2-3 tablespoons of granola on top. Then, place half a cup of mixed berries over the granola. Repeat this process, alternating yogurt, granola, and berries. Finish with a final layer of berries. If you want, sprinkle optional chia seeds on top for extra nutrition. You can serve the parfaits right away for a fresh treat. If you want a cooler snack, chill them for up to 2 hours. Enjoy your Healthy Greek Yogurt Parfaits as a nutritious snack! To see all the details, check the Full Recipe. To create the best parfait, start with layering. Use a spoon to add yogurt, then granola, and finish with berries. Repeat these layers. This method shows off each ingredient. It also keeps the flavors separate until you dig in. Choose clear glassware or simple bowls for serving. Seeing the colors makes it more fun to eat. The layers will attract attention and make your parfait look tasty. For granola, look for low-sugar options. This keeps your parfait healthy. Some granolas have nuts and seeds for added crunch. Others include dried fruit, which adds flavor and chewiness. You can also add toppings like nuts, seeds, or coconut flakes. They bring extra texture and taste to your parfait. A sprinkle of chia seeds adds fiber and omega-3s. You can even drizzle more honey on top for extra sweetness. When arranging berries, place them in neat rows. This makes your parfait look more inviting. Use a mix of colors for a vibrant look. Red strawberries, blue blueberries, and dark raspberries create contrast. Colorful glassware can enhance your parfait's appeal. Bright colors make the dish pop and draw the eye. The right dish can turn a simple snack into a fancy treat. For the full recipe, check out the detailed instructions provided earlier. {{image_2}} You can switch up the fruit in your parfaits. Seasonal fruits add great flavor and color. In summer, fresh peaches or juicy watermelon work well. In fall, use apples or pears for a crisp bite. If you want a sweeter option, bananas can replace berries. They add creaminess and natural sugar. You can mix any fruit you like to keep it fun. Not everyone can eat dairy. For dairy-free options, try coconut or almond yogurt. These work great and still taste good. You can also use flavored Greek yogurt. This adds extra taste without needing more sweeteners. Just check for added sugars to keep it healthy. Granola is crunchy, but other options exist. You can use puffed rice or crushed nuts for a different texture. Almonds or walnuts add protein and good fats. Seeds like pumpkin or sunflower seeds also give a nice crunch. These options let you customize your parfait to fit your needs. For the full recipe, check the earlier section. To store your assembled parfaits, place them in an airtight container. This keeps them fresh and tasty. You can also cover them with plastic wrap. Store them in the fridge for up to 2 hours. This way, they stay cool and delicious. If you wait longer, the granola may get soggy. For long-term storage, it’s best to freeze the individual components. You can freeze your granola and mixed berries separately. Place them in freezer bags and remove as much air as possible. When you want to enjoy your parfait, let the berries thaw in the fridge overnight. Re-crisp the granola by toasting it lightly before using. After you assemble your parfait, it lasts about 24 hours in the fridge. However, the granola may lose its crunch after a few hours. Watch for signs of spoilage like off smells or mold. If the yogurt looks watery or the berries look mushy, it’s time to toss it. Enjoy your Healthy Greek Yogurt Parfaits fresh for the best taste! Greek yogurt parfaits are tasty and healthy snacks. They usually have: - 2 cups plain Greek yogurt - 1 cup low-sugar granola - 2 cups mixed berries (like strawberries, blueberries, raspberries) - 2 tablespoons honey or maple syrup - 1 teaspoon vanilla extract (optional) - 1 tablespoon chia seeds (optional) - Fresh mint leaves for garnish (optional) These ingredients create layers of creamy yogurt, crunchy granola, and sweet fruit. Yes, you can prep Greek yogurt parfaits ahead of time. Just make sure to assemble them in jars or cups. You should keep them in the fridge. They can stay fresh for up to two hours. If you make them too soon, the granola may get soggy. To avoid this, store the granola separately. Add it just before serving for the best crunch. To make Greek yogurt parfaits even healthier, try these tips: - Use low-sugar granola or make your own. - Add more fresh fruits to boost vitamins. - Replace honey with fresh fruit puree for sweetness. - Add superfoods like chia seeds or flaxseeds for extra nutrition. These small changes can help lower sugar and raise nutrients in your parfait. Yes, Greek yogurt parfaits make a great breakfast choice. They are full of protein from yogurt, which keeps you full. The fruits add fiber and vitamins, and granola gives you energy. Having a parfait for breakfast helps you start your day right. You can mix and match ingredients to keep it exciting. We covered how to make a delicious Greek yogurt parfait. Start with good ingredients like Greek yogurt, berries, and granola. Layer them well for a pretty look. Consider different fruits and toppings for variety and taste. Store your parfaits properly to keep them fresh. Greek yogurt parfaits make a tasty and healthy breakfast. With these tips, you can create your perfect parfait every time. Enjoy making and sharing your creations!

Healthy Greek Yogurt Parfaits for a Nutritious Snack

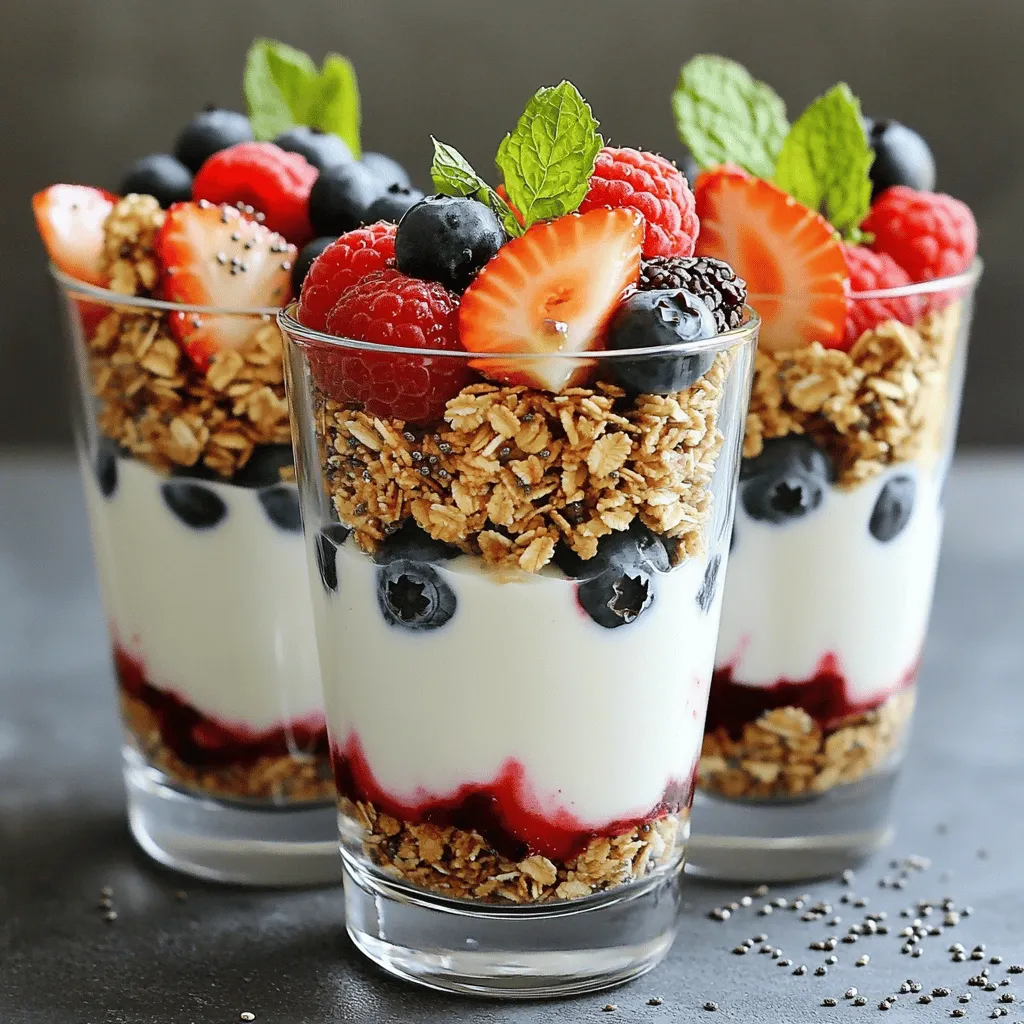
Looking for a quick, tasty, and healthy snack? Greek yogurt parfaits are the answer! With layers of creamy yogurt, crunchy

For a great avocado toast, you need some key items. Here is what you will use: - 2 ripe avocados - 4 slices whole-grain bread - 1 small clove garlic, minced - 1 tablespoon lemon juice - Salt and pepper to taste - 1/4 teaspoon red pepper flakes (optional) Ripe avocados are the star of this dish. They must be soft enough to mash but not too mushy. Whole-grain bread adds a nice crunch and flavor. Garlic gives a bold taste, while lemon juice adds brightness. Salt and pepper round out the flavor. If you like heat, red pepper flakes bring a nice kick. Garnishes make your toast look great and add more taste. Consider these tasty options: - Microgreens and fresh herbs - Red pepper flakes for extra kick Microgreens offer a fresh crunch and a pop of color. Fresh herbs like cilantro or parsley add a burst of flavor. If you want more spice, sprinkle on red pepper flakes. You can make your toast even better with extra toppings. Here are some fun add-ins: - Eggs (poached or fried) - Sliced tomatoes - Cucumber slices Adding an egg makes it a filling meal. Tomatoes bring sweetness, while cucumbers add crispness. Feel free to mix and match based on your taste. For the full recipe, check out Avocado Bliss Toast. To start, cut each avocado in half. Hold the avocado steady and slice down to the pit. Turn the knife to make a circle around the pit. Twist the two halves apart to reveal the pit. To remove it, carefully tap the pit with your knife and twist. It should pop out easily. Next, scoop the creamy flesh into a bowl using a spoon. Be gentle to avoid bruising the flesh. Now, it’s time to mash the avocados. Add minced garlic, lemon juice, salt, and pepper to the bowl. Use a fork to mash the mixture. You can make it smooth or keep it chunky, just how you like it. For extra flavor, feel free to add a pinch of red pepper flakes. Just remember, a little goes a long way! While you mash the avocados, it’s a good time to toast your bread. Whole-grain bread works best for this recipe. You can use a toaster or a skillet. If using a skillet, add a bit of olive oil to help it crisp up. Toast until golden brown and crispy. This will give your toast a nice crunch. Now for the fun part: assembling your toast! Drizzle olive oil over each slice of toast. Spread a good amount of the avocado mixture on top. Make sure to cover the toast evenly. For a finishing touch, sprinkle red pepper flakes if you like some heat. Add microgreens or fresh herbs for color and freshness. Enjoy your Easy Avocado Toast! For the full recipe, refer to the previous section. To choose the best avocados, look for ones that feel slightly soft when you press them. A ripe avocado should give a little but not feel mushy. If you find hard avocados, let them sit at room temperature for a few days to ripen. Once ripe, store them in the fridge to slow down further ripening. This keeps them fresh for a few extra days. Spices and condiments can make your avocado toast even better. Try adding: - A pinch of garlic powder for more flavor. - Fresh herbs like cilantro or basil for freshness. - A drizzle of balsamic vinegar for a sweet kick. - A sprinkle of everything bagel seasoning for extra crunch. These additions can take your toast from good to great! If your avocado is too mushy, mix in a little lemon juice. This can help balance the texture. If the flavor is bland, add more salt or pepper. Don't be afraid to taste as you go. You can also mix in some red pepper flakes for heat. This simple fix can turn a boring toast into a tasty dish. For the full recipe, check out Avocado Bliss Toast. {{image_2}} You can make easy avocado toast even better by adding a few key toppings. A popular choice is eggs. You can top your toast with a poached, fried, or soft-boiled egg. The creamy yolk adds richness and flavor. Feta cheese is another option. Crumbled feta brings a salty taste that pairs well with the avocado. For a gourmet touch, add smoked salmon. It adds a burst of umami and healthy fats. If you follow a special diet, you can still enjoy avocado toast. For a vegan twist, skip the eggs and cheese. Simply have the avocado mixture on its own. You can also use gluten-free bread. There are many great options made from almond or coconut flour. If you're low-carb, try using lettuce wraps instead of bread. This keeps the meal light and fresh while still satisfying your cravings. Seasonal produce can take your avocado toast to new heights. In the spring, add fresh radishes for a crunchy bite. Summer is perfect for juicy tomatoes or corn. Fall brings the chance to add roasted squash or pumpkin seeds. In winter, try pomegranate seeds for a sweet and tart twist. Using what's in season not only tastes great but also supports local farmers. Experiment with these toppings to find your favorite flavor combinations. To keep your avocado mix fresh, use a few tricks. First, press plastic wrap directly onto the surface of the mixture. This helps block air. You can also add a thin layer of lemon juice on top. The acid slows browning. Store it in an airtight container in the fridge. Use the mixture within a day or two for the best taste. To keep your toasted bread fresh, let it cool on a rack. This avoids steam, which makes bread soggy. Wrap the cooled slices in a clean cloth. This helps maintain crispness. You can also store them in a paper bag for a few hours. If you want to keep them longer, freeze the toasted bread. Just reheat in a toaster or oven when ready to eat. You can freeze leftover avocado for later use. First, mash the avocado with lemon juice. This helps prevent browning during freezing. Place the mash in an airtight container or a freezer bag. Squeeze out all the air before sealing. You can store it for up to three months. Thaw it in the fridge overnight when you’re ready to use it. For a full recipe and more tips, check out the Full Recipe. To make your avocado toast healthier, you can: - Use whole-grain bread for more fiber. - Add leafy greens like spinach or kale for vitamins. - Include seeds such as chia or flax for omega-3s. - Top with sliced tomatoes, which add antioxidants. - Swap olive oil for a light drizzle of balsamic vinegar for flavor without added fat. These changes boost nutrients and keep the toast delicious. You can prep some parts ahead. Here’s how: - Mash the avocados and add lemon juice to slow browning. - Store the mixture in an airtight container. - Toast the bread fresh right before serving for crispness. - Assemble the toast within a few hours to keep it fresh. This way, you save time while enjoying a tasty meal. Avocado toast has many nutritional benefits: - Avocados are rich in healthy fats, which support heart health. - Whole-grain bread provides fiber that aids digestion. - Garlic adds antioxidants and can boost your immune system. - Lemon juice gives vitamin C, great for your skin. - Olive oil contains healthy fats and vitamin E. For a deeper dive, you can check the Full Recipe for detailed ingredients. These nutrients make avocado toast not just yummy but also good for you! This guide showed you how to prepare delicious avocado toast. We covered key ingredients, toppings, and methods for perfecting your dish. Keeping avocados fresh and avoiding mistakes can make a big difference. You learned fun variations and ways to store your leftovers, too. Remember, avocado toast is more than a meal; it’s a canvas for your creativity. Experiment with flavors and toppings to find what you love most! Enjoy your tasty journey with avocado toast!

Easy Avocado Toast Simple Flavorful Recipe Guide

Do you crave a quick, tasty meal that’s both healthy and satisfying? Look no further! In this guide, I’ll show

Older posts
Newer posts
← Previous Page1 … Page29 Page30 Page31 … Page53 Next →

dsad

© 2025 savoryspiral • Built with GeneratePress

Our Policies

  • Copyright Policy
  • Cookie Policy
  • GDPR Policy
  • Privacy Policy
  • Disclaimer
  • Terms Of Use

More Information

  • Home
  • About
  • Contact
  • Appetizers
  • Dessert
  • Dinner
  • Drinks
©2025, savoryspiral About Back To Top