Skip to content
DisclaimerTerms Of UseGDPR PolicyCookie Policy

savoryspiral

  • Home
  • Drinks
  • Appetizers
  • Dinner
  • Dessert
  • About
  • Contact
  • Privacy Policy
DisclaimerTerms Of UseGDPR PolicyCookie Policy

Charlotte

- 1 cup semi-sweet chocolate chips - 1 cup mini marshmallows - 1 tablespoon unsalted butter - 1 teaspoon vanilla extract - 1/2 cup graham cracker crumbs The main stars of this s'mores dip are the semi-sweet chocolate chips and mini marshmallows. The chocolate melts to a creamy base, creating a rich taste. The mini marshmallows add that classic s'mores texture and sweetness. You also need unsalted butter. It helps the chocolate melt smoothly and adds a nice richness. The vanilla extract brings out the flavors, making each bite taste better. Finally, the graham cracker crumbs serve as a crunchy topping that gives your dip that classic s'mores vibe. - Additional graham crackers - Chocolate squares - Extra mini marshmallows These optional ingredients can elevate your s'mores dip. Adding more graham crackers gives you something to dip with. Chocolate squares can add extra richness. Extra mini marshmallows on top make for a great presentation and more gooeyness. - Dark chocolate vs. semi-sweet - Vegan alternatives for butter - Gluten-free options for graham crackers If you prefer dark chocolate, feel free to swap it in. It will change the flavor, making it richer. For those who want a vegan dip, you can use a plant-based butter. Also, if you need gluten-free options, look for gluten-free graham crackers at your store. These swaps keep the joy of s'mores alive for everyone! For the full recipe, check the details above. - Gather all necessary ingredients: - 1 cup semi-sweet chocolate chips - 1 cup mini marshmallows - 1 tablespoon unsalted butter - 1 teaspoon vanilla extract - 1/2 cup graham cracker crumbs - Additional graham crackers, chocolate squares, and marshmallows for serving - Prepare your baking dish. Use an oven-safe skillet or a pie dish. This will hold your dip nicely. - First, melt the butter. Do this over medium heat on the stovetop. - Once melted, remove the skillet from heat. Sprinkle the chocolate chips evenly over the butter. - Next, add the mini marshmallows on top of the chocolate. - Drizzle the vanilla extract over everything for a sweet kick. - Now, place the dish in the preheated oven at 450°F (230°C). Bake for 5-7 minutes. Watch for the marshmallows to turn golden and toasted. - Serve the dip warm. It pairs well with graham crackers, chocolate squares, and marshmallows. - To keep the dip warm and gooey, serve it right from the oven. If it cools, it may thicken. For a complete guide, check out the Full Recipe. To get those perfect toasted marshmallows, timing is key. Bake your dip for about 5-7 minutes. Watch closely to avoid burning. For extra toastiness, use the broiling method. Just switch your oven to broil for 1-2 minutes after baking. Keep an eye on it to prevent charring. You can prepare ingredients ahead of time. Measure out your chocolate chips and graham cracker crumbs. Mix them with the butter and store them in your baking dish. You can also store the unbaked dip in the fridge. Just cover it tightly and bake when you are ready. Get creative with your dippers! Try using fruit like strawberries or bananas. You can also use pretzels for a salty crunch. For a flavor boost, sprinkle in some espresso powder or sea salt on top before serving. This adds depth and takes your dip to the next level. {{image_2}} You can make S'mores Dip even more fun by adding extra flavors. One tasty option is a nutty S'mores Dip. Just mix in some peanut butter. The creamy texture adds a nice twist. You could also try seasonal flavors like pumpkin spice. This adds warmth and sweetness, perfect for fall. If you need a fast snack, try the microwave method. Just melt the butter and chocolate in a bowl. Add marshmallows and microwave for about 30 seconds. Stir and enjoy! You can also make a slow cooker version. This is great for parties. Just layer all the ingredients and set it on low. It keeps warm and gooey for everyone to enjoy. For those watching sugar, there are sugar-free options. Use sugar-free chocolate chips and sweeteners. This way, you can still enjoy the dip. If you're vegan, swap the butter for coconut oil. You can also use dairy-free chocolate and marshmallows. These changes keep the delicious taste without dairy. For the full recipe, check the section above. After you enjoy your S’mores dip, store leftovers in an airtight container. Keep it in the fridge for up to three days. This helps keep the flavors fresh and tasty. If you want to freeze the dip, use a freezer-safe container. Make sure to leave some space at the top. This allows for expansion when it freezes. You can freeze it for up to a month. To reheat, use the oven or microwave. If using the oven, preheat it to 350°F (175°C). Warm the dip in an oven-safe dish for about 10 minutes. This will bring back its creamy texture. If you use a microwave, heat it in short bursts of 15-20 seconds. Stir in between to avoid hot spots. Aim for a warm dip, around 100°F (38°C), for the best taste. In the refrigerator, S’mores dip lasts about three days. If frozen, it can stay good for about a month. After that, the taste and texture may change. For the best experience, try to eat it within these time frames. Following these storage tips helps you enjoy this delightful treat longer. Yes, you can! Use the stovetop or a microwave. For the stovetop, melt the butter in a pan, add chocolate chips, and stir until smooth. Top with mini marshmallows. Cover the pan with a lid for a few minutes until the marshmallows puff up. For the microwave, melt the butter and chocolate in a safe bowl. Heat in short bursts, stirring until smooth. Then, add marshmallows and microwave until they puff up. Both methods give you a fun, gooey treat! You have many options! For a gluten-free choice, try crushed rice cakes or almond flour cookies. You can also use oat crackers for a healthier option. If you want a fun twist, use chocolate wafers or vanilla cookies. Each will give a different taste but still pair well with the dip! Keep an eye on your dip while it bakes. Set a timer for 5 minutes. Check for golden color, not dark brown. If you see they are browning too fast, lower the oven temperature slightly. You can also use the broil setting for the last minute to get a perfect toast without burning. Just watch closely! S’mores dip is easy and fun to make. You learned about the key ingredients, simple steps, and clever tips to perfect your dip. Whether you want to try new flavors or prepare it ahead, there are many options. Don’t forget about how to store leftovers and reheat them. Enjoy this tasty treat with friends or family. It’s a delectable way to share a classic favorite!

S’mores Dip Delightful and Easy Dessert Recipe

Who doesn’t love s’mores? Now, imagine enjoying that gooey, sweet delight without leaving your home! In this recipe for S’mores

To make this dish, you need simple, fresh items. Here’s what you will need: - 4 tilapia fillets - 3 tablespoons olive oil - 4 cloves garlic, minced - 1 lemon, juiced and zested - 1 teaspoon paprika - ½ teaspoon salt - ¼ teaspoon black pepper - 1 cup cherry tomatoes, halved - 1 cup fresh spinach - Fresh parsley for garnish These ingredients blend well together. The tilapia is light and flaky. The lemon and garlic give it a bright taste. Olive oil helps keep the fish moist. You can add a few more items for extra taste. Consider these options: - Red pepper flakes for heat - Capers for a salty punch - Fresh herbs like dill or basil These additions can make your dish stand out. Use them based on your taste. This meal is not just tasty but also healthy. Each serving has about: - Calories: 300 - Protein: 28g - Fat: 16g - Carbohydrates: 8g - Fiber: 2g This dish gives you a good source of protein. It also has healthy fats from olive oil. Plus, the spinach and tomatoes add vitamins and minerals. Eating this meal keeps you full and satisfied. For the full recipe, check out the details above. First, gather your tilapia fillets. Place them on a large baking sheet. Make sure they are in a single layer. This helps them cook evenly. Next, season each fillet with salt and black pepper. This simple step adds a lot of flavor. In a small bowl, combine the olive oil, minced garlic, lemon juice, and lemon zest. Whisk them together until mixed well. Add paprika, salt, and black pepper to this mixture. This sauce is the star of your dish. It brings brightness and depth to the tilapia. Pour this sauce over the tilapia fillets. Be sure each fillet is well coated. After coating the fillets, add cherry tomatoes and fresh spinach around them. These veggies not only taste great but also add color. Now, preheat your oven to 400°F (200°C). Once it's hot, place the baking sheet in the oven. Bake for 15 to 20 minutes. The tilapia should flake easily with a fork when done. When it’s ready, take it out and garnish with fresh parsley. You now have a beautiful and tasty meal ready to serve! For the full recipe, check out the details above. Cooking tilapia is simple and quick. Aim for a cook time of 15 to 20 minutes. The fish should flake easily with a fork when done. If you want it juicier, do not overcook. Use a meat thermometer. The ideal internal temperature is 145°F (63°C). This ensures it is safe to eat and tasty. Feel free to adjust the seasonings in the lemon garlic mix. If you like it spicy, add a pinch of cayenne or red pepper flakes. For a sweeter taste, try adding honey or a dash of sugar. Remember, you can always add more, but you can't take it away. Start with less and taste as you go to find your perfect flavor. Fresh ingredients make a big difference in this dish. Use fresh garlic instead of powder for a stronger taste. Fresh lemon juice and zest add brightness and depth. The cherry tomatoes should be ripe and juicy. They enhance the colors and flavors. Fresh spinach wilts beautifully and adds nutrients. Always choose the best ingredients you can find; your meal will shine! For the full recipe, see the details above. {{image_2}} You can swap tilapia for other fish. Cod, haddock, or even salmon work well. Each fish brings its own taste and texture. Cod has a mild flavor, while salmon is richer. Adjust the cooking time based on the fish you choose. Thicker fish like salmon may need more time to cook. Just make sure the fish flakes easily when done. Feel free to add or change the veggies. Zucchini or bell peppers add great color and crunch. Asparagus also pairs nicely with the lemon flavor. You can even toss in some olives for a briny kick. Just be sure to cut the veggies into similar sizes for even cooking. This way, they will cook at the same time as the fish. This recipe is already low in carbs, but you can make it gluten-free too. Just ensure your seasonings are gluten-free. You can skip the tomatoes if you want a lower-carb option. Instead, add more spinach or other low-carb veggies. The lemon and garlic will still give you a fresh, vibrant taste. For a heartier meal, serve it with a side of cauliflower rice. For the full recipe, check out the entire guide. After enjoying your One-Pan Lemon Garlic Tilapia, store any leftovers quickly. Place the fish and veggies in an airtight container. Keep it in the fridge for up to three days. This way, you can enjoy it again without losing flavor. To reheat the tilapia, use an oven or a skillet. Preheat the oven to 350°F (175°C) and place the fish on a baking sheet. Heat it for about 10 minutes. If using a skillet, cook on medium heat for 4-5 minutes. This keeps the fish moist and tasty. You can freeze this dish if you have extra portions. Wrap the tilapia and veggies tightly in plastic wrap. Then, place them in a freezer bag. This dish can last up to three months in the freezer. When you're ready to eat, thaw it in the fridge overnight before reheating. Enjoy your delicious meal again! For the full recipe, check out the detailed instructions above. Yes, you can make this dish without lemon. You can use lime juice instead. Lime adds a nice zest. You could also try vinegar for a tangy flavor. Keep in mind, the dish will taste different without lemon. It's best to use a fresh ingredient to keep flavors bright. One-Pan Lemon Garlic Tilapia pairs well with many sides. Here are a few ideas: - Steamed rice - Quinoa - Roasted vegetables - A fresh green salad - Garlic bread These options add more texture and flavor to your meal. Try mixing and matching to find your favorite combo. To check if tilapia is done, look for a few signs. The fish should be opaque and white. It should also flake easily with a fork. If you have a food thermometer, the center should be 145°F (63°C). These tips will help you ensure perfect tilapia every time. For the full recipe, click here. This guide shows you how to make One-Pan Lemon Garlic Tilapia. We covered key ingredients and steps. You learned tips for cooking tilapia and enhancing flavor. We shared variations, storage tips, and answered common questions. Cooking is fun and easy with this recipe. Enjoy your meal and feel good about your choices. Your cooking skills will impress everyone, and you will love the flavor!

One-Pan Lemon Garlic Tilapia Flavorful and Easy Meal

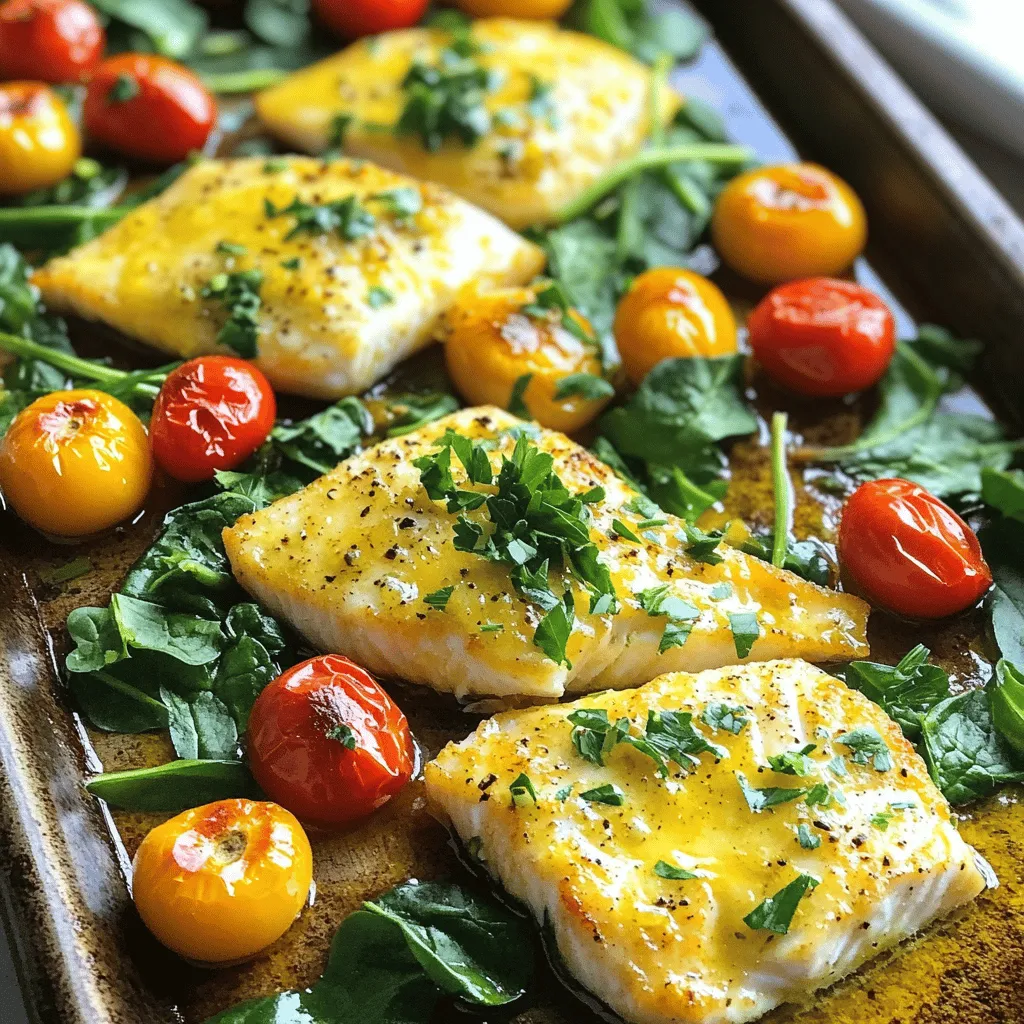
Are you ready to impress your family with a quick and tasty meal? This One-Pan Lemon Garlic Tilapia recipe is

- 1 lb chicken breast, thinly sliced - 3 tablespoons olive oil - 2 tablespoons Greek yogurt - 1 tablespoon lemon juice - 2 cloves garlic, minced - 1 tablespoon dried oregano - Salt and pepper to taste To make Greek chicken gyros, start with fresh chicken breast. I love using thinly sliced chicken. It cooks quickly and soaks up flavors. Olive oil adds richness while Greek yogurt gives creaminess. Lemon juice brightens the dish, making it fresh and zesty. Garlic and dried oregano bring in that classic Greek flavor. Season with salt and pepper to enhance everything. - 4 pita breads - 1 cucumber, diced - 1 tomato, diced - 1/2 red onion, thinly sliced - 1/4 cup feta cheese, crumbled - Fresh parsley for garnish Now, for the fresh ingredients. Pita bread is perfect for wrapping. It holds all the goodness inside. Cucumber and tomato add crunch and color. Red onion gives a nice bite. Don’t forget the feta cheese! It adds a salty, creamy touch. Fresh parsley makes everything look pretty and adds a pop of flavor. - Grill pan or outdoor grill - Mixing bowls - Cutting board - Knife - Serving platter - Parchment paper You will need some basic tools. A grill pan or an outdoor grill works great for cooking the chicken. Mixing bowls help combine the marinade. A cutting board and knife make chopping easy. For serving, a platter lined with parchment paper looks nice. It also keeps everything tidy. For the full recipe, check out the instructions linked above. Enjoy your cooking! To make your chicken gyros flavorful, start with the marinade. In a bowl, combine: - 3 tablespoons olive oil - 2 tablespoons Greek yogurt - 1 tablespoon lemon juice - 2 cloves garlic, minced - 1 tablespoon dried oregano - Salt and pepper to taste Mix these ingredients until they blend well. This marinade adds great taste to the chicken. Next, take your 1 lb chicken breast, thinly sliced, and coat it in the marinade. Make sure every piece gets covered. Cover the bowl and refrigerate for at least 1 hour. If you have time, let it marinate overnight for even more flavor. Now it’s time to grill. Preheat your grill or grill pan over medium-high heat. Once hot, remove the chicken from the marinade. Grill the chicken for 5-7 minutes on each side. Look for a nice char and check the internal temperature. It should reach 165°F (75°C) to be safe to eat. While the chicken grills, warm your pita bread. You can do this on a skillet or directly on the grill. Heat it for about 1 minute on each side. Once the chicken is done, let it rest for a few minutes. Then slice it into bite-sized pieces. To assemble your gyros, take a warm pita bread and lay it flat. Start with a good portion of grilled chicken. Then, add toppings: - Diced cucumber - Diced tomato - Thinly sliced red onion - Crumbled feta cheese Finally, garnish with fresh parsley. Wrap the pita around your filling. Enjoy your delicious Greek chicken gyros! For the full recipe, check out the complete guide. For the best flavor, marinate the chicken for at least one hour. If you have time, let it sit overnight. This allows the chicken to soak up all the tasty flavors. To balance the flavors, adjust the ingredients based on your taste. If you like it tangy, add more lemon juice. If you prefer richer flavors, increase the olive oil or yogurt. To achieve a perfect char, preheat your grill to medium-high heat. Place the chicken on the grill and leave it alone for a few minutes. This helps form those nice grill marks. If you don’t have a grill, you can use a grill pan on the stove. You can also bake the chicken in the oven at 400°F for about 20 minutes. When wrapping your gyros, lay the pita flat and add the chicken first. Then, layer your veggies and feta cheese. This keeps everything from falling out. For presentation, serve the gyros on a platter with parchment paper. Add a side of cucumber and tomato salad for color and freshness. This makes your dish look more appealing and adds a nice crunch! For the full recipe, check out the Full Recipe section. {{image_2}} You can switch up the protein in your gyros. Pork and lamb are classic choices in Greece. They offer rich flavors that pair well with the spices. If you prefer plant-based meals, try marinated tofu or tempeh. These options are tasty and satisfying. Toppings can make your gyros special. You might want to add more veggies like bell peppers or spinach. You can also try different sauces, like a spicy mayo or hummus. A must-have is tzatziki sauce. It’s cool and creamy, made with Greek yogurt, cucumber, and garlic. To make it, mix: - 1 cup Greek yogurt - 1/2 cucumber, grated - 1 clove garlic, minced - 1 tablespoon lemon juice - Salt to taste This sauce adds a bright taste to your gyros. Think about what to serve with your gyros. A Greek salad is a great side. It’s fresh and healthy, with tomatoes, cucumbers, and olives. Roasted veggies also fit well. They add color and flavor to your plate. For drinks, consider serving a light white wine or sparkling water. These drinks will enhance the meal without overpowering it. After enjoying your Greek chicken gyros, store any leftovers properly. Place leftover chicken in an airtight container. You can keep it in the fridge for up to three days. For longer storage, freeze the chicken. It can last for about three months in the freezer. Just make sure to label the container with the date. This way, you'll know when it was stored. When it’s time to eat your leftovers, you have two great options. You can use a microwave or an oven. For the microwave, place the chicken on a microwave-safe plate. Heat it in short bursts, checking often to avoid drying it out. Alternatively, for the oven, preheat to 350°F (175°C). Place the chicken on a baking sheet and cover it with foil. Heat for about 10-15 minutes, until warm throughout. How long can you keep marinated chicken and assembled gyros? Marinated chicken can stay fresh in the fridge for up to two days. If you assemble the gyros, it's best to eat them the same day. The pita can become soggy if stored too long. If you need to prepare ahead, keep the fillings separate. This helps keep everything fresh and tasty. For the best flavor experience, enjoy them soon after making! The best type of chicken for gyros is chicken breast. It cooks well and stays juicy. You can also use chicken thighs if you want more flavor. Just remember to cut it into thin slices for even cooking. This helps each piece soak up the marinade well. Yes, you can make Greek Chicken Gyros in advance! You can marinate the chicken overnight. This will enhance the flavor. Once grilled, you can store the chicken in the fridge for up to three days. Just reheat it before serving. I love serving Greek Chicken Gyros with fresh sides. Here are some great options: - Greek salad with tomatoes and cucumbers - Roasted vegetables for added flavor - Hummus and pita chips for a crunchy snack - Tzatziki sauce for dipping and extra taste Enjoy your gyros with a side of your choice! Greek chicken gyros are a tasty meal that you can make at home. We covered the key ingredients, from chicken and olive oil to fresh veggies and feta. You learned how to marinate, grill, and assemble your gyros for the best flavor. Plus, there are great tips for perfecting your meal and suggestions for storage. Feel free to mix things up with different proteins and toppings. Enjoy your gyros and get creative with variations. You now have the tools to impress your family and friends with this delicious dish.

Greek Chicken Gyros Flavorful and Easy Recipe Guide

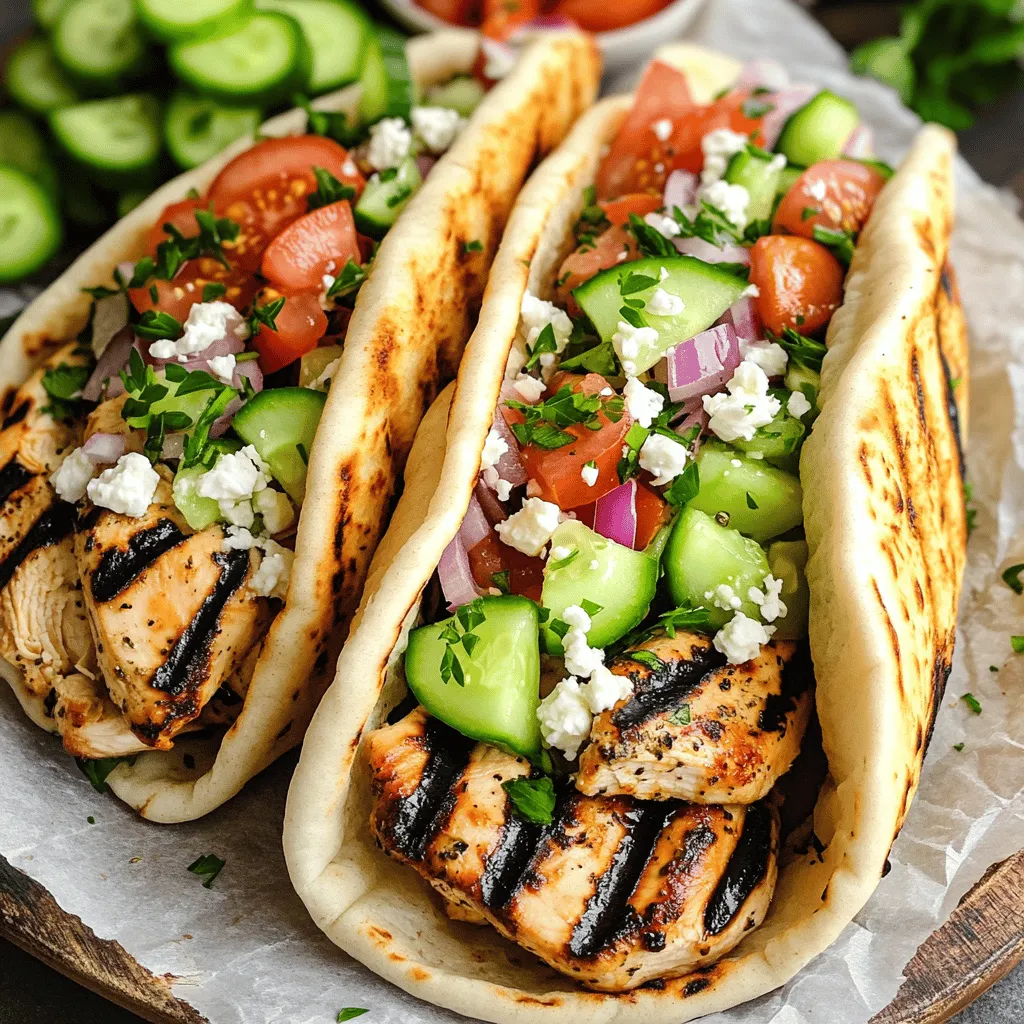
Are you ready to bring the taste of Greece to your kitchen? In this guide, I’ll walk you through making

To make a savory Chicken Parmesan Casserole, gather these key ingredients: - 2 cups cooked rotini pasta - 3 boneless, skinless chicken breasts, cooked and shredded - 2 cups marinara sauce - 1 cup ricotta cheese - 1 cup shredded mozzarella cheese - 1/2 cup grated Parmesan cheese - 1 tablespoon Italian seasoning - 1 teaspoon garlic powder - Salt and pepper to taste - Fresh basil leaves for garnish These simple ingredients blend together to create a warm, cheesy dish. Each layer adds flavor and texture, making this casserole a family favorite. You can customize your Chicken Parmesan Casserole with these options: - Use whole wheat pasta for added fiber. - Swap out the chicken for cooked ground turkey or beef. - Add sautéed vegetables like spinach, bell peppers, or mushrooms for extra nutrition. - Substitute low-fat cheese options to cut calories. Feel free to mix and match ingredients based on what you have on hand. This flexibility makes the dish even more enjoyable. Each serving of Chicken Parmesan Casserole provides: - Calories: Approximately 400 - Protein: 30 grams - Carbohydrates: 36 grams - Fat: 15 grams This meal is a good source of protein and carbohydrates. It fuels your body while being delicious. The balance of flavors ensures that you not only eat well but also enjoy every bite. For the complete recipe, refer to the Full Recipe section. First, grab a 9x13-inch baking dish. Make sure to grease it well with cooking spray or olive oil. This will help your casserole not stick. You want a nice, easy way to serve it later. Preheating your oven to 350°F (175°C) is next. This ensures your chicken Parmesan casserole cooks evenly and comes out perfectly. Now, let’s mix our ingredients. In a large bowl, add the cooked rotini pasta. Toss in the shredded chicken, marinara sauce, and ricotta cheese. Sprinkle in the Italian seasoning and garlic powder. Don’t forget to add salt and pepper to taste. Use a spatula to mix everything together until well combined. You want each bite to be full of flavor. Once your mix is ready, it’s time to layer. Spread half of the pasta mix evenly in your greased baking dish. Now, sprinkle half of the mozzarella cheese and half of the Parmesan cheese on top. Repeat this with the rest of your pasta mix. Finally, add the last of the mozzarella and Parmesan on top. Cover the dish with aluminum foil and bake for 25 minutes. After 25 minutes, take off the foil. Bake for another 15 minutes. You want the cheese to be bubbly and golden. When done, let it sit for about 5 minutes. This helps with cutting and serving. Garnish with fresh basil leaves for that extra touch before you dig in. You’ll be amazed at how easy this full recipe is to make! For a great Chicken Parmesan Casserole, you need the right cheese. I recommend using a mix for the best taste. Mozzarella melts well and gives a creamy texture. It also adds stretch, which everyone loves. Parmesan brings a sharp flavor that balances the meal. Ricotta adds a rich creaminess, making the whole dish feel special. You can also try provolone for a different twist. Mix these cheeses for a blend that excites your taste buds. To keep your chicken moist, cook it gently. Boiling or baking it with a bit of broth works well. After cooking, shred the chicken while it's warm. This helps it stay juicy. When mixing, don’t skimp on the marinara sauce. It adds flavor and keeps everything creamy. Mixing in ricotta cheese also helps the dish stay moist. Always taste and adjust salt and pepper to your liking. This dish should burst with flavor in every bite. This casserole shines on its own, but sides can elevate your meal. A fresh salad with crisp greens pairs nicely. You could also serve garlic bread for a fun touch. Roasted vegetables add color and nutrients. They make the meal feel complete. For a light option, consider steamed broccoli or green beans. These sides balance the richness of the casserole well. Enjoy making this meal a family favorite! {{image_2}} You can make a delicious meatless version of Chicken Parmesan Casserole. Instead of chicken, use cooked lentils or chickpeas. These ingredients give you protein and a nice texture. You can also use eggplant slices or zucchini for a more hearty feel. Just layer them like you would with chicken. The rest of the recipe stays the same. You still use the tasty marinara sauce and creamy cheeses. This version is perfect for anyone who enjoys plant-based meals. If you need a gluten-free meal, you can easily swap regular pasta for gluten-free pasta. Many brands offer rotini or penne shapes that work great. Just cook them according to the package instructions. The rest of the recipe remains unchanged. Your casserole will still taste amazing. You will enjoy the cheesy, savory flavors without any gluten. This option is great for friends and family with dietary needs. Want to add more flavor? Mix in some veggies! Spinach, bell peppers, or mushrooms work well. Chop them up and add them to your pasta mixture. You can also try different spices. A pinch of red pepper flakes adds heat. Fresh herbs like oregano or thyme bring a bright taste. Adding these ingredients makes your casserole even better. It’s a great way to sneak in extra nutrition and flavor for your family. For the full recipe, check the earlier section to see how these variations fit into the cooking steps. To keep your casserole fresh, let it cool first. Then, cover it tightly with plastic wrap or aluminum foil. You can also use an airtight container. Store it in the fridge. It stays good for about three to four days. If you want to keep it longer, freezing is a great option. When you reheat your casserole, do it slowly. Preheat your oven to 350°F (175°C). Place the casserole in an oven-safe dish and cover it with foil. This helps keep the moisture in. Heat it for about 20 to 30 minutes. Check if it's hot all the way through before serving. To freeze your casserole, make sure it’s cool first. Wrap it well in plastic wrap and then in foil. You can also place it in a freezer-safe container. It can last for up to three months in the freezer. When you're ready to eat, let it thaw in the fridge overnight. Then, reheat it as mentioned above. Enjoy your Chicken Parmesan Casserole later with ease! Yes, you can make Chicken Parmesan Casserole in advance. Prepare the dish up to the baking step. Cover it well and store it in the fridge. This way, you save time on busy days. When ready to bake, just uncover and bake it as usual. If you freeze it, let it thaw in the fridge overnight before baking. To reheat Chicken Parmesan Casserole, preheat your oven to 350°F (175°C). Place the casserole in an oven-safe dish. Cover it with foil to keep it moist. Heat for about 20-25 minutes or until warm throughout. You can also use a microwave for faster reheating, but the oven gives a better texture. Yes, you can substitute ricotta cheese. Cream cheese works well for a smooth texture. Cottage cheese is another option, but it has a different flavor. You can also use a mix of sour cream and cream cheese for a tangy twist. Just ensure it blends well with the other ingredients in the dish. For the full recipe, check the details above. In this article, we explored how to make a delicious Chicken Parmesan Casserole. We covered the key ingredients, cooking tips, and variations. You learned about optional ingredients, nutrition facts, and how to store leftovers. The different ways to enjoy this dish make it a great meal for everyone. I hope these tips help you create a tasty casserole. Enjoy making and sharing it with family and friends!

Savory Chicken Parmesan Casserole Easy Family Meal

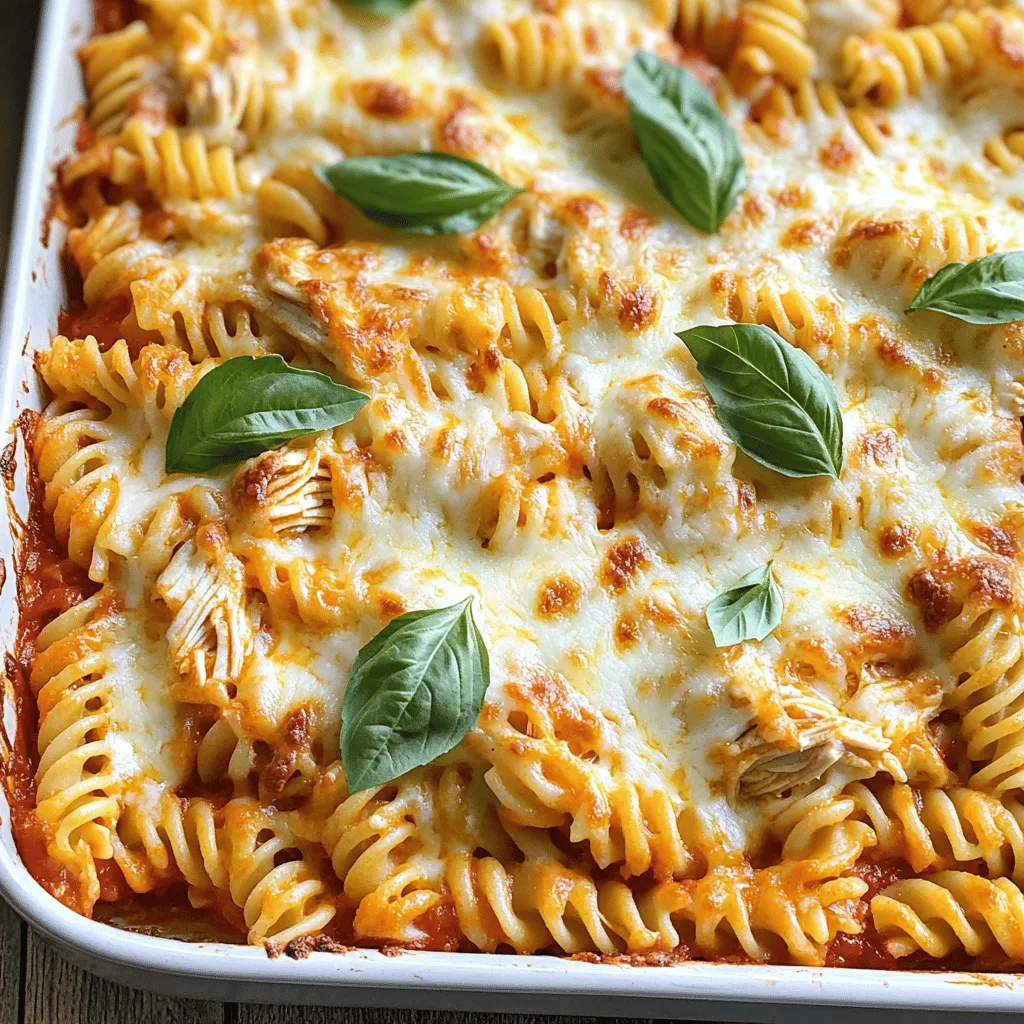
Looking for an easy family meal that packs a punch? This Savory Chicken Parmesan Casserole is your answer. It blends

- 2 large sweet potatoes, cut into thin fries - 2 tablespoons olive oil - 1 teaspoon paprika - 1 teaspoon garlic powder - Salt and pepper to taste - 1 cup black beans, rinsed and drained - 1 cup corn (fresh or canned) - 1 cup shredded cheese (cheddar or a blend) - 1 avocado, diced - 1/4 cup sour cream or Greek yogurt - 2 tablespoons fresh cilantro, chopped - 1 jalapeño, sliced (optional) To make loaded sweet potato fries, start with large sweet potatoes. Their natural sweetness brings great flavor. Cut them into thin fries for that perfect crunch. Next, you’ll need olive oil and seasonings. Olive oil helps the fries crisp up nicely in the oven. Use paprika and garlic powder for added flavor. Sprinkle in salt and pepper to taste. Now for the toppings! Black beans and corn add texture and color. Melted cheese makes everything better. Diced avocado adds creaminess. A dollop of sour cream or Greek yogurt gives a cool finish. Fresh cilantro adds a burst of freshness. You can add jalapeños for some heat, if you like. These ingredients come together to create a snack that is crispy and bursting with flavor. For the full recipe, check out the details above. 1. Preheating the oven Start by preheating your oven to 425°F (220°C). This high heat helps make the fries crispy. 2. Preparing fries and seasoning In a large bowl, combine the sweet potato fries, olive oil, paprika, garlic powder, salt, and pepper. Mix well until every fry is coated. This step is key for flavor. 3. Spreading on a baking sheet Line a baking sheet with parchment paper. Spread the seasoned fries in a single layer. Make sure they are not crowded. This allows the heat to circulate and cook them evenly. 1. Baking time and temperatures Place the baking sheet in the oven. Bake the fries for 20-25 minutes. You want them to be golden brown and crispy. 2. Flipping method for even cooking Halfway through baking, flip the fries. This helps both sides get that nice crunch. Use a spatula to turn them carefully. 1. Melting cheese on fries When the fries are done, take them out of the oven. Immediately sprinkle the shredded cheese over the hot fries. The heat will melt the cheese perfectly. 2. Assembling the topping mixture In a small bowl, mix the black beans and corn. Once the cheese is melted, add this mixture on top of the fries. Then, finish with diced avocado, jalapeño slices, and a drizzle of sour cream or Greek yogurt. Sprinkle fresh cilantro for that extra touch. Your Loaded Sweet Potato Fries are now ready to delight your taste buds! For the full recipe, check out the earlier section. Enjoy this colorful, tasty snack! To make your fries crispy, bake them at the right temperature. I recommend 425°F (220°C). This heat helps the fries cook evenly and get that golden crunch. Also, avoid overcrowding your baking sheet. If the fries are too close together, they will steam instead of crisp. Spread them out in a single layer for the best results. Adding seasonings can boost flavor. Try using smoked paprika for a deeper taste. A pinch of cumin can add warmth too. For dipping sauces, consider a zesty lime crema. Just mix sour cream with lime juice and zest. Ranch or guacamole also pair well with loaded sweet potato fries. You can prep your fries in advance. Cut and season them a few hours before. Just store them in the fridge until you're ready to bake. If you have leftover pre-seasoned fries, store them in an airtight container. They can last for a couple of days in the fridge. {{image_2}} You can change up your loaded sweet potato fries with different cheeses and veggies. Here are some ideas: - Cheeses: Try using mozzarella for a gooey melt or feta for a tangy bite. Pepper jack adds spice, while goat cheese gives a creamy touch. - Veggie Add-Ins: Add bell peppers, red onions, or cherry tomatoes for a fresh crunch. Spinach or kale can boost nutrients and flavor. If you want a lighter meal, some easy swaps work well. Here are some suggestions: - Substitutions: Use less oil or switch to avocado oil for a healthier fat. Replace sour cream with Greek yogurt for extra protein and less fat. - Air Fryer Method: Try cooking the fries in an air fryer. It reduces oil and keeps them crispy. Cook at 400°F for about 15-20 minutes, shaking halfway for even crispiness. To give your fries a twist, explore these cuisine ideas: - Tex-Mex Twist: Add salsa or pico de gallo on top. Use chili powder in your seasoning mix for more heat. - Southwestern Flavors: Top with grilled corn, diced tomatoes, and cilantro. A squeeze of lime brightens up the whole dish. These variations keep your loaded sweet potato fries exciting and fun. For the full recipe, visit the earlier section! To store leftovers, place the fries in an airtight container. This keeps them fresh. You can store them in the fridge for up to three days. However, they are best when eaten right away. For freezing cooked fries, let them cool completely first. Then, spread them on a baking sheet in a single layer. Freeze them for about two hours until firm. Once frozen, transfer the fries to a freezer bag. Squeeze out as much air as possible. They can stay frozen for up to three months. When you’re ready to eat, thaw the fries in the fridge overnight. Reheat them in the oven for best texture. To maintain crispiness, use the oven. Preheat it to 400°F (200°C). Spread the fries on a baking sheet and bake for about 10 minutes. This method helps avoid sogginess. You can also use an air fryer for a quick and crispy result. Avoid reheating in the microwave, as it makes fries soft. If you must use a microwave, only warm them for a short time. Enjoy your crispy loaded sweet potato fries again! To make Loaded Sweet Potato Fries, you first cut two large sweet potatoes into thin fry shapes. Preheat your oven to 425°F (220°C) and line a baking sheet with parchment paper. In a bowl, mix the sweet potato fries with 2 tablespoons of olive oil, 1 teaspoon of paprika, 1 teaspoon of garlic powder, salt, and pepper. Toss them well and spread on the baking sheet. Bake for 20-25 minutes, flipping halfway, until crispy. After baking, add the toppings like black beans, corn, cheese, avocado, sour cream, and cilantro. Check the Full Recipe for more details. Yes, you can use regular potatoes. They will change the flavor and texture a bit. Regular potatoes have a more neutral taste, while sweet potatoes add a sweeter flavor. The cooking method stays the same. Great dipping sauces include ranch, chipotle mayo, or guacamole. You can also try a yogurt-based sauce for a fresh kick. Each sauce pairs well with the flavors of the fries. Yes, Loaded Sweet Potato Fries are gluten-free. As long as you use gluten-free toppings, you can enjoy them without worry. Always check labels for any hidden gluten in sauces. To make Loaded Sweet Potato Fries vegan, swap the cheese for vegan cheese or skip it altogether. Use a vegan sour cream option as well. The rest of the recipe is naturally vegan-friendly. Loaded Sweet Potato Fries are packed with nutrients. Sweet potatoes are high in fiber and vitamins. The black beans add protein, while avocado provides healthy fats. A serving has around 300-400 calories, depending on toppings. Check specific brands for accurate nutrition info. Loaded sweet potato fries are a fun and tasty dish you can make at home. We covered everything from ingredients to baking tips. You learned how to prepare the fries, layer toppings, and enhance flavors. Remember, the right temperature is key for crispiness. You can also try different toppings or make a lighter version. Lastly, store any leftovers properly to keep them fresh. Enjoy making your loaded sweet potato fries, and let your creativity shine on each plate!

Loaded Sweet Potato Fries Crispy and Flavorful Snack

Are you craving a snack that’s both crispy and packed with flavor? Loaded sweet potato fries might be just what

To make your easy tzatziki sauce, gather these ingredients: - 1 cup Greek yogurt - 1 medium cucumber, grated and excess moisture squeezed out - 2 cloves garlic, minced - 1 tablespoon fresh dill, chopped - 1 tablespoon fresh mint, chopped - 1 tablespoon lemon juice - 1 tablespoon olive oil - Salt and pepper to taste I measure ingredients by volume and weight. Here are the units I use: - Cup for yogurt - Medium for cucumber - Tablespoon for herbs and oil - Cloves for garlic For the best results, I recommend these brands: - Greek yogurt: Fage or Chobani - Fresh herbs: Local farmers' market or organic brands - Olive oil: California Olive Ranch or Colavita These choices enhance flavor and freshness in your tzatziki sauce. For the full recipe, check out the details above. Enjoy making this refreshing dip! To make tzatziki, first gather all your ingredients. You need Greek yogurt, cucumber, garlic, dill, mint, lemon juice, olive oil, salt, and pepper. Start by grating the cucumber. Use a box grater for this task. After grating, place the cucumber in a clean cloth. Squeeze it tightly to remove excess water. This step is key. Too much moisture will make your sauce runny. In a medium bowl, add the Greek yogurt and grated cucumber. Use a spatula or a spoon to mix them well. Next, add the minced garlic, chopped dill, and chopped mint. Stir until everything blends together nicely. Now, drizzle in the lemon juice and olive oil. Continue mixing until the sauce appears smooth and creamy. Finally, season with salt and pepper. Taste it and adjust the flavors if needed. Tzatziki sauce is a great dip for veggies or pita bread. You can also serve it with grilled meats or fish. For a fun twist, use it on sandwiches or wraps. Don’t forget to chill it in the fridge for 30 minutes. This helps all the flavors come together. For the full recipe, check the previous section. To get the best texture, use thick Greek yogurt. This gives your tzatziki a creamy feel. Grate the cucumber finely and squeeze out as much water as you can. Too much moisture makes the sauce runny. Mix everything well, so it is smooth and even. Letting it chill helps it thicken too. You can boost the flavor in simple ways. Try adding more herbs like parsley or basil. A little bit of chili powder can add a nice kick. Experiment with garlic; you can use roasted garlic for a sweet touch. A splash of vinegar can also brighten the taste. Taste as you go to find what you like best. Avoid using too much cucumber; it can drown out the yogurt's creaminess. Don’t skip the salt; it brings out the flavors. If you rush and skip chilling, the flavors won’t blend well. Also, be careful with the garlic; too much can overpower the dish. Follow the Full Recipe closely for the best results. {{image_2}} You can change the taste of tzatziki by using different herbs. While dill and mint are classic choices, you can try others. Fresh parsley or chives can add a nice twist. You might even add a pinch of oregano for an earthy flavor. Experimenting with herbs keeps your tzatziki fresh and fun. If you want a vegan tzatziki, use plant-based yogurt. Coconut or almond yogurt works great. Just follow the same steps in the Full Recipe. It tastes just as good without dairy. You can also add a splash of vinegar for a tangy kick. For those who love heat, try adding some spice. A pinch of cayenne pepper can heat things up. If you want more flavor, chop up some jalapeños and mix them in. This gives your tzatziki a fresh, spicy touch. Adjust the heat to fit your taste! Store tzatziki sauce in an airtight container. This keeps it fresh for longer. Place the sauce in the fridge right after making it. Use a clean spoon to scoop out portions. This prevents germs from getting in. Tzatziki sauce will last about 3 to 5 days in the fridge. If you want to keep it longer, you can freeze it. Just pour it into a freezer-safe container. Leave some space at the top for expansion. It can last up to 2 months in the freezer. When you’re ready to eat it, thaw it in the fridge overnight. You do not need to heat tzatziki sauce. It tastes best cold. If you find it a bit watery after thawing, stir it well. You can also add a bit of yogurt or grated cucumber to restore the texture. Enjoy it with your favorite dishes or as a dip! Tzatziki sauce pairs well with many dishes. It is a classic side for gyros and souvlaki. You can also use it with grilled meats and fresh veggies. I love it as a dip for pita bread or chips. It adds a cool and creamy touch to any meal. Serve it alongside roasted veggies for a tasty treat. Yes, you can use sour cream. It will change the flavor a bit. Sour cream is tangy and creamy, just like Greek yogurt. However, Greek yogurt has more protein and a thicker texture. If you prefer a lighter option, stick with Greek yogurt. Both versions can taste great in your tzatziki sauce. Tzatziki sauce lasts about three to four days in the fridge. Store it in a covered container. Keep it cool and away from other strong-smelling foods. If you notice any off smells or changes in texture, it’s best to toss it. Always trust your senses to keep food safe. In this blog post, we covered how to make tasty tzatziki sauce. We listed key ingredients, their measurements, and top brands. You learned the steps to prepare and mix, plus creative ways to serve. We shared tips for texture, flavor, and common slip-ups. You discovered fun variations, safe storage methods, and answers to your questions. Tzatziki is a simple sauce that can enhance many meals. Now, enjoy experimenting with flavors and making it your own!

Easy Tzatziki Sauce Simple and Refreshing Recipe

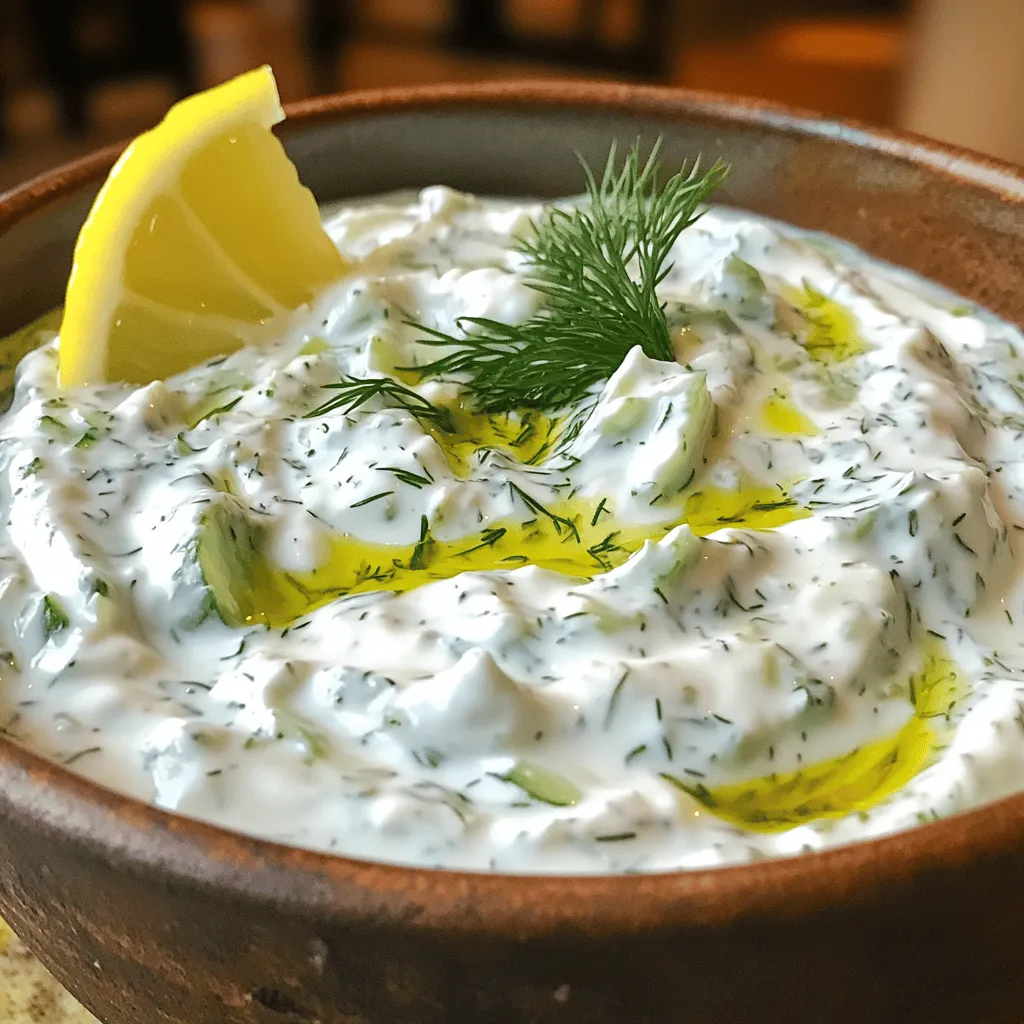
Tzatziki sauce is a game-changer for your meals. It’s creamy, cool, and full of fresh taste! In this post, I’ll

- 4 large bell peppers (any color) - 1 cup quinoa, rinsed - 2 cups vegetable broth - 1 can black beans, rinsed and drained - 1 cup corn (fresh or frozen) - 1 small red onion, diced - 2 cloves garlic, minced - 1 teaspoon cumin - 1 teaspoon smoked paprika - 1 teaspoon chili powder - 1 cup diced tomatoes (canned or fresh) - Salt and pepper to taste - 1 cup shredded cheese (cheddar or Mexican blend) - Fresh cilantro for garnish When making stuffed bell peppers, I focus on fresh and vibrant ingredients. The bell peppers serve as a colorful vessel for all the tasty fillings. I love using quinoa for its nutty flavor and protein boost. The black beans and corn add texture and sweetness. I always choose a small red onion for its mild taste. Garlic brings depth, while cumin, smoked paprika, and chili powder add warmth. I like to use diced tomatoes for moisture and flavor. For topping, I never skip the cheese. It melts beautifully and adds richness. Finally, fresh cilantro gives a nice herbal note. This mix creates a delicious, hearty meal that everyone will love. Check out the Full Recipe for detailed steps! - Preheat the oven to 375°F (190°C). - Cut the tops off the bell peppers and remove seeds and membranes. - Bring vegetable broth to a boil. - Add quinoa, reduce heat, cover, and simmer for 15 minutes. - Sauté diced onion and garlic in olive oil. - Add cooked quinoa, black beans, corn, diced tomatoes, spices, salt, and pepper. - Fill each bell pepper with the quinoa mixture and top with cheese. - Cover with foil and bake for 25 minutes. Bake without foil for another 10-15 minutes. By following these steps, you will create a colorful and tasty dish. For the complete recipe, you can refer to the full recipe section above. Enjoy your cooking adventure! - Look for firm, colorful bell peppers. They should feel heavy for their size. - Choose right-sized peppers for even cooking. Smaller peppers cook faster than larger ones. - Rinse quinoa thoroughly to remove bitterness. This step makes a big difference in taste. - Toast quinoa before boiling for enhanced flavor. Just a few minutes in a dry pan will do. - Use different cheeses for a flavor twist. Cheddar, mozzarella, or even goat cheese work well. - Consider dairy-free options for allergens. Nutritional yeast gives a cheesy flavor without dairy. For the full recipe, you can check [Full Recipe]. {{image_2}} For a vegetarian twist, skip the meat. You can load up on extra veggies like zucchini, mushrooms, or spinach. Beans make a great substitute too. Black beans work nicely in this recipe. You can also use plant-based cheese alternatives if you want a cheesy topping without dairy. If you're watching carbs, you can replace quinoa with cauliflower rice. This keeps the dish low in carbs but still filling. Be sure to adjust your seasonings to boost the flavor. You might want to add more spices like garlic powder or oregano for that extra taste. Do you like heat? Add jalapeños or your favorite hot sauce to the filling. This will give your stuffed peppers a nice kick. For more spice, top with a spicy cheese blend. Pepper jack or a spicy cheddar can really amp up the heat. Store leftover stuffed peppers in an airtight container. This keeps them fresh and tasty. Consume within 3-5 days for best quality. If you wait too long, they may spoil or lose flavor. Before freezing, allow the stuffed peppers to cool completely. This step is key for texture. Wrap each pepper individually in plastic wrap or foil. You can freeze them for up to 2-3 months. Label the containers with dates for easy tracking. For a quick meal, microwave the stuffed peppers. Just heat them in short bursts to avoid overheating. For the best texture, bake them in the oven. Preheat to 350°F (175°C) and heat for about 20 minutes. This method helps the cheese melt nicely and keeps the peppers firm. Enjoy your delicious meal again! For the full recipe, check the full recipe section. You can customize your filling easily. For gluten-free diets, use gluten-free grains like rice or quinoa. You can also add legumes like lentils or chickpeas. Plant-based proteins, like tofu or tempeh, work well too. Each option gives you a tasty and healthy meal. Yes, you can. Simply assemble your stuffed peppers and store them uncooked in the fridge. They can stay fresh for one day before you cook them. This makes preparing dinner easier on busy nights. For a balanced meal, pair your stuffed peppers with a fresh salad. Whole-grain side dishes, like brown rice or quinoa, also work well. These sides add great texture and flavor to your meal. To check if your peppers are done, look for tenderness. The cheese should be melted and bubbly. This means the peppers are ready to eat. A fork should easily pierce the peppers when they're cooked just right. To keep your peppers from getting soggy, avoid overcooking them. Make sure not to overstuff with filling either. This way, the peppers stay crisp and tasty. Stuffed bell peppers are simple, tasty, and versatile. You learned about the key ingredients, preparation steps, and tips to make them perfect. Whether you prefer vegetarian, keto, or spicy options, customization is easy. Storing leftovers also ensures you can enjoy them later. Experiment with flavors, and don’t shy away from trying new ingredients. With these techniques, you’ll create delicious meals that impress everyone at your table. Enjoy your cooking journey and make these stuffed peppers a regular favorite!

Stuffed Bell Peppers Flavorful and Easy Dinner Recipe

Ready to spice up your dinner routine? These stuffed bell peppers are your answer! Packed with flavor and easy to

- 2 flatbreads or naan bread - 1 cup cooked chicken, shredded - 1/2 cup BBQ sauce - 1 cup shredded mozzarella cheese - 1/2 cup red onion, thinly sliced - 1/2 cup corn kernels (canned or frozen) - 1/4 cup fresh cilantro, chopped - 1 teaspoon olive oil - Salt and pepper to taste The ingredients for BBQ chicken flatbread pizza are simple and easy to find. You can use flatbreads or naan bread as your base. I love using naan because it adds a nice texture. Shredded cooked chicken is key here. It mixes well with BBQ sauce. I recommend using about a cup for full flavor. Next, grab some BBQ sauce. Use your favorite brand or homemade. It really boosts the flavor. You'll also need mozzarella cheese to melt on top. It gives that gooey, cheesy goodness we all love. Red onions add a nice crunch and sharpness. Thinly slice them so they cook well. Corn kernels bring sweetness. You can use canned or frozen corn. Fresh cilantro adds a burst of color and flavor. Finally, a little olive oil, salt, and pepper help enhance everything. - Alternative proteins: You can swap chicken for pulled pork, beef, or tofu. - Cheese options: Try cheddar, gouda, or dairy-free cheese if you prefer. - Gluten-free flatbread options: Look for gluten-free flatbreads or rice-based alternatives. These substitutions keep the dish fun and flexible. You can easily make BBQ chicken flatbread pizza to fit your taste! For the full recipe, check out the details above. - Preheat the oven to 400°F (200°C). This temperature helps the flatbread get crispy. - In a small bowl, mix the shredded chicken with half of the BBQ sauce. Make sure the chicken is well coated. - Lightly brush the flatbreads with olive oil and season with salt and pepper. This adds flavor and helps with crispiness. - Spread the remaining BBQ sauce evenly over the flatbreads. Leave a small border around the edges. - Evenly distribute the BBQ chicken mixture on top of the sauce. This ensures every bite is full of flavor. - Sprinkle the mozzarella cheese over the chicken. Then add the sliced red onion and corn kernels. - Place the flatbreads on a baking sheet. Bake for 12-15 minutes. Look for the cheese to melt and bubble, and the edges to turn golden. - Once done, remove them from the oven. Let them cool for a couple of minutes. This step makes slicing easier. - Garnish liberally with fresh cilantro before cutting into pieces. It adds a nice touch and fresh taste. For the full details, check the Full Recipe. To get the perfect crispy flatbread, start by preheating your oven. A hot oven helps the flatbread crisp up nicely. Brush your flatbreads with olive oil and season them with salt and pepper. This adds flavor and helps with browning. Bake the flatbreads for about 12-15 minutes. Keep an eye on them to avoid burning. For melting cheese, use shredded mozzarella. It melts well and becomes gooey. Spread the cheese evenly over your toppings. This helps it melt uniformly. If you want extra meltiness, you can cover the flatbreads with aluminum foil for the first half of baking. Then remove it to let the cheese bubble. To add more flavor, consider spices or herbs. A sprinkle of smoked paprika or garlic powder can elevate your dish. Fresh herbs like oregano or thyme can also enhance the taste. Just sprinkle them on before baking for a fragrant boost. When it comes to BBQ sauce, homemade is often the best choice. It lets you control the flavor and sweetness. But if you're short on time, store-bought sauces work too. Look for one that is bold and has a nice balance of sweetness and tang. For a beautiful presentation, serve your flatbreads on a wooden cutting board. This adds a rustic touch. Drizzle extra BBQ sauce on top for a nice visual appeal. You can use a squeeze bottle for a neat effect. Garnish with chopped cilantro right before serving for a pop of color. This makes your dish look inviting and delicious. {{image_2}} You can switch things up with different flavors. For a spicy kick, try buffalo chicken flatbread pizza. Just swap out the BBQ sauce for buffalo sauce. Use shredded chicken, and top it with mozzarella. The heat from the buffalo sauce pairs well with cool ranch dressing as a drizzle. Another option is a Mediterranean-style flatbread. Use feta cheese, olives, and roasted red peppers. This version gives you a fresh taste. The tangy feta adds a nice zing. These unique twists keep your meals exciting. If you want a vegetarian option, load your flatbread with grilled veggies. Bell peppers, zucchini, and mushrooms work great. You can also add plant-based proteins like chickpeas or tempeh for a hearty touch. For cheese lovers, consider dairy-free cheese options. Almond or cashew cheese melts well and tastes great. Use a homemade or store-bought tomato sauce instead of BBQ sauce. This way, you can enjoy a tasty pizza without any meat. BBQ chicken flatbread pizza shines in summer. It’s perfect for picnics or backyard gatherings. You can add seasonal toppings like fresh basil or cherry tomatoes. These give your pizza a bright, fresh flavor. In winter, make comfort variations. Top your flatbread with roasted winter vegetables like squash or Brussels sprouts. A sprinkle of nutmeg can add warmth. This makes your BBQ chicken flatbread pizza cozy and satisfying. Explore these variations to keep your meals fun and flavorful! For more ideas, check out the Full Recipe. To store your BBQ chicken flatbread pizza leftovers, let them cool first. Place the slices in an airtight container. This helps keep them fresh for longer. You can store them in the fridge for up to three days. If you want to keep them longer, consider freezing. The best containers for storage are glass or plastic. Choose ones that seal tightly. This prevents air from getting in and keeps the pizza tasty. To reheat your flatbread pizza, you want to keep it crispy. For the oven, preheat to 350°F (175°C). Place the slices on a baking tray and heat for about 10 minutes. This keeps the crust nice and crunchy. If you use a microwave, place a slice on a plate. Heat for about 30 seconds. This method is quick but may make the crust softer. You can also use an air fryer. Set it to 350°F (175°C) and heat for about 5 minutes. This gives you a crispy finish, just like fresh out of the oven. You can freeze BBQ chicken flatbread pizza, both unbaked and baked. If you freeze it raw, prepare it first but don’t bake it. Wrap each flatbread tightly in plastic wrap and then foil. This helps avoid freezer burn. For baked flatbreads, let them cool completely. Wrap them the same way. They can last up to three months in the freezer. To thaw, place the frozen flatbread in the fridge overnight. For quick reheating, bake it straight from the freezer. Adjust the baking time to ensure it heats through and stays delicious. BBQ chicken flatbread pizza stays good for about 3 to 4 days in the fridge. To keep it fresh, wrap it tightly in plastic wrap or store it in an airtight container. This way, you prevent it from drying out. If you notice any odd smells or changes, it’s best to toss it out. Always check for freshness before enjoying your leftovers. Yes, you can prepare BBQ chicken flatbread pizza ahead of time. You can assemble the pizza without baking it. Cover it and keep it in the fridge for up to a day. When you're ready to eat, just pop it in the oven. This makes meal prep easy and quick. If you want, you can also cook the chicken and store it separately. This way, you save time on busy days. Pair your BBQ chicken flatbread pizza with simple side dishes to make a complete meal. Here are some ideas: - Fresh garden salad - Coleslaw for a crunchy bite - Sweet potato fries for extra flavor - Fresh fruit salad for a sweet touch - Cold drinks like lemonade or iced tea These sides balance the pizza’s rich flavors and make for a fun meal. Enjoy mixing and matching! This recipe for BBQ chicken flatbread pizza is simple and fun to make. We covered the key ingredients, like shredded chicken and cheese, and explained how to bake it perfectly. You can easily customize it with different proteins or cheeses. Don’t forget about storage tips for leftovers. Experimenting with flavors can make your pizza night exciting. Use this guide to create your own tasty dish and share it with your friends. Enjoy your cooking journey with these easy steps!

BBQ Chicken Flatbread Pizza Easy and Flavorful Meal

Craving a quick and tasty dinner? BBQ Chicken Flatbread Pizza is the answer! This easy recipe packs bold flavors and

- Zucchini and Chocolate Chips - 1 cup grated zucchini (about 1 medium zucchini) - 1/2 cup semi-sweet chocolate chips - Flour and Sugar Types - 1 cup all-purpose flour - 1/2 cup whole wheat flour - 1/2 cup granulated sugar - 1/4 cup brown sugar, packed - Eggs and Oils - 2 large eggs - 1/2 cup vegetable oil (or melted coconut oil) Gathering fresh, quality ingredients makes a big difference. The zucchini adds moisture and nutrients. It keeps the bread soft and fluffy. I love using semi-sweet chocolate chips. They add a rich flavor without being too sweet. For the flour, I mix all-purpose and whole wheat. This blend gives a nice texture. Granulated sugar sweetens the bread, while brown sugar adds depth. The oil keeps the bread moist. Eggs help bind everything. If you want, you can add walnuts. They give a nice crunch and flavor. For the full recipe, check out the detailed steps. Preheating the Oven Start by preheating your oven to 350°F (175°C). This step is important for even baking. Greasing and Lining the Loaf Pan Next, grease a 9x5-inch loaf pan with butter or oil. You can also line it with parchment paper. This helps the bread come out easily after baking. Combining Flours and Leavening Agents In a large bowl, mix together all-purpose flour and whole wheat flour. Add baking soda, baking powder, and salt to this mix. Whisk it well to remove any lumps. Adding Spices and Salt Now, sprinkle in the ground cinnamon. This adds a warm flavor that complements the zucchini and chocolate. Creaming Sugars and Oils In another bowl, combine granulated sugar and brown sugar. Add vegetable oil and mix until it looks smooth. Incorporating Eggs and Vanilla Next, crack in the eggs and pour in the vanilla extract. Mix it all together until it is well combined. Folding in Zucchini Gently fold the grated zucchini into the wet mixture. Make sure the zucchini is evenly mixed in. Mixing Wet and Dry Ingredients Gradually add the dry ingredients into the wet mixture. Stir until just combined. Your batter should be slightly lumpy; do not overmix it. Carefully Mixing in Chips and Walnuts Fold in the semi-sweet chocolate chips and walnuts if you choose to use them. Make sure they are evenly distributed in the batter. Pouring Batter into the Pan Pour the batter into your prepared loaf pan. Use a spatula to smooth the top. Baking Time and Testing for Doneness Place the loaf pan in the preheated oven. Bake for 55 to 65 minutes. Check if it’s done by inserting a toothpick into the center. If it comes out clean, your bread is ready! For the full recipe, refer to the detailed instructions above. - Importance of Grated Zucchini Grated zucchini is key for moist bread. It adds moisture without extra fat. Use a box grater or food processor to shred the zucchini finely. Remember to squeeze out excess water. This helps prevent a soggy loaf. - Avoiding Overmixing Mixing the batter too much can make the bread tough. You want a tender crumb, so mix just until combined. The batter should remain a bit lumpy. This keeps your bread light and fluffy. - Optional Add-ins for Extra Flavor You can customize your bread with fun add-ins. Try adding nuts, like walnuts or pecans, for crunch. Dried fruits like raisins or cranberries also work well. Experiment with spices like nutmeg for warmth. - Adjusting Sweetness Levels You can tweak the sweetness to your taste. Use less sugar if you prefer a less sweet bread. Alternatively, add a bit of honey or maple syrup for natural sweetness. Just remember to adjust the wet ingredients if you do. - Serving Suggestions Slice the bread warm for the best experience. Serve it with a dollop of cream cheese or butter. This adds richness and flavor. You can also enjoy it plain for a healthier option. - Garnishing Ideas Add a touch of elegance by dusting the top with powdered sugar. You can also sprinkle some chocolate chips on top before baking for a beautiful finish. A few fresh herbs, like mint, can brighten the plate too. {{image_2}} You can make your chocolate chip zucchini bread even better for you. Start by using whole wheat flour instead of all-purpose flour. This swap adds fiber and nutrients. If you're gluten-free, try gluten-free flour blends. They work well in this recipe and keep the bread soft. To lower the sugar, use less granulated sugar. You can cut it by a third. You can also try adding mashed banana or unsweetened applesauce. This will keep the bread sweet while reducing sugar. Want to spice things up? Add some nutmeg or ginger to the batter. Just a teaspoon will bring warmth. You could also try adding cinnamon for extra flavor. These spices give your bread a cozy taste. You can change the chocolate chips too. Use dark chocolate chips or white chocolate for a twist. If you like dried fruit, toss in raisins or cranberries. These add a sweet and chewy texture. In the fall, add pumpkin spice for a seasonal treat. Just a teaspoon of pumpkin spice will give it that warm, autumn flavor. You could also add chopped apples or nuts to celebrate the season. During summer, use fresh berries instead of chocolate chips. Blueberries or raspberries mix well with zucchini. They keep the bread light and fresh. You can also add lemon zest for a bright touch. For the full recipe, check out the [Full Recipe]. Store leftover chocolate chip zucchini bread in an airtight container. You can keep it at room temperature for up to three days. If you want it to last longer, put it in the fridge. The cool air can help keep it fresh. Just be aware that refrigeration may change the bread's texture slightly. If you have extra bread, freezing is a great option. Wrap the bread tightly in plastic wrap, then place it in a freezer bag. This method protects it from freezer burn. You can freeze it for up to three months. To enjoy it later, just take it out and let it thaw at room temperature. How long will chocolate chip zucchini bread last? When stored properly, it can stay good for about a week. Always check for signs of spoilage. If you see mold or if it smells off, it’s best to toss it. Remember, freshness is key to enjoying this moist and fluffy delight! Yes, you can use frozen zucchini. Just make sure to thaw it first. After thawing, drain the excess water. Use a clean kitchen towel to squeeze out more moisture if needed. This helps keep your bread from being too wet. Frozen zucchini works well and saves prep time. If your bread is too dense, check the mixing method. Overmixing can cause this issue. Make sure to fold your ingredients gently. Also, check your leavening agents. Ensure your baking soda and baking powder are fresh. If they are old, they may not work well. Another tip is to add a bit more grated zucchini for moisture. Yes, you can make this bread vegan. Replace the eggs with flax eggs. To make one flax egg, mix one tablespoon of flaxseed meal with two and a half tablespoons of water. Let it sit for five minutes to thicken. For dairy, use almond milk or another plant-based milk instead of regular milk. These swaps work well without losing flavor. You can tell if the bread is done by using the toothpick test. Insert a toothpick into the center of the loaf. If it comes out clean or with a few crumbs, the bread is ready. Also, look for a golden-brown crust. The bread should spring back when lightly pressed. These cues help ensure your bread is perfectly baked. For the full recipe, check out the details provided earlier. This article covers how to make delicious zucchini bread step-by-step. We talked about the key ingredients like zucchini, chocolate chips, and the types of flour and sugars. You learned how to prepare your pan, mix your ingredients, and bake your bread perfectly. Remember to try variations for flavor and health. Use whole wheat flour or add spices for a twist. Store your leftovers properly to keep them fresh. Baking can be fun and rewarding. Enjoy your time in the kitchen!

Chocolate Chip Zucchini Bread Moist and Fluffy Delight

Are you craving a treat that combines the rich taste of chocolate with the hidden goodness of zucchini? Look no

- 1 lb fresh asparagus, trimmed - 3 cloves of garlic, minced - Zest of 1 lemon - 2 tablespoons olive oil - Juice of 1 lemon - Salt and pepper to taste - 1 teaspoon red pepper flakes (optional) - 2 tablespoons grated Parmesan cheese (optional) To make Lemon Garlic Roasted Asparagus, you need fresh asparagus. Look for bright green stalks that are firm and straight. Trim the tough ends to keep the dish tender. For flavor, garlic plays a big role. Use fresh garlic and mince it finely. The lemon adds brightness. Use both the juice and the zest for the best flavor. You will also need olive oil. It helps the asparagus cook evenly and adds richness. Season with salt and pepper to taste. If you like a little heat, add red pepper flakes. They are optional but fun! Lastly, Parmesan cheese gives a nice finish. You can add it in the last moments of roasting. For the full recipe, check the instructions provided earlier. 1. Preheat your oven. Set it to 425°F (220°C). This heat helps to roast the asparagus just right. 2. Prepare the asparagus. Trim the tough ends. You want fresh, green stalks for the best flavor. 3. Mix the ingredients. In a large bowl, combine 1 pound of asparagus, 3 minced garlic cloves, the zest of 1 lemon, 2 tablespoons of olive oil, and the juice of 1 lemon. Add salt and pepper to taste. If you like a kick, toss in 1 teaspoon of red pepper flakes. 4. Toss well. Make sure each piece of asparagus gets a nice coat of oil and seasonings. This is key for great taste. 5. Spread on the baking sheet. Line it with parchment paper for easy cleanup. Lay the asparagus in a single layer, ensuring they roast evenly. 1. Roast the asparagus. Place the baking sheet in the preheated oven. Roast for about 12 to 15 minutes. The asparagus should be tender and slightly caramelized. 2. Add cheese if desired. If you want a cheesy touch, sprinkle 2 tablespoons of grated Parmesan cheese on top in the last 2 minutes of roasting. It will melt and create a delicious layer. 3. Final serving tips. Once done, take the asparagus out and adjust the seasoning if needed. Serve warm on a large platter. Drizzle any pan juices over the top for extra flavor. Garnish with lemon wedges and fresh parsley for a pop of color. You can find the [Full Recipe] for more details and tips on this tasty side dish. How to select fresh asparagus When picking asparagus, look for bright green stalks. The tips should be tightly closed. Avoid any that are limp or have dark spots. Fresh asparagus feels firm and has a nice snap when bent. If you can, buy asparagus in season for the best taste. Adjusting seasoning to taste Seasoning is key for great flavor. Start with the recipe's salt, pepper, and lemon juice. After roasting, taste your asparagus. If it needs more flavor, add a pinch of salt or a squeeze of lemon. You can also add red pepper flakes for heat. Remember, you can always add more, but you can't take it away! Ensuring even roasting To get perfectly roasted asparagus, spread it in a single layer on the baking sheet. If the pieces are too close, they will steam instead of roast. Turn the asparagus halfway through cooking for even browning. This helps achieve that nice crisp texture we all love. Presentation ideas for the dish Serve your lemon garlic roasted asparagus on a large platter. Drizzle any pan juices over the top. For a pop of color, garnish with lemon wedges or fresh parsley. This makes the dish look vibrant and inviting. Pairing with main courses Lemon garlic roasted asparagus pairs well with many dishes. Try it with grilled chicken, fish, or steak. It also goes great with pasta dishes. The fresh flavors of asparagus complement rich meals beautifully. Storing leftover asparagus If you have leftovers, cool the asparagus first. Place it in an airtight container in the fridge. It will stay fresh for up to three days. When reheating, warm it in a pan or the oven. This keeps the asparagus crisp rather than soggy. For the full recipe, check the detailed steps provided. {{image_2}} You can switch up the flavors in Lemon Garlic Roasted Asparagus with simple changes. - Alternative seasoning options: Try using lemon pepper or Italian seasoning instead of garlic. These will add a new twist to the dish. - Using different types of cheese: If you want a creamier texture, use feta or goat cheese. Both melt nicely and add a rich flavor. - Other vegetables that can be roasted: Don't limit yourself to asparagus! You can roast broccoli, Brussels sprouts, or even green beans. Each will soak up the lemon and garlic flavors. To make this dish even more delicious, consider these ideas. - Adding nuts or seeds: Toss in some sliced almonds or sunflower seeds before roasting. They add a nice crunch and a nutty taste. - Using different citrus fruits: Instead of lemon, try lime or orange juice. Each adds a unique flavor that brightens the dish. - Infusing with herbs: Fresh herbs like thyme or basil can enhance the taste. Sprinkle them on right before serving for a fresh burst of flavor. These variations keep the dish exciting and perfect for any meal. For the full recipe, check out Lemon Garlic Roasted Asparagus. To keep your lemon garlic roasted asparagus fresh, store it in the fridge. Place leftovers in an airtight container. This helps seal in the flavor and moisture. Roasted asparagus can last about 3 to 4 days in the fridge. When you want to eat it again, reheating is easy. For reheating, use a microwave or oven. If using a microwave, place the asparagus on a plate. Heat for about 30 seconds. Check if it’s warm enough. You can also reheat in the oven. Preheat to 350°F (175°C). Place asparagus on a baking sheet and heat for 10 minutes. This restores some of the crispiness. If you want to save roasted asparagus for later, freezing is a great option. Start by letting it cool completely. Then, place it in a freezer-safe bag. Squeeze out the air to avoid freezer burn. It can last for up to 3 months in the freezer. When you're ready to use frozen asparagus, thaw it first. The best way to thaw is in the fridge overnight. You can also use a microwave on the defrost setting. Once thawed, you can reheat it like fresh asparagus. Just remember, frozen asparagus might be a bit softer than fresh. Enjoy the flavors of your lemon garlic roasted asparagus from the Full Recipe! Yes, you can make Lemon Garlic Roasted Asparagus ahead of time. Cook it fully and let it cool. Store it in an airtight container in the fridge. You can reheat it later in the oven or microwave. This dish tastes great warm or at room temperature. Watch for the color change. Asparagus should turn bright green and slightly golden at the tips. It should be tender but still have a bit of crunch. You can poke it with a fork to check. If it goes in easily, it’s ready. Roasted asparagus is versatile. You can add it to salads for extra crunch. Toss it into pasta or grain bowls. It also makes a tasty topping on pizza. You can even blend it into soups for a creamy texture. Try these ideas for more flavor! In this post, I covered how to make delicious roasted asparagus. We looked at fresh ingredients like asparagus, garlic, and lemon. The step-by-step guide showed how to prep and cook the dish perfectly. I also shared tips for selecting the best asparagus and ideas for serving it. You can even try tasty variations with different flavors or veggies. Remember, storing leftovers well makes them last longer. Enjoy your cooking, and make this simple dish a part of your meals!

Lemon Garlic Roasted Asparagus Simple and Tasty Dish

Looking for a simple and tasty dish to impress your family? Lemon Garlic Roasted Asparagus is a quick winner! This

Older posts
Newer posts
← Previous Page1 … Page27 Page28 Page29 … Page53 Next →

dsad

© 2025 savoryspiral • Built with GeneratePress

Our Policies

  • Copyright Policy
  • Cookie Policy
  • GDPR Policy
  • Privacy Policy
  • Disclaimer
  • Terms Of Use

More Information

  • Home
  • About
  • Contact
  • Appetizers
  • Dessert
  • Dinner
  • Drinks
©2025, savoryspiral About Back To Top