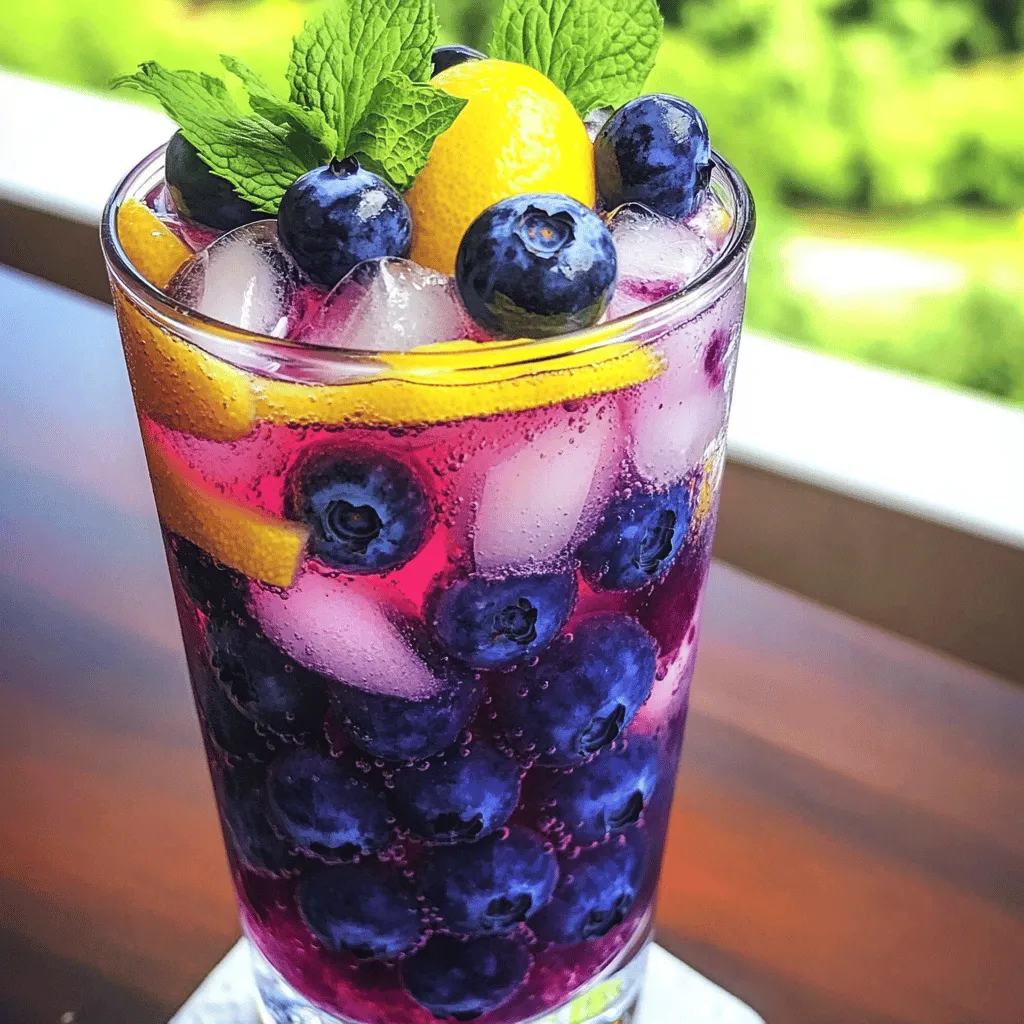
Meyer Lemon Blueberry Refresher Tasty Summer Drink
Summer is here, and what better way to cool down than with a refreshing Meyer Lemon Blueberry Refresher? This drink
Summer is here, and what better way to cool down than with a refreshing Meyer Lemon Blueberry Refresher? This drink
![- Green tea bags - Grapefruit (juice and zest) - Fresh mint leaves The main ingredients in grapefruit mint green tea are vital for its bright taste. Green tea bags give a rich flavor and a hint of caffeine. Grapefruit adds a zesty punch, making it refreshing. The juice brings sweetness, while the zest adds a burst of aroma. Fresh mint leaves give a cool note, enhancing the drink's overall taste. - Honey - Agave syrup Sweeteners help balance the tartness of grapefruit. Honey offers a floral note, while agave syrup is smooth and light. You can choose either based on your taste. Start with two tablespoons and adjust more if needed. This way, you create a tea that fits your palate perfectly. - Ice cubes - Garnishes (mint sprigs, grapefruit slices) Ice cubes make this drink extra refreshing, especially on hot days. You can add them for a chilled experience. Garnishes like mint sprigs and grapefruit slices make the drink look pretty. They also add an extra hint of flavor. Consider using these optional ingredients to elevate your grapefruit mint green tea. For the full recipe, check the above section. First, bring 2 cups of water to a gentle boil in a medium saucepan. This step is key to getting the best flavor from the tea. Once the water boils, add 2 green tea bags. Steep the bags for about 3-5 minutes. The longer you steep, the stronger the flavor will be. After steeping, remove the tea bags. Now, it’s time to add some fun flavors! Stir in the juice and zest of one large grapefruit. This adds a bright, tangy taste. Next, add 1 tablespoon of fresh mint leaves, roughly chopped. Finally, mix in 2 tablespoons of honey or agave syrup. Adjust the sweetness based on your taste. Let the tea mixture cool down to room temperature. Once it’s cool, refrigerate for about 30 minutes. This chilling step makes the tea refreshing. When you’re ready to serve, fill glasses with ice cubes if you like. Pour the chilled grapefruit mint green tea over the ice. For a special touch, garnish each glass with fresh mint sprigs and a slice of grapefruit. Enjoy sipping this delightful drink! To make your grapefruit mint green tea just right, adjust the sweetness to your taste. Some people like it sweeter, while others prefer a light touch. Start with two tablespoons of honey or agave syrup, then taste. Add more if needed. Experiment with steeping time too. A shorter steep gives a milder flavor, while a longer steep brings out more depth. Try steeping the green tea bags for three to five minutes. Find what works best for you! Selecting fresh mint is key to a bright taste. Look for bright green leaves without any brown spots. Fresh mint adds a lively aroma and flavor to the tea. For the green tea, choose high-quality bags. Sencha or Jasmine green tea works well. Both types bring unique flavors and notes to your drink. Try different kinds to see what you like best! Consider adding flavor boosters to your tea. A slice of ginger can add warmth and spice. A few berries can deepen the fruity taste. Feel free to mix and match! Pair your grapefruit mint green tea with light snacks. Fresh fruit or a simple salad complements the drink nicely. This combination makes for a refreshing experience! For the full recipe, check out the [Full Recipe]. {{image_2}} You can make this drink even more refreshing by trying the cold brew method. To do this, add your green tea bags to cold water and let them steep overnight in the fridge. This method gives a smooth, less bitter flavor. Feel free to mix in other fruits, too. Berries, oranges, or even pineapple can add a twist to your drink. Just chop them up and toss them into the tea before chilling. If you want a caffeine-free option, use herbal teas instead of green tea. Peppermint or chamomile work well. These choices give you nice flavors that pair well with grapefruit and mint. You can also play with herbal flavor combinations. Try hibiscus for a fruity zing or lemongrass for a citrus touch. The options are endless. For sweeteners, natural options are best. Honey adds a warm touch, while agave syrup is great for a lighter flavor. If you prefer sugar-free options, consider using stevia or monk fruit. Both will sweeten your drink without added calories. Check out the Full Recipe for more details on getting the perfect mix! When you have leftover grapefruit mint green tea, store it in an airtight container. A glass jar works well. Make sure it seals tightly. This helps keep the tea fresh and tasty. Place the jar in the fridge. This keeps the tea cool and prevents spoilage. Your tea lasts about 3 to 5 days in the fridge. After that, it may lose its flavor. Look for signs of spoilage before drinking. If the tea smells off or looks cloudy, it is best to toss it. Fresh tea tastes better, so enjoy it soon! You can use leftover grapefruit in many ways. Add it to salads or desserts for a fresh taste. To keep mint fresh longer, store it in water like flowers. Just place the stems in a glass with water. Cover the leaves lightly with a plastic bag. This keeps the mint crisp for days. Check out the Full Recipe to learn more about making this refreshing drink! Grapefruit mint green tea packs a punch of health benefits. First, it has strong antioxidants. Antioxidants help fight free radicals in your body. This can boost your immune system and keep you healthy. Second, it aids digestion. Grapefruit can help with stomach issues. Mint also calms the stomach, making this tea a great choice after meals. Yes! You can make this tea without sugar. Try using natural sweeteners like honey or agave syrup. Both options add sweetness without the guilt. Start with a small amount and adjust to your taste. This way, you control how sweet your drink is. Customizing your tea is easy. You can adjust the sweetness by adding more or less sweetener. If you love mint, add more fresh mint leaves. You can also experiment with the grapefruit juice. More juice gives a stronger citrus flavor, while less makes it milder. Play around with these ingredients to find your perfect taste. Grapefruit mint green tea is not caffeine-free. Green tea naturally contains caffeine. However, it has less caffeine than coffee or black tea. If you want to reduce caffeine intake, steep the tea for a shorter time. This keeps the flavor while lowering the caffeine content. Enjoy your refreshing drink without worry! This blog post explored how to make grapefruit mint green tea, covering main ingredients, sweeteners, and optional extras. You learned how to prepare the tea, combine flavors, and chill it for serving. We shared tips for enhancing taste and choosing the best ingredients. Plus, we discussed variations and storage methods to keep your tea fresh. Overall, you can enjoy a refreshing drink that’s both tasty and healthy. Experimenting with flavors makes this drink your own. Enjoy every sip!](https://savoryspiral.com/wp-content/uploads/2025/06/0203a0e4-090d-474e-b9c0-4a8acd1a1626.webp)
Are you ready to discover a refreshing drink that dances on your taste buds? Grapefruit Mint Green Tea is a
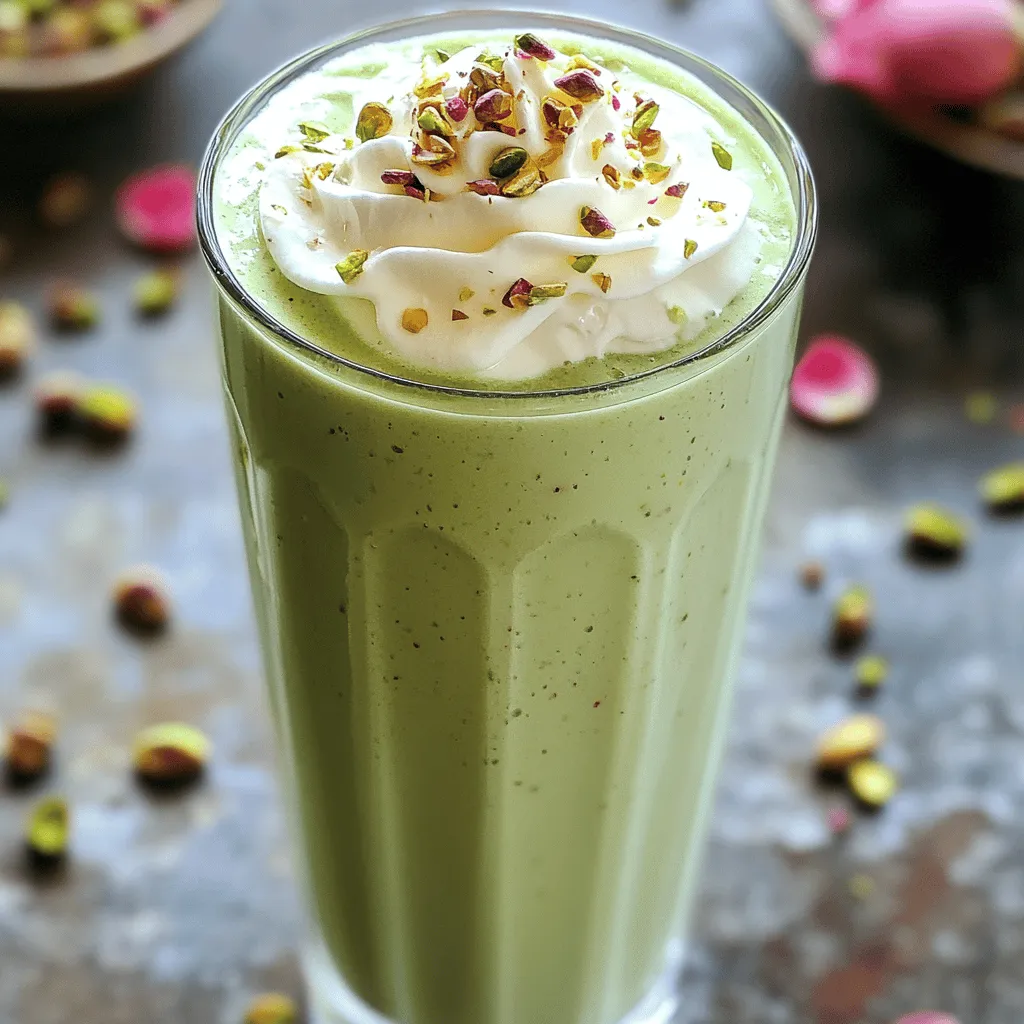
Get ready for a flavor adventure with my Pistachio Rose Milkshake! This delightful drink mixes creamy textures, nutty pistachios, and
![Blackberries are the star of this drink. Their deep color and sweet-tart flavor make it special. Use ripe, fresh blackberries for the best taste. You will need two cups for this recipe. Ginger adds a warm kick to the fizz. It also brings health benefits. Grate about one tablespoon of fresh ginger. This amount gives just the right zing without overpowering the drink. Kombucha is the base for our drink. It adds fizz and a slight tang. Use four cups of unflavored kombucha. This keeps the drink balanced and allows the other flavors to shine. If you like your drink sweeter, consider adding honey or agave syrup. One tablespoon is usually enough, but you can adjust it to your taste. Mix it in after blending for even sweetness. Lemon juice brightens the drink. It enhances the blackberries and ginger. Use the juice of one lemon for a fresh and zesty flavor. This will keep your drink refreshing. Sparkling water is key to making this drink fizzy. It adds bubbles and lightness. Top your glass with sparkling water after pouring the kombucha mixture. This makes every sip fun! Fresh mint leaves are perfect for garnish. They add a pop of color and a fresh aroma. Place a few leaves on top of the drink. You can also add a couple of whole blackberries for extra flair. For the complete recipe, check the Full Recipe section. Enjoy making your refreshing Blackberry Ginger Kombucha Fizz! First, gather your fresh blackberries and ginger. Place both in a blender. Blend until smooth. Next, strain the mix through a fine mesh sieve. This step removes the seeds. You want a smooth juice, not chunky. Now, take a large pitcher. Pour in your blackberry-ginger juice. Add the unflavored kombucha and the juice of one lemon. Stir gently to mix everything well. This step brings all the bright flavors together. Taste your mixture. If you want it sweeter, add honey or agave syrup. Stir until it dissolves completely. It’s all about your taste. You can make it as sweet as you like. Fill glasses with ice cubes. Pour the kombucha mixture over the ice, filling each glass about three-quarters full. Top each glass with a splash of sparkling water. This adds a fizzy finish. Finally, garnish with fresh mint leaves and a few blackberries. Enjoy this refreshing summer drink! For the full recipe, see above. To make your Blackberry Ginger Kombucha Fizz smooth, use a low to medium speed. Start blending at low to break down the blackberries. Gradually increase to medium speed for a few seconds. This method keeps the berries intact while mixing well with ginger. After blending, it is key to strain the mixture for a smooth drink. Use a fine mesh sieve. Place it over a bowl, then pour the mixture through it. Use the back of a spoon to press the juice out. This way, you discard the seeds and keep only the tasty juice. Taste the mixture after combining all ingredients. If it’s not sweet enough, add honey or agave syrup. Stir well until it’s fully dissolved. You can also use stevia or coconut sugar as sweet alternatives. This way, you can control the sugar level in your drink. Garnishing adds beauty to your drink. Use fresh mint leaves for a pop of color. Place a couple of blackberries on top for a fun touch. You can also add a lemon slice on the rim of your glass. This makes your Blackberry Ginger Kombucha Fizz look fancy and inviting. {{image_2}} You can change the fruits in this drink for fun. Raspberries add a tart kick. Strawberries bring a sweet twist. Just blend them like you do with blackberries. Keep the same steps for mixing the drink. Try different fruits for new tastes. Each fruit adds a unique flavor and color. Herbs can make your drink special. Adding fresh mint gives a cool taste. Basil can add a warm, earthy flavor. Just muddle the herbs before blending. This helps release their oils. You can mix and match herbs to find your favorite taste. Kombucha comes in many flavors. You can use ginger, lemon, or berry kombucha. Each flavor changes the drink’s taste. Look for your favorite brand or make your own. Experiment with different types to find your best blend. You can always mix flavors for a fun twist! For the full recipe, check this [Full Recipe]. After making the Blackberry Ginger Kombucha Fizz, you may have some left. Store it in the fridge in a sealed container. This keeps it fresh and fizzy. Try to drink it within three days for the best taste. The flavors stay vibrant for about that long. To keep your ingredients fresh, follow these tips: - Blackberries: Store them in the fridge. Keep them in a container that allows air flow. Don't wash them until you're ready to use them. - Ginger: Wrap fresh ginger in a paper towel and place it in a bag. This helps it stay dry and fresh. - Kombucha: Keep your kombucha in a cool, dark place. Make sure it stays sealed until you use it. Kombucha can last a while if stored right. An opened bottle lasts about a week in the fridge. If you make a batch at home, try to drink it within two weeks for the best flavor. Over time, the taste will change, and it may become more sour. Always check for any signs of spoilage before drinking. For the complete recipe, check out the Full Recipe section. Kombucha is packed with probiotics. These are good for your gut health. It can also help with digestion and boost your immune system. Some studies show that kombucha may lower cholesterol and support heart health. Plus, it contains antioxidants that fight free radicals in your body. Enjoying kombucha can be a tasty way to support your overall health. Yes, you can find pre-made versions in many stores. Look in the beverage aisle or health food section. Some brands offer blackberry and ginger flavors. Just check the label for quality ingredients. However, nothing beats the taste of the homemade version. You can customize the flavors and sweetness to your liking. To make more servings, simply multiply the ingredients. If you want to serve eight, double the recipe. Use 4 cups of blackberries and 8 cups of kombucha. This keeps the flavors balanced. Make sure you have a large enough pitcher to mix everything. It’s easy to scale up for parties or gatherings. Absolutely! The Blackberry Ginger Kombucha Fizz is already alcohol-free. Kombucha itself is a fermented tea, but most store-bought varieties have little to no alcohol. If you want to ensure it’s alcohol-free, check the label. You can serve this drink to everyone, young and old. Enjoy this refreshing drink on a hot summer day! This blog post covered how to make a refreshing Blackberry-Ginger drink. We started with fresh blackberries, ginger, and kombucha. Then, we added lemon juice, sparkling water, and sweeteners. Next, I shared tips for blending and straining. I also explored fun variations with different fruits and herbs. Plus, we looked at storage methods and answered common questions. You can create this tasty drink quickly. Enjoy it any time, and feel free to experiment!](https://savoryspiral.com/wp-content/uploads/2025/06/240dcabd-31af-461f-9632-bb39c5134526.webp)
Looking for a cool drink to beat the summer heat? Dive into my Blackberry Ginger Kombucha Fizz! This refreshing beverage
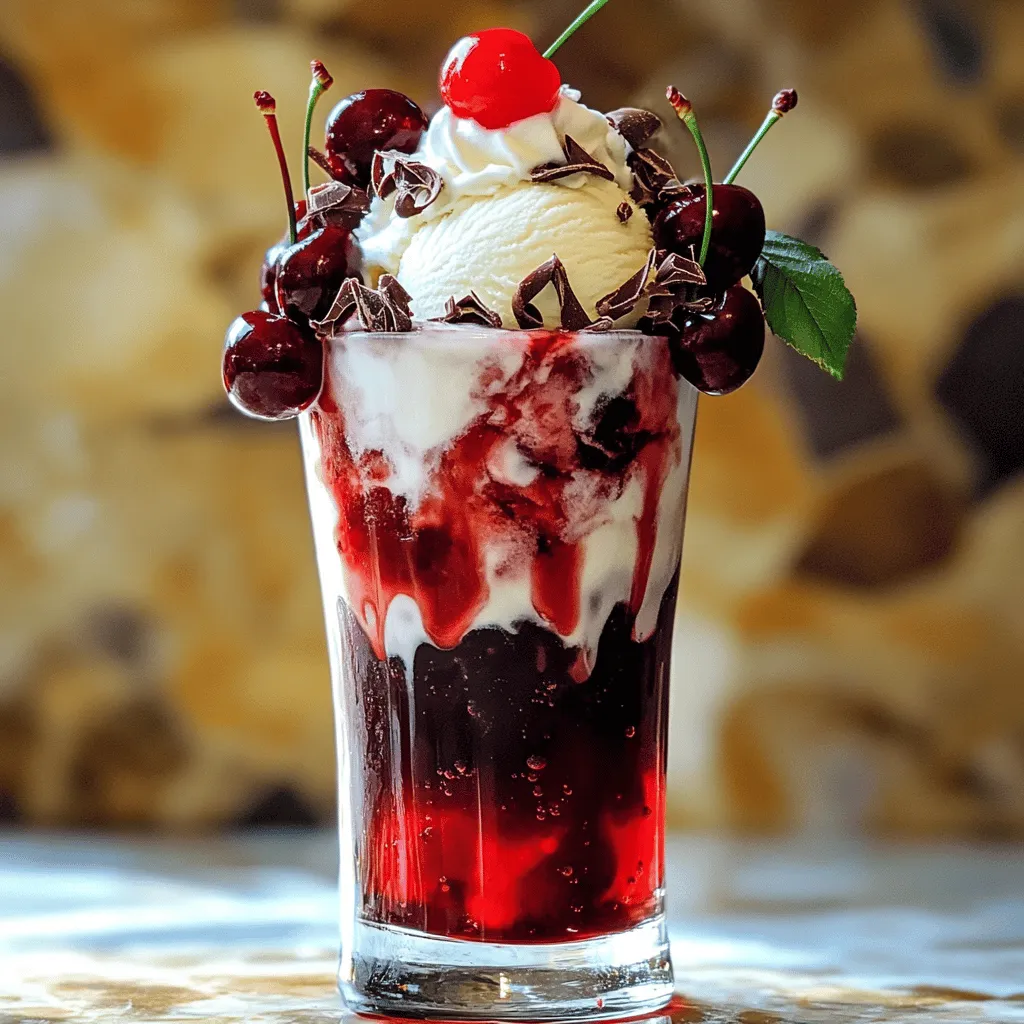
Looking for a fun way to beat the summer heat? Try making a Cherry Vanilla Cola Float! It’s a delightful
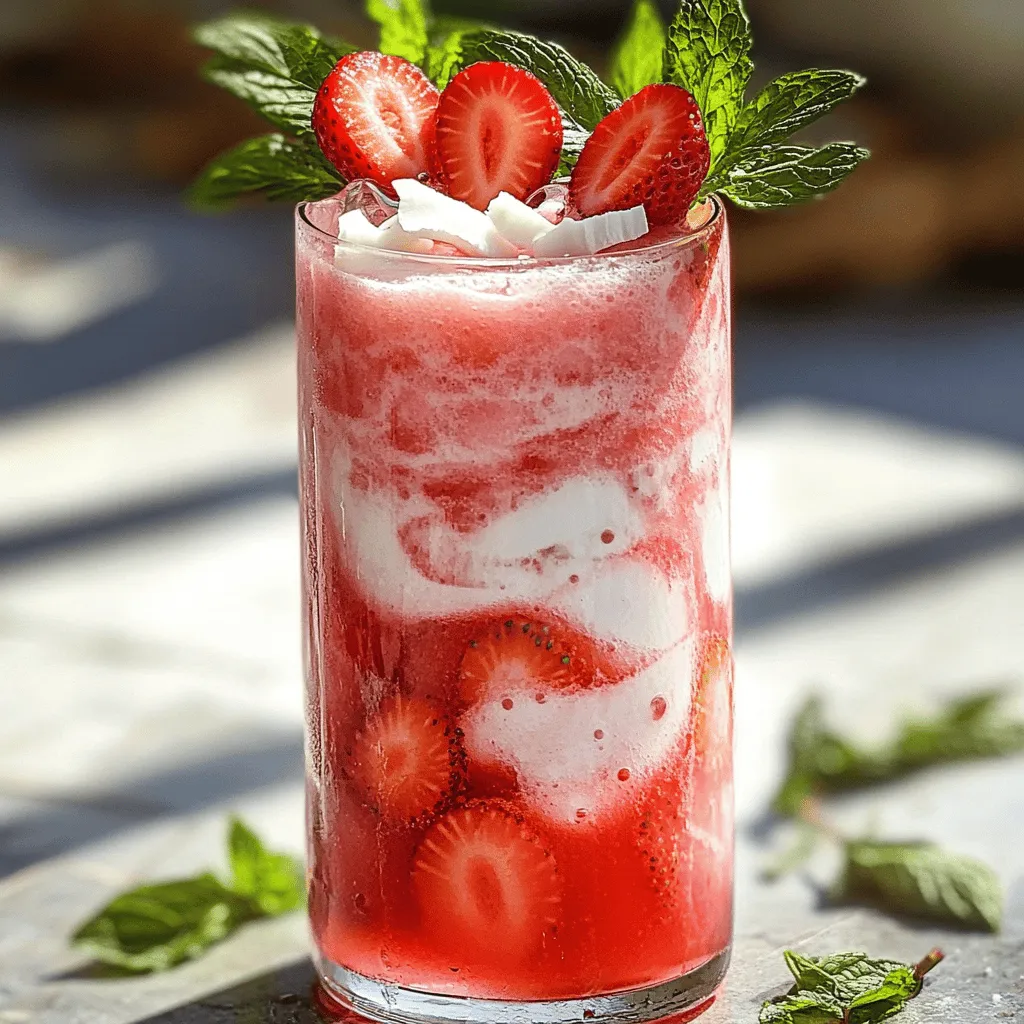
Looking for a drink that screams summer? I’ve got just the thing! This Strawberry Coconut Cream Soda is a sweet

Are you craving a quick and tasty meal? Look no further! These Easy Chicken Quesadillas are simple to make and
![- 2 cups cooked white or brown rice - 2 cups fresh broccoli florets - 2 cups shredded cheddar cheese - 1 cup cream of mushroom soup (or homemade version) - 1/2 cup milk - 1 small onion, finely chopped - 2 cloves garlic, minced - 1 teaspoon dried thyme - 1/2 teaspoon paprika - Salt and pepper to taste - 1/2 cup breadcrumbs (for topping) - 2 tablespoons olive oil The main ingredients bring the casserole to life. You need cooked rice for a hearty base. Broccoli adds a pop of color and nutrition. Cheddar cheese gives that rich, gooey texture we love. Cream of mushroom soup adds creaminess and flavor. Use milk to keep it moist and smooth. Onions and garlic give a savory kick. Thyme and paprika add warmth, while salt and pepper balance the dish. Finally, breadcrumbs create a crunchy topping. - Variations for different cheeses - Using vegetables other than broccoli - Substitutes for cream of mushroom soup You can switch up the cheese for a different taste. Try mozzarella or gouda for new flavors! Feel free to use other vegetables like carrots or peas for variety. If you don’t have cream of mushroom soup, use cream of chicken or a homemade version. - 9x13-inch baking dish - Large mixing bowl - Skillet - Measuring cups and spoons Having the right tools makes cooking easier. A 9x13-inch baking dish helps hold all the yummy layers. A large mixing bowl is key for combining ingredients. A skillet allows you to sauté vegetables perfectly. Measuring cups and spoons ensure accuracy in your recipe. For the full recipe, check out the Cheesy Broccoli Rice Casserole section. Enjoy cooking this delightful family meal! First, you need to cook the rice. You can use white or brown rice. Follow the package instructions for cooking. It usually takes about 15-20 minutes. While the rice cooks, chop your vegetables. You will need fresh broccoli florets and a small onion. Make sure to cut the broccoli into small, even pieces. This helps them cook well. Next, heat 2 tablespoons of olive oil in a large skillet over medium heat. Once hot, add the chopped onion and minced garlic. Cook these for about 3-5 minutes. They should soften and smell nice. After that, add the broccoli florets to the skillet. Sauté them for another 3-4 minutes until they turn bright green. This keeps their crunch. Now, mix all your ingredients in a large bowl. Add the cooked rice, sautéed veggies, cream of mushroom soup, and milk. Don’t forget the thyme, paprika, salt, and pepper. Stir until everything blends well. Then, fold in 1 ½ cups of the shredded cheddar cheese. Reserve the rest for later. Transfer the mixture to a greased 9x13-inch baking dish. Spread it evenly. Now, sprinkle the remaining cheddar cheese and breadcrumbs on top. This creates a delicious crust. Bake in a preheated oven at 350°F for 25-30 minutes. The dish should be golden and bubbly. Once done, let it cool for a few minutes before serving. You can find the full recipe [here]. To keep your broccoli bright and tasty, cook it lightly. Start by adding it to the pan for just a few minutes. This way, it stays green and crisp. If you overcook it, it can turn dull and mushy. For perfect rice texture, make sure it’s fully cooked before mixing. If you use leftover rice, it should be fluffy, not sticky. This will help your casserole blend well without clumps. When serving, scoop out portions onto plates. This helps show off the layers. A sprinkle of fresh parsley makes it look even better. You can also place a slice of the casserole on a colorful plate to add a pop of color. For a charming display, consider using a clear dish. This way, guests can see the layers of cheese and broccoli. It makes the dish feel special. For added depth, try spices like garlic powder or onion powder. These can boost the flavor without being too strong. A pinch of cayenne can also bring a little heat if you like spice. Cheese variations can change the whole dish. You can mix in mozzarella for a milder taste. Or try pepper jack for a kick. This way, you can customize it to fit your family’s taste. For the full recipe, check out the section above. {{image_2}} You can make this dish even better. Try using brown rice instead of white. Brown rice gives you more fiber. This small change boosts health benefits without losing taste. You can also swap in low-fat cheese. This keeps the creamy goodness while cutting calories. Get creative with your veggies! Cauliflower or spinach can work well here. They add new flavors and nutrients. If you want a protein boost, add cooked chicken or bacon. These options make the casserole heartier and more filling. Change things up with the seasons. In fall, add butternut squash for a sweet touch. For summer, fresh herbs like basil or parsley can brighten the dish. These simple tweaks keep your meals exciting and fresh. Check out the Full Recipe to explore all the options! To keep your Cheesy Broccoli Rice Casserole fresh, store leftovers in an airtight container. This helps prevent drying out or picking up other fridge smells. Before placing it in the fridge, let it cool for about 30 minutes. When reheating, preheat your oven to 350°F (175°C). Cover the dish with foil to keep moisture in. Heat for about 20 minutes or until warm. You can also use a microwave, but be sure to cover it to avoid splatters. If you want to save some for later, freezing is a great option. First, let the casserole cool completely. Then, place portions in freezer-safe bags or containers. Squeeze out as much air as possible before sealing. To thaw, move the casserole to the fridge for 24 hours before baking. Preheat your oven to 350°F (175°C) and bake for 25 to 30 minutes. Check that it's heated all the way through before serving. In the fridge, your casserole lasts about 3 to 5 days. If you freeze it, it can last up to 3 months. Just remember that the longer it sits, the more it may lose its texture and flavor. To make Cheesy Broccoli Rice Casserole vegan, you can swap out the dairy and meat. Use plant-based cheese instead of cheddar. You can also use almond or oat milk in place of regular milk. For the cream of mushroom soup, find a vegan version or make your own with blended mushrooms and cashews. This way, you keep the creamy texture without any dairy. Yes, you can use frozen broccoli for this dish. However, it may affect the texture and flavor. Frozen broccoli often cooks down more, making it softer. If you choose frozen, try to thaw and drain it well before adding it to the mix. This helps keep the casserole from becoming too watery. Cheesy Broccoli Rice Casserole pairs well with many sides. You can serve it with a simple green salad to add freshness. Roasted chicken or grilled fish also make great choices for protein. If you want something lighter, consider serving it with steamed vegetables or a fruit salad. To reheat leftovers, use the oven for the best results. Preheat your oven to 350°F (175°C). Place the casserole in an oven-safe dish, and cover it with foil to keep it moist. Heat for about 20 minutes or until hot. You can also use the microwave, but be sure to cover the dish to prevent it from drying out. This blog post covered how to make Cheesy Broccoli Rice Casserole. We discussed the main ingredients, cooking tips, and variations. You learned how to prep and cook easily while enhancing flavor and presentation. Remember, this dish is versatile; you can swap ingredients based on your taste. Don't be afraid to try new things or make healthier choices. Enjoy crafting your own delicious casserole that can please anyone. Happy cooking!](https://savoryspiral.com/wp-content/uploads/2025/06/4911f1bd-b267-4ae6-9b3e-febb826fcd28.webp)
Looking for a hearty meal that will please the whole family? This Cheesy Broccoli Rice Casserole hits the spot! It’s
![- Ground turkey or chicken - 3 cups coleslaw mix (cabbage and carrots) - 2 cloves garlic, minced - 1 tablespoon fresh ginger, grated I start with ground turkey or chicken for this dish. It gives a nice flavor and texture. Coleslaw mix adds crunch and freshness. Garlic and ginger bring warmth and depth. These main ingredients make the base of your egg roll in a bowl. - 1 tablespoon sesame oil - 3 tablespoons low-sodium soy sauce - 1 tablespoon rice vinegar - 1 teaspoon Sriracha (or to taste) Next, I use sesame oil for cooking. It adds a wonderful nutty taste. Low-sodium soy sauce gives the dish a savory kick without too much salt. Rice vinegar adds a tangy note, balancing the flavors. Sriracha adds heat, so adjust it to your liking. - 4 green onions, sliced - Sesame seeds for garnish - Salt and pepper to taste For garnish, I love adding sliced green onions. They bring color and a fresh bite. Sesame seeds make the dish look nice and add a bit of crunch. Finally, season with salt and pepper to taste. These extras elevate your egg roll in a bowl. For the full recipe, check out [Full Recipe]. - Preparing the Ingredients: Start by measuring out all your ingredients. This makes cooking easier. Chop the green onions, mince the garlic, and grate the ginger. Set these aside so they’re ready to use. - Heating the Skillet: Place a large skillet or wok on the stove. Pour in one tablespoon of sesame oil. Heat the oil over medium-high heat. You want it hot enough to sizzle when you add the meat. - Browning the Meat: Add one pound of ground turkey or chicken to the skillet. Use a spatula to break up the meat. Cook it for about 5-7 minutes until it turns brown and fully cooks. - Adding Aromatics and Vegetables: Stir in the minced garlic and grated ginger. Cook for another 30 seconds until you smell the aroma. Next, add three cups of coleslaw mix. Toss it with the meat until the cabbage and carrots start to wilt, which takes about 3-4 minutes. - Mixing Sauces and Final Cooking: In a small bowl, whisk together three tablespoons of low-sodium soy sauce, one tablespoon of rice vinegar, and one teaspoon of Sriracha. Pour this mixture over the skillet. Stir well to combine everything. Season with salt and pepper to taste. Let it cook for one more minute to meld the flavors. - Presentation Tips: Serve the dish hot in bowls. For a nice touch, sprinkle sesame seeds on top. The seeds add a lovely crunch and a pop of flavor. - Ideal Pairings: You can pair this dish with steamed rice or cauliflower rice. It also goes well with a side of pickled vegetables for a fresh crunch. For more details, check out the Full Recipe. - Ensuring Even Cooking To cook your meat well, break it apart as it heats. Use a spatula to make sure it cooks evenly. Stir it often to avoid browning in one spot. This keeps everything juicy and tasty. - Preventing Sogginess Avoid a soggy dish by not adding too much sauce at once. Pour in the sauce slowly while stirring. This helps coat the veggies and meat without making them too wet. Cook the coleslaw just enough to wilt it, about 3-4 minutes. - Adding More Vegetables You can add more veggies to boost the flavor and nutrition. Try bell peppers, snap peas, or mushrooms. Chop them small so they mix well with the coleslaw. This adds color and crunch to your meal. - Adjusting Spice Levels If you like more heat, add extra Sriracha or red pepper flakes. Taste your mix as you go. Adjust slowly to find the perfect spice level for you. This way, you can make it just right. - Meal Prep Ideas Egg Roll in a Bowl is great for meal prep. Cook a big batch and divide it into portions. Store them in airtight containers. This makes it easy to grab a healthy meal during the week. - Best Ways to Enjoy Leftovers Enjoy leftovers by reheating them in a skillet. This keeps the texture nice. You can also eat it cold as a salad. Top it with fresh green onions for a crunchy bite. For the full recipe, check out the Egg Roll in a Bowl. {{image_2}} Using Ground Beef or Pork You can swap ground turkey or chicken for ground beef or pork. Both options add rich flavor. Ground beef gives a hearty taste, while pork brings a slightly sweet touch. Cook them the same way as the turkey. Just make sure they are fully browned. Vegetarian and Vegan Options For vegetarian or vegan versions, use tofu or tempeh. Crumble or cube them into the skillet. They soak up flavors well. You can also use chickpeas for added protein. Cook them until heated through, just like the meat. Asian-inspired flavors To enhance the Asian flavors, try adding hoisin sauce or chili paste. These add a sweet and spicy kick. You can also include five-spice powder for a warm, aromatic taste. Just a pinch can transform your dish! Adding nuts or seeds For crunch, toss in chopped nuts like peanuts or cashews. You can also add sesame seeds for extra texture. These ingredients give a nice contrast to the soft veggies and meat. Incorporating seasonal vegetables Use fresh vegetables from your local market. Try bell peppers in summer or Brussels sprouts in winter. Seasonal veggies add color and nutrition. They can also change the flavor profile of your dish. Adjusting for holidays or special occasions For holiday meals, add festive ingredients. Try incorporating cranberries for a sweet twist or roasted sweet potatoes for a hearty touch. These changes make the dish feel special and unique. The recipe's flexibility ensures that you can enjoy it year-round. Each variation keeps the essence of the dish while adding your personal touch. For the full recipe, check out the section above. How do you store leftovers? Allow your Egg Roll in a Bowl to cool first. Then, place it in a container. A glass or plastic container with a tight lid works best. You want to keep the flavors fresh and tasty. What are the freezing instructions? You can freeze your Egg Roll in a Bowl. First, let it cool completely. Then, portion it into freezer-safe bags. Remove as much air as possible before sealing. This helps prevent freezer burn. What about reheating? Thaw the meal in the fridge overnight. Then, reheat in a skillet over medium heat. Stir until it’s hot all the way through. You can also use the microwave. Heat in a bowl for about 2-3 minutes, stirring halfway. How long does it last in the fridge? When stored properly, it lasts 3-4 days. Make sure to check the date you made it. What are the signs of spoilage? If it smells off or has a strange color, don’t eat it. Always trust your senses. If in doubt, throw it out. Egg Roll in a Bowl is a deconstructed version of a traditional egg roll. It has all the flavors but skips the wrapper. This dish is quick, easy, and packed with taste. It originated from the desire to enjoy egg roll flavors without the deep frying. You get the same great taste, but with fewer calories and less mess. Common Ingredients: - Ground turkey or chicken - Coleslaw mix (cabbage and carrots) - Garlic and ginger - Sesame oil - Low-sodium soy sauce - Rice vinegar - Sriracha These ingredients blend well and create a colorful, tasty meal in one bowl. You can easily customize this recipe to fit your needs. If you have dietary restrictions, swap in a different protein. Ground beef or tofu works great. You can also use gluten-free soy sauce if you need to avoid gluten. Personal Taste Adjustments: - Add more veggies like bell peppers or snap peas. - Adjust spice levels by adding more or less Sriracha. - Experiment with different sauces for a unique taste. You can make this dish your own by mixing in your favorite flavors. Yes, you can make Egg Roll in a Bowl ahead of time. This makes it perfect for meal prep. Cook the dish and let it cool before storing it. Use airtight containers for best results. Reheating Tips: - Heat it in a skillet over medium heat for even warming. - You can also use the microwave, but stir halfway through. Making this dish ahead of time saves you time on busy days. You can enjoy a delicious meal with ease! Egg Roll in a Bowl combines tasty ingredients for a quick, hearty meal. We discussed main ingredients, seasonings, and optional garnishes to elevate your dish. I shared simple steps for cooking and tips to enhance flavors. You learned about variations, storage options, and even some common questions. In the end, this dish offers endless possibilities. Feel free to adapt it to your taste and enjoy!](https://savoryspiral.com/wp-content/uploads/2025/06/576b9a06-2773-43ce-88ca-5cf74c7a2931.webp)
Looking for a quick and tasty dinner? This simple Egg Roll in a Bowl recipe is your answer! You’ll love
![- 2 ripe avocados, pitted and peeled - 1/2 cup unsweetened cocoa powder - 1/4 cup maple syrup (adjust to taste) - 1/4 cup almond milk (or any plant-based milk) - 1 teaspoon vanilla extract - Pinch of sea salt - Fresh berries (for garnish) - Chopped nuts (optional, for garnish) Gathering the right ingredients is key. Avocados give this mousse its rich texture. Cocoa powder brings a deep chocolate flavor. Maple syrup acts as a natural sweetener, making the mousse taste great. The almond milk adds creaminess and helps blend everything smoothly. Don’t forget the vanilla extract; it enhances the taste. A pinch of sea salt balances all the flavors perfectly. Adding fresh berries on top not only looks nice but adds a fruity twist. If you want a little crunch, sprinkle chopped nuts on top. This simple mix creates a delicious dessert that feels indulgent and healthy. - Calories per serving: About 200 - Healthy fats from avocados: These fats are good for your heart. - Benefits of cocoa powder: Cocoa is rich in antioxidants and may boost mood. This mousse is not just tasty but also nutritious. You get healthy fats from avocados that keep you full. Plus, cocoa powder offers health benefits that make this dessert even better. Each bite is a treat that feels good for your body. For the full recipe, check out the details above. - Step 1: Blend avocados until creamy. Start with two ripe avocados. Cut, pit, and peel them. Place them in a food processor. Blend until there are no lumps. You want a smooth, creamy base. - Step 2: Add remaining ingredients. Next, add cocoa powder, maple syrup, almond milk, vanilla extract, and a pinch of sea salt. Scrape down the sides of the processor to mix well. - Step 3: Blend until smooth. Blend again until the mixture is velvety. Taste it, and if needed, add more maple syrup for sweetness. Chilling the mousse is key. It helps the flavors blend and the texture firm up. I recommend chilling it for at least 30 minutes. This waiting time makes a big difference in taste. You can serve the mousse in small cups or bowls. Top it with fresh berries for color. Chopped nuts add a nice crunch too. This dessert looks great and tastes even better! To make a velvety mousse, start with ripe avocados. They should feel soft when you press them gently. Blend the avocados first until they are creamy. Then, add the cocoa powder and other ingredients. Blend again until smooth. If the mousse feels thick, add a splash of almond milk. This helps achieve the right texture. Adjust the sweetness by tasting as you mix. If it needs more sweetness, add more maple syrup a little at a time. Blend again until you reach the desired flavor. One common mistake is over-blending. If you blend too long, the mousse can become too airy. Blend just enough to get a smooth and creamy mix. Choose ripe avocados for the best flavor. If they are too firm, the mousse won't be as creamy. Look for avocados that are dark green and slightly soft. This will help you create that rich texture you want. You can add spices to boost flavor. A pinch of cinnamon or a dash of sea salt can make it pop. If you want more sweetness, try using agave syrup instead of maple syrup. Using flavored plant-based milks can also add a twist. Almond milk gives a nutty taste, while coconut milk adds creaminess. Experiment with what you like best! For the full recipe, check out the [Full Recipe]. {{image_2}} You can easily change the taste of your mousse. Adding espresso gives it a nice mocha flavor. This twist adds a rich depth that complements the chocolate well. Simply mix in a tablespoon of espresso powder when blending. Another fun option is to use nut butter. Almond or cashew butter makes the mousse richer and creamier. It also adds a touch of nutty flavor that pairs well with chocolate. Try adding a couple of tablespoons to your mix for an extra layer of taste. If you need gluten-free options, you're in luck! This mousse is naturally gluten-free because it has no flour or wheat products. You can enjoy it without worry. For a sugar-free version, use a sugar substitute like stevia or erythritol. Just remember to adjust the amount based on your taste. This way, you can still savor the rich flavors without added sugar. Garnishing adds flair to your dish. You can top your mousse with coconut flakes or colorful sprinkles for a fun look. Fresh berries also make a great garnish and add a burst of flavor. Think about the dishes you use for serving. Small cups or ramekins look elegant and are easy to eat from. You could also layer the mousse in a clear glass to show off its rich texture. This makes for a beautiful dessert that impresses guests. For the Full Recipe, check back to create this delightful treat. To keep your vegan chocolate avocado mousse fresh, use airtight containers. Glass jars work well. They keep the mousse safe from air and moisture. Store it in the fridge. The mousse lasts about 3 days. Check for changes in color or smell before eating. This mousse is best served cold. If it loses some texture, stir it gently. You can add a little almond milk to refresh it. Keep mixing until you reach your preferred consistency. Avoid using heat. Heat can ruin the mousse’s smooth texture. Yes, you can freeze the mousse! Use a freezer-safe container. Leave some space at the top because it will expand. The mousse stays good for about 1 month in the freezer. When ready to eat, move it to the fridge to thaw overnight. Stir well before serving. For the best taste, enjoy it fresh! For the full recipe, check the above section. Yes, you can use regular milk. However, this mousse is vegan, so I prefer nut milk. Almond milk, soy milk, or oat milk work well. They keep the mousse creamy and rich. Plant-based milks also add a touch of flavor. Using dairy can change the texture and taste. So, stick with nut milk for the best results. Absolutely! This mousse is great for kids. It has healthy fats from avocados, which are good for growing bodies. The cocoa powder gives it a rich chocolate flavor that kids love. The sweetness from maple syrup makes it taste like a dessert treat. Plus, it has no refined sugars, so it’s a smart choice for little ones. You can keep the mousse in the fridge for about three days. Make sure to store it in an airtight container. This helps it stay fresh and tasty. If you notice any browning, it’s just the avocado. A quick stir will bring back its lovely texture. For the best flavor, eat it within the first two days. This mousse pairs well with many snacks. Serve it with fresh berries for a fruity touch. Chopped nuts add a nice crunch on top, too. You can also use it as a filling in vegan pastries. Try it with graham crackers or fruit slices for dipping. It’s a versatile treat that complements many flavors. For the full recipe, check out the details above. In this post, we covered how to make a rich Vegan Chocolate Avocado Mousse. You learned about the key ingredients, method, and nutritional benefits. We shared tips for texture and flavor, along with ways to store and serve your mousse. Remember, this dessert is not just tasty but also healthy. Experiment with flavors and have fun making it your own! Enjoy this scrumptious treat knowing it’s both good for you and easy to make.](https://savoryspiral.com/wp-content/uploads/2025/06/4ce20fbf-d60a-496c-8079-a5a1664ed084.webp)
Get ready for a treat that’s both rich and creamy! This Vegan Chocolate Avocado Mousse is your new go-to dessert.
