 and start cooking today! To keep your cooked salmon fresh, store it in an airtight container. Make sure it cools down to room temperature first. You can keep it in the fridge for up to three days. If you want to reheat the salmon, do so in the air fryer. Set it to 350°F (175°C) and heat for about 5 minutes. This keeps the salmon moist and adds a nice crispness. If you want to freeze salmon, do it before marinating. Wrap each fillet tightly in plastic wrap, then place them in a freezer bag. This helps prevent freezer burn. You can freeze them for up to three months. When you are ready to cook, thaw the fillets in the fridge overnight. This method keeps the salmon's texture and flavor intact. How long to air fry salmon? You should air fry salmon for 8 to 10 minutes. The exact time depends on the thickness of your fillets. Check for doneness by using a fork to see if it flakes easily. What is the best temperature for air frying salmon? The best temperature for air frying salmon is 400°F (200°C). This high heat helps to cook the fish quickly and gives it a nice, crispy exterior. Can I use frozen salmon? Yes, you can use frozen salmon. Just remember to add a few extra minutes to the cooking time. Ensure the salmon is fully thawed for even cooking. Is it necessary to marinate the salmon? Marinating the salmon is not strictly necessary, but it greatly enhances the flavor. The honey garlic marinade adds a sweet and savory taste that makes the dish shine. How do I know when salmon is done? Salmon is done when it flakes easily with a fork and reaches an internal temperature of 145°F (63°C). Use a meat thermometer for the best accuracy. Tips for preventing salmon from drying out? To prevent salmon from drying out, avoid overcooking. Use a marinade, as it adds moisture. Cooking at the right temperature also helps keep it juicy. This guide covered all you need to know about cooking salmon in an air fryer. We explored key ingredients, marinating tips, and cooking steps. You learned about health benefits and how to store leftovers. With variations and FAQs, you're ready to experiment. Embrace these methods, and enjoy delicious salmon meals. Trust your skills in the kitchen; success is just an air fryer away!](https://savoryspiral.com/wp-content/uploads/2025/07/8c4230aa-38d0-4a4b-995f-349c70d307c4.webp)
Air Fryer Honey Garlic Salmon Tasty and Quick Recipe
Are you ready to whip up a quick and tasty dinner? This Air Fryer Honey Garlic Salmon recipe is your
Are you ready to whip up a quick and tasty dinner? This Air Fryer Honey Garlic Salmon recipe is your
![To make a tasty Vegan Pumpkin Alfredo Pasta, gather the following ingredients: - 12 oz fettuccine pasta (or pasta of choice) - 1 cup pumpkin puree (canned or homemade) - 1 cup coconut milk (full-fat for creaminess) - 2 tablespoons nutritional yeast - 2 tablespoons olive oil - 3 cloves garlic, minced - 1 teaspoon onion powder - 1/2 teaspoon smoked paprika - Salt and black pepper to taste - 1 cup fresh spinach (optional) - Fresh basil or parsley, for garnish These ingredients blend into a rich and creamy sauce. The pumpkin adds a warm, earthy flavor that pairs well with the pasta. You can take this dish up a notch with a few add-ins: - Sautéed mushrooms for a hearty touch - Sun-dried tomatoes for a sweet and tangy bite - Red pepper flakes for a hint of heat - Fresh lemon juice for a zesty finish These add-ins can enhance the taste and texture of your dish. Feel free to mix and match based on your cravings. Not all ingredients may be on hand. Here are some easy swaps: - Use any pasta shape you like, such as penne or spaghetti. - Swap coconut milk for almond milk, but it will be less creamy. - If you don't have nutritional yeast, try vegan cheese instead. - For a nut-free option, use sunflower seed puree in place of pumpkin. With these substitutions, you can still enjoy a creamy and flavorful dish. No matter what you choose, remember to have fun while cooking! Check out the Full Recipe for detailed instructions. 1. Cook the Pasta: Start with a large pot of salted water. Bring it to a boil. Add 12 oz of fettuccine and cook it until al dente. This takes about 8-10 minutes. When it’s done, drain the pasta. Save about 1 cup of the pasta water for later. 2. Prepare the Sauce: In a big skillet, heat 2 tablespoons of olive oil over medium heat. Add 3 minced garlic cloves and sauté for about 1 minute. You want the garlic to smell good but not brown. 3. Mix in the Pumpkin: Stir in 1 cup of pumpkin puree and 1 cup of coconut milk. Add 2 tablespoons of nutritional yeast, 1 teaspoon of onion powder, and 1/2 teaspoon of smoked paprika. Season with salt and black pepper. Cook this mixture for 3-5 minutes. Stir often until it's warm and well mixed. 4. Blend for Creaminess: If you want a smooth sauce, use an immersion blender right in the skillet. You can also transfer the sauce to a blender. Blend until it’s creamy. 5. Combine Pasta and Sauce: Add the cooked fettuccine to your sauce. Pour in a splash of the reserved pasta water. Toss everything together gently. Make sure the pasta is well coated. 6. Add Fresh Spinach: If you like, stir in 1 cup of fresh spinach. Let it wilt in the warm pasta for a minute. 7. Taste and Adjust: Now, taste the dish. Add more salt and pepper if needed. 8. Serve: Plate your pasta. Garnish with fresh basil or parsley for extra flavor and color. To cook pasta al dente, follow these steps: - Use a large pot with plenty of water. This helps the pasta cook evenly. - Add salt to the water. It adds flavor to the pasta. - Check the pasta a minute or two before the package says it’s done. It should be firm but not hard. - Drain it right away and do not rinse. This keeps the starch that helps the sauce stick. Blending the sauce right is key for a smooth texture. Here are some tips: - If using an immersion blender, blend for about 30 seconds. This gives a creamy result. - If using a stand blender, let the sauce cool for a minute before blending. This avoids hot splashes. - Blend until the sauce is uniform. You want it smooth without any chunks. - If it’s too thick, add a little reserved pasta water until you reach your desired consistency. For the full recipe, check out the details above and enjoy a delicious meal! To get a creamy Alfredo sauce, start with full-fat coconut milk. It gives your sauce that rich taste. Blend the sauce well for a smooth texture. If it’s too thick, add some reserved pasta water. This helps mix everything nicely. To boost flavor, use fresh garlic. It adds a great taste. Nutritional yeast gives a cheesy flavor without dairy. Smoked paprika adds warmth and depth. You can also add a squeeze of lemon juice for brightness. Fresh herbs like basil or parsley make a nice touch too. Avoid overcooking the pasta. It should be al dente for the best texture. Don’t skip the blending step; it makes a big difference. If you don’t mix the sauce enough, it can be lumpy. Lastly, taste the sauce before serving. Adjust salt and pepper as needed for the perfect dish. For the full recipe, check out the Vegan Pumpkin Alfredo Pasta section above. {{image_2}} You can easily make this vegan pumpkin Alfredo pasta gluten-free. Just swap the regular pasta for gluten-free options. Look for pasta made from brown rice or chickpeas. These options keep the taste and texture while being friendly for gluten-free diets. Want to spice things up? You can add different herbs and spices to your dish. A pinch of nutmeg adds warmth. If you like heat, try red pepper flakes or cayenne. Fresh herbs like thyme or rosemary can enhance the flavor, too. For a twist, add a splash of lemon juice for brightness. Looking to boost protein in your pasta? Chickpeas are a great choice. They add texture and nutrition. You can also toss in some cubed tofu. Tofu absorbs flavors well, making it a tasty addition. If you want extra heartiness, try adding lentils. Each of these options makes your meal more filling and satisfying. For the complete recipe, check out the [Full Recipe]. To store leftover pasta, let it cool to room temperature. Use an airtight container to keep it fresh. Make sure to close the lid tightly. You can keep it in the fridge for up to three days. If you want it to last longer, consider freezing it. When you’re ready to eat, take the pasta out of the fridge. Add a splash of water or coconut milk to keep it creamy. Heat it in a skillet over medium heat. Stir often to avoid sticking. If you have a microwave, you can use that too. Just cover the bowl and heat it in short bursts until warm. For freezing, portion the pasta into smaller containers. This makes it easier to thaw later. Use freezer-safe bags or containers to prevent freezer burn. It can last up to two months in the freezer. When you’re ready to eat, thaw it overnight in the fridge. Reheat as mentioned above for best results. Enjoy your meal again with the same creamy flavor! Yes, you can use other types of pasta. I like fettuccine, but penne or bowtie works too. Just follow the cooking time on the package. You can even try gluten-free pasta. It will still taste great! If you want to swap coconut milk, try using almond milk or soy milk. Both add a nice flavor. You can also use unsweetened oat milk for creaminess. Just remember to adjust the amount of seasoning to balance the taste. Yes, this recipe is nut-free! It does not contain nuts or nut-based products. You can enjoy this creamy dish even if you have nut allergies. It is safe and tasty for everyone. To add heat, sprinkle some red pepper flakes into the sauce. You can also add a dash of hot sauce for a kick. If you like jalapeños, chop them up and mix them in. Adjust the spice to your taste! Yes, you can make this dish ahead of time. Cook the pasta and prepare the sauce. Store them separately in the fridge. When ready to eat, warm them and mix together. It tastes great even after a day or two! For the full recipe, check out the details above. This vegan pumpkin Alfredo pasta is easy and delicious. We covered the key ingredients, cooking steps, and tips for the best sauce. You learned how to make various tasty versions while avoiding common errors. In the end, this dish lets you enjoy creamy pasta without dairy. Try it out and make it your own! Your taste buds will thank you for this wholesome meal.](https://savoryspiral.com/wp-content/uploads/2025/07/ac660956-dad1-40ec-84a1-29cddb60419c.webp)
Are you ready to savor a creamy vegan delight? This Vegan Pumpkin Alfredo Pasta combines rich flavors with a silky

Looking for a dish that packs a punch? Buffalo Chicken Stuffed Sweet Potatoes are your answer! This recipe combines tender
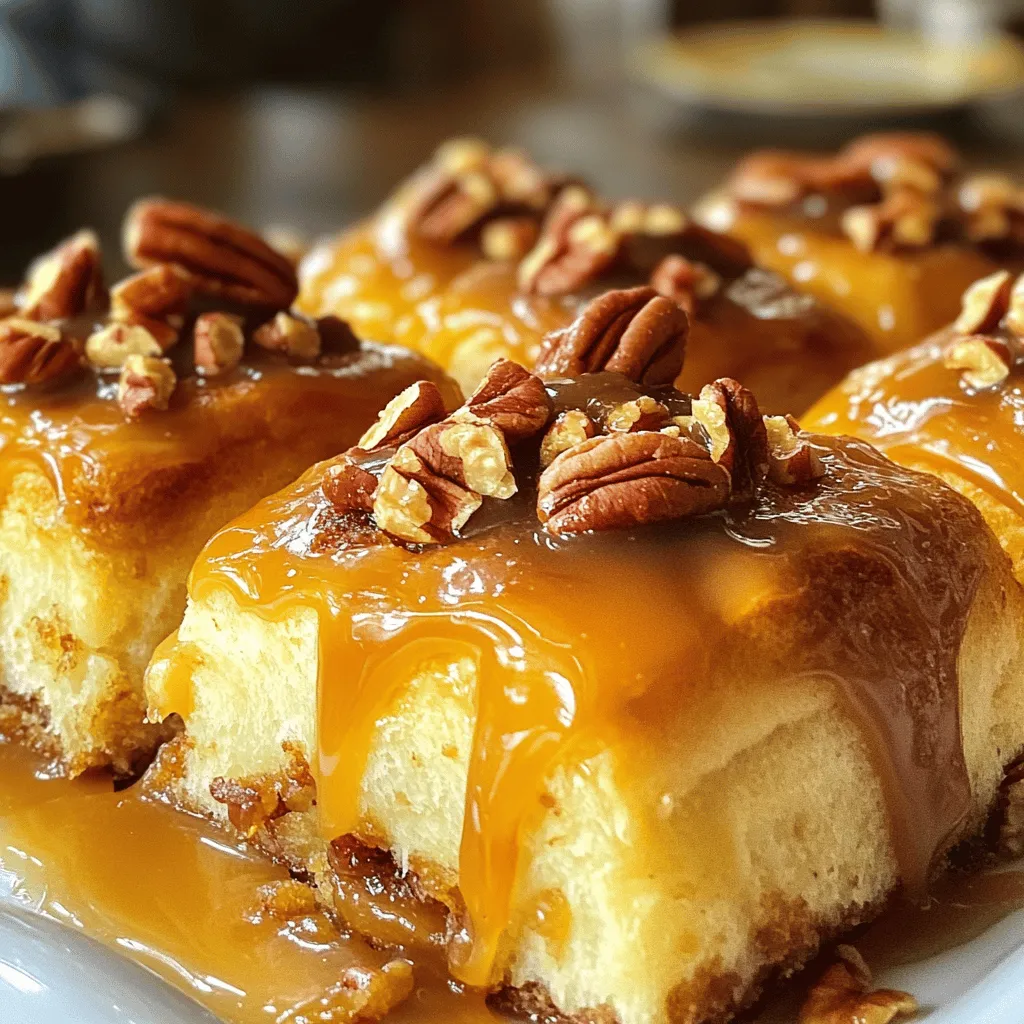
Get ready to treat your taste buds with my Caramel Pecan Sticky Buns! These gooey delights combine rich caramel and

Looking for a fun and tasty appetizer? These Loaded Taco Potato Skins are a hit! In this easy recipe, I’ll
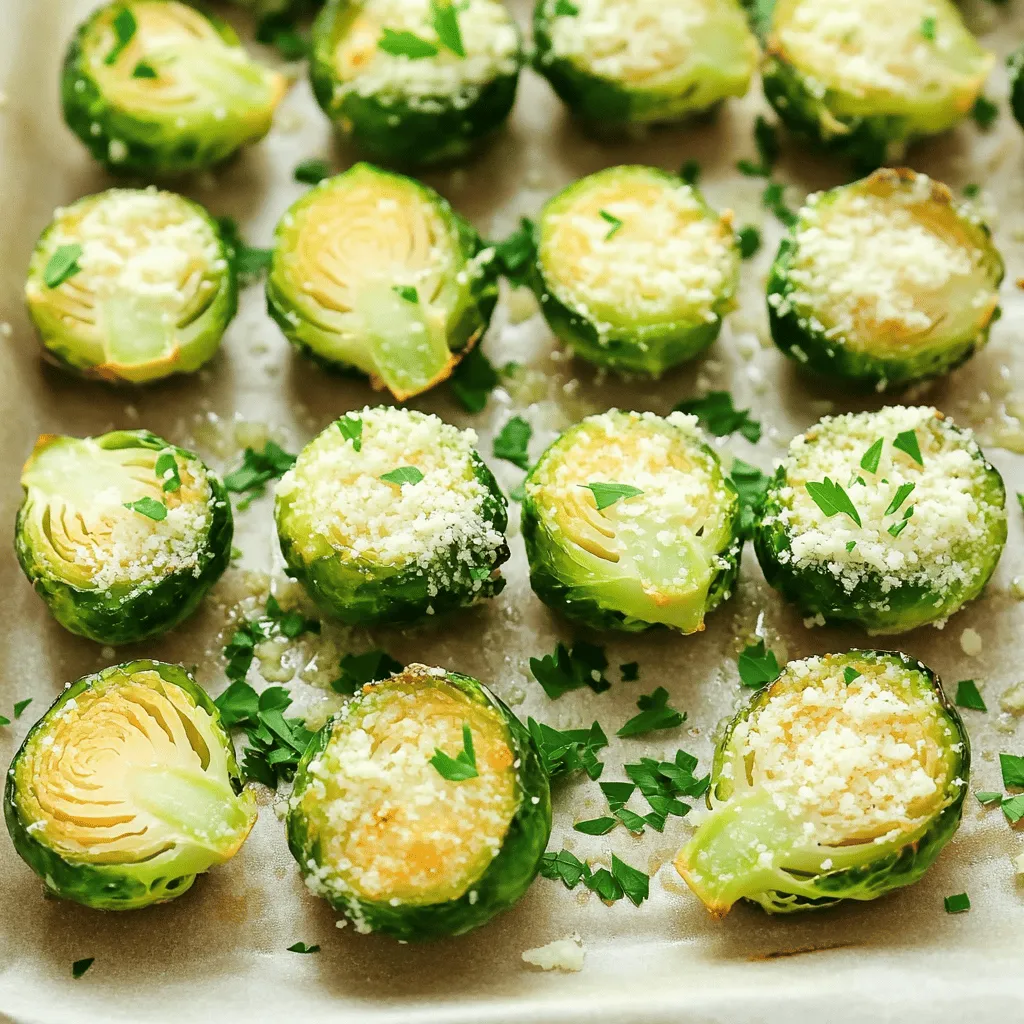
If you’re looking to elevate your veggie game, Crispy Garlic Parmesan Brussels Sprouts are your answer! These little green wonders
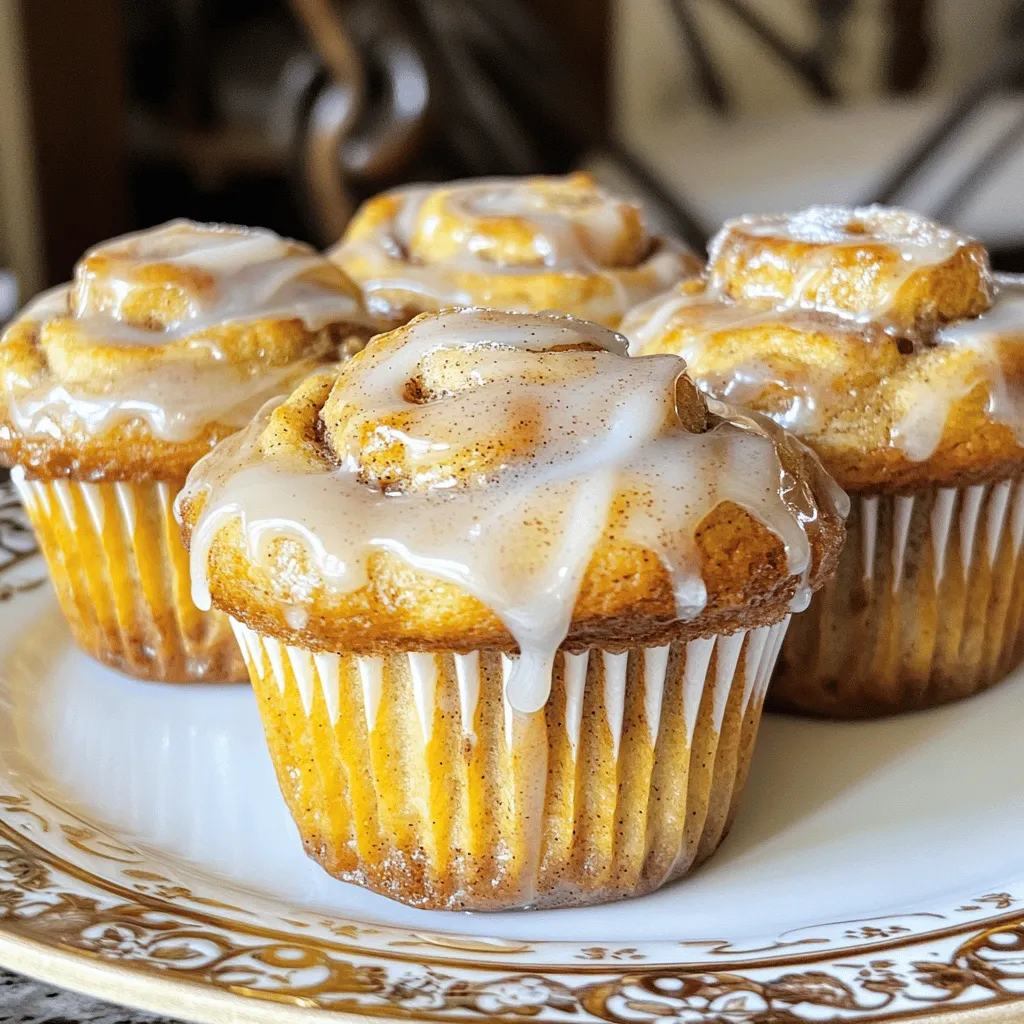
If you’re craving a sweet treat that merges the best of banana bread and cinnamon rolls, you’re in the right
. {{image_2}} You can easily swap out chicken for shrimp or sausage. Shrimp cooks fast, so add it later. For sausage, slice it and brown it before adding veggies. Both options bring a unique taste and pair well with Cajun spices. To make this dish dairy-free, use coconut cream instead of heavy cream. It gives a nice richness and a hint of sweetness. Also, try dairy-free cheese for a cheesy flavor without dairy. You can also skip cheese altogether if you prefer. You can use any pasta shape you like. Penne and fusilli work well, but spaghetti or rotini are great too. If you want a lighter option, use zucchini noodles or whole wheat pasta. These alternatives keep the dish tasty while adding more nutrition. For the full recipe, check out Creamy One Pot Cajun Chicken Pasta . To store leftovers, let the pasta cool first. Then, place it in an airtight container. You can keep it in the fridge for up to three days. Make sure to label your container with the date. This way, you know when to use it. When you are ready to eat, reheat the pasta on the stove. Add a splash of chicken broth or water to help it warm up. Stir it gently over low heat until hot. You can also microwave it in a bowl. Cover it with a lid or a damp paper towel to keep it moist. Heat it for one to two minutes, stirring halfway. If you want to freeze the pasta, use a freezer-safe container. It can last up to three months in the freezer. Make sure to leave some space at the top for expansion. To thaw, place it in the fridge overnight. Reheat it as described above for a quick meal later. For the full recipe, check out the details above! Yes, you can use different types of pasta. Penne and fusilli work best. You can also try shells or rotini. Just make sure to adjust cooking times if the pasta shapes vary. Each type can change the dish's texture and look. Mixing it up keeps things fun! To add more heat, use extra Cajun seasoning. You can also add crushed red pepper flakes. A dash of hot sauce adds a nice kick too. Start small and taste as you go. You can always add more spice, but it’s hard to take it out. Finding your perfect heat level is key! This dish pairs well with a simple salad. A green salad with vinaigrette adds freshness. Garlic bread is also great for soaking up sauce. You can serve it with a side of steamed veggies for more color and nutrition. Each option complements the creamy flavors well! For the full recipe, check out the detailed instructions to make this easy weeknight meal. This blog post shared how to make Creamy One Pot Cajun Chicken Pasta. You learned about key ingredients, helpful kitchen tools, and easy steps for cooking. Tips for perfect pasta and seasoning make this dish stand out. You also saw how to swap proteins and adjust for dietary needs. In closing, cooking this dish is simple and fun. With a few tweaks, you can make it your own. Enjoy the creamy goodness!](https://savoryspiral.com/wp-content/uploads/2025/07/5d3e236e-729c-4c1f-842d-755379891802.webp)
Looking for a delicious weeknight meal that’s quick and easy? This Creamy One Pot Cajun Chicken Pasta is the answer!
![- 2 cups rolled oats - 1 cup pitted cherries, chopped - 1/2 cup almond butter - 1/2 cup honey or maple syrup - 1/2 cup chopped nuts or seeds - 1/4 cup chocolate chips or dried cherries - 1/2 teaspoon vanilla extract - 1/4 teaspoon salt - 1/2 teaspoon cinnamon When I make Cherry Oatmeal Breakfast Bars, I love to start with the main ingredients. The rolled oats form the base. They provide great texture and nutrients. Cherries add a sweet and tart flavor. Their bright color makes the bars look good too. Almond butter gives a rich, creamy taste. You can swap it with peanut butter if you like. Honey or maple syrup serves as a natural sweetener. For extra crunch or flavor, I add optional ingredients. Nuts or seeds enhance the nutrition and taste. Chocolate chips or dried cherries add a fun twist. Vanilla extract brings in a warm flavor. Salt balances the sweetness, while cinnamon adds warmth. You can find the full recipe at the end of this article. This recipe is simple and fun. It’s a great way to start your day or enjoy as a snack! - Preheat oven to 350°F (175°C). - Line an 8x8 inch baking pan with parchment paper. This helps with easy removal later. - In a bowl, combine 2 cups rolled oats, 1/2 teaspoon cinnamon, and 1/4 teaspoon salt. - Stir until they mix well. This step adds flavor and texture to your bars. - In another bowl, whisk together 1/2 cup almond butter, 1/2 cup honey, and 1/2 teaspoon vanilla extract. - Mix until smooth. This mixture brings moisture and sweetness to the bars. - Pour the almond butter mixture into the dry oats. - Mix thoroughly until the oats are coated. - Gently fold in 1 cup chopped cherries and 1/2 cup chopped nuts or seeds. - Transfer everything to the prepared pan. Press it down firmly and evenly. - Bake for 25-30 minutes, until the edges are golden brown. - Remove from the oven and let it cool for about 10 minutes. - Lift the bars out using the parchment paper and cool completely on a wire rack. - Cut into squares or bars of your choice. These steps lead you to delicious Cherry Oatmeal Breakfast Bars. For the complete recipe, check the Full Recipe section. To make your Cherry Oatmeal Breakfast Bars dense, press the mixture firmly into the pan. This helps the bars hold together better. Use your hands or a spatula to flatten the mixture evenly. After baking, let the bars cool in the pan for about ten minutes. This step makes them easier to cut and prevents crumbling. Using fresh cherries when they are in season brings out the best taste. Cherries add a sweet and juicy burst to each bite. You can also try adding spices like nutmeg or ginger. These spices can enhance the flavor and make your bars unique. Just a pinch can make a big difference! {{image_2}} You can easily change the fruit in your Cherry Oatmeal Breakfast Bars. If you prefer, swap out the cherries for blueberries or raspberries. Both fruits add a burst of flavor and color to the bars. Another fun idea is to use dried fruits. Cranberries or apricots work well and give a nice chewy texture. These swaps keep your breakfast exciting and tasty. Don’t worry if you don’t have almond butter. You can use peanut butter or sunflower seed butter instead. These options provide different flavors and nutrients. You can also play around with the nuts. Try walnuts, pecans, or even sunflower seeds for more crunch. Each nut brings its unique taste, making your bars a little different every time. If you need gluten-free options, it’s simple. Just use certified gluten-free oats. They work the same way as regular oats. This way, everyone can enjoy your Cherry Oatmeal Breakfast Bars, even those with gluten sensitivity. Enjoy these delicious bars without worry! For the full recipe, check out the details provided earlier. You can store your Cherry Oatmeal Breakfast Bars in an airtight container. Keep them at room temperature. They stay fresh for about a week. If you want them to last longer, consider freezing them. Freezing is a great way to keep these bars for longer. To freeze, wrap each bar in plastic wrap. Then, place the wrapped bars in a freezer bag. They can last up to three months in the freezer. When you want to enjoy a bar, take it out of the freezer. Let it thaw in the fridge overnight. If you need it faster, you can leave it at room temperature for a few hours. To reheat, pop it in the microwave for about 15-20 seconds. This will warm it up nicely. Enjoy! For the full recipe, check out the [Full Recipe]. Yes, you can use frozen cherries in these bars. Frozen cherries save time and add convenience. They are just as tasty and nutritious as fresh ones. When using frozen cherries, let them thaw before chopping. This helps mix them evenly into the dough. You might want to drain any excess juice to keep the bars from getting too wet. These bars can last up to a week at room temperature. Just keep them in an airtight container. If you store them in the fridge, they can stay fresh for up to two weeks. Be sure to wrap them tightly to keep them moist and tasty. Absolutely! To make these bars vegan, swap honey with maple syrup. You can also use a nut butter like almond or sunflower seed butter. These simple changes will keep the flavor amazing while making the bars plant-based. Oats are packed with health benefits. They are high in fiber, which helps digestion and keeps you full. Oats also contain essential vitamins and minerals, such as iron and magnesium. Plus, they may lower cholesterol, making them heart-healthy. The oats in these bars boost energy, making them a great breakfast or snack option. Enjoy them often for a nutritious treat! For the full recipe, check out the Cherry Oatmeal Breakfast Bars. You learned how to make Cherry Oatmeal Breakfast Bars using simple, nutritious ingredients. These bars are easy to mix, bake, and enjoy. You can customize them with your favorite fruits and nuts. Keeping them fresh is simple, whether at room temperature or in the freezer. I hope you try this recipe and enjoy it as much as I do. Healthy treats like these can make your mornings better!](https://savoryspiral.com/wp-content/uploads/2025/07/62394055-94a1-429b-b428-d30b9033b479.webp)
Looking for a tasty and healthy snack? You’ll love these Cherry Oatmeal Breakfast Bars! They are easy to make and
![To make the Pickle Jalapeño Cheese Ball, you need these key items: - 8 oz cream cheese, softened - 1 cup shredded sharp cheddar cheese - 1/2 cup dill pickles, finely chopped - 1/4 cup pickled jalapeños, finely chopped - 1/4 cup green onions, chopped - 1 teaspoon garlic powder - 1 teaspoon onion powder - 1/2 teaspoon smoked paprika - 1 cup chopped pecans (for coating) These ingredients create a tasty mix of creamy and crunchy flavors. The cream cheese gives a smooth base, while cheddar adds sharpness. Dill pickles and jalapeños bring a nice zing. You can add a few extras to boost the taste of your cheese ball: - A splash of hot sauce for more heat - Fresh herbs like dill or chives for freshness - A squeeze of lemon juice for brightness These optional ingredients can take your cheese ball to the next level. Feel free to experiment with your favorite flavors. If you have specific dietary needs, here are some easy swaps: - Use vegan cream cheese for a dairy-free option - Swap sharp cheddar for a non-dairy cheese - Replace pecans with sunflower seeds for a nut-free version These substitutes help everyone enjoy this delicious snack. You can still create a tasty cheese ball without the main ingredients. For the full recipe, check out the details above. Start by gathering your ingredients. You will need cream cheese, cheddar cheese, dill pickles, pickled jalapeños, green onions, garlic powder, onion powder, smoked paprika, and pecans. Make sure your cream cheese is soft. It’s easier to mix when it's at room temperature. In a large bowl, mix the softened cream cheese and shredded cheddar cheese. Stir well until they blend together. Next, add the finely chopped dill pickles, pickled jalapeños, and green onions. Sprinkle in the garlic powder, onion powder, and smoked paprika. Combine everything until the mixture is even. You want every bite to have a burst of flavor. Now, it’s time to shape your cheese ball. Use your hands to form the mixture into a nice round shape. Once it looks good, roll the cheese ball in the chopped pecans. Press them in gently so they stick. This adds a nice crunch. Wrap the cheese ball in plastic wrap and chill it in the fridge for at least one hour. This helps the flavors blend even more. Serve it with crackers or veggies for a tasty snack. Check the [Full Recipe] for more details! For a great texture, use softened cream cheese. It blends smoothly with cheddar. Mixing well helps avoid lumps. Chill the cheese ball for at least an hour. This step helps it firm up nicely. To boost flavor, add more dill pickles or jalapeños. You can also try different cheeses, like pepper jack. Fresh herbs, like cilantro or parsley, can add a fresh touch. A splash of hot sauce can bring heat, if you like spice. Serve the cheese ball on a wooden board for a rustic look. Surround it with colorful crackers and fresh veggies. For a nice touch, use a sprig of dill on top. This adds color and hints at the flavors inside. You can also serve it with pita chips for a twist. For the full recipe, click [Full Recipe]. {{image_2}} If you love heat, add more jalapeños. Use an extra 1/4 cup of pickled jalapeños. Chop them finely, just like the first batch. Mix them into your cheese ball. This adds a nice kick that spice lovers will enjoy. For a fresh twist, mix in herbs. Try 1 tablespoon of dill or chives. These herbs brighten the flavor. They pair well with the cheese and pickles. Just stir them in with the other ingredients for a tasty change. If you're watching carbs, swap out some ingredients. Use cream cheese and a low-carb cheese. You can skip the pecans or use crushed pork rinds for crunch. This keeps the flavor but cuts down on carbs. Enjoy your cheese ball without the guilt! For the full recipe, check out the Pickle Jalapeño Cheese Ball section above. To keep your cheese ball fresh, wrap it tightly in plastic wrap. This keeps moisture in and air out. Place the wrapped cheese ball in an airtight container. This method helps maintain flavor and texture. Store it in the fridge for up to five days. Make sure to check for any signs of spoilage before serving again. You can freeze the cheese ball if you have leftovers. Wrap it tightly in plastic wrap, then in aluminum foil. This extra layer protects it from freezer burn. Label it with the date before placing it in the freezer. It can last up to three months in the freezer. When ready to enjoy, thaw it in the fridge overnight before serving. When stored correctly, the cheese ball stays fresh for about five days in the fridge. If you freeze it, use it within three months for best taste. Always check for changes in smell or texture before serving. If it seems off, it's best to discard it. You want every bite to be as delicious as the first. Enjoy your Pickle Jalapeño Cheese Ball with confidence! Yes, you can make the cheese ball ahead of time. In fact, making it the day before can help the flavors blend better. Just wrap it in plastic wrap and store it in the fridge. This way, you save time on the day of your gathering. You have many tasty options to serve with the cheese ball. Here are some ideas: - Crackers (choose a variety for fun) - Fresh veggies like carrots, celery, or bell peppers - Sliced baguette or breadsticks - Pretzel chips for a crunchy twist - Tortilla chips for a unique pairing These options enhance the cheese ball’s flavor and make for a fun snack spread. You can easily change the spice level to fit your taste. Here are some tips: - Use fewer pickled jalapeños for a milder taste. - Add extra jalapeños if you like more heat. - Mix in some crushed red pepper flakes for added spice. - Try using spicy cheese instead of regular cheddar. Mix and match these ideas to create the perfect heat for your cheese ball. For the full recipe, check out the detailed instructions above. To sum up, we explored how to make a delicious Pickle Jalapeño Cheese Ball. We covered the essential and optional ingredients, as well as smart substitutes. You learned step-by-step instructions and tips for the best texture and flavor. We also looked at fun variations to try and how to store leftovers. Remember, you can wow your guests with this easy snack. Enjoy making it your own and sharing it with friends!](https://savoryspiral.com/wp-content/uploads/2025/07/be219d98-d94b-46d1-ac35-1a1d2e414457.webp)
Looking for a snack that’s bursting with flavor? Try my Pickle Jalapeño Cheese Ball! This tasty treat is perfect for
