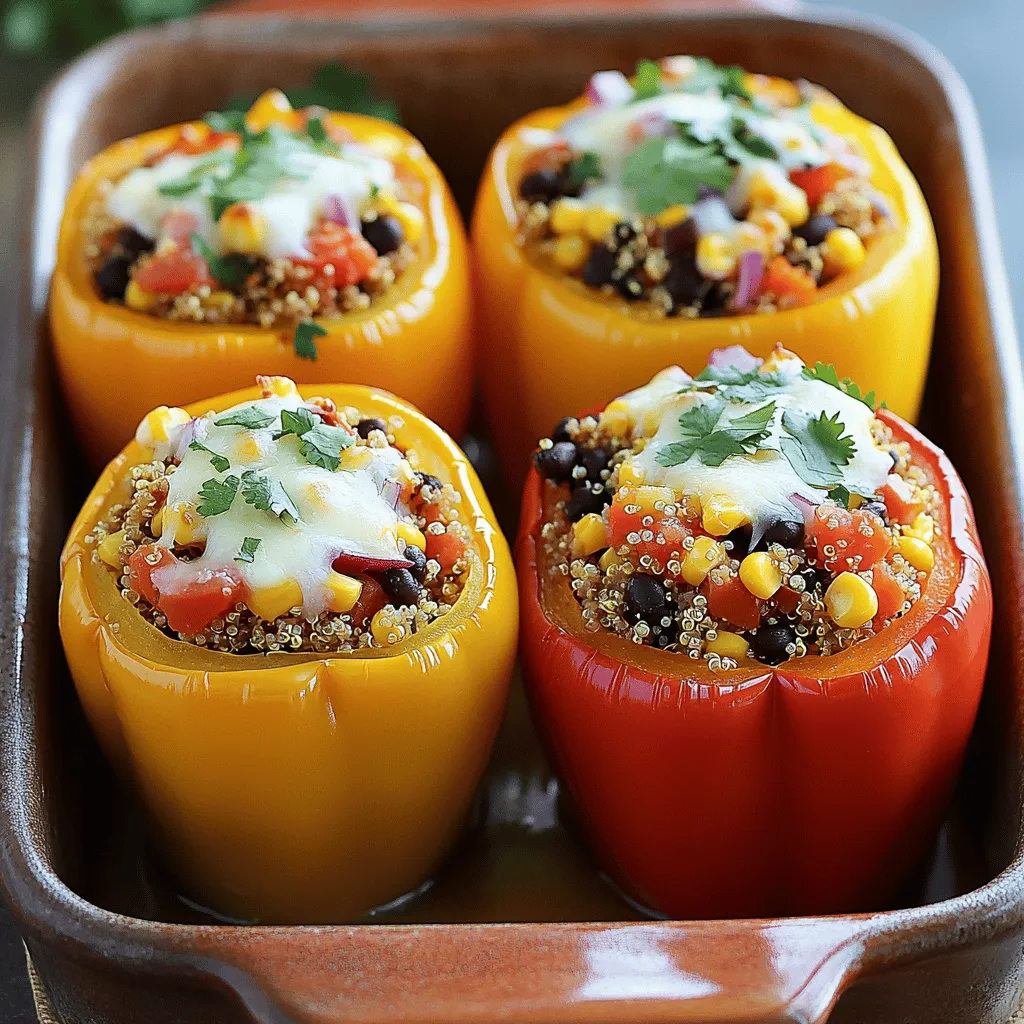
Stuffed Bell Peppers Flavorful Recipe You’ll Love
If you’re looking for a healthy, tasty meal that’s easy to make, you’ve found it! This stuffed bell peppers recipe
If you’re looking for a healthy, tasty meal that’s easy to make, you’ve found it! This stuffed bell peppers recipe
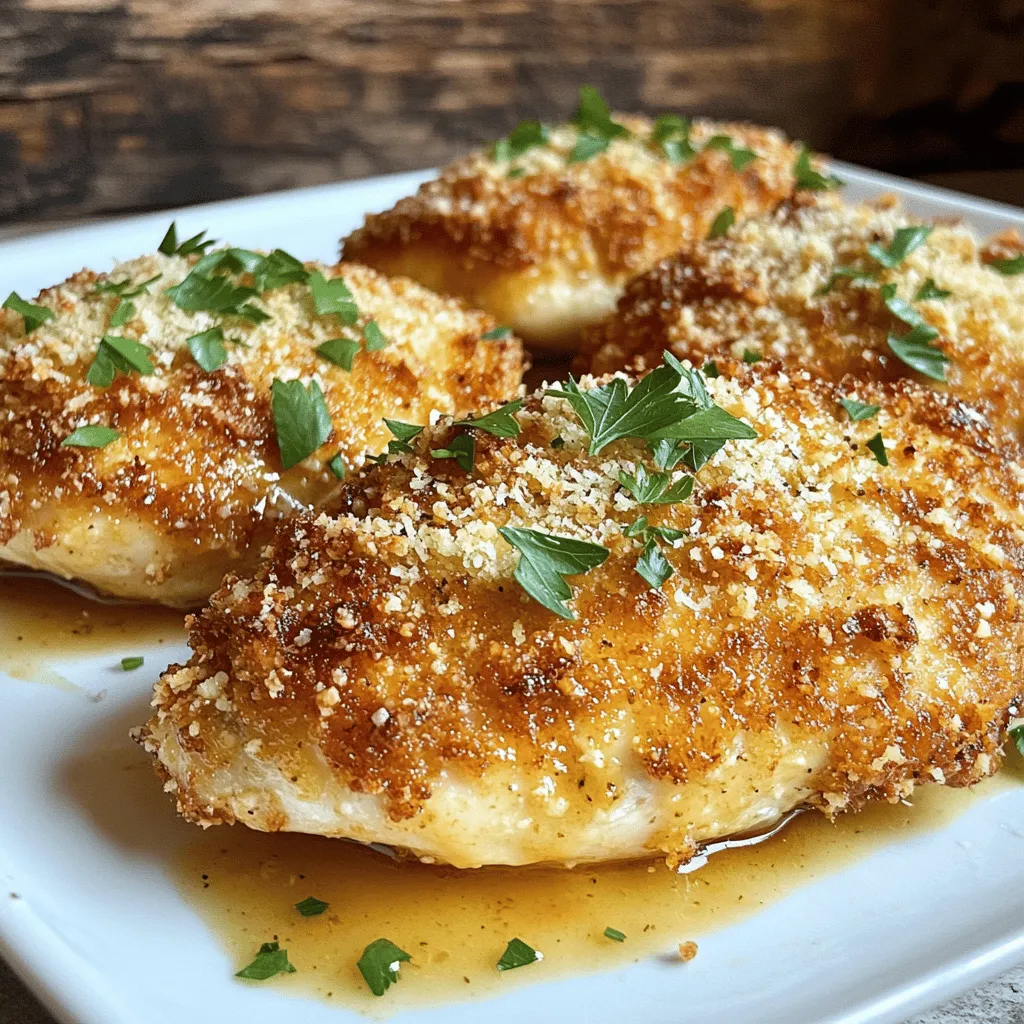
Looking for a simple yet delicious dinner option? Parmesan Crusted Chicken is your answer! This dish combines tender chicken with
![To make a tasty Chimichurri Steak Salad, you need fresh and vibrant ingredients. Here’s what you'll require: - 1 pound flank steak - 2 cups mixed salad greens (arugula, spinach, and romaine) - 1 cup cherry tomatoes, halved - 1 avocado, sliced - 1/2 red onion, thinly sliced - 1/4 cup crumbled feta cheese - 1/4 cup olive oil - 1/4 cup red wine vinegar (or substitute with lemon juice) - 2 cloves garlic, minced - 1 teaspoon dried oregano - 1 teaspoon red pepper flakes - Salt and pepper to taste - Fresh parsley, chopped (for garnish) These ingredients create a perfect blend of flavors. The flank steak provides protein, while the greens add crunch. The cherry tomatoes and avocado bring freshness. The feta cheese adds a creamy touch. The chimichurri sauce ties everything together with its zesty kick. If you're excited to try making this salad, check the Full Recipe for all the steps! To make the chimichurri sauce, I grab a mixing bowl. I add 1/4 cup of olive oil and 1/4 cup of red wine vinegar or lemon juice. Next, I mince 2 cloves of garlic and toss them in. Then, I sprinkle in 1 teaspoon of dried oregano and 1 teaspoon of red pepper flakes. I season with salt and pepper to taste. I whisk it all together until it blends well. This sauce is bright and fresh, perfect for my steak salad. I heat my grill or grill pan to medium-high. I season 1 pound of flank steak generously with salt and pepper. Once the grill is ready, I place the steak on it. I cook it for about 5-7 minutes on each side for a medium-rare finish. After cooking, I remove the steak and let it rest for 5 minutes. Resting the steak helps keep it juicy and tender. For the salad, I take a large bowl. I add 2 cups of mixed salad greens, including arugula, spinach, and romaine. Next, I slice 1 avocado and add it to the bowl. I also add 1 cup of halved cherry tomatoes and 1/2 red onion, thinly sliced. I drizzle half of the chimichurri sauce over the salad and toss gently to mix. Now, I slice the rested flank steak against the grain into thin strips. I place these strips on top of the salad. To finish it off, I sprinkle 1/4 cup of crumbled feta cheese over everything. I drizzle the remaining chimichurri sauce on top. For a pop of color, I garnish with chopped fresh parsley. My chimichurri steak salad is ready to serve. Enjoy this fresh and flavorful delight! To cook the best flank steak, remember these steps: - Choose the Right Cut: Flank steak is lean. It cooks quickly but can be tough if overdone. - Season Generously: Use salt and pepper. This enhances the meat's flavor. - Grill at the Right Temperature: Preheat your grill to medium-high. This helps to sear the steak. - Time It Right: Grill for 5-7 minutes on each side for medium-rare. Adjust time for your preferred doneness. - Let It Rest: After grilling, let the steak sit for 5 minutes. This keeps it juicy. Chimichurri is versatile. Here are some tasty twists: - Add Citrus: Include lemon or lime juice for a bright flavor. - Spice It Up: Increase the red pepper flakes for more heat. - Fresh Herbs: Use cilantro or basil for a unique twist. - Nutty Flavor: Blend in some toasted nuts like walnuts or almonds. Feel free to experiment and find your favorite blend. When serving your steak salad, consider these ideas: - Add Crunch: Top with crispy tortilla strips for extra texture. - Cheese Options: Swap feta for goat cheese or blue cheese. - Grain Boost: Serve over quinoa or farro for a hearty meal. - Dress It Up: More chimichurri? Yes, please! Drizzle extra sauce on top. You can find the full recipe for Chimichurri Steak Salad and enjoy all these flavors together. {{image_2}} If you want to switch up the protein, try chicken or shrimp. Both options work well. For chicken, use boneless breasts or thighs. Cook them until they are juicy and tender. If you choose shrimp, grill them for just a few minutes on each side. They should be pink and firm. These proteins soak up the chimichurri sauce nicely. Feel free to mix in other veggies. Cucumbers add a nice crunch. Bell peppers bring a sweet flavor. You can also toss in radishes for some spice. Adding nuts like walnuts or almonds gives a crunchy texture. If you want a fruity twist, try adding sliced strawberries or mango. These ingredients make the salad brighter and more enjoyable. While chimichurri is a star, there are other choices. You could use a citrus vinaigrette for a fresh taste. Combine orange juice, lemon juice, and olive oil for a zesty kick. A balsamic vinaigrette can add sweetness, too. For a creamy touch, a yogurt-based dressing works well. Each dressing brings a new flavor and feel to the salad. Store your leftover salad in an airtight container. Keep it in the fridge. It stays fresh for up to three days. However, the avocado may brown quickly. To prevent this, you can add a splash of lemon juice to the avocado before storing. This keeps the color bright and fresh. You can freeze leftover flank steak. Wrap it tightly in plastic wrap. Then place it in a freezer bag. It lasts up to three months. When ready to eat, thaw it in the fridge overnight. This keeps the meat juicy and tender. Reheat steak gently to avoid drying it out. Use a skillet over low heat. Add a bit of olive oil to keep it moist. Heat for about five minutes, turning often. You can also reheat it in the microwave. Place it on a plate with a damp paper towel. Heat in short bursts, checking often. Enjoy your Chimichurri Steak Salad again with great flavors! For the full recipe, check out the recipe section above. Chimichurri is a fresh sauce from Argentina. It blends herbs, garlic, vinegar, and oil. Many people use it for grilled meats. This sauce has roots in Argentine cuisine. It adds a bright and tangy flavor. You can find variations in other South American countries. Each region has its twist on this classic. Yes, you can prepare parts of the Chimichurri Steak Salad ahead. Make the chimichurri sauce a day before. Store it in the fridge. This gives the flavors time to blend. You can also grill the steak in advance. Just slice it and store it chilled. Assemble the salad fresh when you are ready to serve. This keeps the greens crisp. Chimichurri Steak Salad goes well with many sides. Here are some ideas: - Garlic bread - Grilled vegetables - Roasted potatoes - Rice or quinoa - A light soup, like gazpacho These sides enhance the meal without overpowering the salad. To make a vegetarian version, swap the steak for grilled vegetables. Use zucchini, bell peppers, or mushrooms. You can also add chickpeas for protein. Maintain the same chimichurri sauce for flavor. This keeps the dish fresh and vibrant. Enjoy the same bright taste without the meat. For even more variety, add nuts or seeds for crunch. For the complete recipe, check the [Full Recipe]. In this blog post, we explored how to make a delicious chimichurri steak salad. We covered the key ingredients, like flank steak, fresh greens, and vibrant veggies. I shared simple steps to prepare the chimichurri sauce and cook the steak. You’ll find tips for perfect steak, variations for dressings, and safe storage methods. This dish is versatile and full of flavor. Experiment with your favorite ingredients or sides. Enjoy your cooking adventure with this tasty salad!](https://savoryspiral.com/wp-content/uploads/2025/07/48ea0661-b35a-4fb7-9b12-9b2abad2dbcc.webp)
Welcome to the vibrant world of Chimichurri Steak Salad! This dish bursts with fresh flavors and colorful ingredients. I’ll show
![- 2 ripe peaches, halved and pitted - 8 oz burrata cheese - 4 cups mixed greens (arugula, spinach, and frisée) - 1/4 cup walnuts, toasted - 3 tablespoons olive oil - 1 tablespoon balsamic glaze - Salt and pepper to taste - Fresh basil leaves for garnish When making grilled peach burrata salad, freshness is key. Choose peaches that are ripe but firm. This gives the best flavor and texture when grilled. Burrata cheese must be fresh for the best creamy bite. Mixed greens like arugula, spinach, and frisée add a nice crunch and balance the sweetness of the peaches. For the extra ingredients, walnuts add a delightful crunch. Toasting them brings out their rich flavor. Olive oil provides a smooth finish, while balsamic glaze adds a sweet tang. Don’t forget salt and pepper! They are essential for bringing all the flavors together. Finally, fresh basil leaves give a pop of color and a fresh aroma. This recipe is simple yet elegant. You can find the Full Recipe to guide you through the steps. Happy cooking! - Preheat the grill or grill pan over medium heat. - Brush the peach halves with olive oil. - Grill the peaches until grill marks appear. Start by getting your grill nice and hot. Medium heat works best for this. Next, take your ripe peaches and brush the cut sides with olive oil. This oil adds flavor and helps prevent sticking. When the grill is ready, place the peaches cut-side down. Grill them for about 2-3 minutes. You want to see those lovely grill marks. The peaches should be tender but not mushy. After grilling, let them cool a bit, then slice into wedges. - Combine mixed greens, peach wedges, and walnuts. - Drizzle with olive oil and balsamic glaze. - Season with salt and pepper before tossing. In a large bowl, toss the mixed greens together with the peach wedges and toasted walnuts. The greens give a fresh crunch, while the peaches add sweetness. Now, drizzle some olive oil and balsamic glaze on top. This combination enhances the flavors. Don’t forget to season with salt and pepper. Gently toss everything together to coat. - Plate the salad with burrata in the center. - Garnish with fresh basil. - Add extra balsamic glaze if desired. Now it’s time to serve! Take a generous portion of the salad and place it on a plate. Tear the burrata cheese and put it right in the middle. This creamy cheese is the star of the dish. Garnish your salad with some fresh basil leaves for a pop of color. If you like more flavor, drizzle on extra balsamic glaze. Your grilled peach burrata salad is now ready to impress! For the complete recipe, check the [Full Recipe]. - Look for ripe yet firm peaches. They should feel slightly soft but not mushy. - Use freestone peaches for easier handling. The pit comes out cleanly, making prep a breeze. - Opt for fresh burrata for the best flavor. This cheese has a rich, creamy center. - Tear burrata just before serving for creaminess. This keeps it fresh and delicious. - Maintain medium heat to avoid charred peaches. Too high heat can ruin their sweet flavor. - Experiment with grilling time for desired softness. Aim for about 2-3 minutes per side. {{image_2}} You can easily switch up some ingredients in this salad. If you want a different nut, substitute walnuts with pecans or almonds. Both options add a nice crunch and flavor. You can also change the greens. Instead of mixed greens, try using kale or romaine. These will give your salad a fresh twist. If you're looking for a new flavor, try a lemon vinaigrette instead of balsamic. The bright citrus taste will brighten your salad. For those who like it sweeter, add honey to your dressing. This small change can make a big difference in taste. Want to elevate your dish? Incorporate goat cheese for added tanginess. It pairs well with the sweetness of the peaches. You can also add grilled chicken for a protein boost. This makes the salad heartier and perfect for dinner. To keep your salad fresh, store components separately. Place grilled peaches and mixed greens in airtight containers. This method helps maintain texture and flavor. If you have extra burrata, wrap it tightly and store it in the fridge. For the best taste, eat the salad within 24 hours. Grilled peaches stay good in the fridge for 2-3 days. After that, they may lose their sweetness and texture. When you reheat peaches, do so gently. Heat them in a skillet on low to avoid sogginess. It’s best to assemble your salad fresh just before serving. This keeps each ingredient at its best. Yes, you can prep the components ahead. Just store them separately. Wait to assemble until right before serving. This keeps everything fresh and tasty. You can cut the peaches, grill them, and wash the greens in advance. This salad pairs well with grilled meats. It also works as a light appetizer. You might enjoy it with chicken or steak. The flavors complement many dishes, making it a great choice for a meal. No, this salad is not vegan-friendly due to the burrata cheese. If you want a vegan option, try a cheese alternative. There are many great plant-based cheeses available today. They can give you a similar taste and texture. This blog post shows you how to make a Grilled Peach Burrata Salad. You’ve learned about the main and additional ingredients, plus easy step-by-step instructions. I shared tips for choosing peaches and perfecting burrata. You can even try variations with different nuts or dressings. Embrace creativity with this salad. Fresh peaches and creamy burrata make a tasty combo. Remember to store leftovers properly to keep it fresh. Enjoy making your salad and impressing friends with your skills!](https://savoryspiral.com/wp-content/uploads/2025/07/3344db8d-c9bc-4647-b5b9-83c1810c3bc8.webp)
Are you ready to elevate your summer meals? My Grilled Peach Burrata Salad offers a fresh twist on traditional flavors.
![To make these tasty no-bake chocolate oat bars, you need a few key items: - 2 cups rolled oats - 1 cup almond butter (or any nut butter you like) - 1/2 cup honey or maple syrup These main ingredients form the heart of the bars. Rolled oats give them a chewy texture. Nut butter adds richness and helps bind everything together. Sweeteners bring the right amount of sweetness to each bite. You can customize your bars with fun add-ins: - 1/4 cup dark chocolate chips (plus more for topping) - Optional: 1/4 cup chopped nuts or dried fruit - Flavor enhancers like 1 teaspoon vanilla extract Adding chocolate chips gives a nice chocolatey burst. Chopped nuts or dried fruit adds crunch and flavor. Vanilla extract enhances the overall taste, making each bite more enjoyable. To make these bars, you'll need: - A large mixing bowl - An 8-inch square baking dish - Parchment paper A mixing bowl helps combine all the ingredients well. The baking dish shapes the bars, while parchment paper ensures easy removal and clean-up. Using the right equipment makes the process smooth and fun. For the [Full Recipe], follow the steps to create these delicious treats. To start, gather your ingredients. In a large mixing bowl, combine: - 2 cups rolled oats - 1 cup almond butter (or your favorite nut butter) - 1/2 cup honey or maple syrup - 1/2 cup unsweetened cocoa powder - 1/4 teaspoon sea salt - 1 teaspoon vanilla extract Stir the dry ingredients and nut butter together. Mix until it looks like thick dough. If you like, fold in: - 1/4 cup dark chocolate chips - Optional: 1/4 cup chopped nuts or dried fruit This adds texture and flavor. Next, line an 8-inch square baking dish with parchment paper. Leave some paper hanging over the sides. This helps with easy removal. Press the oat mixture into the bottom of the dish. Make it even and firm. Now, melt more chocolate chips. Use a microwave-safe bowl. Heat for about 30 seconds, then stir until smooth. Drizzle or spread this melted chocolate over the top layer of the oat mixture. Refrigerate the bars for at least 1 hour. This firms them up, making them easier to cut. Once set, lift the bars out using the parchment overhang. Cut them into squares or rectangles. Enjoy your tasty no-bake chocolate oat bars! For the full recipe, check the details above. You can easily change the nut butter in your bars. Almond butter works well, but peanut butter is a great choice too. If you want a nut-free option, try sun butter. You can also vary the sweetness. If you prefer less sugar, use less honey or maple syrup. For a sweeter taste, add a bit more. Just remember to keep the balance. Getting the right texture is key. The mixture should be thick and sticky but not too dry. If it feels crumbly, add a touch of nut butter or sweetener. When pressing the mix into the dish, make sure to pack it down firmly. This helps the bars hold together well. Use a spatula to smooth the top for even layering. These bars pair well with dips or toppings. Try serving them with yogurt or a drizzle of melted chocolate. You can also top the bars with chopped nuts or fresh fruit for added flavor. For a fun presentation, cut them into fun shapes. Use cookie cutters to make them look special for parties or snacks. {{image_2}} You can easily make these bars fit your diet. For a gluten-free option, use certified gluten-free rolled oats. This simple swap lets everyone enjoy these treats. If you need a vegan version, replace honey with maple syrup. This keeps the bars sweet without any animal products. Get creative with flavors! You can add spices like cinnamon or nutmeg for warmth. A dash of vanilla extract boosts the taste as well. Want to change the chocolate? Use milk chocolate for a sweeter taste or dark chocolate for a richer flavor. Each choice gives you a new twist on this classic treat. Seasonal fruits can brighten your bars. Try adding dried cranberries in fall or fresh strawberries in summer. You can also make holiday-themed bars by mixing in peppermint extract or festive sprinkles. These fun touches make your no-bake chocolate oat bars special for any occasion. For the full recipe, check the previous section. To keep your No-Bake Chocolate Oat Bars fresh, use an airtight container. This helps prevent moisture loss and keeps the bars from drying out. Glass or plastic containers work well. You can also wrap them in wax paper and place them in a zip-top bag for added protection. Store the bars in a cool, dry place out of direct sunlight. In the fridge, your No-Bake Chocolate Oat Bars can last for about one week. They stay fresh due to the moisture from the almond butter and sweeteners. If you want to keep them longer, consider freezing them. They can last up to three months in the freezer. Just make sure to wrap them well to avoid freezer burn. If you freeze the bars, let them thaw in the fridge overnight before eating. You can also serve them cold, which makes for a refreshing treat. If you prefer them warm, you can microwave a bar for about 10-15 seconds. This will melt the chocolate slightly and give a softer texture, enhancing the flavor. Enjoy them as a tasty snack anytime! To make No-Bake Chocolate Oat Bars, start by mixing the dry and wet ingredients. 1. In a bowl, combine rolled oats, almond butter, honey, cocoa powder, salt, and vanilla. 2. Stir until everything blends into a thick dough. 3. If you want, add dark chocolate chips and any nuts or dried fruit. 4. Line an 8-inch baking dish with parchment paper. 5. Press the mixture into the dish evenly. 6. Melt more chocolate chips and drizzle over the top. 7. Chill in the fridge for at least one hour. 8. Cut into bars once firm. You can find the full recipe in the article above. Yes, you can use other sweeteners. Maple syrup is a great option. It gives a nice flavor and works well. You can also try agave nectar or brown rice syrup. Each sweetener will change the taste a little. Just remember that some sweeteners are thinner than honey. You may need to adjust the amount of oats to keep the right texture. No-Bake Chocolate Oat Bars can last up to one week in the fridge. Store them in an airtight container for best results. If you want to keep them longer, you can freeze them. They will stay good for about three months in the freezer. Just wrap them well to prevent freezer burn. No-bake chocolate oat bars are easy and fun to make. We covered the main ingredients, like rolled oats and nut butter, and explored tasty add-ins. You learned the step-by-step process, along with tips for perfecting texture and storage. These bars are flexible, letting you adjust flavors and make them fit your diet. Whether enjoyed cold or warmed, they make a great snack. Now you can create endless variations to share or enjoy yourself. Get started, and let your creativity shine with these delicious treats!](https://savoryspiral.com/wp-content/uploads/2025/07/08acb057-3ac0-45af-8280-066707a38dd8.webp)
Craving a quick, delicious treat? You’re in the right place! These No-Bake Chocolate Oat Bars are simple to make and
. To make your skewers really shine, marinate them. Let them sit for about 10-15 minutes. This time allows all the flavors to blend. You want each bite to burst with taste. For even flavor, thread your ingredients in a pattern. Alternate between tomatoes, basil, and mozzarella. This way, every bite has a bit of everything. When it comes to serving, think outside the box. Arrange the skewers in a tall glass. This not only looks nice but makes them easy to grab. You can also lay them diagonally on a platter. Add a small bowl of balsamic glaze for dipping, and garnish with more basil. This adds a fresh touch and makes your dish pop. You can prep these skewers in advance. Assemble them up to a day before serving. Just keep them in the fridge. To keep them fresh, cover them tightly. If you make them early, remember to marinate them right before serving. This keeps the flavors vibrant and tasty. {{image_2}} You can easily change up your Caprese skewers. Adding different vegetables can enhance the taste. Try bell peppers, zucchini, or even cucumbers. These veggies add crunch and freshness. You can also add fruits for a fun twist. Pineapple or strawberries pair well with mozzarella. The sweetness of fruit balances the salty cheese. Boost the flavor of your skewers by using flavored olive oils. A garlic or basil-infused oil can add depth. You can also experiment with dressings or spices. A sprinkle of Italian herbs can elevate the dish. Consider adding a touch of chili flakes for heat. This little change can make a big difference. If you're looking for vegan options, swap mozzarella for avocado or marinated tofu. These alternatives keep the creamy feel without dairy. For a gluten-free adaptation, ensure your skewers are made of safe ingredients. Most of the items in this recipe are already gluten-free. Just be cautious with the balsamic glaze; check for hidden gluten in the brand you choose. To store leftover skewers, keep them in an airtight container. This helps keep them fresh. You can also wrap them tightly in plastic wrap. If you have extra ingredients, store them separately. Place cherry tomatoes, mozzarella, and basil in the fridge. This keeps each item fresh longer. Prepared skewers last about 1-2 days in the fridge. After that, they may lose flavor. If you want to save them longer, you can freeze the individual parts. Freeze mozzarella and tomatoes separately in freezer bags. Basil does not freeze well, so use it fresh. You usually do not need to reheat Caprese salad skewers. They taste best fresh and cold. If you really want to warm them, do it gently. Place them in a warm oven for a few minutes. Avoid the microwave, as it makes them soggy. For best results, enjoy them cold right after making. Check the [Full Recipe] for more tips! Easy Caprese Salad Skewers are a fun and tasty way to enjoy the classic Caprese salad. They feature fresh cherry tomatoes, creamy mozzarella, and fragrant basil, all on a skewer. This simple dish is colorful and packed with flavor. You can enjoy it as a snack or serve it at a party. Making Easy Caprese Salad Skewers is quick! It takes about 10 minutes to prep. After that, you let them sit for 10-15 minutes to soak up the flavors. The total time is around 25 minutes, making it easy for any occasion. Yes, you can! If you want to skip mozzarella, try using avocado or marinated tofu. These options offer a great taste and texture. You can still enjoy the fresh flavors of basil and tomatoes, making it a tasty dish for everyone. To boost flavor, try adding herbs like oregano or thyme. You can also sprinkle on some red pepper flakes for heat. A drizzle of lemon juice adds a fresh twist. Experiment with different spices to find what you love best. Absolutely! You can prepare the skewers a day ahead. Just store them in the fridge, covered. If you want to keep them fresh, wait to drizzle the balsamic glaze until you serve them. This keeps the flavors bright and yummy. For the full recipe, check the section above! Easy Caprese Salad Skewers are a fun, tasty, and fresh dish. We covered the key ingredients, exact steps, and clever tips. You learned how to assemble these delicious skewers and make them your own with swaps. Remember, you can prepare them in advance and store them to keep flavors fresh. Enjoy creating unique versions with fruits or herbs. These skewers elevate any meal or gathering. Now, it’s time to get cooking and impress your friends and family!](https://savoryspiral.com/wp-content/uploads/2025/07/81f5c0de-f9c4-4e70-bf95-2d6d83daabf5.webp)
Get ready to delight your taste buds with Easy Caprese Salad Skewers! This fresh and simple dish uses cherry tomatoes,
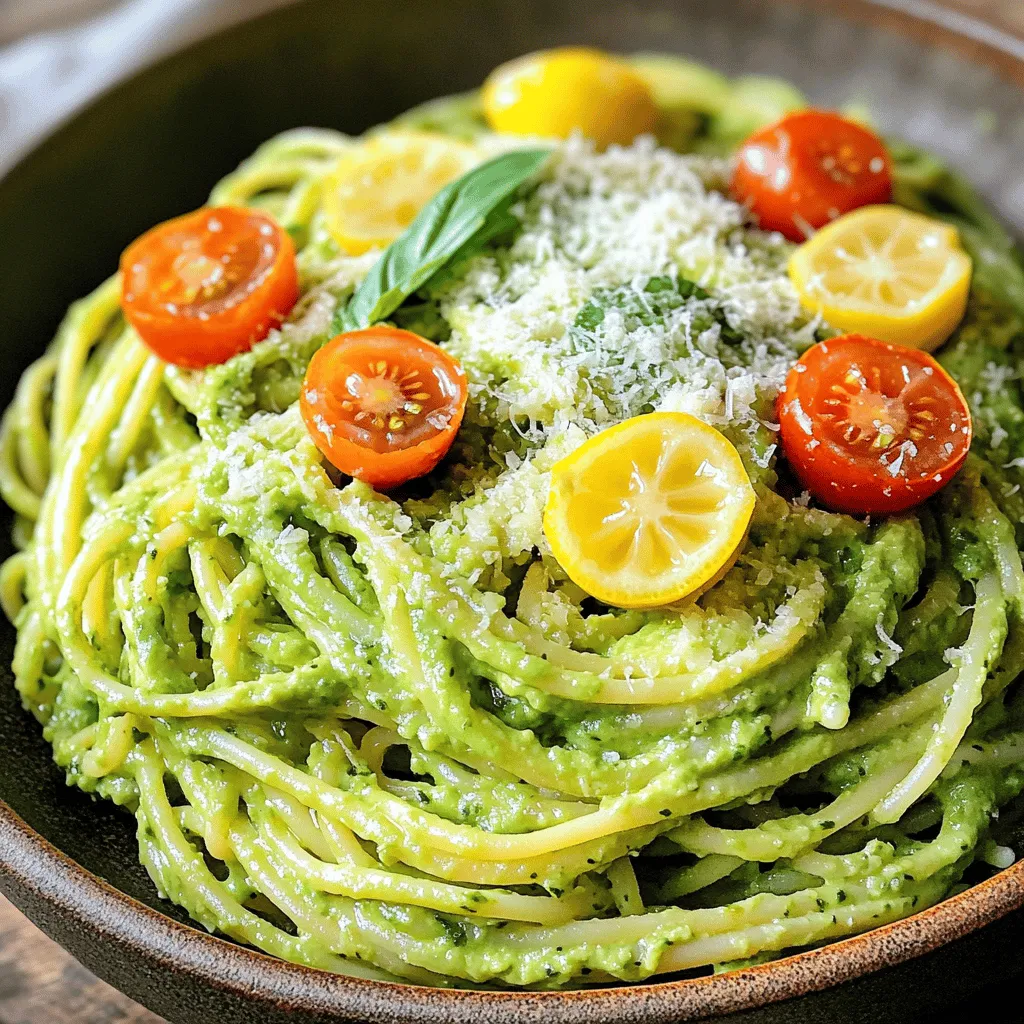
Craving a quick and tasty meal? You’re in for a treat with this creamy avocado pasta! This delightful dish combines
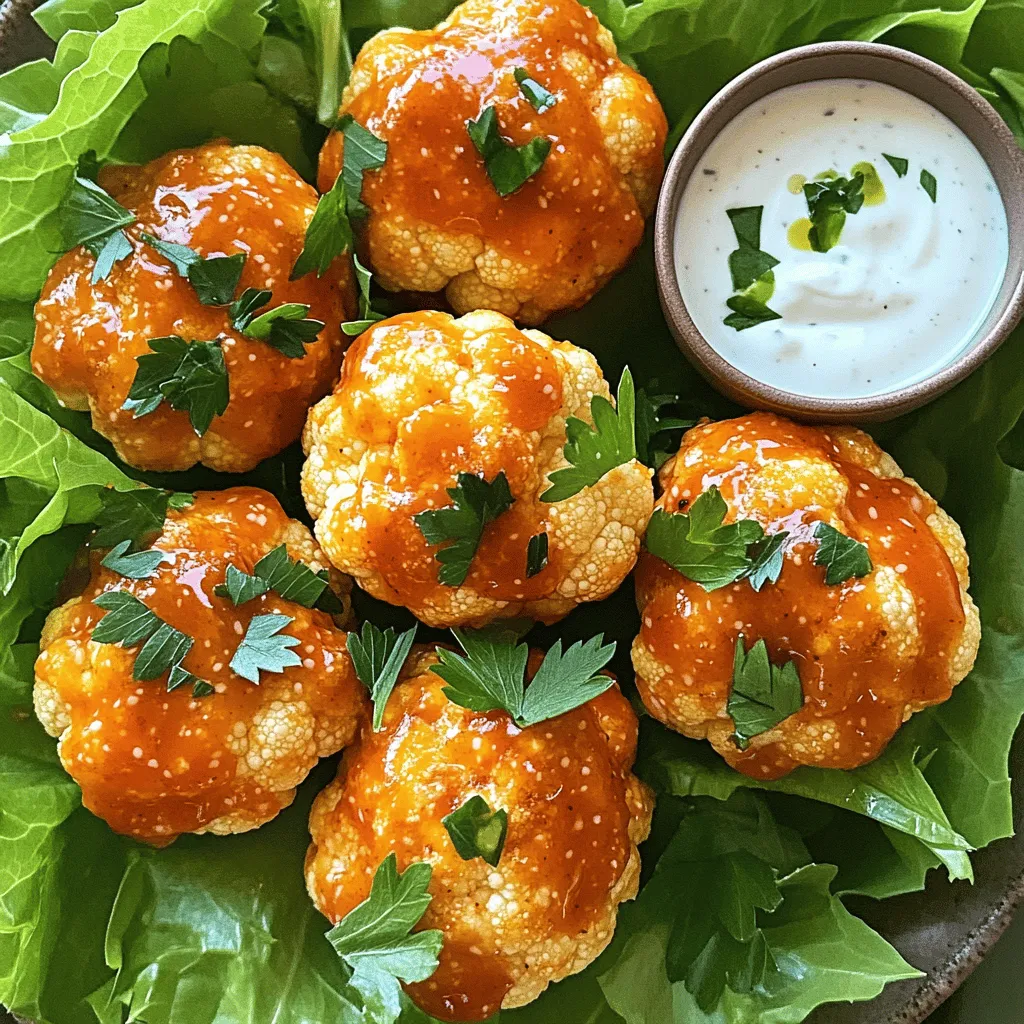
Are you ready to spice up your snack game? Buffalo Cauliflower Bites are the perfect blend of crispy texture and
![- 2 ripe avocados - 8 oz pasta (spaghetti or fettuccine) - Fresh lemon juice and garlic Creamy avocado pasta relies on simple, fresh ingredients. You start with two ripe avocados. They should feel slightly soft when you press them. Next, choose your pasta—spaghetti or fettuccine work best. Don’t forget fresh lemon juice and garlic. They add a bright flavor to the dish. - Grated Parmesan cheese - Cherry tomatoes for garnish - Red pepper flakes for heat You can add grated Parmesan cheese for a rich taste. Cherry tomatoes look great and add color. If you like a little heat, sprinkle in some red pepper flakes. They can make your dish more exciting. These optional ingredients let you customize your pasta to suit your taste. For the full recipe, check the details above. First, boil water in a large pot. Add a pinch of salt to the water. Once boiling, add 8 oz of pasta, either spaghetti or fettuccine. Cook the pasta according to package instructions until it's al dente. This usually takes about 8-10 minutes. While cooking, reserve about 1/2 cup of the pasta water before draining the pasta. This water helps adjust the sauce later. While the pasta cooks, take 2 ripe avocados, pitted and peeled. In a food processor, combine the avocados, 2 tablespoons of fresh lemon juice, 2 minced garlic cloves, and 1/4 cup of extra virgin olive oil. Blend this mixture until it’s smooth and creamy. If the sauce is too thick, slowly add the reserved pasta water until you reach a nice, creamy consistency. Season the sauce with salt and pepper to taste. In a large mixing bowl, add the drained pasta. Pour the avocado sauce over the pasta. Toss gently to coat the pasta evenly with the sauce. You want every strand to be covered with that creamy goodness. Serve the pasta right away. For a nice touch, garnish with grated Parmesan cheese and halved cherry tomatoes if you want a pop of color. This dish is fresh, easy, and delicious! For the full recipe, check out the [Full Recipe]. When choosing avocados, look for a few key signs of ripeness. First, gently squeeze the avocado. If it yields to pressure, it's ripe. You can also check the color; dark green skin often signals ripeness. Avoid avocados with large dents or dark spots. To store avocados for optimal freshness, keep them at room temperature if they are still hard. Once they ripen, place them in the fridge. This helps slow down the ripening process. If you have cut an avocado, sprinkle lemon juice on the flesh. Cover it tightly with plastic wrap and store it in the fridge. To boost the flavor of your creamy avocado pasta, consider adding spices and herbs. Fresh basil is a great choice, but you can also use parsley or cilantro. A pinch of sea salt and black pepper enhances the taste. If you like heat, try adding red pepper flakes. Adjusting creaminess is easy. If your sauce feels too thick, add some of the reserved pasta water. This helps thin it out and make it silkier. You can also mix in a splash of vegetable broth for extra flavor and a smoother texture. For more details, check out the Full Recipe. {{image_2}} You can make your creamy avocado pasta even tastier by adding protein. Grilled chicken brings a nice, smoky flavor. Simply season and grill your chicken pieces until they are cooked through. Slice them and toss them with the pasta for a hearty meal. Shrimp is another great choice. Sauté shrimp in olive oil until they turn pink and opaque. Add them to your dish for a seafood twist. Both options boost the dish's protein and flavor. If you want vegetarian options, chickpeas work well. They add protein and a bit of texture. You can mix canned or cooked chickpeas right into the pasta. They soak up the sauce and add a lovely creaminess. If you need gluten-free options, choose gluten-free pasta. Many types are available, like rice or corn pasta. They cook similarly to regular pasta, so you won’t miss out on the taste. Just check the cooking time on the package. For vegan modifications, skip the Parmesan cheese. Nutritional yeast is a great substitute. It gives a cheesy flavor without using dairy. You can also add extra lemon juice or herbs to enhance the taste. These small changes let everyone enjoy your creamy avocado pasta. Want to try this recipe? Check out the Full Recipe for all the details! To store leftover creamy avocado pasta, place it in an airtight container. Make sure to cover it well. The pasta can last in the fridge for up to three days. If you want the best taste, eat it within two days. The avocado sauce can oxidize, making it brown. So, try to eat it fresh for the best flavor. You can freeze the avocado sauce, but it's best to do it without the pasta. To freeze, place the sauce in a freezer-safe container. Leave some space at the top for expansion. It can last up to three months in the freezer. When you want to use it, thaw the sauce in the fridge overnight. You can also use the microwave to thaw it. After thawing, you may need to stir in a bit of olive oil or water to restore the creaminess. Reheat gently on low heat, stirring often, until warm. Creamy avocado pasta lasts about 2 to 3 days in the fridge. To keep it fresh, store it in an airtight container. If you notice the avocado turning brown, don't worry. Just stir it well before serving. The lemon juice helps slow down browning. Yes, you can make creamy avocado pasta in advance, but with a few tips. Prepare the avocado sauce and store it separately from the pasta. This way, the sauce stays fresh and creamy. Cook the pasta on the day you plan to serve it. When ready, mix the pasta with the sauce. Creamy avocado pasta pairs well with many sides. Try garlic bread for a crunchy bite. A fresh green salad adds a nice crunch. You can also serve it with grilled chicken or shrimp for protein. Roasted vegetables or a light soup work well, too! This blog post covered a delicious creamy avocado pasta recipe. You learned about main and optional ingredients, cooking steps, and tips. Ripe avocados and fresh lemon juice make the sauce shine. Try adding proteins or spices to personalize your dish. Remember the storage tips for freshness and convenience. Enjoy this recipe often, as it’s quick, healthy, and versatile. Building meals around avocados is a smart way to eat well while delighting your taste buds.](https://savoryspiral.com/wp-content/uploads/2025/07/bd16ad3e-c09c-4dc6-8edd-c60c5ac2ac68.webp)
If you’re craving something creamy and fresh, you’re in the right place! This Creamy Avocado Pasta recipe is not only
![When making honey lime chicken tacos, you need fresh and simple ingredients. Each component adds flavor and texture to your meal. Here’s what you will need: - Boneless, skinless chicken breasts - Marinade components: honey, lime juice, olive oil - Spices and seasonings: garlic, cumin, chili powder, salt, and pepper - Tacos components: corn or flour tortillas, shredded red cabbage, avocado, fresh cilantro - Garnishing: lime wedges These ingredients come together for a tasty dish. The honey adds sweetness, while lime juice brings a zesty kick. The spices, like cumin and chili powder, enhance the chicken's flavor. Fresh toppings, like avocado and cilantro, create a nice crunch. You can find the full recipe here for easy preparation. Enjoy cooking! Start by whisking your marinade ingredients together. In a medium bowl, combine: - 1/4 cup honey - 1/4 cup fresh lime juice - 2 tablespoons olive oil - 2 cloves garlic, minced - 1 teaspoon cumin - 1 teaspoon chili powder - Salt and pepper to taste Mix them well until everything blends. The honey adds sweetness, while lime gives a nice tang. This balance makes the chicken taste great. Next, marinate the chicken. Place your 1 pound of boneless, skinless chicken breasts in a resealable plastic bag or a shallow dish. Pour the marinade over the chicken. Seal the bag or cover the dish tightly. Let it soak in the fridge for 30 minutes. This step makes the chicken juicy and flavorful. Now it’s time to cook the chicken. Preheat your grill or skillet to medium-high heat. When hot, remove the chicken from the marinade. Discard the marinade to keep it safe. Grill or cook the chicken for about 6-7 minutes on each side. Look for nice grill marks and ensure it is cooked through. To check for doneness, use a meat thermometer. The chicken should reach an internal temperature of 165°F. If you don’t have a thermometer, cut into the chicken. The meat should be white and juices should run clear. While the chicken rests, warm your tortillas. You can do this in a skillet or microwave until they are soft and pliable. This step makes them easier to fold. Now, it’s time to layer your tacos. Take a warm tortilla and place a few slices of grilled chicken in the center. Top it with: - Shredded red cabbage - Slices of ripe avocado - Fresh cilantro for garnish Finally, serve your tacos with lime wedges on the side. A squeeze of fresh lime adds a burst of flavor. Enjoy your Honey Lime Chicken Tacos! For the full recipe, check the details provided above. Marination Tips for Maximum Flavor Marinating your chicken is key to great taste. Use the marinade for at least 30 minutes. This time allows the honey and lime to soak in well. If you can, marinate it longer for deeper flavors. You can also add some zest from the lime for an extra kick. Spice Adjustments Adjust the spices to suit your taste. If you like heat, add more chili powder. For a smoky flavor, try adding smoked paprika. This small tweak can change the whole taste of your tacos. Grill vs. Skillet Cooking Both grilling and using a skillet work well. Grilling gives a nice char and flavor. A skillet allows easy cooking indoors. If you grill, keep the heat high for great grill marks. If you use a skillet, make sure to add a bit of oil to prevent sticking. Avoiding Overcooking Chicken To avoid dry chicken, check the cooking time. The chicken should cook for about 6-7 minutes per side. Use a meat thermometer to check for 165°F for safety. Let the chicken rest after cooking. This keeps the juices inside. Ideal Accompaniments Serve your tacos with fresh lime wedges. They add a zesty touch. You can also add a side of black beans or corn salad. These sides bring color and nutrition to your meal. Presentation Ideas Make your tacos look great on the plate. Arrange the tacos in a line with lime wedges around them. Add a sprinkle of cilantro on top. This adds freshness and looks appealing. You can also serve them on a colorful platter for a fun touch. For the complete recipe, check the [Full Recipe]. {{image_2}} You can switch the chicken for tofu or shrimp. Tofu absorbs flavors well. It makes a great vegetarian option. Use firm tofu and marinate it like chicken. For shrimp, use medium to large shrimp. Cook them until they turn pink, which takes only a few minutes. You might want to adjust the sweetness of the marinade. If you like it less sweet, reduce the honey. You can add a bit of extra lime juice. This change gives you a nice tangy taste. Want some heat? Add some diced jalapeños or a pinch of cayenne pepper to the marinade. You can also use hot sauce on top of the tacos. This brings a spicy kick that many people love. Adding fresh vegetables can level up your tacos. Try chopped tomatoes, diced onions, or corn for extra crunch. Fresh salsas, like mango or pico de gallo, also brighten up the dish. They add color and flavor. If you're gluten-free, use corn tortillas. They taste great and hold the filling well. Always check the label to ensure they are gluten-free. For vegan adaptations, swap chicken for plant-based proteins like jackfruit or tempeh. Use maple syrup instead of honey for sweetness. This keeps the taste delicious while being plant-based. To keep your Honey Lime Chicken Tacos fresh, store any leftovers in the fridge. First, place the chicken in an airtight container. This helps keep it moist. You can store the tortillas and toppings in separate containers. This way, they stay fresh and crisp. - Best Practices for Refrigeration: Cool the food before sealing it. Hot food can create steam, which leads to sogginess. Use containers that fit snugly to save space. - Freezing Chicken and Tacos: You can freeze the chicken for later use. Wrap it tightly in plastic wrap and then in foil. For tacos, freeze the chicken and tortillas separately. You can also freeze toppings like shredded cabbage. When you're ready to enjoy leftovers, you have two great options. - Microwave: Place the chicken on a microwave-safe plate. Cover it with a damp paper towel. Heat for about 1-2 minutes. Check if it's warm enough. - Oven Techniques: Preheat your oven to 350°F (175°C). Place the chicken on a baking sheet. Cover with foil and heat for about 10-15 minutes. This keeps the chicken juicy. For the best taste and safety, follow these guidelines: - Duration for Best Quality: Store the chicken in the fridge for up to 3 days. If frozen, it can last up to 3 months. The longer it sits, the more the flavor and texture may change. Enjoy your Honey Lime Chicken Tacos at their best! To check if your chicken is ready, use a meat thermometer. The internal temperature should reach 165°F (75°C). This temperature ensures your chicken is safe to eat. If you do not have a thermometer, cut into the thickest part of the chicken. The meat should be white, not pink. Yes! Making the marinade in advance is a smart move. It saves time and allows the flavors to deepen. Just store it in the fridge until you are ready to use it. This way, your chicken will soak up all that yummy honey-lime goodness. These tacos pair well with many side dishes. Consider serving them with: - Black beans - Corn salad - Mexican rice - Fresh pico de gallo For drinks, a light beer or a fresh lime soda works great. You can store leftover tacos in the fridge for up to 3 days. Keep them in an airtight container to maintain freshness. When you’re ready to eat, reheat them gently on the stove or in the microwave. Enjoy your tasty leftovers! In this post, we covered delicious Honey Lime Chicken Tacos. We explored key ingredients, from juicy chicken to fresh garnishes. I outlined simple steps for marinating, cooking, and assembling your tacos. Plus, I shared tips for flavor and cooking methods. Don't forget about variations to suit your taste or diet. Proper storage and reheating help you enjoy leftovers too. Cooking can be fun, and these tacos offer a tasty way to impress anyone at your table. Get cooking and enjoy every bite!](https://savoryspiral.com/wp-content/uploads/2025/07/13e035dc-9c2b-4f29-a85d-05dcff0ce3cc.webp)
Get ready for a tasty twist on taco night! My Honey Lime Chicken Tacos are easy to make and packed
