Skip to content
DisclaimerTerms Of UseGDPR PolicyCookie Policy

savoryspiral

  • Home
  • Drinks
  • Appetizers
  • Dinner
  • Dessert
  • About
  • Contact
  • Privacy Policy
DisclaimerTerms Of UseGDPR PolicyCookie Policy

Charlotte

- 8 oz rice noodles - 1 tablespoon sesame oil - 1 red bell pepper, thinly sliced - 1 cup shredded carrots - 1 cup snap peas, trimmed - 2 green onions, sliced - 1/4 cup fresh cilantro, chopped For this dish, rice noodles are key. They soak up the peanut sauce and add a nice texture. Fresh vegetables like bell peppers, carrots, and snap peas bring crispness and color. The sesame oil gives a rich flavor, making each bite pop. - 1/2 cup creamy peanut butter - 3 tablespoons soy sauce - 2 tablespoons lime juice - 1 tablespoon honey or maple syrup - 1–2 tablespoons sriracha (adjust to your heat preference) - 2 cloves garlic, minced - 1 teaspoon ginger, freshly grated - Water (to thin the sauce as needed) The peanut sauce is the star. Creamy peanut butter gives it depth. Adding soy sauce and lime juice balances the flavors. Sweetener adds a touch of sweetness, and sriracha kicks up the heat. Garlic and ginger give it an aromatic twist, making the sauce irresistible. - Sliced green onions - Fresh cilantro - Crushed peanuts Garnishes add fun and flavor. Sliced green onions lend a fresh crunch. Fresh cilantro brightens the dish and crushed peanuts add a delightful crunch. You can mix and match these garnishes to suit your taste. For the full recipe, check out the detailed steps to create this tasty meal! 1. Boil Water: Start by bringing a large pot of water to a boil. 2. Cook Noodles: Add 8 oz of rice noodles and cook them according to the package instructions. 3. Rinse Noodles: Once the noodles are tender, drain them and rinse under cold water. This stops the cooking process. 4. Set Aside: Place the rinsed noodles in a bowl and set them aside for later. 1. Combine Ingredients: In a medium bowl, mix 1/2 cup creamy peanut butter, 3 tablespoons soy sauce, and 2 tablespoons lime juice. 2. Add Sweetener: Next, stir in 1 tablespoon honey or maple syrup. 3. Add Heat: For spice, whisk in 1 to 2 tablespoons sriracha to taste. 4. Mix Aromatics: Add 2 cloves minced garlic and 1 teaspoon freshly grated ginger. 5. Adjust Consistency: If the sauce is thick, add water, one tablespoon at a time until it reaches your desired thickness. 1. Heat Oil: In a large skillet or wok, heat 1 tablespoon of sesame oil over medium-high heat. 2. Add Vegetables: Add 1 thinly sliced red bell pepper, 1 cup of shredded carrots, and 1 cup of snap peas. 3. Cook Time: Sauté the veggies for 4-5 minutes until they are tender but still crisp. 1. Combine Ingredients: Add the cooked rice noodles to the skillet with the sautéed veggies. 2. Pour Sauce: Drizzle the peanut sauce over the noodles and veggies. 3. Toss Together: Gently toss everything until well mixed and heated through for about 2-3 minutes. 4. Taste and Adjust: Taste the dish and adjust seasonings as needed. For the full recipe, refer to the recipe section above. Enjoy your cooking! To make your dish just the right heat, start with sriracha. Add one tablespoon first, then taste. If you want more heat, add a bit more. You can also mix in fresh chili peppers or chili flakes for extra spice. Cooking your rice noodles is key. Boil them until they are al dente, which means firm to the bite. After cooking, rinse them under cold water. This stops the cooking and keeps them from sticking together. When sautéing your veggies, keep them crisp. Cook them for about 4-5 minutes. This gives them a nice crunch. Serve your noodles in a large bowl for a casual look. For a fancier touch, use a plate and twirl the noodles into a nest shape. Garnish with fresh cilantro or crushed peanuts for color and flavor. You can also sprinkle some sliced green onions on top for a pop of green. For the full recipe, check out the [Full Recipe]. {{image_2}} To make this dish fit your diet, you can choose gluten-free noodles. Look for rice noodles or other gluten-free options. These work well in the recipe. For a vegan sauce, swap honey with maple syrup. This keeps the sauce sweet and tasty while staying plant-based. You can add proteins to make the meal heartier. Consider chicken, shrimp, or tofu. For chicken, cook it for about 6-8 minutes until fully done. Shrimp only needs 3-4 minutes until pink and opaque. If you prefer tofu, sauté it for 5-7 minutes until golden. Each protein adds its own flavor and texture. For extra crunch, toss in some nuts or seeds. Peanuts, sesame seeds, or cashews work great. You can also enhance the flavor by adding fresh herbs. Try Thai basil or mint for a new twist. These additions make the dish more exciting and flavorful. For the full recipe, check the complete instructions above to get started! To keep your Spicy Thai Peanut Noodles fresh, store them right. First, let the noodles cool down to room temperature. Then, place them in an airtight container. This helps keep the flavors locked in. You can store the noodles in the fridge for up to three days. When it's time to eat your leftovers, you have a few options. The best way is to use a skillet. Heat it on medium and add a splash of water. Toss in the noodles and sauce. Stir until warmed through. This method keeps the noodles from getting mushy. You can also use the microwave. Just place the noodles in a microwave-safe bowl. Add a little water to help steam them. Cover and heat in short bursts, stirring in between. This way, you maintain the noodle texture. If you want to save your Spicy Thai Peanut Noodles for later, freezing is a good option. First, let the dish cool completely. Then, pack the noodles and sauce into freezer-safe bags or containers. Flatten the bags to save space. You can freeze them for up to three months. When you're ready to eat, thaw your noodles overnight in the fridge. Reheat them in a skillet or microwave as mentioned before. Enjoy your meal as if it was fresh! To reduce the heat of your Spicy Thai Peanut Noodles, you can adjust the sriracha. Start with just one tablespoon. Taste the sauce. If you want it less spicy, add more peanut butter or honey to balance the heat. You can also add coconut milk for a creamy texture, which helps tone down the spice. Another method is to serve the dish with extra lime wedges. The acidity from the lime can help offset the heat. Yes, you can use many types of noodles for this recipe. Rice noodles work great, but you can swap them for whole wheat spaghetti or soba noodles. For a gluten-free option, use zucchini noodles or shirataki noodles. Each type will give a unique taste and texture. Just make sure to adjust cooking times based on the noodle type you choose. These noodles pair well with several side dishes. You can serve them with a fresh cucumber salad for crunch. A simple side of steamed broccoli adds nutrition and color. For protein, grilled chicken or shrimp complements the dish nicely. You can also serve spring rolls to make a full meal. Each side enhances the flavors of the noodles. For the full recipe, check the complete guide. This blog post covered all essential aspects of making Spicy Thai Peanut Noodles. We explored key ingredients like rice noodles, fresh veggies, and peanut sauce components. I shared step-by-step cooking instructions and helpful tips for perfect texture and spice levels. You learned about variations to suit dietary needs and proper storage. In the end, this dish is versatile and fun to make. Enjoy exploring your own twists on this classic recipe!

Spicy Thai Peanut Noodles Tasty and Quick Recipe

Are you ready to indulge in a bowl of creamy, spicy delight? My Spicy Thai Peanut Noodles are here to

The main ingredients for coconut curry meatballs create a tasty dish. Here’s what you need: - 1 lb ground chicken or turkey - 1/2 cup breadcrumbs - 1/4 cup fresh cilantro, chopped - 1 egg - 2 cloves garlic, minced - 1 tablespoon ginger, minced - 1 teaspoon salt - 1 teaspoon black pepper - 1 tablespoon curry powder - 1 can (13.5 oz) coconut milk - 2 tablespoons red curry paste - 1 tablespoon lime juice - 1 tablespoon sugar (optional, to balance flavors) - Cooked rice or quinoa, for serving This mix of items gives the meatballs a rich flavor. The coconut milk makes the sauce creamy and smooth. You can customize your meatballs with some add-ins. Try these options: - Swap ground chicken with ground beef or pork. - Add chopped green onions for extra flavor. - Use panko breadcrumbs for a lighter texture. - Try different herbs like parsley or mint. - Substitute lime juice with lemon juice for a twist. These changes keep the dish interesting. Feel free to experiment and find your favorite combo. Fresh ingredients make a big difference in taste. Here are some tips: - Use fresh herbs for the best flavor. Dried herbs lack the same punch. - Choose high-quality coconut milk. Look for brands with no additives. - Buy meat from a trusted source. Fresh meat improves texture and taste. - Store herbs properly. Wrap them in damp paper towels in the fridge. Using fresh ingredients enhances your dish. It ensures your coconut curry meatballs taste their best. For the full recipe, follow the guide above. Start by gathering your ingredients. In a large bowl, add the ground chicken or turkey, breadcrumbs, and chopped cilantro. Next, crack the egg into the bowl. Then, add the minced garlic, minced ginger, salt, black pepper, and curry powder. Mix everything well with your hands or a spoon. Make sure there are no dry spots. This mixture creates the base for your meatballs. Now, it’s time to shape the meatballs. Scoop out a small amount of the mixture. Roll it into a ball about the size of a golf ball. Aim for 1 inch in diameter. You should get around 20 meatballs. Heat a skillet over medium heat and add oil. Once it’s hot, add the meatballs in batches. Brown them for about 5 to 7 minutes. Turn them carefully to get an even color. Once browned, place them on a plate and set aside. In the same skillet, lower the heat to medium-low. Pour in the coconut milk. Add the red curry paste and lime juice. If you like, add sugar to balance the flavors. Stir well to mix everything. Bring the sauce to a gentle simmer. Carefully add the meatballs back into the skillet. Cover and let them cook for 10 to 15 minutes. This helps them soak up all the tasty curry sauce. If you want a thicker sauce, let it simmer uncovered for 5 more minutes. For the full recipe, check out the [Full Recipe]. To get the best meatball texture, use fresh ingredients. Ground chicken or turkey works well. Mix the meat with breadcrumbs, egg, and herbs. The breadcrumbs help keep the meatballs light. Don’t overmix, or they can become tough. Shape them gently into 1-inch balls. This size cooks evenly and stays juicy. Spice is key in coconut curry meatballs. Start with the recommended curry powder and red curry paste. If you like more heat, add more red curry paste. For a milder dish, reduce the curry paste. Taste the sauce before adding the meatballs. This way, you can adjust spice levels to your liking. Fresh herbs make a big difference in flavor. I love using cilantro in the meatball mix and as a garnish. You can also add fresh basil or mint for a twist. Chop the herbs finely to spread the flavor throughout. Adding fresh herbs at the end of cooking brightens the dish up, making it taste fresh and vibrant. Try these tips to make your coconut curry meatballs stand out. For the full recipe, check the main article. {{image_2}} You can change up the meatballs easily. Try ground beef or pork for a richer taste. You can also use lean ground lamb for a unique flavor. If you want a lighter option, ground turkey works great. Each protein brings its own twist to the dish. Just make sure to adjust cooking times based on the protein you choose. If you want a vegetarian or vegan version, swap the meat with lentils or chickpeas. You can mash cooked lentils with spices for a tasty mix. Use breadcrumbs made from whole grains to help bind them. Adding grated carrots or zucchini can give extra flavor. For a vegan option, skip the egg and use a flaxseed meal mix instead. This works well to hold everything together. You can play with the coconut curry sauce too. Add a splash of soy sauce for a salty kick. If you like it spicy, throw in some fresh chilis or extra red curry paste. For a fruity twist, add pineapple chunks or mango slices. You can even mix in some spinach or kale for color and nutrients. Each change brings a new taste adventure to your plate. For the full recipe, check out the detailed instructions above. To store your leftover coconut curry meatballs, place them in an airtight container. Make sure to cover them with the sauce. This helps keep them moist. They will stay fresh in the fridge for 3 to 4 days. Always let them cool down before sealing. You can freeze these meatballs for later use. First, let them cool completely. Then, place them on a baking sheet in a single layer. Freeze them for about 1-2 hours until firm. After that, transfer the meatballs to a freezer-safe bag or container. They will last for up to 3 months in the freezer. Label the bag so you know what’s inside. To reheat your meatballs, you have a few options. You can microwave them on high for 1-2 minutes until hot. If you prefer, you can heat them on the stove. Just place them in a skillet over low heat. Stir in a little extra coconut milk or water to keep them moist. Cook until they are warmed through. Enjoy them with warm rice or quinoa. For the full recipe, check out the complete guide to coconut curry meatballs! Yes, you can use canned coconut milk. In fact, it’s a great choice for this recipe. Canned coconut milk is rich and creamy. It adds a nice texture to your sauce. Look for full-fat coconut milk for the best flavor. Light coconut milk works too, but it may be less creamy. If you use canned coconut milk, shake it well before opening. This helps mix the cream and liquid inside. You can make meatballs without breadcrumbs easily. Just use oats or ground nuts as a substitute. Oats give a nice texture and help bind the meatballs. Ground nuts add flavor and richness. You can also use cooked rice or quinoa. Just make sure to adjust the amount. Use about 1/2 cup of oats or nuts for every pound of meat. This keeps the meatballs moist and tasty. Coconut Curry Meatballs are great with many sides. Here are a few ideas: - Cooked rice (white, brown, or jasmine) - Quinoa for a healthy twist - Noodles, like rice noodles or soba - Steamed vegetables, such as broccoli or snap peas - A fresh salad with lime dressing These sides balance the rich curry flavor. They also soak up the tasty sauce. Enjoy exploring different pairings to find your favorite! For the full recipe, check out the [Full Recipe]. Coconut curry meatballs are simple and fun to make. We covered the key ingredients, tasty variations, and ways to store leftovers. Remember to adjust spices and use fresh herbs for the best taste. You can easily swap out proteins or make it vegan too. With these steps and tips, you can enjoy a delightful meal anytime. Experiment and find your favorite combinations. Happy cooking!

Coconut Curry Meatballs Flavorful and Easy Recipe

If you’re looking for a quick and tasty dinner idea, you’ve found it! My Coconut Curry Meatballs are packed with

To make Caprese stuffed Portobello mushrooms, gather these key ingredients: - 4 large Portobello mushrooms, stems removed - 2 cups cherry tomatoes, halved - 1 cup fresh mozzarella balls, halved - 1/2 cup fresh basil leaves, chopped - 3 tablespoons balsamic glaze - 2 tablespoons olive oil - 1 teaspoon garlic powder - Salt and pepper to taste These ingredients create a fresh and tasty dish that bursts with flavor. The Portobello mushrooms serve as a perfect base. Their meaty texture adds heartiness to the meal. You can add more to your dish with these optional ingredients: - 1/4 cup pine nuts (for extra crunch) Pine nuts bring a delightful crunch that contrasts nicely with the soft cheese and juicy tomatoes. Feel free to mix in other ingredients you love. This dish serves four and has great nutrition. Each serving contains: - Calories: Approximately 250 - Protein: 10g - Carbohydrates: 15g - Fat: 18g These stuffed mushrooms are rich in protein and healthy fats. They make a satisfying meal or side dish. For the full recipe, check out the section titled Full Recipe. First, gather all your ingredients. You need Portobello mushrooms, cherry tomatoes, mozzarella, basil, and more. Preheat your oven to 375°F (190°C). Line a baking sheet with parchment paper. Next, remove the stems from the mushrooms. This creates a nice space for the filling. In a bowl, mix the cherry tomatoes, mozzarella, and basil. Add olive oil, balsamic glaze, garlic powder, salt, and pepper. Toss until everything is well coated. Place the mushrooms, cap side up, on the prepared baking sheet. Drizzle olive oil inside each mushroom. Sprinkle with salt and pepper. Fill each mushroom with the Caprese mixture, pressing down gently to pack it in. If you want a crunch, sprinkle pine nuts on top. Bake in the oven for 20 to 25 minutes. The mushrooms should be tender, and the cheese should melt and brown slightly. Once baked, remove the mushrooms from the oven. Drizzle with more balsamic glaze for extra flavor. To make your dish pretty, serve the stuffed mushrooms on a rustic wooden board. Garnish with extra basil leaves for color. This makes your meal look as good as it tastes! Want to see the full recipe? Check the Full Recipe section for all details. One big mistake is not cleaning the mushrooms well. Dirt can spoil the taste. Always wipe them with a damp cloth. Another issue is overfilling. If you pack too much, the mushrooms can burst. Use just enough filling to sit level. Also, don’t skip the salt. It enhances the flavors. Lastly, avoid using cold ingredients. Room temperature items blend better for taste. Seasoning is key for great flavor. Use salt and pepper to taste. A pinch of garlic powder adds depth. Balsamic glaze brings sweetness and tang. Drizzle some on top before serving. Taste the filling before you stuff the mushrooms. Adjust flavors if needed. If you want more zest, add a squeeze of lemon juice. This brightens the dish a lot. Serve your Caprese stuffed Portobello mushrooms warm. They look nice on a rustic wooden board. Add fresh basil leaves for color. A drizzle of balsamic glaze makes a great touch. Pair with a light salad or crusty bread. This adds a nice balance to the meal. You can also serve them as appetizers. They are perfect for parties or gatherings. Check out the Full Recipe for more ideas! {{image_2}} You can switch up the cheese in this recipe. Try goat cheese for a tangy taste. Feta cheese adds a salty kick that pairs well. You can also use ricotta for a creamy texture. Each cheese gives the dish its own twist. Mixing cheeses can create new flavors. Experiment to find your favorite! Want to make this dish heartier? Add grilled chicken or tofu. Shredded chicken boosts protein and makes it filling. For a plant-based option, use firm tofu. Just cube it and marinate for flavor. Both options work well with the Caprese mix. They also make the meal more satisfying. You can also add seasonal veggies to your stuffed mushrooms. Try zucchini or bell peppers for extra crunch. Spinach or kale adds a lovely green touch. These veggies enhance flavor and nutrition. Feel free to mix and match based on what you have. Seasonal ingredients keep it fresh and exciting. For the full recipe, check out the details provided! To keep your Caprese stuffed Portobello mushrooms fresh, let them cool first. Place them in an airtight container. Store in the fridge for up to three days. This way, you can enjoy them later without losing flavor. When you're ready to eat your leftovers, preheat your oven to 350°F (175°C). Place the mushrooms on a baking sheet. Heat for about 10-15 minutes or until warm. You can also use a microwave, but the oven keeps them crispier. You can freeze these mushrooms if you want to save them for later. Wrap each stuffed mushroom tightly in plastic wrap. Then, place them in a freezer bag. They can stay frozen for up to three months. When you're ready to eat, thaw them in the fridge overnight before reheating. Enjoy your delicious Caprese stuffed Portobello mushrooms again! For the full recipe, check the main article. Yes, you can use larger mushrooms. Just make sure they hold the filling well. Larger mushrooms may take a bit longer to cook. Check them for tenderness at the 25-minute mark. This recipe works best with Portobello mushrooms, but you can experiment with other types. Just remember to adjust the cooking time based on the size. To keep mushrooms firm, start with dry mushrooms. Wipe them with a damp cloth before cooking. Avoid soaking them in water. After cleaning, you can brush the mushrooms lightly with olive oil. This helps seal in moisture while they bake. If you want extra crispiness, bake them upside down for a few minutes before adding the filling. You can serve these mushrooms with a fresh salad or garlic bread. A simple arugula salad works great. Toss arugula with a splash of lemon juice and olive oil. For a heartier option, pair them with quinoa or rice. You can also enjoy these mushrooms as an appetizer or main dish. They are versatile and fit many occasions. For the full recipe, check out the detailed cooking instructions above. This article covered how to make Caprese stuffed Portobello mushrooms. We listed essential and optional ingredients, along with their nutrition facts. I provided step-by-step instructions, tips to avoid mistakes, and ways to present your dish. You also learned about variations, storage, and answers to common questions. Enjoy cooking and experimenting with flavors. These mushrooms can be a tasty dish for anyone. Enjoy your cooking adventure!

Caprese Stuffed Portobello Mushrooms Savory Delight

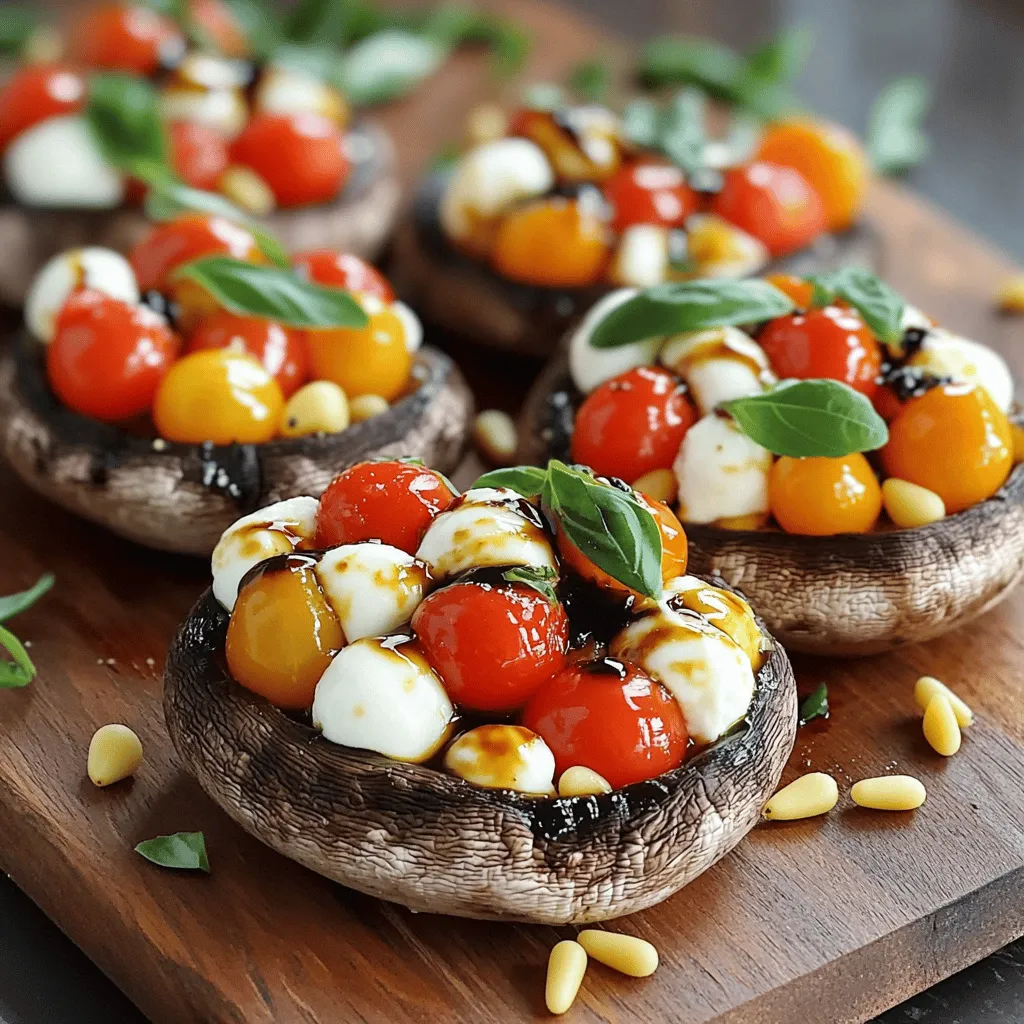
Are you ready to take your taste buds on a savory journey? Caprese stuffed portobello mushrooms offer a rich and

- 2 cups cooked chicken breast, shredded - 1 ripe avocado, diced - 1/2 cup cherry tomatoes, halved - 1/4 cup red onion, finely chopped - 1/4 cup fresh cilantro, chopped - 1 lime, juiced (plus zest for garnish) - 1 tablespoon olive oil - Salt and pepper to taste - 1/4 teaspoon garlic powder - 1/4 teaspoon cumin For this Avocado Lime Chicken Salad, having fresh ingredients is key. The chicken should be cooked and shredded for a tender bite. Make sure your avocado is ripe; it should give slightly when you press it. The cherry tomatoes add a burst of sweetness, while the red onion gives a nice crunch and tang. Fresh cilantro brings a bright flavor that ties everything together. When choosing avocados, look for ones that are dark green and slightly soft. Avoid those with dark spots or hard skin. For chicken, select breasts that are plump and have no off smells. Fresh herbs should look vibrant and crisp. Check for any wilting or browning, as this means they are past their prime. This salad is not only tasty but also nutritious. One serving contains about 300 calories. You’ll get protein from the chicken, healthy fats from the avocado, and vitamins from the veggies. The lime juice adds vitamin C, which is great for your immune system. Each bite offers a balance of flavors and health benefits, making it a smart choice for lunch or dinner. For the full recipe, visit the recipe section. 1. In a large mixing bowl, combine the shredded chicken, diced avocado, halved cherry tomatoes, and chopped red onion. This mix gives a nice blend of flavors and textures. 2. In a small bowl, whisk together the lime juice, olive oil, garlic powder, cumin, salt, and pepper. This dressing adds a fresh zing to the salad. 3. Pour the dressing over the chicken mixture. Gently toss everything together, being careful not to mash the avocado too much. You want to keep that creamy texture. - To avoid mashing the avocado, use a light hand when tossing the salad. Gentle motions keep the chunks intact. - For even dressing distribution, pour the dressing slowly and toss in stages. This way, every bite gets that delicious flavor. - Always taste your salad. Adjust the seasoning if needed by adding more salt, pepper, or lime juice. - This salad tastes best at a cool temperature. Serve it right away or chill it for 15-30 minutes. - For a pretty presentation, serve the salad on a bed of mixed greens. Add lime zest and a sprig of cilantro on top for a vibrant look. For the full recipe, check out the details above. Enjoy your fresh and flavorful dish! - Adding spices for more depth: Try adding paprika or chili powder for a kick. - Including different herbs: Fresh basil or parsley can brighten the flavor. - Using variations of dressings: Swap lime for lemon juice for a new twist. - Prepping ingredients in advance: Chop veggies the night before for quick assembly. - Using leftover chicken: Use rotisserie chicken to save time and effort. - Utilizing kitchen tools: A food processor can quickly chop herbs and mix dressings. - Overripe avocados: Choose avocados that yield slightly to gentle pressure. - Overdressing the salad: Start with a little dressing and add more if needed. - Not allowing it to chill: Letting the salad chill enhances the flavors and taste. These tips can help you create a delicious Avocado Lime Chicken Salad. For a complete guide, check out the Full Recipe. {{image_2}} You can swap chicken for shrimp in this salad. Shrimp adds a nice, sweet flavor. Just cook the shrimp until pink, then cool before adding it. You can also use plant-based proteins like chickpeas or tofu. They add texture and a different taste. Both options make this salad versatile and fun. Feel free to change the greens in your salad. Try spinach, arugula, or kale for a fresh twist. You can also add other veggies. Bell peppers, cucumbers, or corn all work well. These swaps can add crunch and color to your dish. If you need a gluten-free option, this salad is naturally gluten-free! Just ensure the dressing has no gluten ingredients. Low-carb lovers can skip the tomatoes or reduce the avocado. Each option keeps the salad healthy and satisfying. Enjoy experimenting with flavors! Store your Avocado Lime Chicken Salad in an airtight container. Glass containers work best, but plastic ones are fine too. This keeps the salad fresh and prevents odors from mixing. Place the container in the fridge right away. Do not leave it out. The cool temperature helps maintain flavor and texture. This salad stays fresh for about 2 to 3 days in the fridge. Check for signs of spoilage before eating. If the avocado turns brown or the chicken smells off, toss it. A slimy texture is also a red flag. Always trust your senses! You can freeze some parts of this salad, but not the whole dish. The avocado doesn’t freeze well. Instead, freeze the chicken and the dressing separately. To freeze chicken, place it in a freezer bag, squeezing out extra air. For the dressing, store it in a small container. When ready to enjoy, thaw and mix everything fresh. This keeps your salad tasty! For the full recipe, click [Full Recipe]. You can prepare this salad ahead of time by prepping the ingredients early. Store the chicken, diced avocado, and veggies in separate containers. This keeps them fresh and ready for mixing later. When you are ready to serve, combine everything in a bowl. To keep your avocados fresh, squeeze lime juice on them. This prevents browning. You can also store avocados in an airtight container. Just remember, avoid mixing the salad until you are ready to eat. Yes, you can serve this salad warm if you prefer. Warm chicken adds a cozy touch. Just heat the chicken before adding it to the salad. You can also add warm grilled vegetables for extra flavor. This option gives a different twist but keeps the taste fresh. This salad pairs well with several sides. You can serve it with crunchy tortilla chips for a fun texture. It also goes great with a light soup or some grilled veggies. For drinks, consider serving iced tea or a refreshing lemonade. These drinks complement the zesty lime in the salad. Try to keep your meal light and bright to match the salad's fresh vibe. For the full recipe, check out the detailed instructions above! This blog post detailed a tasty Avocado Lime Chicken Salad. We highlighted fresh ingredients, easy steps, and smart tips for preparation. I shared ideas for variations and how to store leftovers properly. You can enjoy this salad in many ways. Using these methods makes your cooking fun and stress-free. Whether you make it now or later, enjoy every bite. With a little practice, you'll impress everyone with your skills. Dive in and make this salad shine in your meals!

Avocado Lime Chicken Salad Fresh and Flavorful Dish

Are you ready to enjoy a fresh and flavorful dish? This Avocado Lime Chicken Salad combines tender chicken, creamy avocado,

To start, you need some key ingredients for the meatballs. Here’s what you’ll need: - 1 pound ground beef or ground turkey - 1/4 cup breadcrumbs - 1/4 cup grated Parmesan cheese - 1/4 cup finely chopped onion - 2 cloves garlic, minced - 1 tablespoon fresh parsley, chopped - 1 egg, beaten - Salt and pepper to taste These ingredients create a tasty base for your meatballs. Ground beef gives a rich flavor, while turkey offers a lighter option. Breadcrumbs and cheese help bind everything together. Garlic and onion add depth, making each bite special. Now, let’s talk about the glaze. This sauce is what makes the dish shine. You will need: - 1/4 cup honey - 1/4 cup soy sauce - 2 cloves garlic, minced - 1 teaspoon ginger, freshly grated - 1 tablespoon sesame oil - 1 teaspoon cornstarch mixed with 2 tablespoons water (to thicken) The honey adds sweetness, while the soy sauce brings saltiness. Fresh garlic and ginger create a bright flavor. Sesame oil gives it a nice nutty hint. Cornstarch helps to thicken your glaze, making it stick to the meatballs perfectly. To elevate your dish, consider these optional ingredients: - Fresh herbs (e.g., parsley) - Seasonings for added flavor Though not required, fresh herbs brighten the dish. You can also play with seasonings like black pepper or red chili flakes for a kick. These small touches can change the flavor profile and make the dish your own. For the full recipe, be sure to check out the complete guide! First, you need to preheat your oven to 400°F (200°C). This high heat helps the meatballs cook evenly and become golden brown. Line a baking sheet with parchment paper to prevent sticking. Using parchment also makes cleanup easier. For optimal baking conditions, space the meatballs on the sheet. This allows hot air to circulate around them. If they touch, they will steam instead of bake. In a large mixing bowl, combine the following ingredients: - 1 pound ground beef (or ground turkey) - 1/4 cup breadcrumbs - 1/4 cup grated Parmesan cheese - 1/4 cup finely chopped onion - 2 cloves garlic, minced - 1 tablespoon fresh parsley, chopped - 1 egg, beaten - Salt and pepper to taste Mix these ingredients well. The key is to blend them until fully combined. If you add too much or too little of anything, it can change the taste and texture. Once your meatball mixture is ready, shape it into small balls, about 1 inch wide. Place them evenly on your baking sheet. Bake the meatballs for 20 minutes. You will know they are done when they are well-cooked and browned. While the meatballs bake, prepare the glaze. In a small saucepan, combine: - 1/4 cup honey - 1/4 cup soy sauce - 2 cloves garlic, minced - 1 teaspoon ginger, freshly grated - 1 tablespoon sesame oil Heat this mixture over medium heat until it simmers. Let it cook for about 2-3 minutes to blend the flavors. To thicken the glaze, mix 1 teaspoon of cornstarch with 2 tablespoons of water in a small bowl. Add this to the sauce while stirring. This will help the glaze coat the meatballs nicely. Once the meatballs are baked, transfer them to a large bowl. Pour the honey garlic glaze over the meatballs and gently toss them to coat. You can now serve them warm, either as an appetizer or main dish. For more details, refer to the Full Recipe. To get the best meatball texture, you need the right meat-to-breadcrumb ratio. I recommend using one part breadcrumbs for every four parts meat. This keeps them moist but not too dense. If you want to switch things up, you can use oats instead of breadcrumbs. They work well and add fiber. For binding, try using an egg or even mashed potatoes. Both options help hold the meatballs together. To make your honey garlic sauce pop, add spices or herbs. A pinch of red pepper flakes gives a nice kick. Fresh thyme or rosemary can also add depth. When balancing sweetness and saltiness, taste as you go. If it feels too sweet, add a splash of soy sauce. If it’s too salty, a bit more honey will help. These meatballs shine with simple sides. Serve them over rice or noodles for a hearty meal. You can also pair them with steamed veggies for a lighter touch. For a fun twist, skewer them on toothpicks for a party. Drizzle extra glaze on top to impress your guests. Want to make it a feast? Add a crunchy salad on the side! For the full recipe, check out the details above. {{image_2}} You can make your honey garlic glazed meatballs healthier in a few ways. - Use lean ground turkey instead of beef. This cuts fat and calories. - Try meat substitutes like lentils or chickpeas. They add protein and fiber. - For gluten-free options, use gluten-free breadcrumbs. They work well without losing flavor. Don't be afraid to mix things up! - Add different sauces like sriracha for heat. It gives a nice kick. - Try spices like smoked paprika or cumin. They can change the dish's flavor profile. - Explore regional flavors. Think about adding teriyaki sauce for an Asian twist. Serving your meatballs can be fun and creative. - Serve them over rice or noodles for a complete meal. It soaks up the sauce well. - Use them as appetizers. Skewer them with toothpicks for easy eating. - Plan a themed dinner party. Pair these meatballs with Asian-inspired sides or Italian bread. For the full experience, check out the Full Recipe. You’ll enjoy every bite of this savory dish! To keep your meatballs fresh, place them in an airtight container. This helps maintain moisture and flavor. Make sure they cool down before sealing. You can store them in the fridge for up to three days. After that, their taste and texture may change. Freezing is a great option if you want to save meatballs for later. First, let them cool completely. Then, arrange them on a baking sheet in a single layer. Freeze them for about one hour. Once they are firm, transfer the meatballs to a freezer bag. Remove as much air as possible before sealing. This method helps keep their flavor and texture intact. You can freeze them for up to three months. When it’s time to enjoy your meatballs again, reheating is key. The best way to reheat them is in the oven. Preheat your oven to 350°F (175°C). Place the meatballs in a baking dish and cover with foil. Bake for about 15 minutes or until warmed through. If you use a microwave, place them on a microwave-safe plate. Heat in short bursts, checking often to avoid drying them out. Either method works; just remember to keep them moist for the best taste. For the full recipe and more tips, check out the delicious Honey Garlic Glazed Meatballs! Yes, you can use various meats for these meatballs. Ground beef gives a rich flavor, while ground turkey offers a lighter option. If you want a vegetarian choice, try using lentils or chickpeas. Just mash them well and mix with breadcrumbs. This keeps the dish tasty and flexible. Look for a few signs to check if your meatballs are fully cooked. They should be golden brown on the outside and firm to the touch. You can also cut one open. The center should be no longer pink, and the juices should run clear. If you have a meat thermometer, aim for an internal temperature of 160°F (71°C) for beef or turkey. Absolutely! You can prepare the honey garlic glaze in advance. Store it in an airtight container in the fridge for up to a week. When you are ready to use it, just reheat it in a saucepan over low heat. This will save you time and let the flavors meld even more. You can also store leftover meatballs in the fridge or freeze them for later. In this blog post, we covered how to make delicious honey garlic glazed meatballs. We discussed the key ingredients like ground beef or turkey, honey, and soy sauce. You learned step-by-step instructions for preparing, baking, and glazing. I also shared tips on perfecting texture and enhancing flavor. Remember, you can customize these meatballs to fit your taste. Experiment with herbs, spices, and serving styles. Whether for dinner or a party, these meatballs are sure to impress!

Honey Garlic Glazed Meatballs Savory and Simple Dish

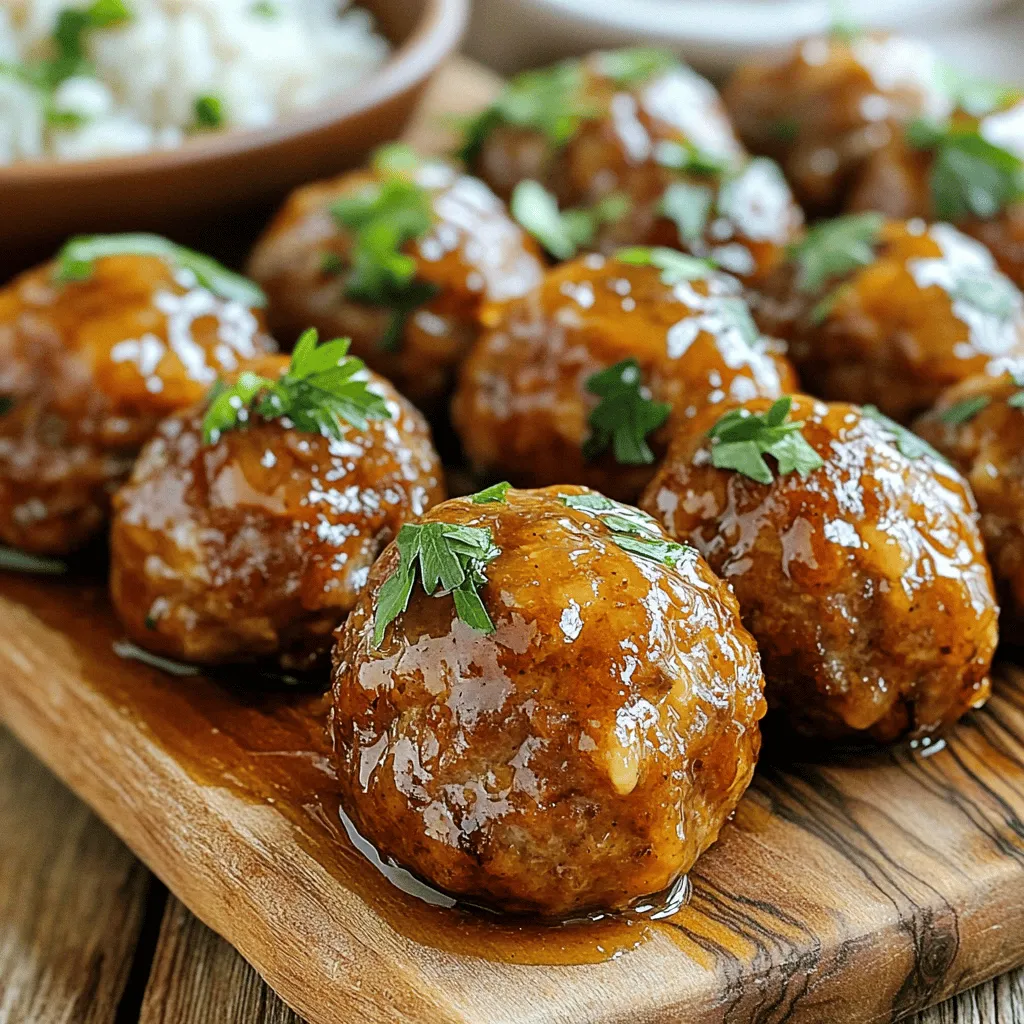
Are you ready to enjoy a sweet and savory treat? Honey Garlic Glazed Meatballs are a simple dish that will

- 2 cans of chickpeas (15 oz each), drained and rinsed - 3 tablespoons olive oil - 1 tablespoon ranch seasoning mix - 1 teaspoon garlic powder - 1 teaspoon onion powder - 1/2 teaspoon smoked paprika - 1/4 teaspoon cayenne pepper - Salt, to taste The main ingredient here is chickpeas. They are packed with protein and fiber. This makes them a great snack option. They also help keep you full. You can use store-bought ranch seasoning or make your own. If you choose to make it, you can control the flavors. The garlic powder and onion powder add depth to the ranch flavor. Smoked paprika gives a nice warmth, while cayenne adds a kick. Adjust the cayenne to your liking. If you prefer less spice, simply reduce the amount. - Calories per serving: About 120 calories - Breakdown of macros: - Protein: 6g - Fat: 5g - Carbs: 15g Chickpeas are not just tasty; they are healthy too. They provide protein and fiber. This helps with digestion and keeps your heart healthy. Plus, they are low in fat. The healthy fats come from olive oil. It adds flavor and helps absorb nutrients. This makes ranch roasted chickpeas a smart snack option. For the full recipe, check out the instructions above. To start, preheat your oven to 400°F (200°C). This step is key for crispy chickpeas. Next, take your chickpeas from the cans. Drain and rinse them well under cold water. Then, spread the chickpeas on a clean kitchen towel. Pat them dry gently. This helps remove extra moisture. Removing moisture gives a better crunch. Now, grab a large bowl. Combine the dried chickpeas with olive oil, ranch seasoning mix, garlic powder, onion powder, smoked paprika, cayenne pepper, and salt. Mix well, ensuring each chickpea gets a nice coat of the seasoning. This step is crucial for flavor. You want every bite to burst with taste. Take a baking sheet and line it with parchment paper. Spread the seasoned chickpeas out in a single layer. This ensures they bake evenly. Place them in the preheated oven and bake for 25 to 30 minutes. About halfway through, shake the pan. This helps them cook consistently. They should turn golden brown and crispy. Once done, let them cool for a few minutes. This cooling time helps them crisp up even more. Enjoy your ranch roasted chickpeas as a snack or a salad topping. For the full recipe, check the section above. To get the best crunch from your ranch roasted chickpeas, start by drying them well. After you drain and rinse them, lay them on a clean kitchen towel and pat them dry. This step is key. Extra moisture will lead to soft chickpeas, not crunchy ones. When it comes to baking, spread the chickpeas in a single layer on your baking sheet. This helps them cook evenly. Shake the pan halfway through to ensure that all sides get nice and crispy. Bake at 400°F (200°C) for about 25-30 minutes. Keep an eye on them as they bake. You want them golden brown and crunchy. To make your ranch roasted chickpeas even better, think about adding extra spices. You can try chili powder for heat or lemon zest for brightness. If you love garlic, add more garlic powder! Adjust the seasoning to match your taste. If you prefer a milder flavor, reduce the cayenne pepper. Tasting as you go is important. Mix the spices well, and make sure they coat the chickpeas evenly. This way, each bite is full of flavor. Make your ranch roasted chickpeas shine! Serve them in a small bowl with fresh parsley on top. This adds a splash of color. You can also use them as a crunchy topping for salads or soups. They add great texture and flavor. For a fun twist, try serving them with a dip on the side. A creamy yogurt dip or a spicy salsa can make them even more delicious. Enjoy your crispy ranch roasted chickpeas as a snack or a tasty addition to your meal! {{image_2}} You can play with the taste of ranch roasted chickpeas easily. Try different seasoning mixes to find your favorite. Consider taco seasoning for a spicy twist. You can also use garlic and herb blends for a milder flavor. If you want more heat, add more cayenne pepper. For less spice, cut back on the cayenne. This way, you can make the snack just right for you. Fresh herbs can brighten up your roasted chickpeas. Instead of dried herbs, use fresh parsley or cilantro. They add color and flavor. You can also swap out oils for health benefits. For instance, use avocado oil for a heart-healthy choice. This change can make the dish even better for your diet. Ranch roasted chickpeas make a great snack. They are crunchy and fun to eat on their own. You can also use them as a topping on salads. Just sprinkle them over greens for added texture. They work well in soups too, giving a nice crunch. You can mix them in or use them as a garnish. Either way, they add flavor and fun to your meals. For the full recipe, check the article above. To keep your ranch roasted chickpeas fresh, use an airtight container. Glass jars or plastic containers work great. They should stay crunchy for about a week. For long-term storage, you can freeze them. Just place them in a freezer-safe bag. This way, they can last for up to three months. To enjoy crispy chickpeas again, use your oven. Preheat it to 350°F (175°C). Spread the chickpeas on a baking sheet. Heat for about 10 minutes. This method helps maintain their crunch. Avoid the microwave if you want them crispy. The microwave will make them soft and chewy. You can keep ranch roasted chickpeas in your pantry for about a week. Look for signs of spoilage. If they smell weird or feel soft, it's time to toss them. Freshness is key for the best taste and texture. Enjoy them as a tasty snack or as a topping on salads. Yes, you can use dried chickpeas. First, soak the dried chickpeas in water overnight. This helps them soften. Next, drain the soaked chickpeas and rinse them well. Cook them in boiling water for about 1-1.5 hours until they are tender. You want them soft but not mushy. Once cooked, let them cool before seasoning. This method gives you fresh chickpeas, perfect for ranch roasting. Making ranch seasoning is simple. Here’s a quick recipe you can use: - 1 tablespoon dried dill - 1 tablespoon garlic powder - 1 tablespoon onion powder - 1 teaspoon dried parsley - 1 teaspoon black pepper - 1 teaspoon salt - 1/2 teaspoon paprika Mix all these ingredients in a bowl. Store in an airtight container. This homemade mix brings fresh flavor to your ranch roasted chickpeas. Ranch roasted chickpeas are a great snack. They are high in protein and fiber. This makes them filling and good for digestion. One serving has about 160 calories, with 6 grams of protein and 4 grams of fat. Chickpeas also provide vitamins and minerals. They help keep your heart healthy and boost energy. You can find ready-made ranch roasted chickpeas at many grocery stores. Look in the snack aisle or health food section. Some brands offer them online. Check sites like Amazon or local grocery delivery services. They are a quick snack option if you don’t want to make them at home. Absolutely! You can adjust the spice levels to fit your taste. If you like it mild, skip the cayenne pepper. For extra heat, add more cayenne or a dash of hot sauce. You can also experiment with other spices, like chili powder or cumin. Taste your seasoning before baking to get it just right. In this post, we covered how to make tasty ranch roasted chickpeas. You learned about the ingredients, their health benefits, and how to prepare them step-by-step. We shared tips for the best crunchiness, flavor variations, and serving suggestions. Storing them properly ensures they stay fresh longer. Remember, these chickpeas are a healthy snack and easy to customize based on your taste. Try out these steps, and enjoy your flavorful treat!

Ranch Roasted Chickpeas Crispy and Flavorful Snack

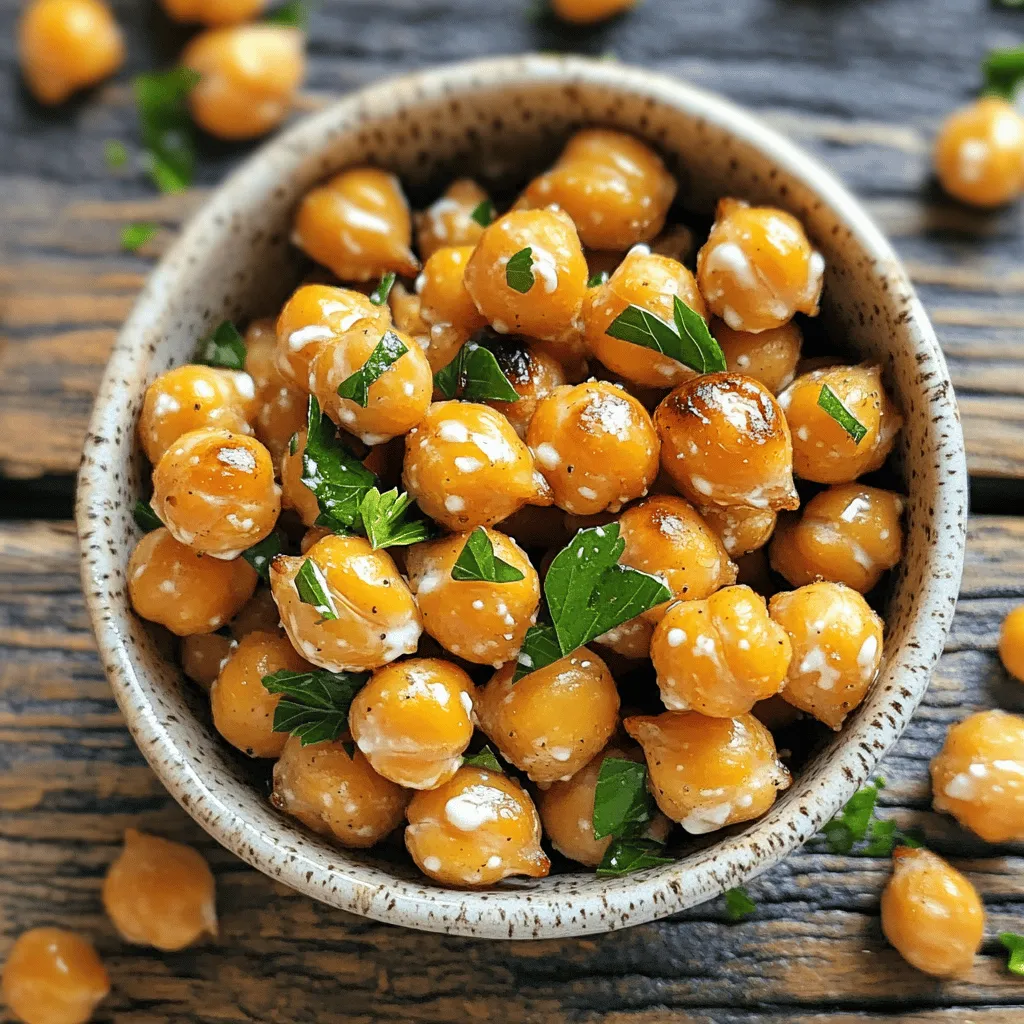
Looking for a snack that’s both tasty and healthy? Ranch roasted chickpeas are your answer! They’re crispy, full of flavor,

For the creamy pesto tortellini, you will need: - 2 cups fresh tortellini (cheese or spinach-filled) - 1/2 cup basil pesto (store-bought or homemade) - 1 cup heavy cream - 1/2 cup grated Parmesan cheese - 1 tablespoon olive oil - 1 clove garlic, minced - Salt and pepper to taste - 1/4 cup cherry tomatoes, halved (for garnish) - Fresh basil leaves (for garnish) You can switch out some ingredients if needed: - Use gnocchi instead of tortellini for a different texture. - Swap heavy cream with half-and-half for a lighter sauce. - Try nutritional yeast in place of Parmesan for a vegan option. - Use homemade pesto for a fresh, bright flavor. Fresh ingredients make a big difference in flavor. Here are some tips: - Look for tortellini with a short list of ingredients. - Choose basil pesto that smells fresh and bright. - Use heavy cream that is well within its expiration date for the best taste. - Buy cherry tomatoes that are firm and vibrant in color. First, get a large pot. Fill it with water and add salt. Bring the water to a boil. Once boiling, add 2 cups of fresh tortellini. Cook the tortellini for about 3-4 minutes. Check the package for exact time. You want it al dente, which means firm but not hard. After cooking, drain the tortellini and set it aside. You can keep it warm by covering it with a cloth. Now let’s make the sauce. In a large skillet, heat 1 tablespoon of olive oil over medium heat. Once hot, add 1 clove of minced garlic. Sauté for 1-2 minutes. You want the garlic to smell nice but not brown. Next, lower the heat and pour in 1 cup of heavy cream. Stir constantly so it mixes well. Bring the cream to a gentle simmer. Then, stir in 1/2 cup of basil pesto and 1/2 cup of grated Parmesan cheese. Mix until the cheese melts and the sauce is creamy. Add salt and pepper to taste. Now it’s time to combine! Add the drained tortellini to the skillet. Toss gently to coat the pasta with the creamy pesto sauce. Heat for another 1-2 minutes to warm everything up. The tortellini should be fully covered in the sauce. When ready, serve immediately. Top with halved cherry tomatoes and fresh basil leaves for a lovely look. Enjoy this dish with friends and family! You can find the Full Recipe for more details. To make a great sauce, start with the right cream. Heavy cream gives a rich texture. If you want it lighter, use half-and-half. Heat the cream slowly to avoid burning. Stir it gently to mix well with the garlic. If the sauce is too thick, add a splash of pasta water. This will help it blend smoothly with the tortellini. You can boost the taste of your creamy pesto tortellini easily. Adding fresh herbs like parsley or chives can lift the flavor. A squeeze of lemon juice adds brightness. For a kick, sprinkle in red pepper flakes. You can also toss in cooked chicken or shrimp for protein. This can turn it into a heartier meal. How you plate your dish matters! Use a large bowl or plate to show off the tortellini. Garnish with halved cherry tomatoes for color. Fresh basil leaves add a nice touch too. Drizzle some olive oil on top for shine. A sprinkle of extra Parmesan cheese makes it look gourmet. Serve it immediately for the best taste and warmth. For the full recipe, check out the complete guide on making creamy pesto tortellini. {{image_2}} If you want to keep this dish vegetarian, use cheese tortellini. You can also add veggies. Try sautéing zucchini, bell peppers, or spinach. These give great color and flavor. They also make the dish more healthy. A sprinkle of pine nuts on top adds a nice crunch. To add protein, cook chicken or shrimp separately. For chicken, use boneless, skinless thighs or breasts. Season them with salt and pepper. Sauté until golden and cooked through. For shrimp, cook until pink and firm. Mix either into the creamy pesto tortellini right before serving. This step makes it a filling meal. If you need a gluten-free option, choose gluten-free tortellini. Many stores sell them now. You can also use zucchini noodles or spaghetti squash for a fun twist. These alternatives keep the dish light and fresh. Just remember to adjust cooking times for these ingredients. For more details, check out the full recipe. After you enjoy your creamy pesto tortellini, store any leftovers in a sealed container. Make sure to let the dish cool to room temperature before sealing it. Keep it in the fridge for up to three days. If you want to keep it longer, consider freezing it. To reheat, you can use a microwave or a stovetop. If using a microwave, place a serving in a bowl. Cover it with a damp paper towel to keep moisture. Heat for about 1-2 minutes, stirring halfway. For stovetop reheating, add a splash of cream or water in a pan over low heat. Stir gently until warmed through. You can freeze creamy pesto tortellini for up to three months. To do this, place it in an airtight container or freezer bag. Make sure to remove as much air as possible. When you're ready to eat, thaw it in the fridge overnight. Reheat it following the instructions above for the best results. You can use half-and-half or whole milk. These options will lighten the dish. Coconut cream is another choice for a dairy-free option. Just remember, the sauce may not be as rich. Creamy pesto tortellini lasts about three to four days in the fridge. Store it in an airtight container. Make sure to cool it down before sealing. Yes, you can use dried tortellini. Just follow the cooking time on the package. Dried tortellini may take longer to cook than fresh ones. Great side dishes include garlic bread and a fresh salad. You can also serve steamed veggies like broccoli or green beans. These sides add color and nutrition to your meal. For more ideas, check the Full Recipe. To make creamy pesto tortellini, gather the following items: - 2 cups fresh tortellini (cheese or spinach-filled) - 1/2 cup basil pesto (store-bought or homemade) - 1 cup heavy cream - 1/2 cup grated Parmesan cheese - 1 tablespoon olive oil - 1 clove garlic, minced - Salt and pepper to taste - 1/4 cup cherry tomatoes, halved (for garnish) - Fresh basil leaves (for garnish) These ingredients combine to create a rich and tasty dish. Fresh tortellini gives a nice bite. The pesto adds bright, herbal notes. Heavy cream makes the sauce smooth and creamy. Parmesan cheese adds a savory depth. Garlic gives a warm, aromatic flavor. If you want to try different flavors, here are some substitutions: - Use sun-dried tomato pesto for a twist. - Replace heavy cream with half-and-half for less richness. - Add cooked chicken or shrimp for extra protein. For the best results, use fresh ingredients. Fresh basil and ripe cherry tomatoes add a nice touch. Look for high-quality pesto for a richer taste. Check the *Full Recipe* to see how to assemble these ingredients into a delicious meal. This blog post covered all you need to make creamy pesto tortellini. We explored ingredients, cooking steps, and tips for the perfect dish. Remember, fresh ingredients yield the best flavors. Don’t hesitate to try substitutions or variations like adding protein. Storing leftovers correctly keeps your meal fresh for later. Follow these steps, and you'll impress everyone at the table. Enjoy your cooking adventure!

Creamy Pesto Tortellini Tasty and Simple Recipe

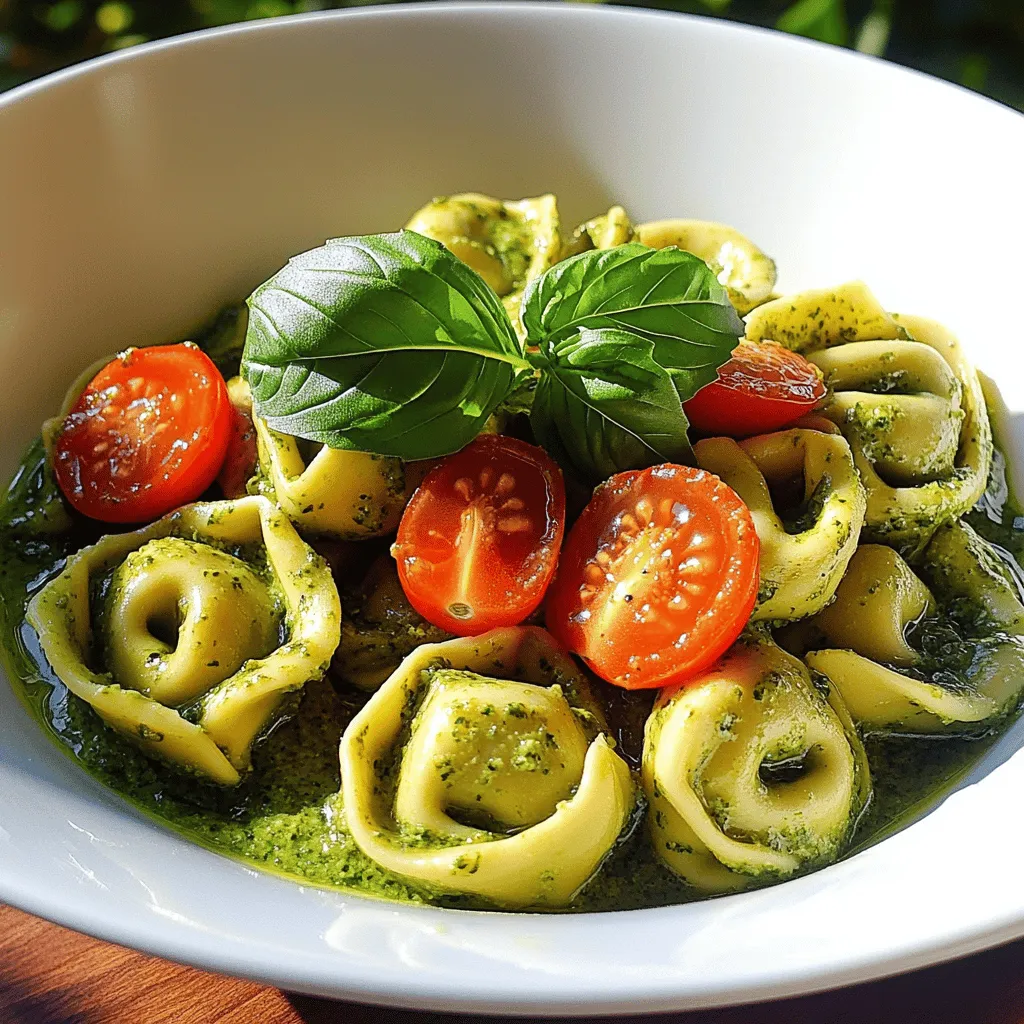
Are you ready to whip up a delicious dish that’s both creamy and delightful? My Creamy Pesto Tortellini recipe is

- 2 ripe mangos, diced - 1 medium red onion, finely chopped - 1 red bell pepper, diced - 1 jalapeño, deseeded and minced - 1/4 cup fresh cilantro, chopped - Juice of 2 limes - 1 tablespoon honey (optional) - Salt and pepper to taste To make spicy mango salsa, start with ripe mangos. They give the best flavor and sweetness. Red onion adds crunch and sharpness. The red bell pepper brings color and sweetness, while jalapeño adds the heat. Fresh cilantro gives a burst of freshness. Limes add acidity, brightening the dish. Honey can sweeten the salsa if desired. Don't forget salt and pepper for balance. - Cutting board - Knife - Mixing bowl - Spoon for mixing You will need a cutting board to chop all your ingredients easily. A sharp knife is important for clean cuts. Use a mixing bowl to combine everything. A spoon helps to mix and serve the salsa. Simple tools make this process quick and fun. - Best mango types to use: Ataulfo or Haden mangos - Preferred brands of fresh ingredients: Organic or local produce for best flavor For the best mango, I suggest Ataulfo or Haden. They are sweet and creamy. Always choose fresh, organic, or local ingredients if possible. They pack the most flavor and nutrients. Using quality products will enhance your salsa's taste. Check your local farmer’s market for the best options. You can find the [Full Recipe] for Spicy Mango Salsa to enjoy this vibrant dish! - Start by dicing the ripe mangos into small cubes. Aim for even pieces. - Next, chop the red onion finely. This lets its flavor blend well. - Dice the red bell pepper. It adds sweetness and color to the salsa. - For the jalapeño, carefully deseed it. Then mince it for that spicy kick. - In a mixing bowl, combine all the diced ingredients. - Squeeze the juice of two limes over the mixture. It adds brightness. - For sweetness, add a tablespoon of honey if you like. - Season with salt and pepper to taste. Give it a good stir. - Chill the salsa for at least 20 minutes before serving. - This resting time allows the flavors to mix well and deepen. - Enjoy the freshness and vibrant taste of your creation! For the full recipe, check the [Full Recipe]. Using ripe fruit is key to great salsa. Ripe mangos are sweet and juicy. You can tell if a mango is ripe by its color and softness. A small squeeze should feel slightly soft but not mushy. To balance sweetness and heat, mix in lime juice. The acidity cuts through the mango's sweetness. If you want more heat, add more jalapeño or try a pinch of cayenne pepper. Remember, start small and taste as you go! Spicy mango salsa pairs well with grilled chicken or fish. It adds a fresh burst of flavor to tacos or burritos. You can also serve it as a dip with tortilla chips for a fun snack. For unique ways to serve salsa, try it on top of avocado toast or with shrimp cocktails. You can even mix it into a fresh green salad for a zesty twist. To make your salsa stand out, serve it in a colorful bowl. Use a bowl that contrasts with the bright colors of the salsa. For garnishing, add a sprig of cilantro on top. You can also sprinkle some lime zest for extra color and aroma. Present your salsa alongside crispy tortilla chips for a beautiful and tasty display. For the full recipe, check out our detailed cooking guide! {{image_2}} You can switch up the fruits in your salsa. Try using pineapple or peaches. Pineapple adds a sweet and tangy taste. Peaches bring a juicy flavor that pairs well with mango. You can also mix in different spices or herbs. Try cumin for a smoky taste or basil for a fresh twist. Want more heat? Add more jalapeño or try a serrano pepper. For less spice, remove all seeds from the jalapeño. You can also swap jalapeño for a milder pepper like a bell pepper. Taste as you go, and adjust the heat to fit your family’s taste. This salsa is naturally vegan and gluten-free. If you want to make it sweeter, use agave syrup instead of honey. This keeps it vegan. You can also serve it on gluten-free chips or with grilled veggies for a healthy meal. Enjoy the fresh flavors without worry! To keep your spicy mango salsa fresh, store it in the refrigerator. Use an airtight container. This helps lock in flavors and prevents spills. A glass jar or plastic container works well. Make sure the lid is tight. When stored properly, salsa lasts about 3 to 5 days in the fridge. Check for signs of spoilage. If you see mold or smell something sour, it's best to throw it away. Fresh salsa will have bright colors and a fruity aroma. Yes, you can freeze spicy mango salsa! Just place it in a freezer-safe container. Leave some space at the top for expansion. To thaw, move it to the fridge overnight. For best results, mix it gently after thawing. This keeps the flavors fresh and tasty. For the full recipe, check out Spicy Mango Salsa. To make Spicy Mango Salsa, you need just a few steps. First, dice two ripe mangos and place them in a bowl. Next, chop one medium red onion and add it to the mangos. Then, dice one red bell pepper and toss it in for sweetness. For heat, mince one jalapeño, making sure to deseed it for less spice. Add 1/4 cup of fresh chopped cilantro and squeeze the juice of two limes into the mix. If you like a touch of sweetness, add one tablespoon of honey. Finally, season with salt and pepper, mix well, and chill for at least 20 minutes. You can find the full recipe [here]. Yes, you can use frozen mango for salsa. Frozen mango is convenient and often cheaper. It can save time and still taste great. However, it may have more water than fresh mango. This extra moisture can make the salsa watery. To avoid this, let the frozen mango thaw and drain off excess liquid. Fresh mango will give a better texture, but frozen is a good option in a pinch. Spicy Mango Salsa pairs well with many foods. It’s great with grilled chicken or fish. You can serve it with tortilla chips as a fun snack. It also works well in tacos or on top of salads. Try it with quesadillas or even on a burger for a tasty twist. This salsa adds a fresh kick to any meal. To tone down the heat in your salsa, here are a few tips. Use less jalapeño or leave out the seeds. If you want a milder flavor, try adding more mango or bell pepper. You can also mix in avocado for creaminess, which helps balance the spice. Adding more lime juice can also help cut the heat. Experiment until you find the right balance for your taste. Spicy mango salsa is simple and fun to make. You start with ripe mangoes, fresh veggies, and a mix of flavors. We covered how to prepare, mix, and serve this tasty dish. Remember to chill it for the best taste. You can adjust ingredients for your taste and dietary needs. Store it well for freshness. Enjoy this salsa with meals or as a snack. With practice, you’ll create your perfect spicy mango salsa every time. Enjoy your cooking adventure!

Spicy Mango Salsa Flavorful and Easy Recipe Guide

Are you ready to elevate your snack game? This Spicy Mango Salsa recipe brings a burst of fresh fruit flavor

- 1 cup all-purpose flour - 1 cup water - 1/4 cup unsalted butter - 1/4 teaspoon salt - 1 teaspoon vanilla extract - 2 large eggs - 1/2 teaspoon baking powder - Vegetable oil for frying - 1/2 cup granulated sugar - 1 tablespoon ground cinnamon - Alternative flours: You can use whole wheat flour or almond flour. They change the taste and texture. - Dairy-free options: Swap unsalted butter for coconut oil or vegan butter. This keeps it creamy without dairy. - Sugar substitutes: Try using coconut sugar or a sugar-free blend for fewer calories. Just adjust to taste. - Importance of precise measurements: Accurate measuring gives the best results. Too much or too little can spoil the dough. - Tips for measuring flour correctly: Use a spoon to fluff the flour in the bag. Then, spoon it into your measuring cup without packing it down. Level it off with a knife for a perfect measurement. First, we need to combine the wet ingredients. In a medium saucepan, add the water, unsalted butter, and salt. Heat it over medium heat until the butter melts. Once it boils, remove it from heat. Now, add in the all-purpose flour and baking powder. Stir until a dough forms. Let this rest for about five minutes to cool slightly. Next, we add the eggs and vanilla extract. In a mixing bowl, beat the eggs and vanilla together. Gradually stir this mixture into the dough. You want the dough to be smooth and just a bit sticky. This is key for the perfect churro bites! Now, let's fry those churro bites! Preheat your vegetable oil in a deep frying pan or pot. Aim for an oil temperature of 375°F (190°C). This is hot enough to make them crispy and golden. Using a piping bag or a plastic bag with a corner snipped off, pipe small pieces of dough into the hot oil. Make them about one inch long. Be careful not to overcrowd the pan. Fry each piece for about 2-3 minutes on each side. Look for a nice golden brown color. Once they are done, use a slotted spoon to remove the churro bites. Place them on a paper towel-lined plate to drain any extra oil. While the churro bites are still warm, it’s time to coat them in cinnamon sugar. In a shallow bowl, mix together the granulated sugar and ground cinnamon. A good ratio is 1/2 cup of sugar to 1 tablespoon of cinnamon. Toss the warm churro bites in this mixture until they are fully coated. Make sure each bite gets the right amount of cinnamon sugar. This step adds the perfect sweet touch! For the full recipe, check the complete instructions above. Enjoy making these delicious treats! To get the best churro bites, your dough needs to be smooth and slightly sticky. This texture helps them puff up while frying. A common mistake is adding too much flour. This makes the dough dry and tough. Instead, stick to the recipe. If you find your dough too dry, add a bit more water. Frying can be fun, but safety is key. First, use a deep pot to avoid splatter. Heat the oil to 375°F (190°C) for perfect frying. Always test the oil with a small piece of dough. If it bubbles up, you’re ready to go! When frying, use a slotted spoon to remove churro bites. Be careful, as hot oil can cause burns. Churro bites taste great on their own, but dips make them even better. Try chocolate syrup or caramel sauce for a sweet touch. You can also serve them with whipped cream. For a fancy look, arrange your churro bites on a platter. Drizzle sauce on top and sprinkle extra cinnamon sugar around them. This will impress your guests and make your treat shine. For the full recipe, check out the link provided. {{image_2}} To make chocolate-dipped churro bites, start by melting your favorite chocolate. You can use dark, milk, or white chocolate. Cut the chocolate into small pieces and place it in a microwave-safe bowl. Heat it in the microwave for 20 seconds at a time, stirring in between. Keep heating until the chocolate is smooth. Once your churro bites are cool, dip them into the melted chocolate. Let the excess drip off, then place them on parchment paper. The chocolate will harden quickly, giving a tasty twist to your treat. Stuffed churro bites add fun flavors. You can fill them with chocolate, caramel, or fruit jams. For a chocolate filling, use a chocolate ganache or Nutella. For a fruity option, try raspberry or strawberry jam. To stuff the churro bites, pipe some dough into the oil and let them fry for a minute. Then, use a syringe to inject the filling into the churro bites before coating them in cinnamon sugar. This extra step makes each bite a surprise! If you need gluten-free churro bites, swap the all-purpose flour. Use a gluten-free flour blend instead. Make sure the blend contains xanthan gum for better texture. You can also try almond flour or coconut flour, but they may change the taste and texture. Follow the rest of the recipe as usual. With these adjustments, you can enjoy churro bites without gluten. They will still taste amazing with the cinnamon sugar coating! Check the Full Recipe for more details on making these delicious bites. To keep your churro bites fresh, store them in an airtight container. Line the bottom with paper towels to absorb moisture. This helps them stay crispy. You can keep them at room temperature for up to two days. For longer storage, place them in the fridge. When you want to enjoy them again, reheat in the oven at 350°F (175°C) for about 5-7 minutes. This restores their crunch and warmth. If you want to save churro bites for later, freezing works well. First, let them cool completely on a wire rack. Then, arrange them in a single layer on a baking sheet. Freeze for about an hour until firm. After that, transfer them to a freezer-safe bag. Squeeze out as much air as possible. When you're ready to eat, thaw them in the fridge overnight. Reheat in the oven as mentioned above for best results. When stored correctly, churro bites last two days at room temperature and about five days in the fridge. If frozen, they can last up to three months. However, for the best taste and texture, try to eat them within a month. Fresh churro bites always taste better! For the full recipe, check out the details above. Cinnamon sugar churro bites are small, fried pastries coated in cinnamon sugar. They have a crispy outside and a soft inside. This treat comes from Mexico, where churros are popular. They often serve them with chocolate or caramel sauce. These bites are perfect for snacking or dessert. The blend of sweet and spicy flavors makes them a favorite for many. You can tell churro bites are done by their color and texture. Look for a golden brown shade. This usually takes about 2-3 minutes per side. You can also check by tapping them lightly. If they feel firm and crisp, they are ready. Don’t rush this step; frying them too fast can lead to raw dough inside. Yes, you can prepare churro bites ahead of time! You can make the dough and store it in the fridge for a day. Just bring it back to room temperature before frying. For cooked churro bites, let them cool completely. Store them in an airtight container for up to two days. Reheat them in the oven for a few minutes to regain crispness. Cinnamon sugar churro bites pair well with various dips. Chocolate sauce is a classic choice. You can also serve them with caramel sauce or even whipped cream. Fresh fruit like strawberries or bananas adds a nice touch too. For a fun twist, try drizzling them with maple syrup or honey. You now know how to make delicious Cinnamon Sugar Churro Bites. We explored key ingredients, precise measuring tips, and cooking methods to ensure great texture. Remember, substitutions can fit different diets. Storing leftovers and freezing tips help keep your treats fresh. Try variations like chocolate-dipped or stuffed churros for fun twists. With these steps, you are ready to impress everyone. Enjoy creating these tasty bites that bring joy to any occasion!

Cinnamon Sugar Churro Bites Quick and Easy Treat

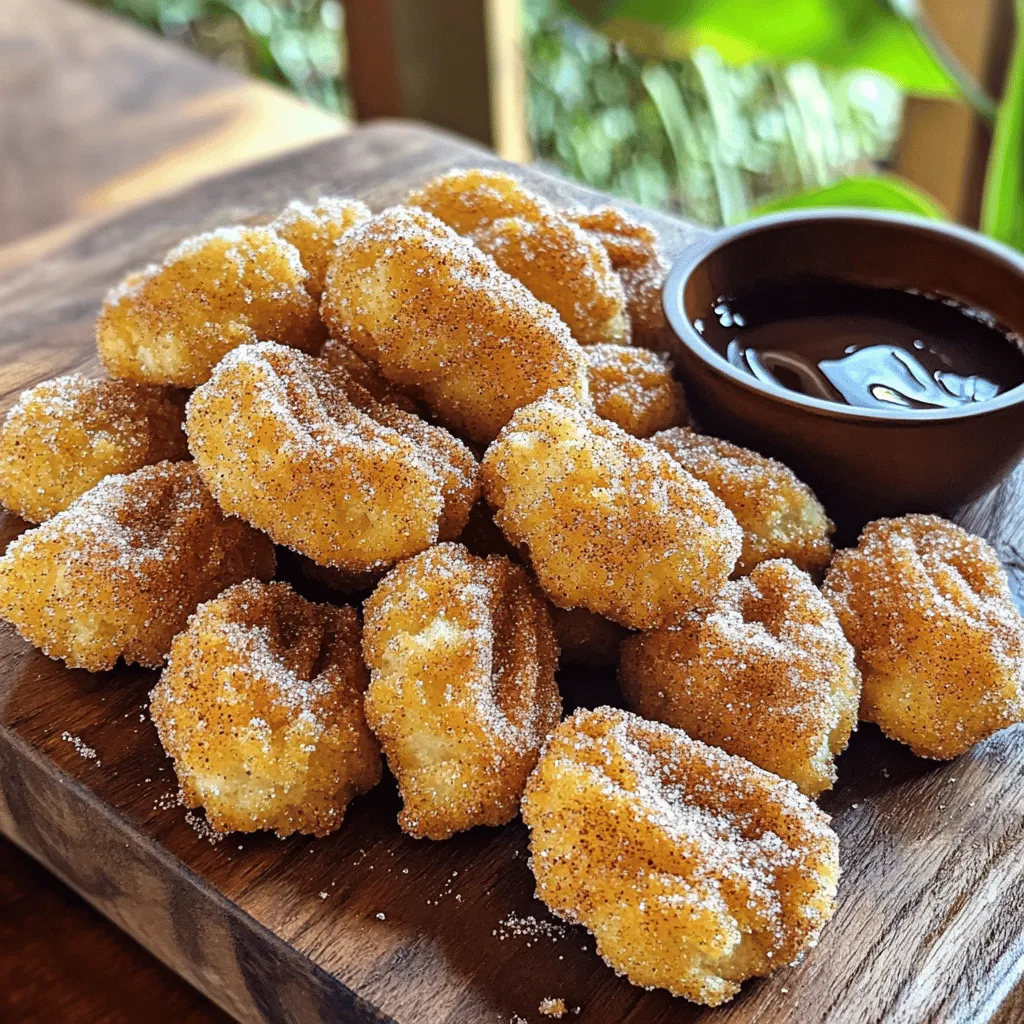
If you’re craving a sweet snack that’s quick and easy to make, look no further! These Cinnamon Sugar Churro Bites

- 6 large eggs - ¼ cup mayonnaise - 1 teaspoon Dijon mustard - 1 teaspoon apple cider vinegar - ¼ teaspoon smoked paprika - Salt and pepper to taste - 2 tablespoons fresh chives, finely chopped - 1 tablespoon pickles, finely diced (optional) For the best deviled eggs, I use fresh ingredients. Start with six large eggs. The eggs should not be too fresh. Slightly older eggs peel easier. Next, you'll need a quarter cup of mayonnaise. This gives the filling a creamy texture. One teaspoon of Dijon mustard adds a nice tangy flavor. The apple cider vinegar, one teaspoon, brightens it all up. I like to add a quarter teaspoon of smoked paprika for depth. Don't forget salt and pepper to taste. For some freshness, I chop two tablespoons of chives. If you want a crunch, add one tablespoon of finely diced pickles; this is optional. These ingredients combine well to create a classic taste. They make deviled eggs delightful and easy to enjoy. For the complete steps on making these eggs, check the Full Recipe. To boil the eggs for perfect texture, start with a saucepan. Place six large eggs in the pan and cover them with water. Bring the water to a boil over medium-high heat. Once it boils, remove the pan from the heat and cover it. Let the eggs sit for 12 minutes. This method cooks the eggs evenly. To cool the eggs quickly, transfer them to a bowl filled with ice water. Let them chill for at least 5 minutes. This quick cooling helps make peeling easier. Next, slice each egg in half lengthwise. Carefully remove the yolks and place them in a mixing bowl. This is where the magic happens. Add ¼ cup mayonnaise, 1 teaspoon Dijon mustard, 1 teaspoon apple cider vinegar, and ¼ teaspoon smoked paprika to the yolks. Season with salt and pepper to taste. Mash everything together until smooth and creamy. For added texture, fold in 1 tablespoon of finely diced pickles if you like a crunch. This gives your filling a nice twist. Now it's time to fill the egg whites. You can spoon the yolk mixture back in, or for a nicer look, use a piping bag. This makes your deviled eggs look fancy. To finish, sprinkle the eggs with 2 tablespoons of fresh chives and a light dusting of smoked paprika. This adds color and flavor, making your deviled eggs delightful and beautiful. To get a creamier texture, swap out some mayonnaise for Greek yogurt. This change adds a nice tang and keeps it light. You can also try adding a spoonful of sour cream for extra richness. Avoid these common mistakes: - Boiling eggs too long can lead to a greenish yolk. Stick to 12 minutes. - Not cooling the eggs fast enough makes peeling hard. Ice water is key. - Overmixing the yolk mixture can make it too runny. Mix just until smooth. Spices can elevate your deviled eggs. Try adding a pinch of cayenne for heat. A dash of curry powder brings a unique twist. Always season to taste. Start with salt and pepper, then adjust the flavors. Remember, tasting as you go is crucial for a balanced dish. {{image_2}} One way to spice up your classic deviled eggs is to add crispy bacon bits. The salty crunch of bacon gives a nice contrast to the creamy filling. Just cook the bacon until it's crispy, then chop it into small pieces. Mix it right into the yolk mixture or sprinkle it on top for a fun garnish. Another exciting twist is to make spicy sriracha deviled eggs. Simply add a dash of sriracha to the yolk mixture for some heat. This addition will wake up your taste buds. You can adjust the amount based on how spicy you want it. Don't forget to taste as you go! If you are looking for vegan options, you can swap out mayonnaise for a plant-based alternative. Many brands offer vegan mayo that tastes great. You can also use mashed avocado for a creamy texture. This will add a fresh flavor while keeping the dish vegan. For those who need gluten-free options, deviled eggs are naturally gluten-free. Just ensure any added ingredients, like certain mustards or seasonings, are also gluten-free. Check the labels to be safe. This way, everyone can enjoy your delicious deviled eggs without worry. For the Full Recipe, check out Divine Deviled Eggs 🥚! To keep your deviled eggs fresh, store them in the fridge. Place them in an airtight container. This helps prevent drying out. If you cover the eggs with plastic wrap, it works too. Make sure the eggs stay chilled below 40°F (4°C) to keep them safe. Deviled eggs stay fresh for about 2 to 3 days. After this, they may lose their taste and texture. Always check for any off smell or change in color before eating. When in doubt, throw them out. You can serve deviled eggs cold or at room temperature. If you serve them cold, they taste crisp and refreshing. For room temperature, set them out for about 30 minutes before serving. If you want to enhance the flavor after reheating, try adding a sprinkle of fresh herbs. A bit of extra paprika can also boost taste. If you prefer a warm twist, pop them in the oven at a low heat for a few minutes. This can give a new take on classic deviled eggs. For the full recipe, check out Divine Deviled Eggs 🥚. To keep your deviled eggs looking fresh, cover them tightly. Use plastic wrap or a lid. You can also add a dash of lemon juice to the filling. This helps prevent browning. Serve them cold to keep their bright color. Yes, you can make deviled eggs ahead of time. Prepare the filling and store it in the fridge. Keep the egg whites separate until you are ready to serve. This keeps everything fresh and tasty. They will stay good for up to two days. Peeling hard-boiled eggs can be tricky. I find that peeling them under running water helps. Start by tapping the egg on a hard surface. Then, roll it gently to crack the shell. Doing this under water makes it easier to remove the shell. You can find the Full Recipe for Divine Deviled Eggs 🥚 in this article. This recipe will guide you step-by-step to create perfect deviled eggs. You now have all the tools to make perfect deviled eggs. We covered the key ingredients and how to prepare them. You learned tips to enhance flavor and avoid common mistakes. With the variations provided, you can customize your deviled eggs for any taste. Remember to store them properly for freshness. Enjoy your tasty creations at your next gathering!

Classic Deviled Eggs Delightful and Easy Recipe

Are you ready to elevate your appetizer game? Classic Deviled Eggs are a crowd favorite, and making them is easier

Older posts
Newer posts
← Previous Page1 … Page3 Page4 Page5 … Page55 Next →

dsad

© 2025 savoryspiral • Built with GeneratePress

Our Policies

  • Copyright Policy
  • Cookie Policy
  • GDPR Policy
  • Privacy Policy
  • Disclaimer
  • Terms Of Use

More Information

  • Home
  • About
  • Contact
  • Appetizers
  • Dessert
  • Dinner
  • Drinks
©2025, savoryspiral About Back To Top