Skip to content
DisclaimerTerms Of UseGDPR PolicyCookie Policy

savoryspiral

  • Home
  • Drinks
  • Appetizers
  • Dinner
  • Dessert
  • About
  • Contact
  • Privacy Policy
DisclaimerTerms Of UseGDPR PolicyCookie Policy

Charlotte

To make the best maple pumpkin cookies, gather these simple ingredients. Each one adds flavor and texture to your treat. - 1 cup canned pumpkin puree - 1/2 cup unsalted butter, softened - 1 cup brown sugar, packed - 1/4 cup pure maple syrup - 1 large egg - 2 teaspoons vanilla extract - 2 cups all-purpose flour - 1 teaspoon baking soda - 1 teaspoon baking powder - 2 teaspoons pumpkin pie spice - 1/2 teaspoon salt - Optional ingredients: 1/2 cup chopped pecans, 1/2 cup chocolate chips Canned pumpkin puree gives moisture and rich taste. Unsalted butter adds creaminess, while brown sugar adds sweetness and depth. Pure maple syrup brings a unique flavor. The egg binds the mix, and vanilla extract enhances everything. Using all-purpose flour gives the right structure for cookies. Baking soda and powder help them rise. Pumpkin pie spice adds warmth and aroma, while salt balances the sweetness. If you want more texture, add chopped pecans or chocolate chips. Check out the Full Recipe for more details on how to put these ingredients together. 1. Preheat your oven to 350°F (175°C). Line a baking sheet with parchment paper. This helps the cookies not stick. 2. In a large bowl, cream together the softened butter and brown sugar. Mix until it is light and fluffy. This step adds air to the dough. 3. Next, add the pumpkin puree, maple syrup, egg, and vanilla extract to the bowl. Mix until everything is combined. This creates a rich, moist base. 4. In a separate bowl, whisk together the flour, baking soda, baking powder, pumpkin pie spice, and salt. This helps the cookies rise and adds flavor. 5. Gradually add the dry mix to the wet mix. Stir gently until just combined. If you want to add pecans or chocolate chips, fold them in now. These add extra texture and taste. 1. Using a cookie scoop or tablespoon, drop rounded dough onto the prepared baking sheet. Space them about 2 inches apart. This allows them to spread while baking. 2. Bake in your preheated oven for 12-15 minutes. Look for golden edges. The centers may seem soft, but they will firm up as they cool. 3. Allow the cookies to cool on the baking sheet for 5 minutes. Then transfer them to a wire rack to cool completely. This keeps them from getting soggy. For the full recipe, refer to the earlier section. Enjoy your baking! To get the best texture for your maple pumpkin cookies, use canned pumpkin puree. It keeps the dough moist and tender. Avoid using fresh pumpkin, as it may add too much water. Mix the butter and brown sugar until they are light and fluffy. This step adds air to your dough, which helps cookies rise nicely. If you want to make these cookies gluten-free, swap all-purpose flour with a gluten-free blend. Just ensure it has xanthan gum for better texture. For a vegan option, replace the egg with a flax egg. Mix one tablespoon of ground flaxseed with three tablespoons of water. Let it sit until it thickens. Presentation matters! Serve your cookies on a decorative plate. A sprinkle of pumpkin pie spice on top adds a lovely touch. You can also drizzle some extra maple syrup over the cookies for an even sweeter look. Pair these cookies with warm drinks. A cup of hot apple cider or a nice chai latte complements their flavors well. Both drinks enhance the fall vibe of these delicious treats. For the full recipe on how to make these cookies, you can refer back to the detailed instructions provided earlier. Enjoy! {{image_2}} To make these cookies even better, you can add different spices. Try adding cinnamon, nutmeg, or ginger. Each spice brings a new warmth and depth of flavor. You could also mix in some dried fruits. Raisins or dried cranberries work well. They add a nice chewiness and sweetness. If you need gluten-free cookies, swap the all-purpose flour for gluten-free flour. Many brands work well in baking. Just check the label to ensure it is a one-to-one substitute. For vegan cookies, replace the egg with a flaxseed meal or applesauce. You can also use vegan butter in place of unsalted butter. These small changes keep the cookies tasty while meeting your needs. For the full recipe, check out the previous section! To keep your cookies fresh, store them in an airtight container. This method helps keep their soft texture. You can add a slice of bread to the container. The bread keeps the cookies moist. These cookies stay good for about 5 to 7 days at room temperature. If you want them to last longer, you can freeze them. They can stay fresh in the freezer for up to 3 months. Just remember to wrap them well in plastic wrap before freezing. When you want to enjoy your cookies warm, reheating is easy. Place a cookie on a microwave-safe plate. Heat it for about 10 to 15 seconds. This will bring back the soft and chewy texture. If you prefer an oven, preheat it to 350°F (175°C). Place the cookies on a baking sheet and heat for about 5 minutes. This method will make them warm and tasty again. For best results, eat them right after reheating! You can find the full recipe [here](#). How can I make my cookies more fall-flavored? To boost the fall flavor, add more pumpkin pie spice. You can also mix in a dash of nutmeg or cinnamon. Using fresh pumpkin puree can enhance the taste too. Don't forget to include chopped apples or cranberries for a fruity twist. Each of these tips brings a cozy fall vibe to your cookies. Can I freeze maple pumpkin cookies? Yes, you can freeze maple pumpkin cookies. Make sure to let them cool completely first. Then, place them in an airtight container or freezer bag. They will stay fresh for up to three months. When you’re ready to eat them, thaw them in the fridge overnight or let them sit at room temperature for a few hours. What is the best way to prevent cookies from spreading? To stop your cookies from spreading, chill the dough before baking. This firms up the butter, which helps maintain shape. Use parchment paper on your baking sheet for an easy release. Lastly, be sure not to overmix the dough, as this can also cause spreading. Following these steps will give you perfect, thick cookies every time. For the recipe, check out the Full Recipe. This blog post covered how to make delicious maple pumpkin cookies using simple ingredients. You learned the preparation steps, baking process, and tips to get the best results. We explored various flavor additions and dietary variations, plus how to store and reheat your cookies for freshness. Feel confident in trying this recipe. Enjoy the sweet, warm, and festive flavors of fall with every bite. Happy baking!

Maple Pumpkin Cookies Irresistible Fall Treats

Fall is here, and with it comes the perfect reason to bake. Maple pumpkin cookies are an ideal treat that

To make the Best Ever Vegetable Soup, you need these fresh and tasty ingredients: - 2 tablespoons olive oil - 1 onion, diced - 3 cloves garlic, minced - 2 carrots, diced - 2 celery stalks, diced - 1 red bell pepper, chopped - 1 zucchini, diced - 1 cup green beans, chopped - 2 cups kale, chopped - 1 can (15 oz) diced tomatoes - 6 cups vegetable broth - 1 teaspoon dried thyme - 1 teaspoon dried basil - Salt and pepper to taste - 1 tablespoon lemon juice - Fresh parsley for garnish Using fresh ingredients gives your soup a bright flavor. Fresh veggies hold more nutrients and taste better. You can find crisp carrots or vibrant green beans at your local market. However, frozen veggies work too! They are picked at peak ripeness and can save you time. Just thaw them before adding to the pot. Both options can make a delicious soup. Spices and herbs make your soup sing with flavor. I love using dried thyme and basil in this recipe. They add warmth and depth. You can also try adding a bay leaf while cooking for extra flavor. For a kick, red pepper flakes can bring some heat. Experiment with herbs like dill or rosemary if you want a twist. Always taste as you go to find your perfect balance. First, gather all your ingredients. This helps you stay organized. Wash and peel your veggies. Chop the onion, garlic, carrots, and celery. Dice the red bell pepper and zucchini. Cut the green beans into small pieces. Finally, chop the kale into bite-sized bits. Having all your vegetables prepared makes cooking much easier. You will save time and avoid stress while cooking. Plus, it makes your kitchen look neat and tidy. Now, let’s get cooking! Heat 2 tablespoons of olive oil in a large pot over medium heat. Add the diced onion first and sauté it for about 3-4 minutes. You want it to become soft and clear. Next, stir in the minced garlic, diced carrots, and celery. Cook these for another 5 minutes. Stir often to keep them from sticking. Then, add the red bell pepper, zucchini, and green beans. Cook for 5 more minutes. This allows the vegetables to soften and blend their flavors together. After that, pour in 1 can of diced tomatoes and 6 cups of vegetable broth. Stir in 1 teaspoon of dried thyme, 1 teaspoon of dried basil, salt, and pepper. Bring the mixture to a boil. Once it boils, lower the heat to a simmer. Add the chopped kale and cover the pot. Let it cook for 15-20 minutes. This lets all the flavors meld together and makes the veggies tender. When the soup is ready, stir in 1 tablespoon of lemon juice. This adds a fresh and bright flavor. Taste the soup, and adjust the seasoning if needed. Ladle the soup into bowls and garnish with fresh parsley. This makes it look colorful and inviting. Serve with some crusty whole-grain bread on the side for a complete meal. For the full recipe, check out the Best Ever Vegetable Soup 🥦🥕. Enjoy your hearty and delicious soup! To make your soup burst with flavor, try these tips. Start with fresh herbs like thyme and basil. They add depth and aroma. Use quality vegetable broth for a rich base. A splash of lemon juice at the end brightens the taste. You can also add a dash of hot sauce for some heat. If you want more umami, stir in a spoonful of miso paste. Many people make simple mistakes when making vegetable soup. One common error is overcooking the vegetables. This can make them mushy and bland. Aim to keep some crunch. Another mistake is skimping on seasoning. Always taste your soup and adjust salt and pepper as needed. Lastly, don’t forget to add acid, like lemon juice. This lifts the flavors and adds brightness. Busy days call for quick cooking! To save time, chop your veggies ahead. Store them in the fridge for easy access. You can also use a food processor for fast chopping. If you want a quick meal, use frozen vegetables. They are just as nutritious and cook fast. Lastly, make a big batch and freeze leftovers. This gives you soup on hand for future meals. For the full recipe, check the Best Ever Vegetable Soup. {{image_2}} You can boost your soup with protein. Consider adding canned beans. Chickpeas or kidney beans work great. You can also use lentils. They add texture and keep the soup hearty. If you like meat, diced chicken or turkey adds flavor. Just cook it before adding to the soup. Tofu is another good choice for a meat-free option. It soaks up the soup’s flavors well. Feel free to change the veggies. You can use what you have in your fridge. Sweet potatoes or butternut squash bring a sweet taste. Peas or corn add a fun pop of color. Try adding spinach or Swiss chard for extra greens. You can also mix in some mushrooms for an earthy flavor. The key is to keep the balance of colors and textures. You can choose between a creamy or brothy soup. For a creamy soup, blend part of the soup. This makes it thick and smooth. You can also add coconut milk or cream for richness. If you prefer a brothy soup, keep it simple. Just let the vegetables shine with the broth. Both styles are delicious and warming. You can find your favorite by trying both methods. To keep your soup fresh, let it cool first. Then, pour it into airtight containers. Make sure to leave some space at the top. This helps the soup expand when frozen. Label your containers with the date. Store them in the fridge for up to five days. If you want to enjoy the soup longer, freezing is a great option. Freezing vegetable soup is easy. Use freezer-safe containers or bags. I like to divide the soup into single servings. This makes it simple to grab just what you need. When freezing, remove as much air as possible. This helps prevent freezer burn. Your soup can last up to three months in the freezer. When you’re ready to eat it, just thaw it overnight in the fridge. To reheat, you can use the stove or microwave. If using the stove, pour the soup into a pot. Heat it on low, stirring often. This prevents it from burning. If you use a microwave, heat in short bursts. Stir every minute to ensure even heating. You can add a splash of broth or water if it seems too thick. Enjoy your warm, hearty soup! For the complete recipe, check out the Full Recipe link. Yes, you can easily make this soup vegan. The recipe already uses vegetable broth, which is plant-based. Just ensure you skip any animal-based ingredients. You can also use vegetable oil instead of olive oil if you prefer. Vegetable soup lasts about 3 to 5 days in the fridge. Store it in an airtight container to keep it fresh. Always check for signs of spoilage before eating. Absolutely! Feel free to swap out vegetables as you like. Use what you have on hand or what is in season. This soup is very flexible and can adapt to your taste. Serve the soup hot in bowls. A sprinkle of fresh parsley adds color and flavor. Pair it with crusty whole-grain bread for a hearty meal. You can also drizzle some olive oil on top for extra richness. For the full recipe, check out the complete details above. In this post, we explored the best vegetable soup. We covered ingredients, cooking steps, and tips. Use fresh or frozen veggies for great taste. Add herbs and spices to boost flavor. Remember to avoid common mistakes to make it perfect. You can also customize it with different proteins and vegetables. Proper storage will keep your soup fresh longer. Following these steps yields a warm, tasty dish. Enjoy your cooking and make this soup your own!

Best Ever Vegetable Soup Simple and Hearty Recipe

If you’re craving a warm, delicious bowl of comfort, you’re in the right place! This Best Ever Vegetable Soup is

To make this Crunchy Cabbage Cucumber Salad, you will need: - 2 cups green cabbage, finely shredded - 1 large cucumber, sliced thinly - 1 red bell pepper, diced - 1 carrot, grated - 1/4 cup red onion, thinly sliced - 1/4 cup chopped fresh cilantro - 3 tablespoons rice vinegar - 2 tablespoons sesame oil - 1 teaspoon honey or agave syrup - Salt and pepper to taste - 1/4 cup roasted peanuts, roughly chopped (for crunch) These simple ingredients blend together for a fresh and vibrant salad. You can make this salad your own with some optional ingredients: - Sliced radishes for extra crunch - Shredded carrots for added sweetness - Chopped jalapeño for a spicy kick - Avocado for creaminess - Lime juice for a zesty twist Feel free to mix and match to create a flavor that fits your taste. Using fresh, high-quality ingredients makes a big difference in taste. Here are my top picks: - Cabbage: Look for firm heads without blemishes. - Cucumber: Choose organic cucumbers for the best flavor. - Bell Pepper: Pick vibrant red bell peppers; they add sweetness. - Sesame Oil: Use toasted sesame oil for a deeper flavor. - Peanuts: Freshly roasted peanuts add the best crunch. For the best results, choose fresh and local products whenever possible. For the full recipe, check out the earlier section. First, gather all the ingredients. You need fresh cabbage, cucumber, bell pepper, carrot, onion, and cilantro. Start by finely shredding the cabbage. This gives it a nice crunch. Next, slice the cucumber thinly. Thin slices soak up the dressing well. Dice the red bell pepper and grate the carrot. Then, thinly slice the red onion. Place all these veggies in a large mixing bowl. Make sure you toss them gently to mix. In a separate small bowl, whisk together the rice vinegar, sesame oil, honey, salt, and pepper. This dressing brings a zesty flavor. Adjust the seasoning to match your taste. If you like it sweeter, add a bit more honey. For a tangy kick, add more vinegar. The dressing should balance well with the veggies. Pour the dressing over the mixed vegetables. Toss everything together until the veggies are well coated. This step is key for great flavor. Next, fold in the chopped cilantro and roasted peanuts. The peanuts add a perfect crunch. Let the salad sit for 10-15 minutes. This waiting time allows the flavors to blend. When ready to serve, you can enjoy it chilled or at room temperature. Toss lightly again before serving to keep it fresh. For a beautiful look, serve it in a large bowl, garnished with more cilantro and chopped peanuts. For the full recipe, check the earlier section. To get the best crunch, start with fresh veggies. Use green cabbage and cucumbers that are firm. Shredding the cabbage finely helps it mix well. Slice the cucumber thinly for a nice bite. You can also chill the salad before serving. This keeps everything crisp and tasty. Adding roasted peanuts right before serving gives an extra crunch. Seasoning is key to a zesty salad. I like using rice vinegar for a tangy taste. Sesame oil adds a rich flavor without being heavy. Honey or agave syrup balances the acidity. Don't forget salt and pepper; they bring everything together. You can also add a sprinkle of chili flakes for a spicy kick. Fresh cilantro adds a bright taste, too. Serve this salad in a big bowl to show off its colors. Garnish with extra cilantro and chopped peanuts for flair. This salad pairs well with grilled chicken or fish. You can also enjoy it as a light lunch on its own. For a picnic, pack it in a jar for easy transport. For the full recipe, check the earlier section. {{image_2}} You can switch things up with different veggies. Try adding shredded carrots for extra color and crunch. Radishes add a peppery kick. If you like some heat, diced jalapeños work well too. You could also use purple cabbage for a vibrant look. Mixing in snow peas or bell peppers can add a nice crunch and sweetness. To make this salad a meal, add protein. Grilled chicken or shrimp pairs well with the fresh flavors. You can also add chickpeas for a plant-based boost. Tofu cubes are another great option. These proteins not only fill you up but also make the salad more nutritious. The dressing can change the whole dish. Try lime juice for a tangy twist. A mix of yogurt and herbs makes a creamy dressing. For more sweetness, use a bit of orange juice. You can also experiment with spicy sauces like sriracha or chili paste. Each dressing creates a new flavor experience for your Crunchy Cabbage Cucumber Salad. For the full recipe, check the provided details. After enjoying your Crunchy Cabbage Cucumber Salad, store any leftovers in an airtight container. This method keeps the salad fresh and crisp. Make sure to separate any toppings, like peanuts, to maintain crunchiness. You can add them just before serving. Place the container in the fridge. The cooler temperature helps preserve the salad's flavor and texture. When meal prepping this salad, chop your veggies ahead of time. Store them in separate containers until you're ready to mix. This way, all ingredients stay fresh. Prepare the dressing ahead too, and keep it in a jar. When meal time arrives, combine everything for a fresh and zesty dish. This method supports easy assembly and keeps your salad vibrant. Your salad will stay fresh in the fridge for about three days. Check for wilting cabbage or slimy cucumbers. These signs mean it’s time to toss the salad. Fresh ingredients bring the best flavor. If the salad begins to smell off or changes color, it’s best to discard it. Always trust your senses; they guide you in food safety. For the full recipe, check the detailed instructions! Cabbage is low in calories and high in fiber. It helps with digestion and weight loss. It also provides vitamin C, which boosts your immune system. Cabbage contains antioxidants that protect your cells. Cucumbers are hydrating and refreshing. They are also low in calories. Cucumbers provide vitamin K, which helps with bone health. Both vegetables are rich in water, which keeps you hydrated. Yes, you can make this salad ahead of time. If you prepare it a few hours before serving, it will taste even better. The flavors will blend together nicely. However, if you make it a day early, store the dressing separately. This keeps the veggies crunchy. Add the dressing just before serving for the best texture. To make this salad vegan, simply swap honey for agave syrup. This keeps it sweet and plant-based. You can also add more veggies or use different nuts for crunch. Try adding chickpeas for extra protein. Feel free to experiment with the dressing too. Using a plant-based oil will maintain the vegan theme. Check the Full Recipe for more ideas! This blog post covered how to make a crunchy cabbage cucumber salad. We explored the key ingredients and how to prepare them. I shared tips for maximum crunchiness and tasty seasonings. You also learned about different variations and how to store your salad. Remember, this salad is not just delicious. It’s versatile and healthy too. With these tips and tricks, you can enjoy a fresh, vibrant salad anytime. Try customizing it to suit your taste and make it your own! Happy eating!

Crunchy Cabbage Cucumber Salad Fresh and Zesty Dish

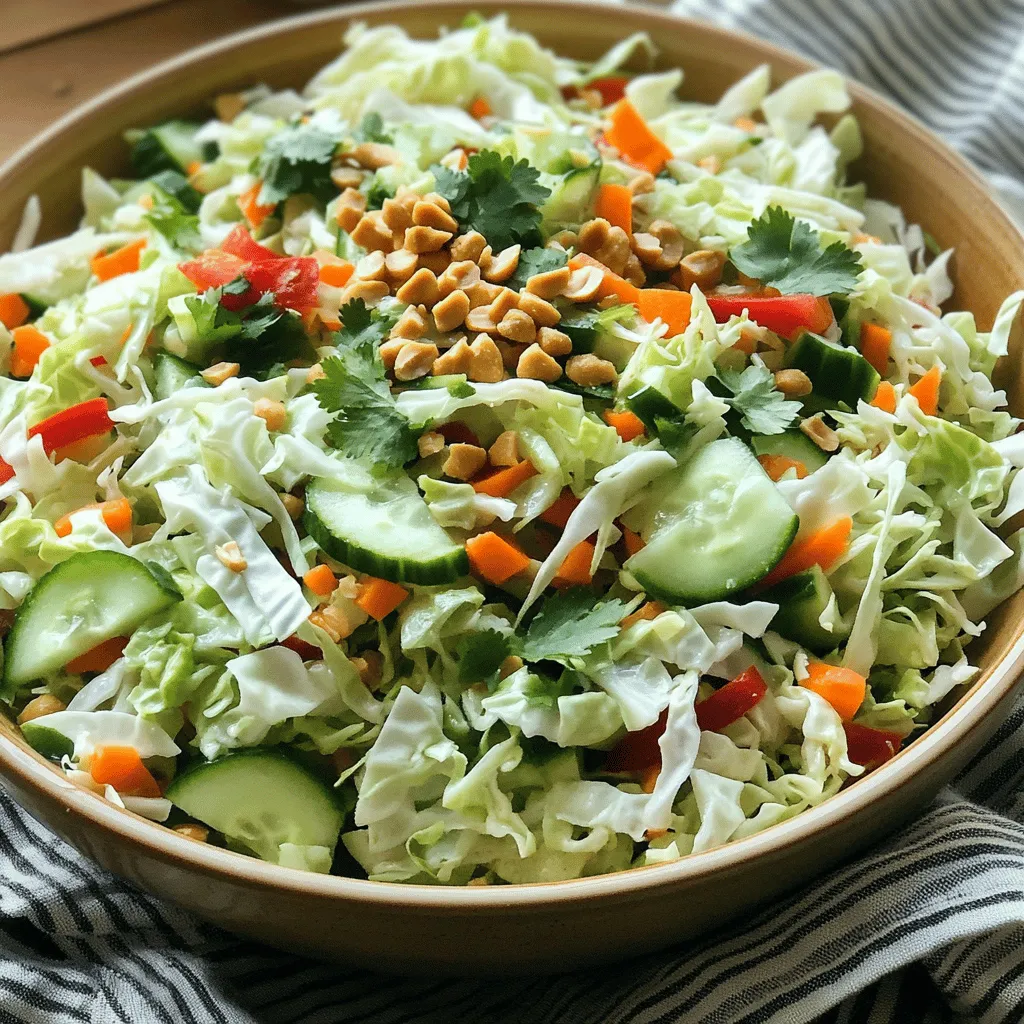
Looking for a fresh and zesty addition to your meals? Try my Crunchy Cabbage Cucumber Salad! This simple dish is

- 2 cups rotini pasta: This pasta shape holds sauce well, making each bite tasty. - 1 tablespoon olive oil: Use extra virgin for a rich flavor. - 2 cups cooked chicken breast, diced: Grilled or rotisserie chicken adds great taste. - 1 cup romaine lettuce, chopped: This gives a fresh crunch to the salad. - 1/2 cup cherry tomatoes, halved: These add sweetness and color. - 1/4 cup grated Parmesan cheese: Choose a high-quality brand for best flavor. - 1/4 cup Caesar dressing: Select a creamy dressing for a classic taste. - 1 teaspoon garlic powder: This boosts the flavor without overpowering. - 1/2 teaspoon black pepper: Freshly ground adds a nice kick. - 1/4 teaspoon salt: Use sea salt for a fine taste. - Optional: Croutons for garnish, adding crunch and texture. For high-quality brands, look for local markets that offer fresh ingredients. Specialty stores often have better olive oils and dressings. You can customize your salad by trying different proteins or adding more veggies based on what you like. To make a tasty Chicken Caesar Pasta Salad, follow these easy steps. 1. Cook the Pasta: Start by boiling 2 cups of rotini pasta. Follow the package directions for timing. Once done, drain the pasta. Rinse it with cold water. This helps stop the cooking. Set the pasta aside. 2. Mix Ingredients: In a large bowl, add your cooked pasta. Then, add 2 cups of diced chicken breast. Next, mix in 1 cup of chopped romaine lettuce and 1/2 cup of halved cherry tomatoes. 3. Dress the Salad: Drizzle 1 tablespoon of olive oil and 1/4 cup of Caesar dressing over the salad. This gives it a rich flavor. 4. Season Well: Sprinkle in 1 teaspoon of garlic powder, 1/2 teaspoon of black pepper, and 1/4 teaspoon of salt. Toss gently to mix everything well. 5. Add Cheese: Use 1/4 cup of grated Parmesan cheese. Add it to the bowl and toss lightly again. This adds creaminess and a savory taste. 6. Garnish: If you want extra crunch, feel free to add croutons on top. They make the salad more fun to eat. 7. Serve or Chill: You can serve the salad right away. Or, refrigerate it for 30 minutes. This lets the flavors blend together nicely. - Use a big pot with lots of water. This helps the pasta cook evenly. - Stir the pasta within the first few minutes. This stops it from sticking. - Taste a piece before draining. It should be "al dente," meaning firm but not hard. - Always wash your hands before cooking. - Rinse veggies like romaine lettuce and tomatoes under cold water. - Keep raw chicken separate from other foods to avoid cross-contamination. For a complete set of steps and measurements, check the Full Recipe. To make your Chicken Caesar Pasta Salad even better, think about adding herbs and spices. Fresh basil or parsley can brighten the dish. You can also try a pinch of red pepper flakes for a little heat. For dressings, store-bought Caesar is great, but homemade is best. Mix 1/2 cup of mayo, 1 tablespoon of lemon juice, 1 teaspoon of Dijon mustard, and 1 clove of minced garlic. This mix really boosts the flavor. Balancing textures is key. Your salad needs both crunch and softness. The romaine lettuce stays crispy, while the pasta is soft. Add croutons for extra crunch. They give a nice bite against the creamy dressing. Explore the Full Recipe for easy steps to create this tasty salad! {{image_2}} Customization is key to making any dish your own. Chicken Caesar Pasta Salad is no different. Here are some fun ideas to switch it up! - Dietary Restrictions: For gluten-free needs, use gluten-free pasta. Many brands make tasty options. For a vegetarian version, skip the chicken and add chickpeas or grilled veggies. They pack in protein and flavor! - Creative Ingredient Swaps: You can swap chicken for shrimp or turkey. Both choices add great taste. Try adding bell peppers or cucumbers for extra crunch. Fresh herbs like basil or parsley can also brighten the dish. - Seasonal Variations: In spring, toss in peas or asparagus. In summer, add corn or diced zucchini. Fall is great for roasted squash. Winter calls for hearty greens like kale. Each season brings new life to this dish! These options help you create a Chicken Caesar Pasta Salad that fits your taste and needs. Enjoy exploring all the different flavors! You can find the full recipe [here](#). To keep Chicken Caesar Pasta Salad fresh, store it in an airtight container. This helps to lock in flavor and moisture. Refrigerate it right away after serving. If you want to freeze the salad, separate the dressing. Freeze only the pasta and chicken without the veggies. This keeps the salad from getting soggy. When ready to eat, thaw it in the fridge overnight. To prevent sogginess, add the lettuce and tomatoes fresh, right before serving. Keep them in a separate container until you are ready to eat. When reheating, use a microwave. Heat it gently to warm it up. Avoid overheating, as it can make the pasta mushy. If you want a cold salad, enjoy it straight from the fridge. For the full recipe, check out the Ultimate Chicken Caesar Pasta Salad. Can I make Chicken Caesar Pasta Salad ahead of time? Yes, you can make this salad ahead of time. Just mix the pasta and other ingredients. Keep the dressing separate until serving. This keeps everything fresh and crisp. You can store it in the fridge for up to 24 hours. What can I substitute for Caesar dressing? If you need a substitute, try ranch or Greek yogurt dressing. Both add flavor and creaminess. You can also mix olive oil, lemon juice, and Parmesan cheese. This gives a nice taste without the Caesar dressing. How long does Chicken Caesar Pasta Salad last in the fridge? This salad lasts about 3 days in the fridge. After that, the ingredients may get soggy. Always check for freshness before eating. If it smells off or looks strange, throw it away. Can I use canned chicken for this recipe? Yes, you can use canned chicken. It saves time and is convenient. Make sure to drain and rinse it well. This helps remove excess sodium and improves the taste. For the best flavor, I recommend using shredded canned chicken. For more details on making this dish, check the Full Recipe. This blog post covered all you need to make a tasty Chicken Caesar Pasta Salad. You learned about key ingredients, step-by-step instructions, and helpful tips to boost flavor. You saw how to customize the dish for various diets and how to store leftovers. Remember, cooking is about creativity. Feel free to experiment with ingredients and flavors. With this guide, you're ready to whip up your own Chicken Caesar Pasta Salad easily. Enjoy making this dish and sharing it with friends or family. Happy cooking!

Chicken Caesar Pasta Salad Tasty and Fresh Recipe

Are you ready to enjoy a vibrant twist on your classic favorite? This Chicken Caesar Pasta Salad brings together fresh

To make Vegan Creamy Garlic Potato Soup, you need a few key ingredients. Here’s what you’ll need: - 4 medium potatoes, peeled and diced - 1 large onion, chopped - 6 cloves garlic, minced - 4 cups vegetable broth - 1 cup canned coconut milk (or almond milk for a lighter version) - 2 tablespoons olive oil - 1 teaspoon dried thyme - 1 teaspoon smoked paprika - Salt and black pepper to taste - Fresh chives, finely chopped (for garnish) Each ingredient plays a vital role in creating a rich and creamy soup. The potatoes provide a smooth base. The garlic and onion add depth and flavor. Vegetable broth brings warmth and richness, while coconut or almond milk gives it that creamy texture. I always recommend using fresh ingredients. They make a big difference in taste. For the best flavor, choose good quality vegetable broth. Also, feel free to adjust the seasonings. Make it your own! For the full recipe, you can refer to the complete instructions. Enjoy making your Vegan Creamy Garlic Potato Soup with these simple, fresh ingredients! 1. Sautéing onion and garlic Start by heating olive oil in a large pot over medium heat. Add the chopped onion and sauté for 5-7 minutes. You want the onion to turn soft and clear. Next, stir in the minced garlic. Sauté for another 2 minutes. The garlic should smell amazing at this point. 2. Cooking potatoes with broth and seasonings Now, add the diced potatoes, vegetable broth, dried thyme, and smoked paprika to your pot. Bring it to a boil. After it boils, lower the heat to a simmer. Cover the pot and cook for about 15-20 minutes. You’ll know it's ready when the potatoes are soft. 3. Blending process for creamy texture Once your potatoes are tender, it's time to blend! Use an immersion blender to mix everything until smooth and creamy. If you don’t have one, carefully pour the soup into a standard blender in batches. Blend until you achieve that velvety texture. 1. Incorporating coconut milk After blending, return the soup to the pot. Now, stir in the coconut milk. This adds rich creaminess to your soup. 2. Adjusting seasonings and heating through Taste your soup and add salt and black pepper as needed. Heat the soup on low for a few minutes to warm it up. This step is key for the best flavor. 1. How to present the soup Serve the soup hot in warm bowls. Drizzle a bit of coconut milk on top for a nice touch. Finish with fresh chives for color and flavor. 2. Recommended accompaniments I love serving this soup with a slice of crusty bread. It makes for a cozy and comforting meal. Enjoy every spoonful! For the full recipe, check out the section above. To boost the garlic flavor, use fresh garlic. Fresh garlic adds a punch that dried garlic cannot match. Try roasting some of the garlic cloves before adding them to the soup. Roasting brings out a sweet and rich taste. For herbs, I recommend thyme and chives. Thyme blends well with garlic and potatoes. Fresh chives on top add a nice crunch and oniony bite. You can also try adding a pinch of smoked paprika. This spice gives the soup a warm, smoky flavor that pairs nicely with garlic. For a creamy texture, use an immersion blender. This tool lets you blend the soup right in the pot. If you don’t have one, pour the soup into a regular blender. Blend in small batches for safety. When cooking, the size of your potato pieces matters. Smaller pieces cook faster, so cut them into even sizes. If your potatoes are large, you may need to cook them a bit longer. Always check for tenderness with a fork. Potatoes are great for your health. They are high in vitamins and fiber. Garlic is also a superfood. It can help boost your immune system and improve heart health. When choosing milk, coconut milk is creamy and rich. It adds a nice flavor to the soup. Almond milk is lighter and lower in calories. Choose based on your taste and health goals. Both options work well in this recipe. For the full recipe, check out the details above. {{image_2}} You can change the plant-based milk in this soup. Almond milk gives it a lighter touch. Coconut milk makes the soup creamy and rich. Both options work well, so choose what you like best. Adding veggies is another great idea. Carrots and celery can boost the soup's nutrition. They also add flavor and texture. Just chop them up and toss them in the pot with the potatoes. Do you want to spice things up? Try adding curry or cumin to the mix. These spices bring warmth and depth to the soup. You can start with a small amount and adjust to your taste. Another simple tweak is a splash of lemon juice. It adds brightness and balances the flavors. Just a bit can really lift the dish. You can also use this soup in different ways. Serve it as a dip for bread or crackers. It makes a tasty sauce, too, for roasted veggies or pasta. Want something heartier? Turn your soup into a stew. Just add proteins like beans or lentils. This makes the dish filling and satisfying. For the full recipe, check out the [Full Recipe] section. To store your leftovers, let the soup cool first. Pour it into an airtight container. Make sure to seal it tightly. This will keep the soup fresh. In the fridge, it lasts about 3 to 5 days. If you want to enjoy it later, consider freezing it. To freeze the soup, use a freezer-safe container. Leave some space at the top. The soup may expand when frozen. It keeps well for up to 3 months. When you’re ready to eat it, thaw it overnight in the fridge. For reheating, warm it on the stove over low heat. Stir it often for a smooth texture. If it looks thick, add a splash of vegetable broth or water. Enjoy your creamy garlic potato soup just like fresh! Can I make Vegan Creamy Garlic Potato Soup ahead of time? Yes, you can make this soup ahead of time. The flavors blend well as it sits. Cool the soup completely, then store it in an airtight container in the fridge. It will last for 3 to 4 days. When reheating, add a splash of broth to help regain its creamy texture. What can I use instead of coconut milk? If you prefer, you can use almond milk or another plant-based milk. Almond milk gives a lighter taste. For a richer option, try cashew cream. You can also blend soaked cashews with water to create a creamy base. How can I thicken the soup further? To thicken the soup, you can add more potatoes. Just chop them small and cook them longer. Another option is to blend in a tablespoon of cornstarch mixed with cold water. This will help create a thicker texture without changing the flavor. Is it possible to make this soup high protein? Yes, you can boost the protein in this soup. Add cooked lentils or chickpeas for a protein punch. Tofu or tempeh also works well. Just blend them in for a creamy finish. Each option adds a nice texture and flavor. This guide shared the key steps to making Vegan Creamy Garlic Potato Soup. We covered ingredients, cooking methods, and creative variations. Remember to sauté your garlic and onion for a rich flavor. Use coconut milk for creaminess or try almond milk. Feel free to mix the ingredients to suit your taste. Creating this soup is easy and fun. It’s healthy, tasty, and perfect for any meal. Enjoy every spoonful and feel proud of your cooking. Happy cooking, and have fun experimenting with your own twists!

Vegan Creamy Garlic Potato Soup Flavorful and Easy

Are you ready to warm up with a delicious bowl of Vegan Creamy Garlic Potato Soup? This easy recipe is

To make these tasty Bakery-Style Pumpkin Muffins, gather the following ingredients: - 1 ½ cups all-purpose flour - 1 teaspoon baking soda - ½ teaspoon baking powder - 1 teaspoon ground cinnamon - ½ teaspoon ground nutmeg - ¼ teaspoon ground ginger - ½ teaspoon salt - 1 cup granulated sugar - ½ cup packed brown sugar - ½ cup vegetable oil - 2 large eggs - 1 cup canned pumpkin puree - 1 teaspoon vanilla extract - 1 cup chocolate chips (optional) - ½ cup pecans or walnuts, chopped (optional) These ingredients combine to create a rich, moist muffin full of fall flavor. For some fun, you can customize your muffins! Consider adding chocolate chips or chopped nuts for extra texture. Feel free to play with spices too. If you want it sweeter, add a bit more sugar or even some maple syrup. This recipe is all about making it yours while keeping it simple. For the complete recipe, check the Full Recipe section. First, preheat your oven to 375°F (190°C). This helps the muffins bake evenly. Next, prepare your muffin tin by lining it with paper liners or spraying it with non-stick cooking spray. This step stops the muffins from sticking. Now, let’s mix the dry ingredients. In a medium bowl, whisk together: - 1 ½ cups all-purpose flour - 1 teaspoon baking soda - ½ teaspoon baking powder - 1 teaspoon ground cinnamon - ½ teaspoon ground nutmeg - ¼ teaspoon ground ginger - ½ teaspoon salt Whisk until all ingredients blend well. Set this bowl aside for now. In a large bowl, combine the granulated sugar and brown sugar with the vegetable oil. Mix these until they look smooth and combined. Then, add the eggs, one at a time. Mix well after each egg. This helps keep your muffins light and fluffy. Next, stir in the canned pumpkin puree and the vanilla extract. Mix until everything is smoothly blended. The pumpkin adds moisture and flavor, making your muffins delicious! Now, it’s time to combine the dry and wet ingredients. Gradually add the flour mixture to the pumpkin mix. Stir gently until just combined. Be careful not to overmix; this can make your muffins tough. If you want to add some fun, fold in chocolate chips or chopped nuts at this stage. These add texture and taste to your muffins. Spoon the batter into the prepared muffin tin. Fill each cup about ¾ full. This allows room for the muffins to rise. Bake for 18-20 minutes. Check for doneness by inserting a toothpick into the center. If it comes out clean, your muffins are ready! Let them cool in the pan for about 5 minutes. Then, transfer them to a wire rack to cool completely. For a little extra treat, dust with powdered sugar or serve warm with whipped cream. Enjoy your bakery-style pumpkin muffins! For the full recipe, check out the details provided above. To make the best bakery-style pumpkin muffins, avoid common mistakes. One big mistake is overmixing. This can make your muffins tough. Mix the wet and dry ingredients just until combined. You want a few lumps to stay in the batter. Even baking is key for great muffins. Use an oven thermometer to check your oven's heat. If your oven runs hot, your muffins may burn on the outside. If it runs cold, they may not bake through. Rotate the muffin tin halfway through baking for even heat. You can easily swap some ingredients for better taste or health. For oil, use applesauce or yogurt for a lighter muffin. This keeps the moisture but cuts some fat. If you like it sweeter, add more sugar or honey. You can also reduce sugar for a less sweet taste. Adjust spices based on your preference. If you love cinnamon, feel free to add a bit more. For a spicier kick, increase the nutmeg or ginger. For the full recipe, check back to the earlier section. Follow these tips, and you’ll have perfect muffins every time! {{image_2}} You can change up your pumpkin muffins in fun ways. Adding mix-ins makes them special. Here are some ideas: - Nuts: Chopped pecans or walnuts add crunch and flavor. - Chocolate Chips: Mix in a cup of chocolate chips for a sweet surprise. - Raisins: Dried raisins or cranberries offer sweetness and chewiness. You can also try different spices for a unique twist: - Allspice: This spice adds warmth and depth. - Cardamom: A little cardamom can create a fragrant flavor. - Cloves: Ground cloves add a bold and spicy note. If you want to adapt the recipe, here are some simple changes: - Vegan: Replace eggs with flax eggs or applesauce. Use a plant-based oil. - Gluten-Free: Swap all-purpose flour with a gluten-free blend. Make sure it has xanthan gum. - Lower Sugar: Use less sugar or try a sugar substitute like stevia. These adjustments still give you tasty muffins without losing flavor. For the full recipe, check the ingredients section above. To keep your bakery-style pumpkin muffins fresh, follow these easy steps: - Room Temperature: Store them in an airtight container. They stay fresh for 2 to 3 days. - Refrigeration: If you want them to last longer, place them in the fridge. They can last up to a week. Just be sure to seal them well to avoid drying out. Short-term storage is perfect for quick snacks. For long-term storage, freezing is best. To freeze your pumpkin muffins, first, let them cool completely. Then, wrap each muffin tightly in plastic wrap. Place the wrapped muffins in a freezer-safe bag. This keeps them fresh for up to 3 months. When you want to enjoy one, take it out and let it thaw at room temperature. For a quick warm-up, pop it in the microwave for about 15 seconds. This brings back their soft texture and flavor. What can I do if my muffins are too dense? If your muffins turn out dense, you may have overmixed the batter. Mix just until the dry and wet ingredients blend. Also, check your baking soda and powder for freshness. Old leavening agents can lead to denser muffins. You can also add a bit more liquid, like milk, to help lighten the texture. Can I make mini muffins with this recipe? Yes, you can make mini muffins! Simply adjust the baking time. Bake them for about 10 to 12 minutes, or until a toothpick comes out clean. The smaller size makes for cute treats and perfect snacks. How do I make these muffins healthier? To make these muffins healthier, try using whole wheat flour instead of all-purpose flour. You can also reduce the sugar by using applesauce or mashed bananas. Adding oats or using Greek yogurt can boost the nutrition too. Can I substitute fresh pumpkin for canned? Yes, you can use fresh pumpkin puree. Just steam or roast fresh pumpkin until soft, then blend it until smooth. Make sure it is not too watery, as that can affect the batter. Fresh pumpkin can add a nice texture and flavor to your muffins. For the complete recipe, check out the [Full Recipe]. Making muffins is easy and fun. You learned about the key ingredients, mixing methods, and tips for perfect muffins. I shared ideas for variations and healthy swaps. Remember to store your muffins properly to keep them fresh. With these steps, you can bake tasty muffins every time. Enjoy experimenting and making this recipe your own! Happy baking!

Bakery-Style Pumpkin Muffins Simple and Delicious Recipe

Do you crave warm, spiced pumpkin muffins like the ones from your favorite bakery? If so, you’re in the right

- 4 medium sweet potatoes, peeled and cubed - 2 medium apples, cored and diced (e.g., Granny Smith or Honeycrisp) - 3 tablespoons olive oil - 2 teaspoons ground cinnamon - 1 teaspoon vanilla extract - 1/2 teaspoon nutmeg - 1 tablespoon maple syrup - Chopped pecans or walnuts for garnish When I create cinnamon roasted sweet potatoes and apples, I always start with fresh ingredients. Sweet potatoes give a creamy texture, while apples add a hint of tartness. You can choose any variety of apple, but I love using Granny Smith or Honeycrisp. Their flavor really shines through in this dish. Next, I drizzle olive oil over the sweet potatoes and apples. Olive oil brings healthy fats and enhances the roasting process. It helps to caramelize the natural sugars in both the sweet potatoes and apples, creating a lovely golden color. Now, let’s talk about the spices. Ground cinnamon is key for that warm, cozy flavor. I also add nutmeg for a hint of warmth and vanilla extract to round out the sweetness. These spices make the dish smell incredible as it cooks. If you want extra sweetness, you can add maple syrup. It adds a nice layer of flavor. Finally, for a lovely crunch, I suggest topping with chopped pecans or walnuts. They add texture and a nutty taste that pairs perfectly with the soft, sweet potatoes and apples. This delightful mix comes together to create a dish that looks as good as it tastes. You can find the full recipe above to guide you through each step. - Preheat oven to 425°F (220°C). - Prepare the baking sheet with parchment paper. Start by getting your oven nice and hot. Preheating it helps the sweet potatoes and apples cook evenly. Parchment paper makes cleanup easy and helps prevent sticking. You can use a large baking sheet for this recipe. - Mixing sweet potatoes and apples in a bowl. - Adding oil, spices, and optional sweeteners. Next, grab a large bowl. Combine the cubed sweet potatoes and diced apples. Make sure they mix well. Now, drizzle the olive oil over the mix. Sprinkle in the ground cinnamon, nutmeg, and vanilla extract. If you want some extra sweetness, add the maple syrup. A pinch of salt will enhance the flavors. Toss everything together until the sweet potatoes and apples get a nice coating of the mixture. - Spreading the mixture on the baking sheet. - Cooking time and tossing instructions. Spread the sweet potato and apple mixture evenly on the prepared baking sheet. This helps them roast well. Roast in your preheated oven for about 25-30 minutes. Halfway through, toss the mixture gently to help them cook evenly. You’ll know they are done when the sweet potatoes are tender and lightly caramelized. Once finished, take them out and let them cool a bit. You can garnish with chopped pecans or walnuts for some added crunch. For the full recipe, check the section above. When picking apples for this dish, I love to use Granny Smith or Honeycrisp. - Granny Smith: Tart and crisp, they add a nice zing. - Honeycrisp: Sweet and juicy, they balance the flavor well. Different apples change the taste and texture of your dish. Tart apples bring brightness, while sweet ones add warmth. Experiment to find your favorite mix! To make your dish even more tasty, consider adding spices. A sprinkle of ginger or a pinch of cloves can boost the warm flavors. You can also switch up the oil. Try coconut oil for a tropical twist or avocado oil for a rich taste. If you want more sweetness, drizzle in some honey or agave syrup instead of maple syrup. How you present your dish can make it even more appealing. Serve the sweet potatoes and apples in a warm bowl. Top with a sprinkle of cinnamon and some extra nuts for crunch. This dish pairs well with roasted chicken or pork. The sweet and savory mix will impress your guests. For a vegetarian option, serve it with quinoa or a fresh salad. Check the Full Recipe for more ideas! {{image_2}} You can switch up the nuts in your cinnamon roasted sweet potatoes and apples. Pecans bring a sweet and buttery flavor. They also add a nice crunch. Walnuts offer a more earthy taste and a slightly softer texture. You can use either nut based on what you like. If you want to try something different, consider sunflower seeds or pumpkin seeds. These options add a fun twist and are great for those with nut allergies. You can mix and match nuts and seeds to create a unique topping. Fruits can bring more flavor to this dish. Pears make a great addition due to their sweet and juicy nature. They pair well with sweet potatoes and apples. You can also try adding cranberries for a tart kick. Combining various fruits creates a colorful medley. Mix apples, pears, and cranberries for a burst of flavor. This blend not only tastes great but also makes your dish look stunning. You can easily make this recipe fit different diets. For a vegan version, simply stick with the ingredients listed. Use maple syrup as a sweetener for a natural touch. If you want a gluten-free option, you’re already in luck! This recipe is naturally gluten-free. You can also use coconut oil instead of olive oil for a different flavor. Customize your dish to fit your needs while keeping it delicious. For the full recipe, check out the details earlier in this article. To keep your cinnamon roasted sweet potatoes and apples fresh, use airtight containers. Glass or plastic containers work great. Make sure to seal the lids tightly to keep air out. Store the leftovers in the fridge. They can stay good for about three days. When reheating, the oven is your best friend. Preheat it to 350°F (175°C). Spread the leftovers on a baking sheet. Heat for about 10-15 minutes. This keeps the texture nice and crisp. You can use a microwave if you're in a hurry. Heat in short bursts of 1-2 minutes. Just be careful, as it might get a bit soggy. You can freeze both raw and cooked dishes. For raw, prepare the sweet potatoes and apples but do not roast them. Place them in a freezer-safe bag and remove as much air as possible. For cooked leftovers, let them cool first. Store in a freezer-safe container or bag. To thaw, move them to the fridge overnight. Reheat them in the oven for the best taste. Cinnamon roasted sweet potatoes and apples can last for about 3 to 5 days in the fridge. To keep them fresh, store them in an airtight container. This helps prevent moisture loss and keeps the flavors intact. Yes, you can make this recipe ahead of time. You can prepare the sweet potatoes and apples, then store them in the fridge. When you're ready, simply roast them before serving. This allows the flavors to meld nicely. You can serve cinnamon roasted sweet potatoes and apples with many dishes. Here are some tasty options: - Grilled chicken or turkey - Pork chops or tenderloin - A green salad with nuts and cheese These pair nicely and balance the flavors. Absolutely! You can adjust the sweetness to your taste. If you prefer it sweeter, add more maple syrup. You can also use honey or brown sugar. For less sweetness, skip the optional sweeteners. Enjoy customizing this dish! In this article, we explored a simple yet delicious recipe for cinnamon roasted sweet potatoes and apples. We covered the main ingredients, spices, and optional flavors that enhance taste. You learned about the steps to prepare, roast, and serve this dish, along with useful tips for making it your own. Remember, this recipe is flexible. Feel free to mix in your favorite nuts or fruits. Enjoy your cooking and share this tasty dish with others!

Cinnamon Roasted Sweet Potatoes and Apples Delight

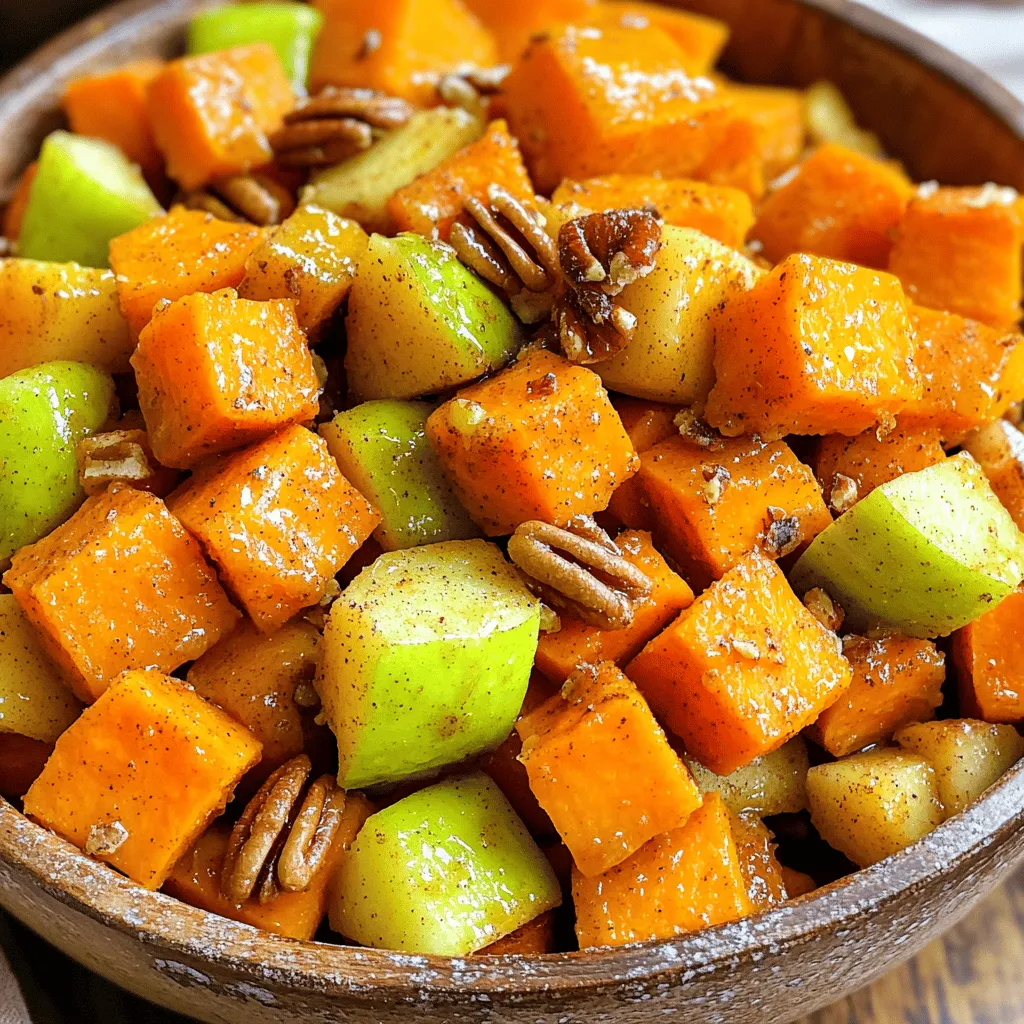
Are you ready for a warm, tasty treat? My Cinnamon Roasted Sweet Potatoes and Apples Delight will make your taste

- Sweet potatoes and their role in texture Sweet potatoes are the star of this dish. They bring a creamy texture and natural sweetness. Their vibrant orange color makes the mash look appealing too. When you cook them, they become soft and easy to mash. This is key for that smooth, velvety finish you want. - Dairy and dairy-free options (coconut milk, butter) You can use dairy or dairy-free products. I love adding coconut milk for extra creaminess and a hint of flavor. It makes the dish feel special. You can also use butter for rich taste, or a vegan spread for a lighter touch. Both options work well in this recipe. - Sweeteners and spices for flavor enhancement Sweeteners like maple syrup add a nice touch. They balance the flavors perfectly. Cinnamon and nutmeg bring warmth and depth. These spices make your creamy mashed sweet potatoes truly stand out. Don’t forget to use salt and pepper! They enhance all the sweet flavors. For the full recipe, check the details above. To make creamy mashed sweet potatoes, you can boil or steam them. I prefer boiling because it cooks them faster. To start, peel and cube your sweet potatoes into even pieces. Aim for about 1-inch cubes. This size cooks evenly. Cook the sweet potatoes in salted water. Bring the water to a boil over medium-high heat. Once boiling, reduce the heat to medium. Let them simmer for about 15 to 20 minutes. You want them fork-tender. To test, poke a piece with a fork. If it slides off easily, it’s ready. After cooking, drain the sweet potatoes. Return them to the pot over low heat. This helps any extra moisture evaporate. Now, it’s time to mash! You can use a potato masher or an immersion blender. I like the immersion blender for a super smooth texture. Add coconut milk for creaminess. If it feels too thick, pour in a little more coconut milk. Keep mashing until it’s smooth and fluffy. Season your mashed sweet potatoes with salt and pepper. Start with a small amount and taste as you go. If you want it sweeter, add maple syrup. This adds a nice flavor boost. For a beautiful finish, top your dish with chopped fresh chives. This adds color and a nice bite. Serve your creamy mashed sweet potatoes warm. You can find the full recipe so you can make it yourself! 1. Overcooking sweet potatoes: If you boil them too long, they can become mushy. Aim for fork-tender potatoes in about 15-20 minutes. 2. Not adjusting seasoning adequately: Always taste as you go. Sweet potatoes can need more salt or sweetener. 3. Using too much liquid: Start with the right amount of coconut milk. You can always add more if needed. - Experimenting with different spices: Try nutmeg or ginger to give your sweet potatoes a unique twist. A pinch can make a big difference. - Adding cream cheese or sour cream: These add extra creaminess and depth to your dish. Just mix in a couple of tablespoons. - Using roasted sweet potatoes: Roasting brings out their natural sweetness and gives a richer flavor. Simply roast them at 400°F until tender. - Pairing with main dishes: Creamy mashed sweet potatoes go well with meats like turkey or chicken. They balance savory flavors nicely. - Ideas for holiday meals or special occasions: Serve them at Thanksgiving or family gatherings. They are a crowd-pleaser and add color to your table. - Creative ways to use as leftovers: Use them in a breakfast hash or blend into soup for a creamy base. Don’t let them go to waste! For the full recipe, check out the details above. {{image_2}} To make creamy mashed sweet potatoes vegan, swap dairy for plant-based options. Use unsweetened coconut milk instead of regular milk. Choose vegan butter or olive oil for rich flavor. Check labels on all products to ensure they are gluten-free. Sweet potatoes are naturally gluten-free, so you’re off to a great start! You can add many flavors to creamy mashed sweet potatoes. For a savory twist, mix in minced garlic or fresh herbs like rosemary or thyme. If you want a sweet version, try adding vanilla extract or a hint of orange zest. For an international flair, sprinkle in spices like cumin or curry powder. These options can transform your dish into something new and exciting! Boost the nutrition of your mashed sweet potatoes with toppings. Add seeds like pumpkin or sunflower for crunch. Chopped nuts also bring texture and healthy fats. To cut calories, use less butter or coconut milk and adjust with vegetable broth. Sweet potatoes are packed with vitamins A and C, fiber, and antioxidants. They not only taste great but also support your health! To store your creamy mashed sweet potatoes, first let them cool. Place them in an airtight container. Make sure to seal it well. Store in the fridge for up to three days. This keeps them fresh and tasty. If you want the best quality, eat them sooner. You have two great ways to reheat your mashed sweet potatoes: the microwave or the stovetop. For the microwave, put them in a bowl. Heat for one minute, then stir. Keep heating in short bursts until warm. For the stovetop, use a non-stick pan. Stir gently over low heat. Add a splash of coconut milk to keep them creamy. This helps maintain the smooth texture. You can freeze creamy mashed sweet potatoes for later use. First, let them cool completely. Then, put them in a freezer-safe container. Leave some space at the top for expansion. They freeze well for up to three months. To thaw, move them to the fridge overnight. When ready to eat, reheat using the stovetop method for best results. Add a bit of coconut milk if needed to bring back the creaminess. To enhance the flavor, try adding more spices. You can mix in garlic powder or even a pinch of cayenne for heat. Fresh herbs like thyme or rosemary add a lovely aroma. You can also switch out the maple syrup for honey or brown sugar. A squeeze of lemon juice brightens the taste too. If you want a richer flavor, consider adding cream cheese or sour cream. This gives your mash a nice, creamy texture and a tangy kick. Don’t forget to taste as you go! Adjust the seasoning with salt and pepper to suit your taste. Yes, you can use other potatoes, but they will change the taste and texture. Regular white potatoes make a fluffy mash, while red potatoes stay a bit chunky. Yukon gold potatoes are a great choice too, as they have a buttery flavor. However, sweet potatoes bring a natural sweetness and creaminess that others can't match. If you mix sweet potatoes with another type, you can balance flavors. Just remember to adjust cooking times, as different potatoes may cook at different rates. You can tell when sweet potatoes are cooked by checking if they are fork-tender. Simply poke them with a fork or knife. If it slides in easily, they are done. This usually takes about 15-20 minutes of boiling. Keep an eye on them; overcooking can lead to a watery mash. If you see them start to break apart while boiling, it’s time to drain them. Yes, this recipe is gluten-free! All the ingredients used, like sweet potatoes, coconut milk, and butter, are safe for a gluten-free diet. Just double-check any additional seasonings or toppings you plan to use. Stick to gluten-free options like fresh herbs or gluten-free broth if needed. You can enjoy creamy mashed sweet potatoes without worry! For the full recipe, check out the [Full Recipe]. Creamy mashed sweet potatoes are versatile and delicious. We covered key ingredients like sweet potatoes and cooking methods. I shared the best mashing tips and tricks to avoid common mistakes. You can enhance flavors with spices or adjust sweetness to your taste. Don’t forget the variations and storage options for using leftovers effectively. Try making these mashed sweet potatoes your own, exploring flavors and textures. Enjoy the dish at your next meal or special occasion; it truly elevates any menu!

Creamy Mashed Sweet Potatoes Flavorful and Easy Recipe

Creamy mashed sweet potatoes are a twist on the classic side dish. With their rich texture and sweet flavor, they

Using fresh ingredients makes all the difference in this dish. Here’s what you need: - 2 medium zucchinis, diced - 1 medium eggplant, diced - 1 bell pepper (any color), diced - 1 medium onion, chopped - 3 cloves garlic, minced - 4 medium tomatoes, chopped These fresh veggies bring vibrant flavors and colors to your ratatouille. Each one adds its unique taste. For example, zucchini is mild and tender, while eggplant has a rich, hearty flavor. Next, we need seasoning and broth. Here’s what to add: - 1 cup vegetable broth - 2 teaspoons dried oregano - 2 teaspoons dried basil - 1 teaspoon salt - 1/2 teaspoon black pepper - 1 tablespoon olive oil These ingredients create a delicious base for the dish. The broth keeps the veggies moist. Oregano and basil give that Italian touch, while salt and pepper enhance the flavors. Finally, consider optional garnishes: - Fresh basil leaves for garnish (optional) Adding fresh basil at the end brightens the dish. It gives a fresh aroma and taste that complements the cooked veggies. You can find the full recipe [here](#). Enjoy the process of making this dish! Start by washing your vegetables. Grab your knife and cutting board. Dice the zucchinis, eggplant, and bell pepper into small pieces. Chop the onion finely. Mince the garlic into tiny bits. Finally, chop the tomatoes. Aim for similar sizes for even cooking. This step helps all the veggies cook well together. In a large mixing bowl, add your prepared vegetables. Toss in the diced zucchinis, eggplant, bell pepper, onion, tomatoes, and garlic. Drizzle the olive oil over the mix. Next, add dried oregano, dried basil, salt, and black pepper. Use your hands or a spoon to mix everything well. Each piece of vegetable should have some seasoning. This makes your ratatouille tasty. Pour the vegetable broth into the bottom of the crockpot. This helps prevent sticking and adds flavor. Next, transfer your mixed vegetables into the crockpot. Layer them evenly for even cooking. If you want, drizzle a little more olive oil on top. Cover the crockpot with its lid. Set it to cook on low for 6-8 hours or on high for 3-4 hours. Check when the veggies are tender. Once cooked, taste and adjust the seasoning if needed. Gently stir to combine all the flavors before serving. You can find the full recipe for more details. When making ratatouille, fresh summer vegetables shine. I love using zucchinis and eggplants. They add a great texture. Bell peppers provide a sweet crunch. Choose ripe tomatoes for a rich flavor. Look for bright colors and firm skin. Farmers' markets are perfect for finding these gems. Don’t forget to wash them well before cooking. Seasoning can make or break your ratatouille. Start with salt and pepper; they bring out the veggies’ flavors. I add dried oregano and basil for warmth and depth. Taste your dish before serving. If it needs more kick, add a pinch of salt or herbs. Fresh basil leaves at the end add a nice touch. Cooking time matters! If you use a crockpot, set it on low for 6-8 hours. This slow cook allows flavors to blend. If short on time, use high for 3-4 hours. Check the veggies for tenderness. They should be soft but not mushy. This cooking method helps keep the dish healthy and vibrant. For the full recipe, check out the cooking guide! {{image_2}} You can make ratatouille heartier by adding protein. Try adding cooked chicken or turkey. Simply shred or chop the meat and mix it in. You can also use beans like chickpeas or white beans. They add protein and fiber, making your meal more filling. If you want a twist, use cooked sausage or tofu for a tasty option. Just remember to adjust your cooking time if you add raw protein. Herbs and spices can change the flavor of your ratatouille. You can stick with classic oregano and basil or mix it up. Try adding thyme or rosemary for a fresh touch. For a citrusy note, include lemon zest. You can also use fresh herbs instead of dried ones. Just remember, fresh herbs are stronger, so use less. Adding spices like cumin or paprika can give it a warm kick. Experiment to find your favorite blend! If you love heat, add some spice to your ratatouille. You can mix in red pepper flakes or cayenne pepper. Start with a little, then taste as you go. If you want a different flavor, add diced jalapeños or serrano peppers. These peppers give a nice kick without overpowering the dish. For a smoky flavor, try smoked paprika. This adds depth and warmth. You can adjust the heat level to match your taste. For more ideas, check out the Full Recipe for Summer Veggie Crockpot Ratatouille. To store leftover ratatouille, let it cool first. Use an airtight container for best results. This keeps your dish fresh. You can store it in the fridge for up to four days. If you want to keep it longer, freezing is a good option. When you're ready to enjoy your leftovers, use the stovetop or microwave. If you use the stovetop, warm it over low heat. Stir often to heat evenly. If you choose the microwave, place it in a bowl. Heat in short bursts, stirring in between. This will help keep the flavors intact. To freeze ratatouille, let it cool completely. Portion it into freezer-safe bags or containers. Remove as much air as possible to avoid freezer burn. Label each bag with the date. You can freeze it for up to three months. When ready to eat, thaw it overnight in the fridge. Then reheat as mentioned above. The flavors will still be delicious! For the complete recipe, check the [Full Recipe]. Yes, you can use frozen vegetables. They work well in this dish. However, fresh veggies give better flavor and texture. If using frozen, reduce cooking time. Check for doneness before serving. This ratatouille is already vegan! All the ingredients are plant-based. Use vegetable broth to keep it vegan. You can add more veggies or beans for extra protein. Ratatouille pairs well with many dishes. Here are some great options: - Crusty bread for dipping - Steamed rice for a hearty meal - Quinoa for a healthy twist - Pasta for a filling option Yes, you can add meat. Chicken or sausage works well. Cook the meat first, then mix it with the veggies in the crockpot. This adds a nice flavor boost. Store leftovers in an airtight container. Keep in the fridge for up to three days. You can also freeze it for later use. Just thaw and reheat when ready. Absolutely! Add red pepper flakes for heat. You can also use fresh chili peppers for more flavor. Adjust to your taste for a spicy kick. This summer veggie crockpot ratatouille is a simple and tasty dish. You learned how to pick fresh ingredients, season well, and cook it perfectly. Remember, adjusting flavors and trying new veggies can change the game. If you have leftovers, store them right, so nothing goes to waste. You can also freeze ratatouille for later use. Dive into your culinary adventure, and enjoy every bite!

Savory Summer Veggie Crockpot Ratatouille Delight

Are you ready to enjoy a colorful, tasty meal this summer? My Savory Summer Veggie Crockpot Ratatouille is simple and

- 4 boneless, skinless chicken breasts - 1 cup buttermilk - 1 tablespoon garlic powder - 1 tablespoon onion powder - 1 teaspoon smoked paprika - 1 teaspoon salt - 1/2 teaspoon black pepper - 1 cup all-purpose flour - 1/4 cup cornstarch - 1/4 cup unsalted butter - 2 tablespoons olive oil - Fresh parsley for garnish To create melt-in-your-mouth chicken breasts, start with the right ingredients. The chicken breasts should be boneless and skinless for tenderness. Buttermilk is key; it adds flavor and helps the chicken stay juicy. Next, gather the seasoning and coating ingredients. Garlic powder and onion powder bring depth, while smoked paprika adds a nice touch. Salt and black pepper enhance all the flavors. The flour and cornstarch help create that golden crust when cooked. Lastly, don’t forget the cooking essentials. Unsalted butter and olive oil work well for cooking. Fresh parsley brightens the dish and adds color. You can find the full recipe for detailed steps to make these chicken breasts truly special! To start, gather your marinade ingredients. In a large bowl, mix these items: - 1 cup buttermilk - 1 tablespoon garlic powder - 1 tablespoon onion powder - 1 teaspoon smoked paprika - 1 teaspoon salt - 1/2 teaspoon black pepper Add the chicken breasts to this mixture, ensuring they are fully submerged. Cover the bowl and place it in the refrigerator. For the best results, let the chicken marinate for at least 1 hour. If you have time, marinating overnight will give even more flavor. Next, preheat your oven to 375°F (190°C). This step is crucial for even cooking. While the oven heats, prepare the coating. In a shallow dish, combine these two ingredients: - 1 cup all-purpose flour - 1/4 cup cornstarch Mix them well. This mixture will create a crispy outer layer for your chicken. Now, let’s cook! Start by searing the chicken. In a large, oven-safe skillet, heat these: - 1/4 cup unsalted butter - 2 tablespoons olive oil Heat them over medium-high heat. Once hot, take the chicken out of the marinade. Let any extra marinade drip off, then dredge each breast in the flour and cornstarch mixture. Press lightly to help it stick. Place the coated chicken in the skillet. Sear for about 4-5 minutes on each side, or until golden brown. After searing, transfer the skillet to the preheated oven. Bake for 20-25 minutes. To ensure it’s safe to eat, check that the internal temperature reaches 165°F (75°C). This will give you juicy, melt-in-your-mouth chicken breasts. Once done, remove the skillet from the oven and let the chicken rest for 5 minutes before serving. This helps keep the juices in. For a beautiful touch, sprinkle fresh parsley on top before plating. Enjoy your delicious creation! For a complete list of instructions, don’t forget to check the Full Recipe. Marinating chicken is key for a great texture. I recommend marinating for at least one hour. This helps the chicken absorb flavors and stay juicy. For the best results, try marinating overnight. The longer the chicken sits, the more tender it becomes. Searing is another important step. Make sure your skillet is hot before adding the chicken. This creates a nice crust. Cook each side for about 4-5 minutes until golden brown. Avoid flipping too early; let it form a crust first. To boost the taste, add spices or herbs. Consider using fresh rosemary or thyme for a fragrant touch. You can also try adding a pinch of cayenne for heat or lemon zest for brightness. These add depth to the dish. Choosing the right oil matters, too. Olive oil gives a rich flavor, but you can also use avocado oil. It has a high smoke point, ideal for searing. Don’t shy away from experimenting with different oils to find your favorite. Pair your chicken with side dishes that complement its flavors. Roasted vegetables or a simple salad work well. Creamy mashed potatoes or fluffy rice can also balance the meal. For visual appeal, garnish your chicken with freshly chopped parsley. This adds a pop of color. You can also add lemon wedges on the side for a fresh touch. Presentation can make your meal feel special, even on a busy night. {{image_2}} You can change the flavor of your melt-in-your-mouth chicken breasts easily. For an Asian twist, try a marinade made with soy sauce, ginger, and sesame oil. This gives a nice umami taste. You can also add a bit of honey for sweetness. For a Mediterranean flavor, mix olive oil, lemon juice, and fresh herbs like thyme or rosemary. These herbs add a bright and fresh taste to the chicken. Each of these options changes the dish completely, making it exciting. You can cook chicken breasts in different ways. Grilling gives the chicken a smoky flavor and nice grill marks. Just make sure to preheat your grill and oil the grates. Grill for about 6-7 minutes per side. Baking is another great option. It keeps the chicken moist and juicy. Just follow the baking steps in the Full Recipe for best results. If you want even more tenderness, try slow cooking. Place the chicken in a slow cooker with your favorite sauce. Cook on low for 6-8 hours. This method makes the chicken super soft and easy to shred. If you need gluten-free options, use almond flour or gluten-free bread crumbs instead of all-purpose flour. This will still give you a nice crispy coating. For a low-fat version, you can swap buttermilk for unsweetened yogurt. You can also use a light oil, like avocado oil, instead of butter. These small changes make the dish fit your dietary needs without losing flavor. To keep your chicken fresh, let it cool down first. Place it in an airtight container. You can store it in the fridge for up to four days. This way, you can enjoy your melt-in-your-mouth chicken again soon! If you want to save it longer, freezing is a great option. Wrap the chicken tightly in plastic wrap, then place it in a freezer bag. Squeeze out the air before sealing. You can freeze cooked chicken for up to three months. When you’re ready to eat, thaw it in the fridge overnight for the best texture. To reheat your chicken, avoid the microwave if possible. Use the oven or stovetop for even heating. If using the oven, set it to 350°F. Heat until the internal temperature reaches 165°F. This keeps the meat moist. Watch the time closely to prevent overcooking. Enjoy your chicken just like the first time! For detailed cooking steps, check the Full Recipe. Marinating chicken breasts is key for flavor and tenderness. I recommend at least 1 hour for good results. However, for the best taste, try to marinate overnight. This allows the chicken to soak up all the flavors from the buttermilk and spices. The longer you marinate, the more the chicken becomes melt-in-your-mouth tender. Yes, you can use frozen chicken breasts. Make sure to thaw them safely before marinating. The best way to thaw is in the fridge overnight. If you're short on time, you can use the microwave to defrost them. Just be careful not to start cooking them. Once thawed, follow the marinating steps as usual. Cooking chicken to the right internal temperature is very important. The safe temperature is 165°F (75°C). Use a meat thermometer to check this. Cooking chicken to this temperature ensures it is safe to eat and juicy. Undercooked chicken can cause foodborne illnesses, so always check the temperature before serving. In this blog post, we explored how to make juicy, flavorful chicken breasts. We discussed key ingredients, including the marinade, seasonings, and cooking essentials. I shared step-by-step instructions to ensure your chicken turns out perfectly. I also offered tips, flavor variations, and storage advice. Remember, marinating is crucial for taste. Experiment with spices and sides to elevate your dish. Whether you bake, grill, or slow-cook, great chicken is within your reach. Enjoy your cooking journey!

Melt-In-Your-Mouth Chicken Breasts Simple and Tasty

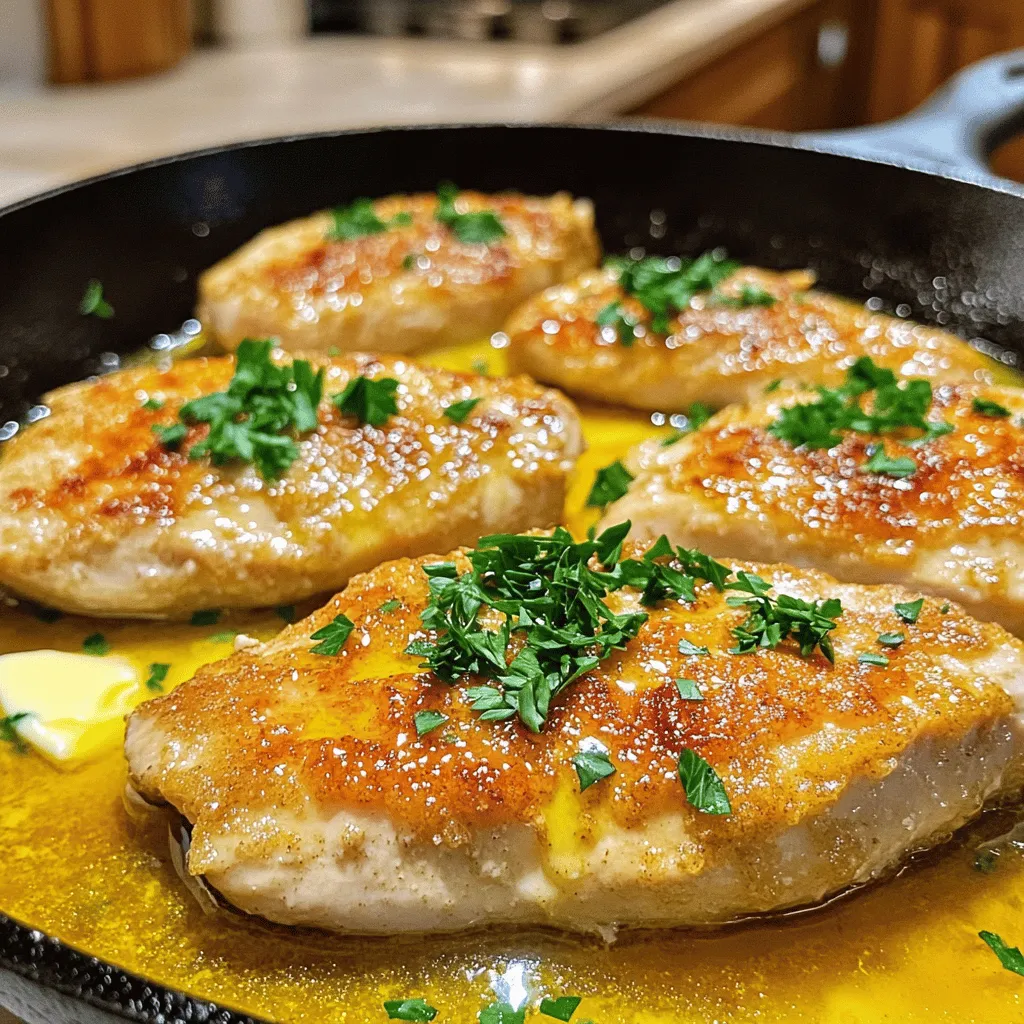
Looking to impress at dinner with juicy, flavor-packed chicken breasts? You’ve landed in the right spot! In this guide, I’ll

Older posts
Newer posts
← Previous Page1 Page2 Page3 … Page55 Next →

dsad

© 2025 savoryspiral • Built with GeneratePress

Our Policies

  • Copyright Policy
  • Cookie Policy
  • GDPR Policy
  • Privacy Policy
  • Disclaimer
  • Terms Of Use

More Information

  • Home
  • About
  • Contact
  • Appetizers
  • Dessert
  • Dinner
  • Drinks
©2025, savoryspiral About Back To Top