Skip to content
DisclaimerTerms Of UseGDPR PolicyCookie Policy

savoryspiral

  • Home
  • Drinks
  • Appetizers
  • Dinner
  • Dessert
  • About
  • Contact
  • Privacy Policy
DisclaimerTerms Of UseGDPR PolicyCookie Policy

Charlotte

- 1 medium head of green cabbage, chopped - 1 large onion, sliced - 3 cloves garlic, minced Cabbage is the star of this dish. It brings a mild taste and nice crunch. I love using a medium-sized head. It cooks well and serves about four people. The onion adds sweetness, while garlic gives a bold kick. Together, they make a great base for flavor. - 2 tablespoons olive oil - 1 tablespoon butter - 1 cup chicken or vegetable broth I use olive oil and butter for cooking. They create a rich, tasty base. The oil helps the cabbage to brown nicely. The broth adds moisture and depth to the dish. You can use chicken broth for more flavor or vegetable broth for a lighter touch. Both work well. - 1 teaspoon smoked paprika - 1/2 teaspoon red pepper flakes (adjust to taste) - Salt and pepper to taste Seasoning is key to great taste. Smoked paprika gives a warm, smoky flavor. Red pepper flakes add a bit of heat, which you can adjust. Salt and pepper enhance all the flavors. Don’t skip these! Together, they make the cabbage sing with flavor. - Chopping cabbage: Start with a medium head of green cabbage. Cut it in half, remove the core, and chop it into bite-sized pieces. You want the pieces to be even for cooking. - Slicing onion: Take a large onion and slice it thinly. This helps the onion cook faster and blend well with the cabbage. - Minced garlic: Grab three cloves of garlic. Peel them and mince finely. The garlic adds a great flavor to the dish. - Heating oil and butter: In a large skillet, heat two tablespoons of olive oil and one tablespoon of butter over medium heat. Wait until the butter melts and the mixture is hot. - Sautéing onion and garlic: Add the sliced onion to the skillet. Sauté it for about five minutes. You want it to turn translucent and smell good. Next, add the minced garlic, smoked paprika, and red pepper flakes. Cook for one to two more minutes, stirring often. - Adding cabbage and spices: Now, add the chopped cabbage to the skillet. Stir it well to mix with the onion and spices. Cook for about five minutes, stirring frequently until it starts to soften. - Pouring in broth and vinegar: Pour in one cup of chicken or vegetable broth. This will help steam the cabbage. Add one tablespoon of apple cider vinegar for a tangy kick. - Covering and cooking: Lower the heat to medium-low. Cover the skillet and let it simmer for 15 to 20 minutes. Stir occasionally so the cabbage cooks evenly. It should be tender but still have some crunch. - Adjusting seasoning: Taste your cabbage and add salt and pepper as needed. This step makes sure the flavors are just right. To make Southern fried cabbage burst with flavor, use the right spices. I recommend smoked paprika for a rich, smoky taste. Red pepper flakes add heat, but feel free to adjust them to your liking. Acidity is key, so add a tablespoon of apple cider vinegar. This balances the richness and brightens every bite. To deepen the flavor, use chicken or vegetable broth. It adds a savory base that enhances the dish. For the best results, use a large, heavy skillet. This helps to cook the cabbage evenly. When cooking, stir often to avoid burning. The goal is a tender cabbage that still has a little crunch. To prevent mushy cabbage, don’t overcook it. Simmer for about 15 to 20 minutes only. You want it soft but not falling apart. Southern fried cabbage pairs well with proteins like fried chicken or pork chops. You can also top it with crispy fried onions for a delightful crunch. For sides, consider cornbread or mashed potatoes. They complement the cabbage and complete your meal. Enjoy your flavorful dish with family and friends! {{image_2}} You can add proteins to make this dish heartier. Bacon or sausage brings a rich flavor. Just cook the meat first, then set it aside. Use the fat to sauté the onions and garlic. This adds depth to the dish. If you prefer vegan options, try adding tofu or tempeh. Both soak up flavors well and add protein. You can also use chickpeas for an extra hearty bite. Incorporating other vegetables can brighten up your dish. Bell peppers add sweetness and color. Chop them up and add them with the onions. Carrots bring a nice crunch. Slice them thin and add them early in the cooking. Tomatoes can also be a great addition. They add moisture and a tangy flavor. Add them in the last few minutes of cooking for the best results. Experimenting with spices can elevate your Southern fried cabbage. You can try cumin or curry powder for a unique twist. Different vinegars change the flavor profile too. Balsamic vinegar adds sweetness, while rice vinegar offers a lighter taste. Adding a touch of sweetness, like a teaspoon of sugar or honey, can balance the flavors. This makes the dish more complex and delicious. To keep your Southern Fried Cabbage fresh, cool it down quickly. Spread it out in a shallow dish. This helps it cool faster. Once cool, transfer it to an airtight container. Glass or plastic containers work well. Be sure to cover it tightly. This keeps the cabbage from drying out. Reheat your cabbage on the stove for the best taste. Use a non-stick skillet over medium heat. Add a splash of broth or water. This keeps the cabbage moist. Stir it often to heat evenly. You can also microwave it, but be careful. Heat it in short bursts to avoid sogginess. If you want to freeze your cabbage, let it cool first. Portion it into freezer-safe bags. Remove as much air as possible. This helps prevent freezer burn. Your Southern Fried Cabbage can last up to three months in the freezer. When you’re ready, thaw it in the fridge overnight before reheating. To make Southern Fried Cabbage gluten-free, you need to choose the right broth. Use vegetable broth instead of chicken broth. Make sure any added toppings, like crispy fried onions, are gluten-free too. Always check the labels. This way, you enjoy a tasty meal without gluten. Southern Fried Cabbage pairs well with many main dishes. Try serving it with: - Grilled chicken - Fried catfish - BBQ pork - Baked ham These dishes add flavor and texture, making a great meal. Leftover Southern Fried Cabbage lasts about 3-5 days in the fridge. Store it in an airtight container to keep it fresh. If you notice any off smells or colors, it’s best to throw it away. Yes, you can easily make Southern Fried Cabbage vegetarian. Just replace chicken broth with vegetable broth. You can also skip the butter and use olive oil instead for a lighter dish. This way, everyone can enjoy it! This blog post covered how to make Southern Fried Cabbage. We explored the main ingredients like cabbage, onion, and garlic. Then we looked at cooking essentials, seasonings, and step-by-step instructions. I shared tips to enhance the flavor and cooking techniques to avoid mushy cabbage. We also discussed variations and how to store leftovers properly. Now you can confidently prepare this dish. Enjoy the flavors and make it your own!

Southern Fried Cabbage Flavorful and Simple Recipe

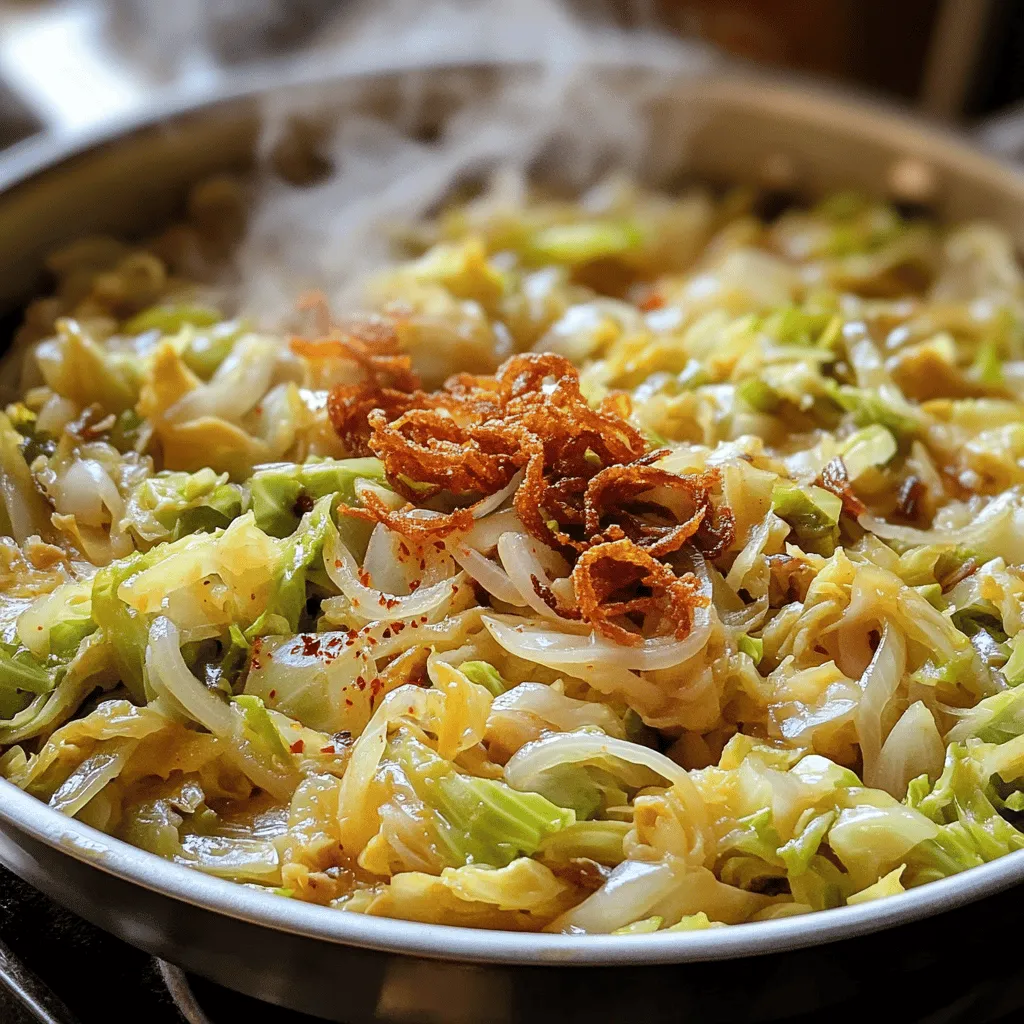
Are you ready to whip up a dish that’s both simple and packed with flavor? Southern Fried Cabbage is the

- 3 medium apples, peeled and diced (preferably Granny Smith) - 1 cup granulated sugar - 1/2 cup brown sugar, packed - 1/2 cup unsalted butter, softened - 3 large eggs - 2 teaspoons vanilla extract - 2 cups all-purpose flour - 1 tablespoon baking powder - 1 teaspoon ground cinnamon - 1/2 teaspoon ground nutmeg - 1/4 teaspoon salt - 1/2 cup buttermilk - 1/2 cup powdered sugar (for icing) - 2 tablespoons milk (for icing) For dietary needs, you can make some swaps: - Use gluten-free flour for a gluten-free cake. - Try applesauce instead of eggs for a vegan option. - Coconut or almond milk can replace buttermilk. Choose apples that give the best taste and texture. My favorites are Granny Smith apples. They add a nice tartness that balances the sweetness of the cake. When picking apples, look for these signs: - Firmness: The apple should feel firm when you squeeze it. - Color: A rich color often means ripeness. Green apples should be bright green. - Skin: Look for smooth skin without bruises or soft spots. Ripe apples make the best cake. They add moisture and flavor. If you can, pick fresh apples from a local farm. They often taste better than store-bought ones. Preheating your oven is key. Set it to 350°F (175°C). This step ensures even baking. While the oven warms, prepare your baking pan. Use a 9x13 inch pan for this cake. Greasing the pan helps the cake release easily. Flour the pan to prevent any sticking. This simple act saves you from a messy cleanup later. Start by creaming the sugars and butter. Use a large mixing bowl for this. Beat them together until they are light and fluffy. This step adds air, making your cake soft. Next, add the eggs one at a time. Mix well after each egg. Then, pour in the vanilla extract. This adds flavor and sweetness. Make sure everything is blended nicely. In another bowl, mix the dry ingredients. Whisk together the flour, baking powder, cinnamon, nutmeg, and salt. Sifting these ingredients helps remove lumps. It also mixes them well. Now, slowly add the dry mix to the wet mix. Alternate with the buttermilk. Stir gently until just combined. Overmixing can lead to a tough cake, so be careful. Pour the batter into your prepared pan. Smooth the top with a spatula for an even surface. Bake in the preheated oven for 30-35 minutes. To check if the cake is done, use a toothpick. Insert it into the center; if it comes out clean, the cake is ready. Once baked, let it cool in the pan for about 10 minutes. This cooling time helps set the cake. After that, transfer it to a wire rack to cool completely. This step ensures the best texture for your delicious apple fritter cake. The key to a fluffy apple fritter cake is to avoid common mistakes. A common pitfall is overmixing the batter. This can make the cake dense instead of light. Mix just until the ingredients blend. Another mistake is not measuring ingredients correctly. Use measuring cups and spoons for the best results. To elevate the flavor of your cake, consider adding spices. Ground ginger or allspice can add a nice kick. You can also enhance the icing. For a glossy finish, add a bit more milk to the powdered sugar. This makes the icing easier to drizzle and helps it shine. Pair your apple fritter cake with a scoop of vanilla ice cream for a delightful treat. The warm cake and cold ice cream create a tasty contrast. You can also serve it with coffee for a cozy dessert experience. For gatherings, cut the cake into neat squares. Arrange them on a pretty platter. Add a sprinkle of cinnamon on top for a nice touch. {{image_2}} You can make your apple fritter cake even better! Try adding nuts or raisins for extra texture. Chopped walnuts or pecans give a nice crunch. Raisins add a sweet chew that contrasts well with the apples. For frosting, think beyond the usual. Caramel sauce can add a rich flavor. Cream cheese frosting is another tasty choice. It adds a tangy twist that pairs well with the sweet cake. Want to make this cake a bit healthier? You can reduce sugar easily. Try using half the amount of granulated and brown sugar. You can also swap in a sugar alternative like honey or maple syrup. To add more fiber, mix in some whole wheat flour. You can also add ground flaxseed or oats. These ingredients boost nutrition without changing the taste too much. Change things up by using seasonal fruits! In fall, try mixing in pears or cranberries. Pears add a sweet, juicy flavor. Cranberries bring a tart kick that brightens the cake. Adjust the spices to fit the season, too. In fall, add a bit more cinnamon or nutmeg. For winter, consider adding ginger or cloves. These spices create warm, cozy flavors perfect for the holidays. To keep your apple fritter cake fresh, store it in an airtight container. This method helps keep moisture in and prevents the cake from drying out. You can keep it at room temperature for up to three days. If you live in a warm place, refrigerating the cake is best. Just make sure to wrap it well in plastic wrap to avoid absorbing fridge odors. You can freeze slices of apple fritter cake for later enjoyment. First, let the cake cool completely. Wrap each slice tightly in plastic wrap. Then, place the wrapped slices in a freezer bag. This way, they will not stick together. Your cake will stay fresh for up to three months. When you want to enjoy your cake, take a slice out of the freezer. Leave it in the fridge to thaw overnight. For a quick thaw, you can set it on the counter for about an hour. This method keeps the cake moist and tasty. Enjoy your sweet treat whenever you want! Can I use different types of apples? Yes, you can. I suggest using tart apples like Granny Smith for the best taste. You can also use Honeycrisp or Fuji apples. Each type has its own flavor. Mixing different apples can add more depth to your cake. How can I make this cake ahead of time? You can bake the cake a day ahead. Just let it cool completely before covering it tightly. Store it at room temperature for up to two days. You can also freeze slices for longer storage. Just wrap them in plastic wrap and foil. Can I skip the icing, and what are alternatives? Skipping the icing is fine. For a simple touch, dust the cake with powdered sugar. You can also serve it with whipped cream or a scoop of vanilla ice cream. These options add flavor and texture without the icing. How to adjust icing consistency for drizzling To make the icing thinner, add more milk. Start with a teaspoon at a time until you reach the right thickness. If it’s too runny, add more powdered sugar. Aim for a smooth, pourable icing that stays on the cake. What to do if the cake turns out too dry or dense If your cake is dry, it may have too much flour or not enough liquid. Ensure you measure correctly. Adding a bit of buttermilk can help. If it’s dense, try mixing the batter less. Over-mixing can cause a tough cake. Fixing over-spiced flavors If your cake tastes too spiced, you can balance it out. Serve it with sweet toppings like ice cream or whipped cream. You can also try adding a bit of vanilla extract to mellow the spices. This guide covered everything you need for making an apple fritter cake. We explored ingredient choices, tips for apple selection, and step-by-step baking instructions. You learned ways to perfect the cake texture and enhance flavors with various spices. We also discussed storage tips and delicious variations. Keep experimenting with different ingredients, and enjoy your homemade creation. With practice, you will master this treat and impress friends and family alike. Happy baking!

Apple Fritter Cake Scrumptious Dessert Recipe Guide

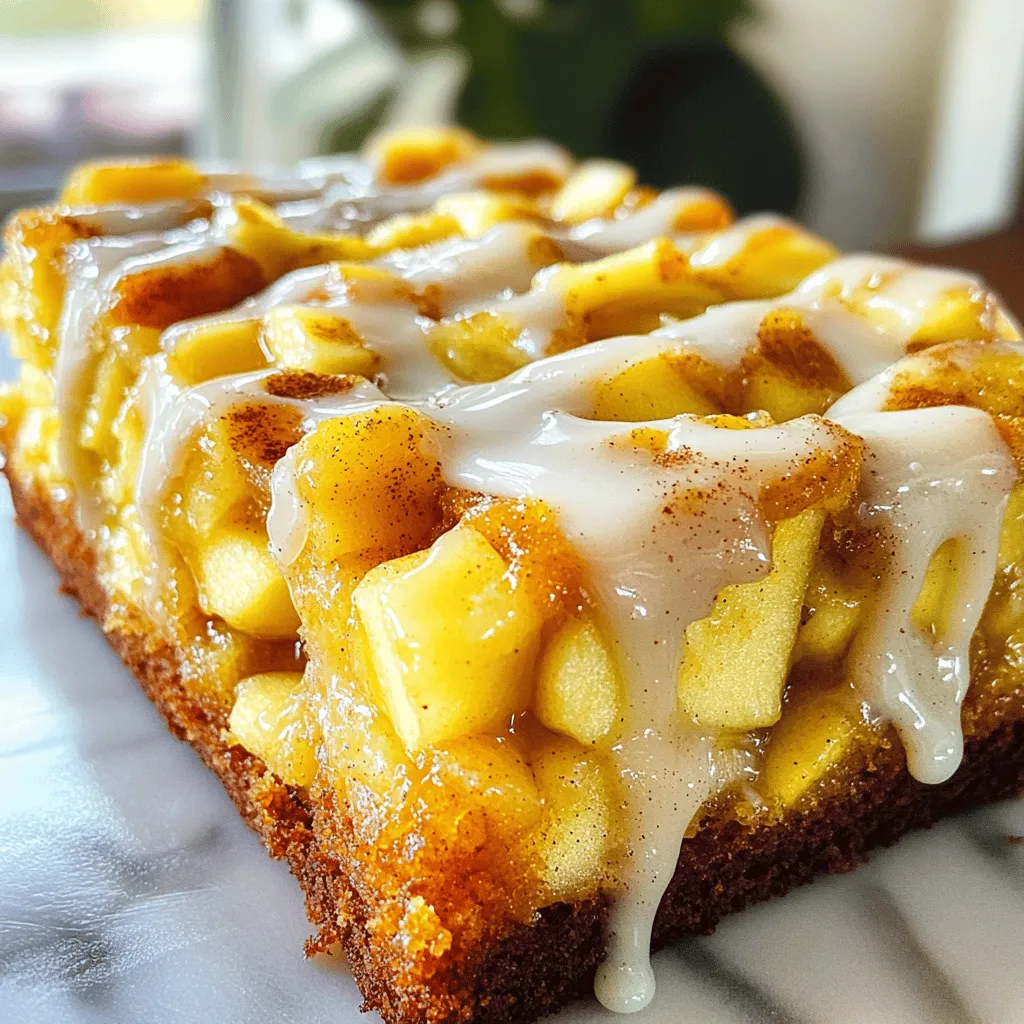
Craving a dessert that bursts with flavor and warmth? Let me introduce you to my Apple Fritter Cake. This guide

- 2 cups all-purpose flour - 1 tablespoon baking powder - 1 teaspoon ground cinnamon - 1/2 teaspoon ground nutmeg - 1/2 teaspoon salt - 1 cup apple cider - 1/2 cup granulated sugar - 1/2 cup brown sugar, packed - 1/2 cup unsalted butter, melted - 2 large eggs - 1 teaspoon vanilla extract - 1/2 cup chopped apples (preferably Granny Smith) - 1/2 cup powdered sugar (for dusting) In this recipe, the dry ingredients give structure and flavor. The all-purpose flour is the base. Baking powder helps the cake rise. Ground cinnamon and nutmeg add warmth and spice, while salt enhances all the flavors. For the wet ingredients, apple cider is key. It adds moisture and a rich apple taste. Granulated and brown sugars sweeten the cake. Butter brings richness and flavor. Eggs bind everything together and add fluffiness. Vanilla extract rounds out the flavors. You can also add optional ingredients for a fun twist. Chopped apples add texture and more apple flavor. Dusting with powdered sugar gives a nice finish and sweetness. This cake is simple, yet it packs a delightful punch! First, preheat your oven to 350°F (175°C). This step warms up the oven for even baking. Next, grease a 9x13-inch baking pan. Use butter or cooking spray to coat it well. This helps the cake come out easily after baking. In a large bowl, whisk together the following dry ingredients: - 2 cups all-purpose flour - 1 tablespoon baking powder - 1 teaspoon ground cinnamon - 1/2 teaspoon ground nutmeg - 1/2 teaspoon salt Whisking well combines everything, ensuring a light cake. In another bowl, combine these wet ingredients: - 1/2 cup granulated sugar - 1/2 cup brown sugar, packed - 1/2 cup unsalted butter, melted - 2 large eggs - 1 teaspoon vanilla extract Whisk until the mixture is smooth and the sugars dissolve. This adds sweetness and richness to your cake. Now, slowly add 1 cup of apple cider to the wet mixture. Stir gently to mix. Then, gradually fold the dry ingredients into the wet mix. Be careful not to overmix; you want it just combined. This keeps your cake tender. Gently fold in 1/2 cup of chopped apples. They add a nice texture and flavor. Pour the batter into your prepared baking pan. Spread it evenly with a spatula. Bake for 25-30 minutes. You will know it’s done when a toothpick inserted in the center comes out clean. After baking, let the cake cool in the pan for about 10 minutes. Then, transfer it to a wire rack to cool completely. This helps keep the cake from getting soggy. Once cooled, dust the top with powdered sugar for a sweet touch. Enjoy your warm, delicious apple cider donut snack cake! To make your snack cake soft and moist, avoid overmixing. This means you should mix the wet and dry ingredients until just combined. Overmixing can make the cake tough. When measuring flour, use a spoon to scoop it into your measuring cup. Then, level it off with a knife. This method helps you avoid packing the flour, which can lead to a dry cake. Spices can boost the flavor of your cake. Besides cinnamon and nutmeg, consider adding a touch of ginger or allspice for warmth. Just a little can make a big difference. Using different apple varieties can change the taste. Granny Smith apples are tart and add a nice contrast. You can also try Honeycrisp or Fuji apples for a sweeter twist. Serve your cake warm or at room temperature. Dust the top with powdered sugar for a sweet touch. For garnish, you can add a drizzle of caramel sauce or some chopped fresh apples. These add color and make the cake even more inviting. {{image_2}} If you want to make this cake gluten-free, you can swap the flour. Use a gluten-free all-purpose blend. Look for one that has xanthan gum added. This will keep the cake light and fluffy. Be sure to check the blend's ratio to regular flour. It often works in a 1:1 ratio. For a dairy-free snack cake, replace the unsalted butter. You can use dairy-free butter or vegetable oil. Coconut oil also works well, adding a slight flavor. If you use oil, 1/2 cup is a good amount. This keeps the cake moist and delicious. You can change up the flavors to suit your taste. Adding nuts like walnuts or pecans gives a nice crunch. Chocolate chips can also bring a sweet surprise. Try adding 1/2 cup of either for a fun twist. Experiment with spices, too. You could add ginger or allspice to enhance the warmth. Just 1/2 teaspoon of each will do. This opens up new flavors while keeping the cake cozy and inviting. To store your Apple Cider Donut Snack Cake, let it cool completely. Once cooled, wrap it in plastic wrap or place it in an airtight container. This keeps the cake fresh. You can store it at room temperature for up to three days. Avoid direct sunlight, as it may dry the cake out. For longer storage, you can freeze the cake. First, cut it into squares. Wrap each piece in plastic wrap, then place them in a freezer-safe bag. Squeeze out all the air before sealing. This helps prevent freezer burn. You can store the cake in the freezer for up to three months. When you're ready to enjoy a piece, take it out of the freezer. Let it thaw in the fridge overnight. For a warm slice, preheat your oven to 350°F (175°C). Place the thawed cake on a baking sheet and heat for about 10 minutes. This warms it through without drying it out. Enjoy your delicious cake as if it was just baked! Apple cider donut snack cake is a cozy dessert inspired by apple cider donuts. It combines rich flavors of apple cider, cinnamon, and nutmeg. The cake is soft, moist, and packed with chopped apples. This treat is perfect for fall gatherings or any time you crave comfort food. The recipe is simple and quick, making it ideal for home bakers of all levels. Yes, you can make the cake ahead of time. Bake it a day before your event or gathering. Once the cake cools, store it in an airtight container. This keeps it fresh and moist. You can also freeze the cake for longer storage. Just wrap it well in plastic wrap and foil. Thaw it in the fridge when ready to serve. If you don't have apple cider, you can use apple juice as a substitute. The flavor will be slightly different but still delicious. You can also mix apple juice with a bit of vinegar for a closer taste to apple cider. Another option is to use a mix of water and apple sauce. Each choice will still yield a tasty cake. To check if the cake is done, insert a toothpick into the center. If it comes out clean or with just a few crumbs, the cake is ready. You can also look for a golden-brown top and a firm texture. If the top springs back when lightly pressed, it's a good sign the cake is fully baked. In this post, I shared how to make a delicious apple cider donut snack cake. I covered the key ingredients, preparation steps, and helpful tips for the perfect bake. You learned about storage options and found answers to common questions. Baking should be fun and easy, so don't hesitate to experiment with flavors. Try variations and enjoy this cake warm, maybe with a sprinkle of powdered sugar. Happy baking!

Apple Cider Donut Snack Cake Delightful and Simple Recipe

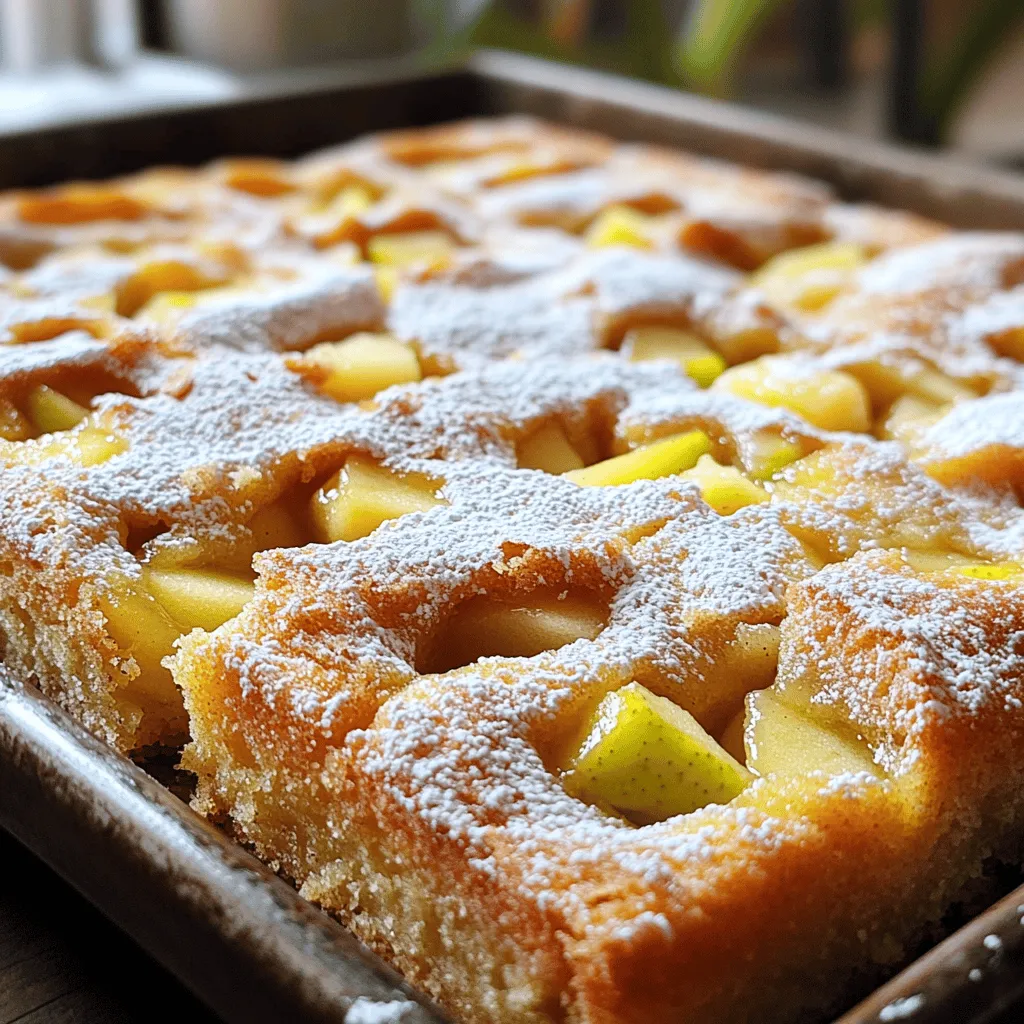
Looking for a cozy treat that captures fall’s essence? You’ve come to the right place! This Apple Cider Donut Snack

- 1 cup orzo pasta - 1 pound shrimp, peeled and deveined - 2 tablespoons olive oil - 3 cloves garlic, minced - 4 cups low-sodium chicken broth - 1 cup grated Parmesan cheese - 1 cup cherry tomatoes, halved - 1 cup spinach, chopped - Fresh basil leaves for garnish - Seasoning essentials: 1 teaspoon Italian seasoning, salt, and pepper For this dish, you need some key ingredients. First, orzo pasta creates a nice base. It cooks quickly and soaks up flavors well. Then, the shrimp adds protein and a sweet taste. Choose fresh shrimp for the best flavor. Olive oil brings richness and helps with cooking. Next, garlic gives a nice aroma and taste. You will also need low-sodium chicken broth. This broth adds depth to the dish without too much salt. Parmesan cheese brings creaminess and a savory touch. Use fresh grated cheese for better melting. Freshness is key, too. Cherry tomatoes add a sweet burst. Spinach gives a touch of green and nutrients. Finally, fresh basil leaves make a lovely garnish. Don't forget the Italian seasoning, salt, and pepper. These simple seasonings enhance the dish perfectly. Together, these ingredients create a savory delight that is sure to impress. Sautéing the garlic First, grab a large skillet. Heat 2 tablespoons of olive oil over medium heat. Add 3 cloves of minced garlic. Sauté the garlic for about 1 minute. You want it to smell nice but not burn. Toasting the orzo Next, add 1 cup of orzo pasta to the skillet. Stir the orzo well to coat it in the garlic oil. Toast the orzo for 2 to 3 minutes. It should turn slightly golden. This step adds flavor to the dish. Adding the broth and simmering Now, pour in 4 cups of low-sodium chicken broth. Bring the mixture to a boil. Once boiling, lower the heat to a simmer and cover the skillet. Cook for about 10 minutes, stirring every few minutes. The orzo should absorb the broth and soften. Incorporating shrimp and tomatoes When the orzo is almost cooked, add 1 pound of peeled and deveined shrimp and 1 cup of halved cherry tomatoes. Sprinkle in 1 teaspoon of Italian seasoning. Cover the skillet again and cook for another 5 minutes. The shrimp will turn pink when done. Adding spinach and Parmesan cheese After the shrimp is cooked, stir in 1 cup of chopped spinach and 1 cup of grated Parmesan cheese. Mix until the cheese melts and the spinach wilts. Season with salt and pepper to taste. Garnishing before serving Remove the skillet from the heat. Let it sit for a couple of minutes. This helps it thicken slightly. Before serving, garnish with fresh basil leaves. Now, your One-Pan Parmesan Orzo with Shrimp is ready to enjoy! - Ensuring the right texture: Cook the orzo until it is just al dente. This keeps it firm and not mushy. Stir regularly while it cooks to avoid sticking. - Avoiding overcooked shrimp: Shrimp cooks fast. Add it to the orzo when it is almost done. Cook it for just 5 minutes until it turns pink. - Substituting other cheeses: If you want a twist, try using feta or goat cheese. They add a nice tangy flavor. - Using fresh herbs for a boost: Fresh herbs like parsley or dill can brighten the dish. Add them right before serving for the best taste. - Best skillet options: Use a large, deep skillet for even cooking. A non-stick skillet helps in easy cleanup too. - Tools for effortless serving: A large spoon or spatula makes serving easy. Consider using a ladle for a neat scoop. {{image_2}} Gluten-free options You can easily make this dish gluten-free. Substitute the orzo with gluten-free pasta. Rice or quinoa also works well. Check your broth to ensure it’s gluten-free too. Vegetarian alternative suggestions If you want a vegetarian dish, skip the shrimp. Add more veggies like bell peppers or zucchini. Tofu or chickpeas can give you protein without meat. Adding different vegetables You can mix in any veggies you like. Try peas, asparagus, or broccoli for a new taste. Each choice adds a nice crunch and color to the dish. Spice it up with cayenne or paprika Want some heat? Add a pinch of cayenne or paprika. This will bring a warm kick to the meal without overwhelming it. Making ahead and freezing You can make this dish ahead of time. Just let it cool, then place it in a freezer-safe container. It lasts up to three months in the freezer. Serving suggestions for leftovers Leftovers are great! You can reheat them in a pan with a splash of broth. Serve with a side salad or crusty bread for a complete meal. To keep your One-Pan Parmesan Orzo with Shrimp fresh, cool it down first. Place leftovers in airtight containers. This helps lock in moisture and flavor. Glass or plastic containers work well. Always label the containers with the date. This way, you can track how long it's been stored. When reheating, the stovetop is best. Place the orzo in a skillet with a splash of broth. Warm it gently over medium heat. Stir often to keep it from sticking. This method helps maintain the creamy texture. You can also use a microwave. Just cover it and heat in short bursts, stirring in between. In the refrigerator, your dish lasts about 3 to 4 days. If you want to save it longer, freezing is a great option. Store it in freezer-safe containers. It's best to eat frozen orzo within 2 months for the best flavor. Remember to thaw it in the fridge overnight before reheating. Can I use another type of pasta? Yes, you can use other pasta. However, orzo works best in this dish. If you use other shapes, adjust the cooking time. How do I know when the shrimp is cooked through? Cook shrimp until they turn pink and opaque. This usually takes about five minutes. Make sure they look firm and not translucent. What can I use instead of Parmesan cheese? You can use Pecorino Romano or nutritional yeast for a dairy-free option. Both add nice flavor. What is a good low-sodium broth alternative? You can use water with herbs or a homemade broth. This keeps the dish tasty without added salt. What pairs well with One-Pan Parmesan Orzo with Shrimp? Serve with a fresh salad or garlic bread for a full meal. A light white wine also complements this dish. Can I serve this dish cold as a salad? Yes, this dish can be served cold. It makes a great pasta salad for warm days. Just chill it after cooking and add a squeeze of lemon. This blog post covered how to make One-Pan Parmesan Orzo with Shrimp. You learned about the main and fresh ingredients. I shared step-by-step instructions for cooking. Tips helped you achieve the best texture and flavor. I also explored dietary variations and storage tips for leftovers. In summary, this dish is easy, flavorful, and flexible. Enjoy cooking and experimenting with your meal!

One-Pan Parmesan Orzo with Shrimp Savory Delight

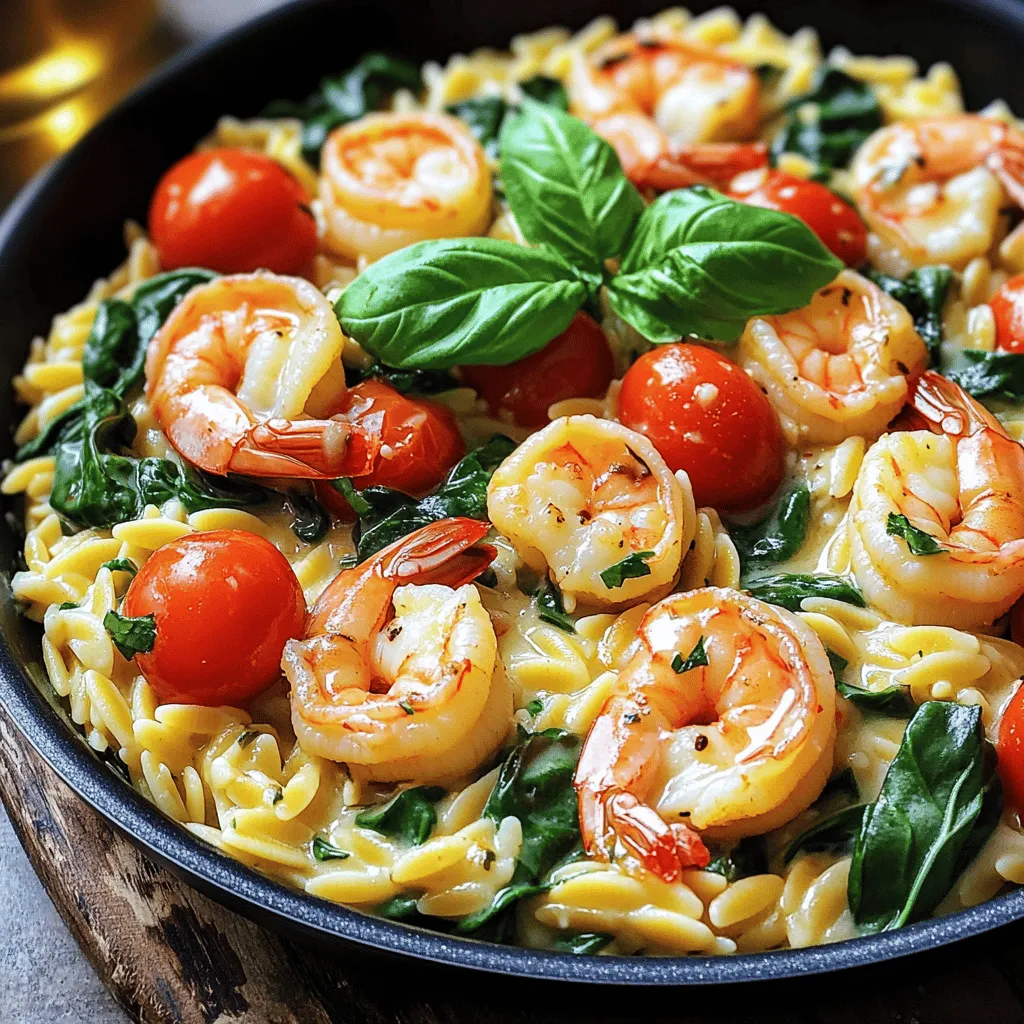
Looking for a quick, tasty dinner? You’ve come to the right place! This One-Pan Parmesan Orzo with Shrimp packs a

- 2 cups of elbow pasta - 1 cup of corn kernels (fresh or frozen) - 1 red bell pepper, diced - ½ cup of red onion, finely chopped - 1 jalapeño, deseeded and minced - ½ cup of Cotija cheese, crumbled - ½ cup of fresh cilantro, chopped - 3 tablespoons of mayonnaise - 2 tablespoons of sour cream - 2 tablespoons of lime juice - 1 teaspoon of chili powder - Salt and pepper to taste When making this pasta salad, I focus on fresh, tasty ingredients. The pasta gives a great base. I love using elbow pasta because it holds the dressing well. Corn adds sweetness and crunch. If fresh corn is not in season, frozen works too. The red bell pepper brings color and a nice bite. Red onion adds a sharp flavor that balances the salad. I like to add jalapeño for a bit of heat. You can adjust this to your taste. Cotija cheese adds a creamy, salty touch. Fresh cilantro brightens each bite. The dressing, made with mayonnaise and sour cream, ties everything together. Lime juice adds a zesty kick. You can swap the elbow pasta for any pasta you like. Penne or fusilli work well too. If you can't find Cotija cheese, feta is a great choice. For a dairy-free option, try using avocado or a nut-based cheese. For the dressing, if you want a lighter option, you can skip the mayonnaise and use more sour cream. You can also use Greek yogurt for a creamy texture. Using fresh corn gives a sweet, crisp taste that is hard to beat. Fresh herbs, like cilantro, add bright flavors that frozen herbs cannot match. They bring life to your dish. While frozen ingredients are handy, I always recommend fresh when you can. They add a depth of flavor that makes your salad stand out. Fresh ingredients make cooking more fun and tasty! Start by boiling salted water in a large pot. Add 2 cups of elbow pasta. Cook it according to the package instructions. Aim for al dente, which means the pasta is firm but cooked. This usually takes about 8-10 minutes. After cooking, drain the pasta. Rinse it under cold water to stop the cooking process and cool the pasta down. If you choose fresh corn, grilling adds a great flavor. Simply husk the corn and place it on high heat. Grill for about 5-7 minutes until the kernels are slightly charred. If you use frozen corn, heat it in a skillet for 3-4 minutes until warm. Let both types of corn cool before adding them to the salad. In a large bowl, combine the cooled pasta, corn, diced red bell pepper, chopped red onion, and minced jalapeño. Add the crumbled Cotija cheese to the mix. Stir gently to blend the ingredients well. This step helps build a rich flavor profile that connects each bite. In a separate small bowl, whisk together 3 tablespoons of mayonnaise, 2 tablespoons of sour cream, 2 tablespoons of lime juice, and 1 teaspoon of chili powder. Add a pinch of salt and pepper. Whisk until the mixture is smooth. Proper seasoning is key for a tasty dressing, so don’t skip this step! Now it’s time to add fresh cilantro to the salad. Reserve a bit for garnishing later. Gently fold the chopped cilantro into the pasta mix. Be careful not to break the pasta or corn. Taste and adjust seasoning with more salt or pepper if needed. Cover the salad and refrigerate for at least 30 minutes. Chilling allows the flavors to meld. Before serving, garnish with extra Cotija cheese and fresh cilantro. This step adds color and makes your dish look as vibrant as it tastes! To make your Mexican Street Corn Pasta Salad even better, try adding more spices. A pinch of cayenne or a sprinkle of hot sauce can bring the heat. If you like bold flavors, don't hold back! You can also mix in other vegetables. Chopped zucchini or diced avocado work well. They add fresh taste and color. Consider using cherry tomatoes for a sweet pop. These enhancements will make your salad more vibrant and filling. This pasta salad pairs well with grilled chicken or shrimp. The protein adds heartiness and makes it a complete meal. You can also serve it with tortilla chips for a fun crunch. For the best taste, serve the salad chilled. It allows the flavors to blend nicely. If you want to serve it warm, let it cool slightly before enjoying. To save time, prepare your ingredients ahead of time. Cook the pasta and chop the veggies early in the day. You can also make the dressing in advance. This way, it all comes together quickly when you’re ready to eat. After cooking, clean up fast. Soak pots and pans in hot water right away. This makes scrubbing much easier later. Keeping your kitchen tidy lets you enjoy your meal without stress. {{image_2}} You can change the taste of this salad easily. - Southwestern twist with black beans: Add one can of black beans, drained and rinsed. This adds protein and a creamy texture. - Mediterranean version with olives: Toss in half a cup of sliced olives for a briny kick. This change gives the dish a fresh twist. If you have special diets, you can still enjoy this salad. - Gluten-free pasta suggestions: Use gluten-free elbow pasta or any gluten-free pasta you like. This keeps the dish tasty for all. - Vegan adaptations of the recipe: Replace mayonnaise and sour cream with vegan versions. Use a dairy-free cheese to make it vegan-friendly. You can adapt the salad based on what’s fresh. - Using seasonal veggies: In summer, add diced tomatoes or cucumbers. In winter, try roasted sweet potatoes or squash. These changes keep the dish exciting. - Adjusting for summer vs. winter flavors: In summer, use fresh herbs like basil or parsley. In winter, add spices like cumin or smoked paprika for warmth. To keep your Mexican street corn pasta salad fresh, use airtight containers. Glass or plastic containers with tight lids work best. Ensure the salad is cooled before sealing it. This helps prevent moisture buildup and keeps the flavors intact. In the fridge, your pasta salad lasts about three to four days. Look for signs of spoilage, like a sour smell or mold. If the salad looks slimy or has changed color, it’s best to throw it away. You can reheat pasta salad, but it's not the best idea. The pasta may become mushy. Instead, serve it cold or at room temperature. If you prefer warmth, heat gently in a skillet. Add a splash of lime juice or olive oil for extra flavor when serving leftovers. Yes, you can make this salad ahead of time. I recommend chilling it for at least 30 minutes. This time helps the flavors mix well. You can also prepare it a day in advance. Just keep it covered in the fridge. I find elbow pasta works best for this salad. Its shape holds the dressing well. You can also try fusilli or rotini. These shapes add texture and fun to the dish. To add heat, use more jalapeño. You can also sprinkle in cayenne pepper. For a smoky flavor, try smoked paprika. Each option brings a unique kick to your salad. Absolutely! This salad is great for meal prep. It keeps well in the fridge for several days. You can pack it for lunches or quick dinners. It’s healthy, tasty, and easy to make ahead. Yes, you can swap Cotija cheese for feta or queso fresco. These cheeses will change the flavor a bit. Both options still work great in this salad. Feel free to experiment and find your favorite. You can make the dressing your own easily. Try adding fresh herbs like dill or parsley. For a tangy twist, mix in some Greek yogurt. You can also add a dash of hot sauce for extra flavor. This blog post guided you through creating a delicious Mexican Street Corn Pasta Salad. We covered ingredients, including types of pasta and cheese. I shared tips for preparing, storing, and serving the salad. Remember to choose fresh ingredients for the best taste. Don't hesitate to try variations that match your diet. This salad is not just tasty; it’s also great for meal prep. Enjoy your cooking, and make it your own!

Mexican Street Corn Pasta Salad Vibrant and Flavorful Dish

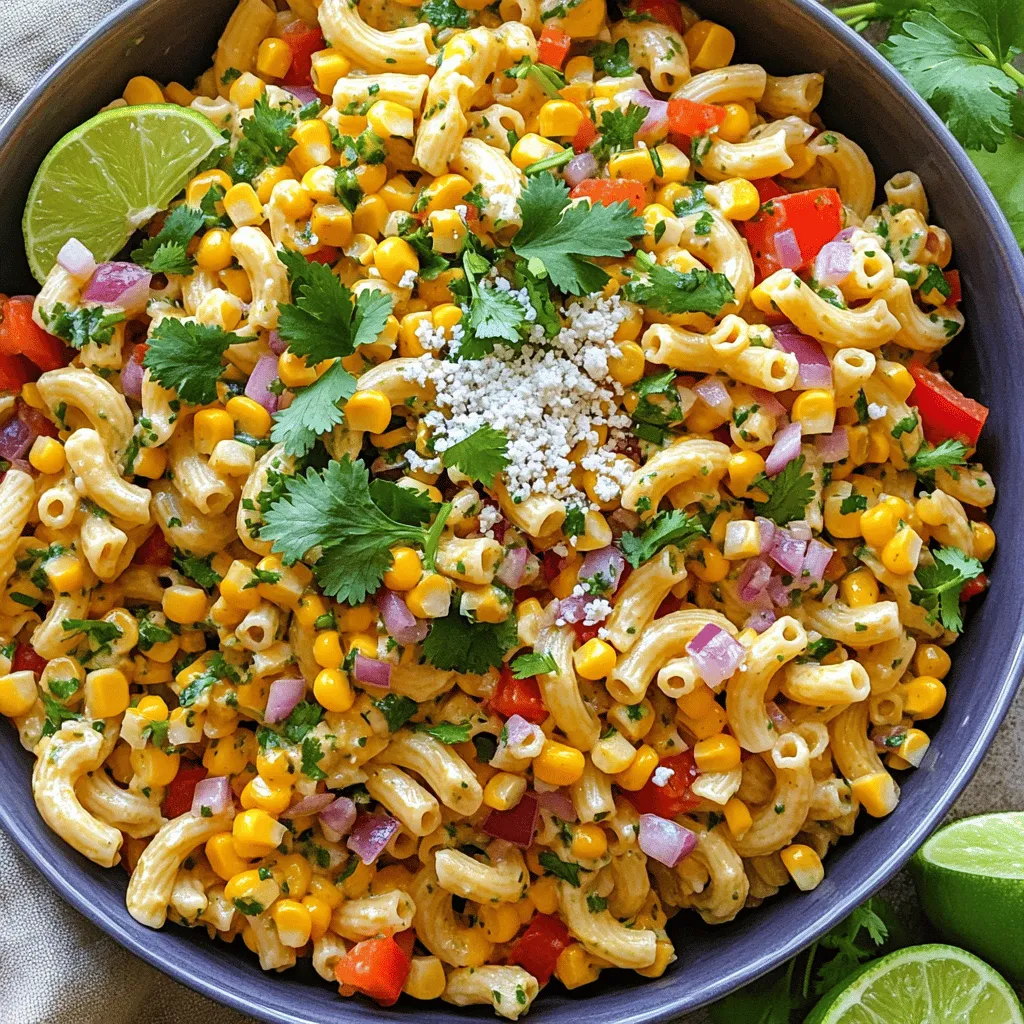
Are you ready to elevate your lunch or dinner with a burst of flavor? This Mexican Street Corn Pasta Salad

- 8 oz linguine pasta - 2 boneless, skinless chicken breasts - 1/4 cup unsalted butter - 4 cloves garlic The main ingredients form the heart of Cowboy Butter Chicken Linguine. The linguine gives a nice base, while the chicken adds protein. Butter makes the dish rich, and garlic gives it flavor. Each ingredient plays a role in making this dish hearty and delicious. - 1/2 teaspoon smoked paprika - 1 teaspoon dried oregano - Grated Parmesan cheese Seasonings enhance the taste of the dish. Smoked paprika adds warmth, and oregano brings a fresh taste. Grated Parmesan cheese on top makes the dish creamy and savory. These extras make the dish more enjoyable and elevate the flavors. - 1/2 cup cherry tomatoes - Fresh parsley for garnish - Heavy cream Adding optional ingredients can change the dish. Cherry tomatoes add a burst of sweetness and color. Fresh parsley brightens the plate and adds freshness. Heavy cream makes the sauce richer and creamier. Use these add-ins to personalize the dish to your taste. You can find the Full Recipe for more details on how to prepare this delightful meal! To start, fill a large pot with salted water and bring it to a boil. This step is crucial for flavor. Once boiling, add 8 oz of linguine pasta. Cook it according to the package instructions until it is al dente. This usually takes about 8 to 10 minutes. When done, drain the pasta. Make sure to save about 1 cup of the pasta water. This water will help adjust the sauce later. Next, take 2 boneless, skinless chicken breasts and cut them into small pieces. Season these pieces with salt and pepper. In a large skillet, heat 1 tablespoon of olive oil over medium-high heat. Add the chicken pieces to the skillet. Cook them for about 6 to 8 minutes until they turn golden brown and are fully cooked. After cooking, remove the chicken from the skillet and set it aside. In the same skillet, lower the heat to medium. Add 1/4 cup of unsalted butter and let it melt. Once melted, stir in 4 cloves of minced garlic, 1/2 teaspoon of smoked paprika, 1/2 teaspoon of cayenne pepper, 1 teaspoon of onion powder, and 1 teaspoon of dried oregano. Cook this mix for 1 to 2 minutes until it smells amazing. Then, return the cooked chicken to the skillet. Add 1/4 cup of heavy cream and mix well. Allow the sauce to simmer for 2 to 3 minutes until it thickens slightly. Now, it's time to mix everything together. Toss the cooked linguine and 1/2 cup of halved cherry tomatoes into the skillet with the sauce. Stir well to coat the pasta and tomatoes with the sauce. If the sauce feels too thick, gradually add some of the reserved pasta water until you reach your desired consistency. Taste your dish and adjust the seasoning if needed. Finally, remove the skillet from the heat. Stir in 1/4 cup of chopped fresh parsley for a pop of color and flavor. Serve the Cowboy Butter Chicken Linguine hot. Top each serving with grated Parmesan cheese for extra richness. For a beautiful presentation, use shallow pasta bowls. Garnish with extra parsley and a sprinkle of Parmesan. You can also add a slice of crusty bread on the side for dipping into the sauce. Enjoy your meal! To enhance the flavor of your Cowboy Butter Chicken Linguine, adjusting the seasoning is key. Start with salt and pepper. Taste the sauce as you go. If it tastes bland, add more smoked paprika or cayenne. These spices give the sauce a nice kick. For thickening the sauce, you have a few options. You can simmer it longer to reduce it. Alternatively, you can add a little more heavy cream. This will make the sauce richer and creamier. When cooking the chicken, make sure it is fully cooked. Cut the chicken into small pieces. Cook them until they are golden brown and no longer pink inside. This will take about 6-8 minutes. Use a meat thermometer to check that it reaches 165°F. To prevent linguine from sticking, stir it often while it cooks. Make sure to use enough salted boiling water. Drain the pasta and toss it with a little olive oil if it sits for a while. This keeps it from clumping together. For side dishes, garlic bread pairs well with linguine. A simple green salad also adds freshness. You can toss in some cherry tomatoes to match the dish. For drinks, a chilled white wine works best. Try a Sauvignon Blanc or a light Pinot Grigio. These wines enhance the meal without overpowering it. {{image_2}} You can change the main protein in this dish. Shrimp works great in place of chicken. Just cook the shrimp until they turn pink. You can also use sausage. Cut it into bite-sized pieces and brown it in the pan. For a vegetarian option, try plant-based proteins. Tofu or tempeh can soak up the flavors well. Changing up the herbs and spices can give this dish a new life. Try adding fresh basil or thyme for a different taste. You can also spice things up with crushed red pepper for heat. Adding veggies is another fun twist. Spinach wilts nicely in the sauce. Bell peppers add color and crunch. Just toss them in the pan with the garlic. If you need gluten-free options, swap the linguine with gluten-free pasta. Many brands offer good alternatives. For those avoiding dairy, use coconut cream or almond milk instead of heavy cream. These options keep the dish creamy but change the flavor a bit. Always taste as you go to make sure it matches your preference. For the Full Recipe, you can find all the steps to make this dish delicious and satisfying. For storing leftovers, use airtight containers. Glass containers work great and keep food fresh. You can also use plastic containers, but ensure they seal well. Leftovers last about three to four days in the fridge. Always let the dish cool before sealing it for storage. To reheat, use the stovetop for best results. Heat a skillet over medium heat and add a splash of water. Stir gently to keep the pasta from sticking. You can also use the microwave, but be sure to cover it. This keeps the moisture in. If you have leftover Cowboy Butter Chicken Linguine, try mixing it with fresh veggies for a quick lunch. To freeze, cool the dish completely first. Then, portion it into freezer-safe bags or containers. Squeeze out any air before sealing. This helps prevent freezer burn. The dish can last up to three months in the freezer. When you're ready to eat, thaw it in the fridge overnight. Reheat it using the stovetop or microwave, adding a splash of water to keep it moist. Yes, you can make Cowboy Butter Chicken Linguine ahead of time. First, cook the chicken and sauce as usual. Let it cool down before storing. Place it in an airtight container. Store it in the fridge for up to three days. When ready to serve, reheat gently. You might need to add a splash of water to loosen the sauce. If you want a lighter option, consider using half-and-half or whole milk. For dairy-free choices, try coconut cream or almond milk mixed with a little flour. These will help thicken your sauce while keeping it creamy. Each option gives a unique flavor, so choose what you prefer. Absolutely! To make it spicy, add more cayenne pepper to the sauce. You could also use crushed red pepper flakes or hot sauce. Start with a little and taste as you go. Adjust until you reach your desired spice level. It’s a great way to personalize the dish. To check if the chicken is cooked, use a meat thermometer. The internal temperature should reach 165°F (75°C). If you don’t have a thermometer, cut into a piece. The meat should be white, not pink. This ensures it’s safe to eat and perfectly cooked. Yes, you can use different types of pasta! While linguine works well, feel free to swap it out. Fettuccine, penne, or even spaghetti can work just fine. Just adjust the cooking time based on the pasta you choose. This lets you enjoy Cowboy Butter Chicken Linguine in your favorite way. For the full recipe, check out Cowboy Butter Chicken Linguine. This blog post shared a simple recipe for Cowboy Butter Chicken Linguine. You learned about the main ingredients, seasonings, and cooking steps to make this dish delicious. I also shared tips on perfecting the sauce and variations for different tastes. In conclusion, enjoy cooking this meal your way. With easy swaps and tips, you can make it great. Just remember to have fun and share it with others. Happy cooking!

Cowboy Butter Chicken Linguine Tasty and Quick Dish

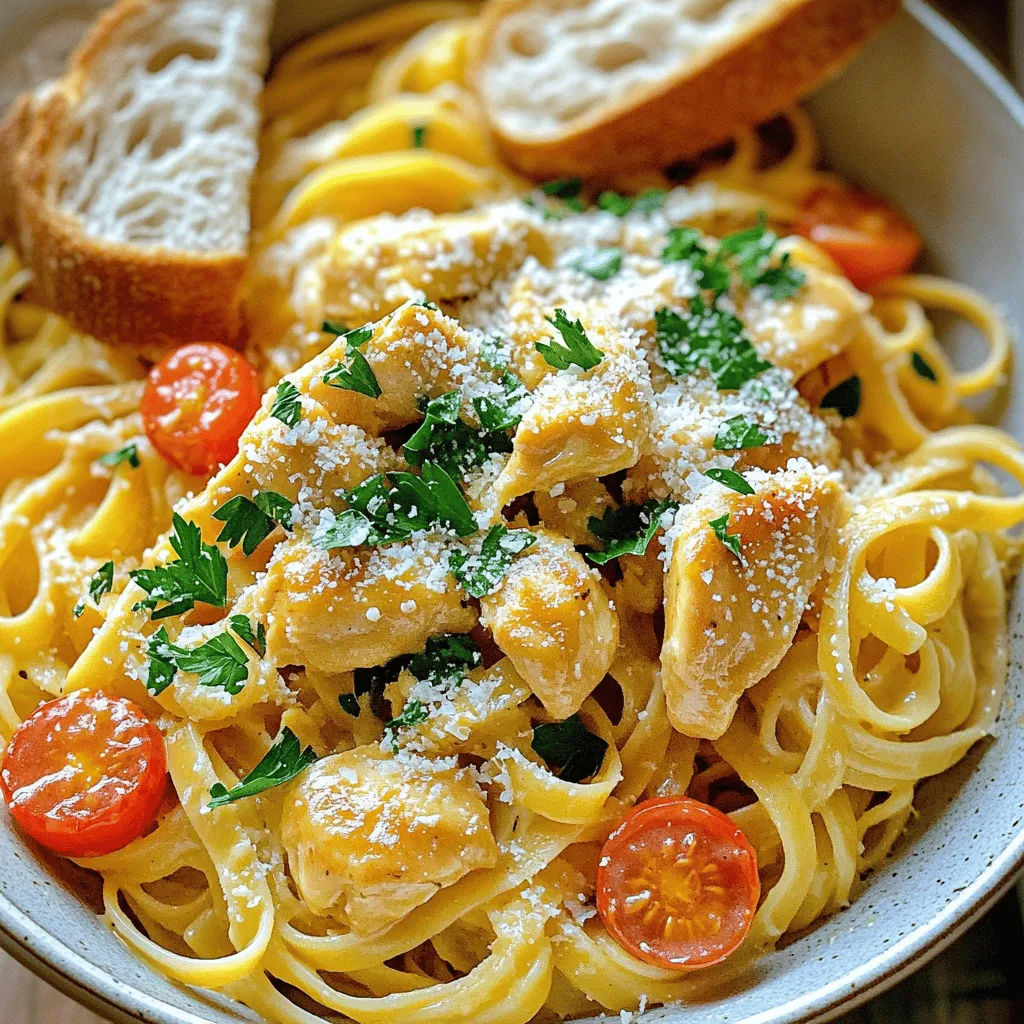
Are you craving a dish that’s both quick and delicious? Look no further than Cowboy Butter Chicken Linguine! This creamy,

To make delicious elotes, you need some key items. Here’s what you’ll need: - 4 ears of fresh corn, husked - 1/2 cup mayonnaise - 1/2 cup sour cream - 1 cup cotija cheese, crumbled (or feta cheese as a substitute) - 2 tablespoons chili powder - 1 lime, juiced - Salt, to taste - Fresh cilantro, chopped (for garnish) - Skewers (optional, for easier handling) These ingredients bring all the amazing flavors together. The corn is sweet, and the cheese adds a nice touch. The lime juice gives it a fresh zing. You can switch things up with some optional ingredients. Here are a few ideas: - Use Greek yogurt instead of sour cream for a healthier twist. - Swap cotija cheese for feta if you can't find it. - Add minced garlic to the mayo mix for extra flavor. - Try different types of chili powder, like smoked or chipotle, for a new taste. These changes can help you find your favorite version of elotes. Don’t be afraid to experiment! Toppings can make your elotes even better. Here are some fun ideas: - Drizzle with hot sauce for a spicy kick. - Sprinkle with more cheese for extra richness. - Add diced avocado for creaminess. - Top with crumbled bacon for a savory crunch. These toppings will make your elotes unique. You can mix and match to suit your taste. Explore the options for the best flavor experience! For the full recipe, check out the detailed instructions and enjoy this tasty treat. First, husk the corn and remove the silk. This step is important for a good taste. If using skewers, push one into the base of each corn ear. This makes it easier to grill. Heat your grill to medium-high. If you don’t have a grill, use a grill pan. Grill the corn for about 10-15 minutes. Turn the corn every few minutes. Look for nice char marks on all sides. This adds great flavor. After grilling, let the corn cool for a bit before touching it. In a bowl, mix mayonnaise, sour cream, lime juice, and a pinch of salt. Stir until smooth. Brush this creamy mix all over the corn. Make sure to cover every bit! Next, sprinkle crumbled cotija cheese over the corn. Press it down gently so it sticks. Finally, add chili powder to taste. If you love spice, go for more! Finish with fresh cilantro on top. Serve hot and enjoy this tasty treat! For the complete details, check the Full Recipe. When picking corn, look for ears that feel firm. The kernels should be plump and bright. Fresh corn has bright green husks, and the silk should look clean and moist. Avoid corn with brown or dry silk. If you see any brown spots or mold, skip that ear. You want sweet and juicy corn for your elotes. One big mistake is overcooking the corn. If you grill it too long, it can dry out. Aim for a nice char without burning. Another mistake is not seasoning enough. The mayo and cheese give flavor, but don’t forget the salt and lime juice! Lastly, forget about skipping the cilantro. It adds a fresh taste and looks great. Spice levels can make or break your corn. If you like it mild, use less chili powder. For more heat, sprinkle more on top. You can also mix in some hot sauce with your mayo. Taste as you go to find what you like best. Everyone has different spice levels, so don’t be shy to adjust! {{image_2}} You can play with different cheeses for your elotes. Cotija cheese gives a nice salty kick. Feta cheese works too if you can’t find cotija. You might also try queso fresco for a milder taste. Shredded cheddar adds a rich twist, but it melts easily. Each cheese gives you a unique flavor and texture. Spices make elotes exciting. Chili powder is classic, but you can use smoked paprika for a deep flavor. Cumin adds warmth and a hint of earthiness. For a spicy kick, try cayenne pepper or hot sauce. Don’t forget garlic powder for that savory boost. Mix and match to find your favorite blend. Get creative with toppings! Fresh lime juice adds zing, while chopped jalapeños bring heat. You can top with crispy bacon bits for a savory crunch. Drizzle with sriracha for a spicy flair. Fresh herbs like parsley or chives can brighten your dish. For a twist, try crushed nuts or seeds for extra texture. For the full recipe, check out the Mexican Street Corn Elotes section! To store leftover elotes, let them cool first. Place each ear in a zip-top bag or wrap in plastic wrap. This keeps them fresh and prevents drying. Store in the fridge for up to three days. If you want to keep them longer, try freezing. When you want to enjoy your elotes again, reheat them in the oven. Preheat your oven to 350°F (175°C). Wrap the corn in foil to keep it moist. Heat for about 10-15 minutes. You can also use the microwave. Place the corn on a plate, cover with a damp paper towel, and heat for 1-2 minutes. If you want to freeze grilled corn, make sure it is fully cooled. Cut the corn off the cob for easier storage. Place the kernels in an airtight container or freezer bag. Remove as much air as possible. You can freeze for up to six months. When ready to use, thaw in the fridge overnight before reheating. Mexican Street Corn, or Elotes, has roots in Mexico's street food culture. Vendors sell this tasty treat at fairs and on busy streets. The corn is usually grilled and topped with creamy sauce and cheese. This dish captures the vibrant flavors of Mexico and reflects its street food tradition. Yes, you can make Elotes without grilling. If you don't have a grill, use a grill pan on your stove. You can also boil or steam the corn. Just cook the corn until tender. Then, follow the same steps to coat it with sauce and toppings. You can still enjoy that delicious flavor! The best way to serve Elotes is hot off the grill. After coating the corn, sprinkle extra toppings like cheese and chili powder. Serve with lime wedges for added zest. You can use skewers for easy handling. This makes it fun to eat while enjoying a sunny day outdoors. For the complete recipe, check out the Full Recipe! In this blog post, I covered how to make tasty elotes. We talked about essential and optional ingredients, plus toppings. I shared step-by-step instructions, grilling tips, and common mistakes to avoid. I also discussed variations to try and how to store leftovers. Elotes are fun and flavorful. You can easily adjust them to fit your taste. Enjoy experimenting with this classic dish!

Mexican Street Corn Elotes Flavorful and Easy Recipe

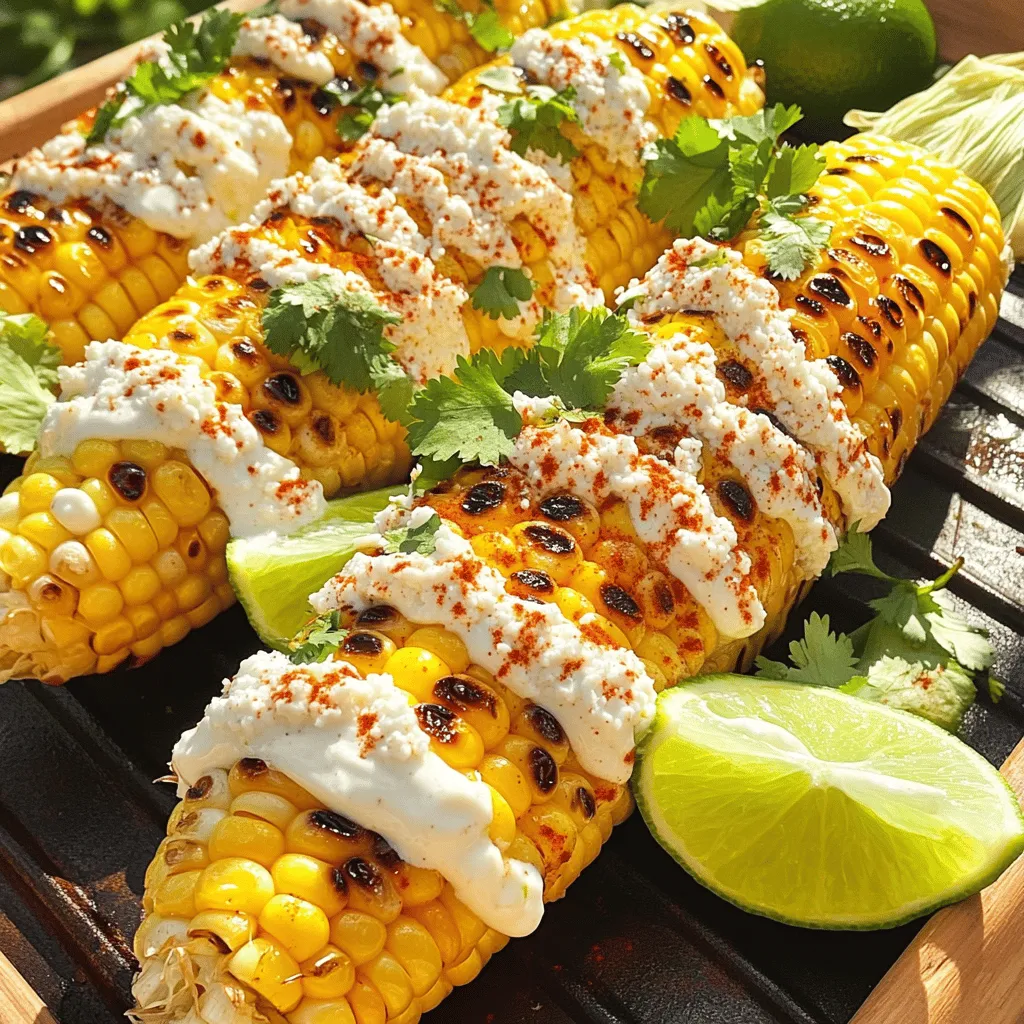
Mexican street corn, or elotes, brings vibrant flavors right to your kitchen! In this easy recipe, I’ll show you how

To make healthy sweet potato gnocchi, you need simple and fresh ingredients. Here’s what you will need: - 2 large sweet potatoes - 1 ½ cups whole wheat flour (plus extra for dusting) - 1 teaspoon salt - 1 teaspoon ground nutmeg - 1 egg, lightly beaten - 1 tablespoon olive oil - Additional toppings: Parmesan cheese, fresh basil These ingredients come together to create a delightful dish. Sweet potatoes are nourishing and give the gnocchi a lovely color and taste. Whole wheat flour adds fiber and a nutty flavor. The egg helps bind everything, while nutmeg adds warmth. Olive oil keeps the gnocchi from sticking and adds richness. Using fresh basil and Parmesan cheese as toppings gives a fresh finish. You can find the full recipe in the article to help you make this delicious dish at home. Enjoy every bite! 1. Preheating the oven and roasting: First, set your oven to 400°F (200°C). This high heat makes the sweet potatoes soft and sweet. 2. Peeling and mashing the sweet potatoes: Pierce each sweet potato with a fork a few times. Place them on a baking sheet and roast for about 45 minutes. Once they are tender, let them cool a bit. Peel off the skins and mash the potatoes in a bowl until smooth. Set aside to cool. 1. Mixing in the dry ingredients: In the same bowl, add 1 teaspoon of salt and 1 teaspoon of ground nutmeg to the mashed sweet potatoes. 2. Incorporating the egg and flour: Add 1 lightly beaten egg to the mix. Gradually stir in 1 cup of whole wheat flour. If the dough is sticky, add more flour until it is soft and workable. 1. Forming the ropes and cutting into pieces: Lightly dust your work surface with flour. Divide the dough into 4 parts. Roll each part into a long rope that is about ½ inch thick. 2. Creating ridges with a fork: Cut the rope into 1-inch pieces. Use a fork to press down gently on each piece, making ridges. This helps the sauce cling better. 1. Boiling the gnocchi: Bring a large pot of salted water to a boil. Gently add the gnocchi in batches. They will float when they are done, about 2-3 minutes. 2. Sautéing for added flavor: Once cooked, remove them with a slotted spoon and place them on a plate. Drizzle with 1 tablespoon of olive oil to keep them from sticking. If you like, sauté the gnocchi in a skillet for 2-3 minutes for a crispy texture. Now you have a tasty and healthy dish ready to enjoy! Don't forget to check out the Full Recipe for more details. To make the best gnocchi, the right dough is key. You want a soft, smooth dough that is not too sticky. Start with less flour and add more as needed. Too much flour makes gnocchi dense. Timing matters when cooking gnocchi. Boil them for 2-3 minutes. They are ready when they float to the top. Watch closely to avoid overcooking. One common mistake is overworking the dough. This can lead to tough gnocchi. Mix just until the dough comes together. Another mistake is not using enough flour. If the dough is too wet, your gnocchi may fall apart during cooking. Always have extra flour handy for dusting. For better flavor, try sautéing your cooked gnocchi. Use olive oil and heat a skillet. This gives a nice crispy texture. Cook for about 2-3 minutes until golden. You can also add herbs or spices during cooking. Fresh basil or garlic can enhance the taste of your dish. Try these tips to make your gnocchi shine! For a full recipe, check out the complete list of ingredients and steps. {{image_2}} You can make this dish gluten-free! Instead of whole wheat flour, use almond flour or gluten-free all-purpose flour. These options will still give you a nice texture. Just add a bit more flour if the dough feels sticky. Want a vegan version? Simply skip the egg. You can use a flaxseed egg instead. To make this, mix 1 tablespoon of ground flaxseed with 2.5 tablespoons of water. Let it sit for a few minutes until it thickens. This will help bind the dough. If you want to cut carbs, try using cauliflower instead of sweet potatoes. Steam and mash cauliflower until smooth. Use about 2 cups of mashed cauliflower. You may need less flour too, so add it slowly. This version is lighter and still tasty! For the full recipe, check out Healthy Sweet Potato Gnocchi 🥔. To store uncooked gnocchi, first, dust them lightly with flour. This helps prevent sticking. Arrange them in a single layer on a baking sheet. Place the sheet in the freezer for about 30 minutes. Once they are firm, transfer the gnocchi to an airtight container or freezer bag. Label the bag with the date. Uncooked gnocchi can last in the freezer for up to three months. To keep cooked gnocchi fresh, allow them to cool completely. Place them in an airtight container. Add a drizzle of olive oil to prevent sticking. Cooked gnocchi can stay in the fridge for up to three days. You can also freeze cooked gnocchi. Just ensure they are in a single layer before packing them away. When reheating gnocchi, you have a few safe methods. You can use the stove, microwave, or oven. For the stove, heat a pan over medium heat. Add a splash of water or olive oil, then toss in the gnocchi. Stir until heated through. In the microwave, place gnocchi in a bowl with a bit of water. Cover and heat for about 1-2 minutes. If using the oven, preheat to 350°F (175°C). Spread the gnocchi on a baking sheet and heat for about 10 minutes. Enjoy your gnocchi warm and tasty! Yes, you can make gnocchi ahead of time. This saves you time during busy days. To prepare them in advance, follow these steps: - After shaping the gnocchi, place them on a floured baking sheet. - Make sure they do not touch each other. - Freeze the gnocchi for about 1-2 hours. - Once frozen, transfer them to a freezer bag or container. This method keeps them fresh for a few weeks. When you’re ready to eat, just boil them directly from the freezer. You can tell gnocchi is cooked by watching for a few signs: - They float to the surface of the water. - This usually happens in about 2-3 minutes. - Once they float, let them cook for an extra minute. If you want, you can taste one. It should be soft and tender. Sweet potato gnocchi pairs well with many sides and sauces. Here are some suggestions: - A light olive oil sauce with garlic and herbs. - A creamy Alfredo or pesto sauce for richness. - Sautéed spinach or kale for a healthy side. - Roasted vegetables for added flavor and color. You can also sprinkle fresh Parmesan cheese on top for extra taste. To find the complete recipe for Healthy Sweet Potato Gnocchi, check the recipe section above. It gives you all the details you need. Enjoy this tasty meal! In this article, I shared the key points to make Healthy Sweet Potato Gnocchi. We covered ingredients, preparation steps, and tips for perfect results. I also highlighted variations, storage tips, and answers to common questions. Making gnocchi at home is fun and rewarding. You can customize it to fit your needs. Enjoy your cooking journey with this tasty dish. It’s easy and brings great flavor to your meals. Dive in and savor the goodness of sweet potato gnocchi!

Healthy Sweet Potato Gnocchi Simple and Tasty Meal

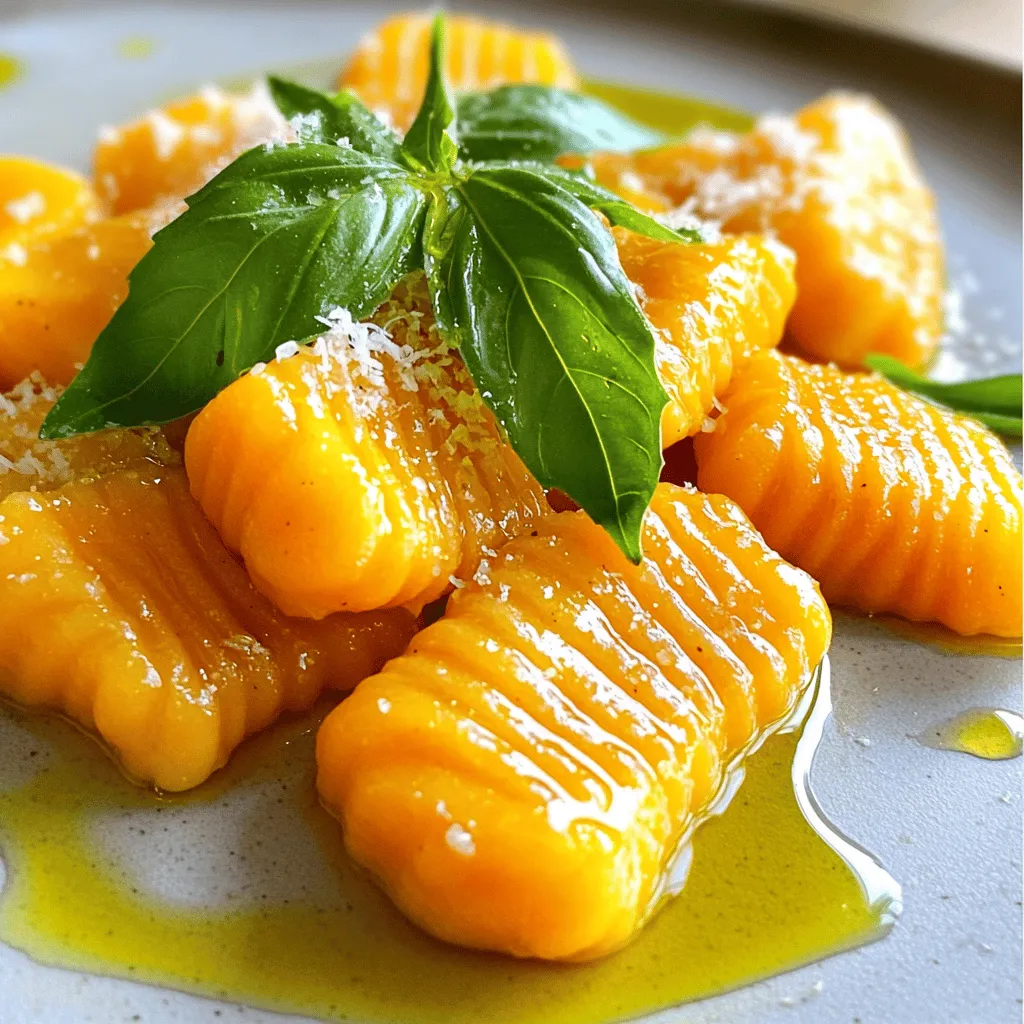
Looking for a simple yet delicious meal? Healthy Sweet Potato Gnocchi checks all the boxes! This dish is quick to

To make Dijon roasted cabbage wedges, you need: - 1 medium green cabbage, cut into 8 wedges - 3 tablespoons Dijon mustard - 2 tablespoons olive oil - 1 tablespoon honey - 1 teaspoon garlic powder - 1 teaspoon onion powder - Salt and black pepper to taste - Fresh parsley, chopped (for garnish) Each measurement is key to balance flavor. You can adjust the honey for sweetness. Maple syrup is a great substitute. If you don’t have Dijon mustard, try yellow mustard. Using avocado oil instead of olive oil works well too. Fresh herbs add bright flavors, but dried herbs are great for convenience. For this recipe, I suggest using fresh parsley for garnish. It gives a lovely color. Dried garlic and onion powders work just fine if fresh isn’t available. When using dried herbs, remember they are stronger. Use less than fresh ones. First, take your medium green cabbage. Cut it into eight wedges. Make sure to keep the core in each wedge. This helps them hold their shape while cooking. Rinse the wedges under cold water to remove any dirt. Pat them dry with a clean towel. Next, arrange the wedges cut side up on your baking sheet. This allows the glaze to soak in and adds flavor. Now, let’s whip up the Dijon glaze. In a small bowl, mix together the following ingredients: - 3 tablespoons Dijon mustard - 2 tablespoons olive oil - 1 tablespoon honey - 1 teaspoon garlic powder - 1 teaspoon onion powder - Salt and black pepper to taste Whisk everything together until it is smooth. This glaze is what makes our cabbage so tasty. Preheat your oven to 400°F (200°C). Once it's warm, brush the glaze generously over each cabbage wedge. Ensure they are well coated for maximum flavor. Place the baking sheet in the oven. Roast the cabbage for about 25 to 30 minutes. Check them halfway through and flip if needed. You want the edges to be crisp and the inside to be tender. Once done, take them out and let them cool for a few minutes. Garnish with fresh chopped parsley for a burst of color. Serve them up and enjoy! For the full recipe, check the details above. To get crispy edges and tender centers, cut your cabbage evenly. Each wedge should be about the same thickness. When you roast them, the heat can do its magic. Always preheat your oven to 400°F (200°C). This high heat helps caramelize the edges. Flipping the wedges halfway through cooking also helps them brown evenly. I recommend roasting them for 25-30 minutes. If you want more crunch, leave them in a bit longer. You can easily change the flavors in this dish. If you like it spicier, add some red pepper flakes to the glaze. For a sweeter taste, increase the honey a little. If you prefer a tangier kick, add more Dijon mustard. Taste the glaze before you apply it to the wedges. This way, you can find the right balance of flavors. Don’t be afraid to experiment! Once your cabbage is roasted to perfection, it’s time to serve. These wedges look great on any plate. I love serving them with a sprinkle of fresh parsley on top. You can pair them with grilled chicken or fish for a complete meal. They also work well with hearty grains like quinoa or farro. Try them alongside a rich sauce or dip. This dish is easy to share at gatherings, too. For the full recipe, check the earlier section. {{image_2}} You can easily change the flavor of your Dijon roasted cabbage wedges. Fresh herbs like thyme, rosemary, or dill can add great taste. Just sprinkle them on before roasting. You can also use spices like smoked paprika or cayenne for a kick. Try adding grated cheese on top during the last few minutes of roasting for a cheesy touch. A squeeze of lemon juice before serving brings a bright flavor that really pops! While roasting is classic, you can grill or pan-sear the cabbage wedges too. For grilling, brush the wedges with the Dijon glaze and place them on a hot grill. Watch them closely, as they will cook faster. For pan-searing, heat olive oil in a large skillet, add the wedges, and cook until they are golden brown on both sides. This method gives a nice crust and deep flavor. Dijon roasted cabbage wedges work well with many main dishes. They pair nicely with grilled chicken, fish, or steak. You can serve them alongside a hearty grain dish, like quinoa or farro, for a complete meal. They also go well with rich foods, balancing out flavors. If you want to keep it light, serve them with a fresh salad. You can find the full recipe for this delicious dish to explore more options! After enjoying your Dijon roasted cabbage wedges, let them cool completely. Place the wedges in an airtight container. This keeps them fresh for later. Store them in the fridge for up to three days. Use parchment paper between layers if you stack them. This helps prevent sticking. To reheat, set your oven to 350°F (175°C). Place the cabbage wedges on a baking sheet. Heat for about 10-15 minutes, or until warm. This keeps the edges crispy and the inside tender. You can also use a microwave. Just cover the wedges with a damp paper towel to keep moisture in. Heat for about one minute. Check and heat more if needed. You can freeze leftover cabbage wedges, but they may lose some texture. First, cool them completely. Then, wrap each wedge in plastic wrap. Place them in a freezer-safe bag or container. Label with the date. They can last up to two months in the freezer. When ready to eat, thaw in the fridge overnight. Reheat as mentioned above for the best flavors. Enjoy your meal again! Green cabbage is the best type for roasting. It has a nice, sweet flavor. The leaves are thick and hold up well to heat. You can also try savoy cabbage. It has a softer texture and adds a unique taste. Both types work great in this recipe. Yes, you can make Dijon Roasted Cabbage Wedges vegan easily. Simply skip the honey and use maple syrup or agave nectar instead. These alternatives add sweetness without using animal products. Your dish will still taste amazing and stay plant-based. Leftover Dijon Roasted Cabbage Wedges last about 3 to 5 days in the fridge. Store them in an airtight container for best results. When you're ready to enjoy them again, just reheat in the oven or on the stovetop. They will taste great! For the full recipe, check the earlier section. Dijon Roasted Cabbage Wedges are simple and tasty. We covered the ingredients, prep, and roasting tips. You learned how to adjust flavors and try different serving ideas. With various cooking methods and storage tips, you can enjoy this dish longer. Experiment with flavors and enjoy your meals. This dish brings flavor to your table. Don’t hesitate to make it your own! Happy cooking!

Dijon Roasted Cabbage Wedges Flavorful and Easy Dish

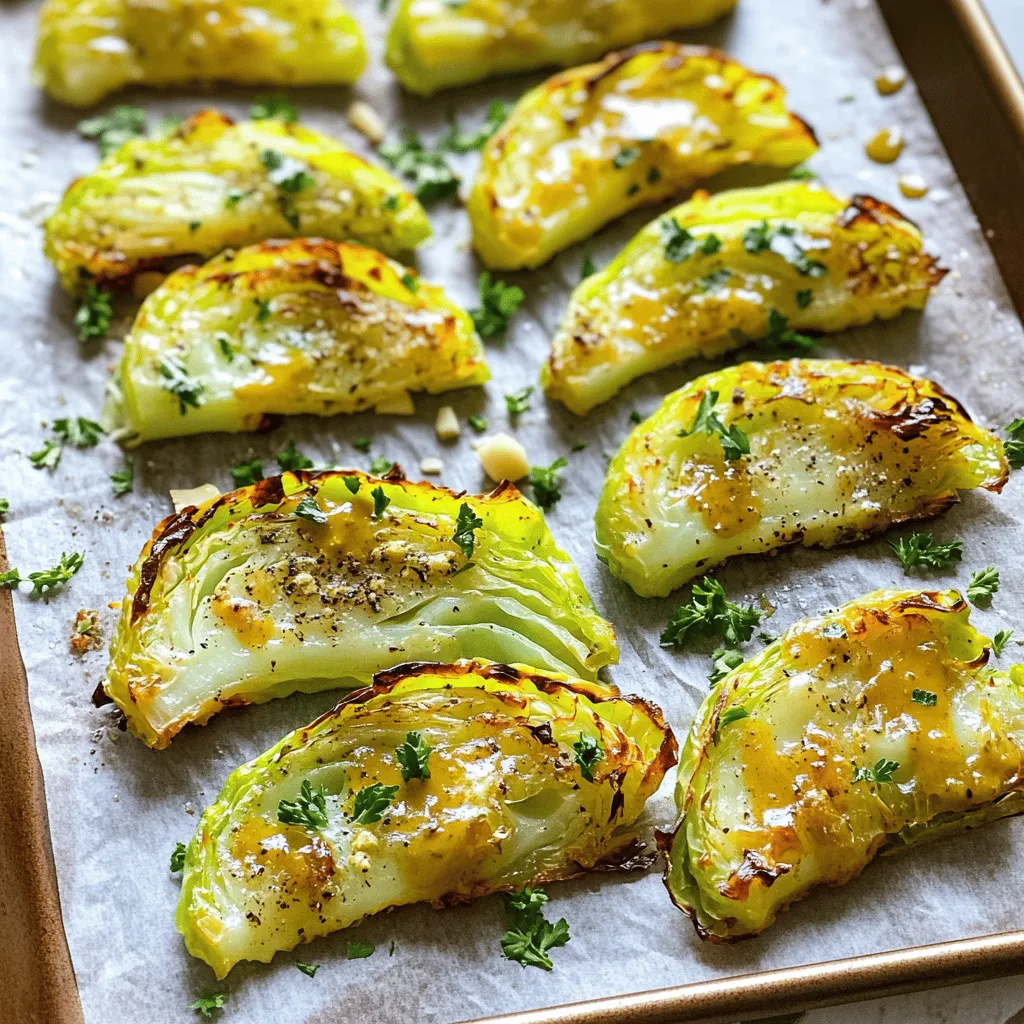
Looking to spice up your meals with a simple, tasty dish? Dijon Roasted Cabbage Wedges are here to save the

To make One Pot Creamy Vegetable Soup, you need some key items: - 1 tablespoon olive oil - 1 medium onion, chopped - 2 cloves garlic, minced - 2 medium carrots, diced - 2 stalks celery, diced - 1 medium zucchini, diced - 1 cup potatoes, peeled and diced - 1 cup green beans, cut into 1-inch pieces - 4 cups vegetable broth - 1 teaspoon dried thyme - 1 teaspoon smoked paprika - Salt and pepper to taste These fresh vegetables create a vibrant mix. The olive oil helps to sauté and develop flavor. The thyme and smoked paprika add depth. You might want to make it even creamier with these extras: - 1 cup coconut milk (or heavy cream for a richer flavor) - Fresh parsley, chopped (for garnish) Adding coconut milk gives a nice sweetness. Fresh parsley brightens the dish with color and taste. For this recipe, gather a few handy tools: - Large pot - Immersion blender - Chopping board and knife A large pot helps cook everything evenly. An immersion blender makes it easy to blend without transferring. A good chopping board and knife are essential for prep. For the full recipe, check out the details provided above. Chopping vegetables Start by washing all your vegetables. I like to chop the onion and garlic first. Next, dice the carrots and celery. Cut the zucchini into small cubes. Finally, peel and dice the potatoes. Measuring spices and broth Grab your measuring cups. Measure out four cups of vegetable broth. Then, get one cup of coconut milk. Finally, prepare your spices: one teaspoon of dried thyme and one teaspoon of smoked paprika. Sauté onions and garlic In a large pot, heat one tablespoon of olive oil over medium heat. Add the chopped onion. Stir it for about three to four minutes. When the onion turns translucent, add the minced garlic. Cook for an extra minute until it smells great. Adding and cooking root vegetables Now, it’s time to add the diced carrots, celery, and potatoes. Sauté these for about five minutes. You want them to soften a bit but not lose all their crunch. Incorporating remaining vegetables and broth Next, stir in the diced zucchini and green beans. Cook these for about two to three minutes. After that, pour in the prepared vegetable broth. Bring the mixture to a boil, then lower the heat to a gentle simmer. Let it cook for about 15 minutes until all the veggies are tender. Blending for desired consistency After the soup cooks, take an immersion blender. Blend until the soup reaches the smoothness you like. If you want some chunks, blend only half of it. Stirring in coconut milk and seasonings Return the pot to low heat. Now, stir in the coconut milk along with the thyme and smoked paprika. Add salt and pepper to taste. Let it warm through for about five minutes. Serving warm with garnish Remove the pot from heat. Ladle the soup into bowls. Top it with chopped fresh parsley for a pop of color and flavor. Enjoy warm! You can find the Full Recipe for more details. You can easily make this soup your own. Here are a few ideas: - Add protein options: Chickpeas or tofu can boost the nutrition. They add texture and flavor without changing the soup's creamy base. - Include a wider variety of vegetables: Don’t limit yourself to just the listed veggies. Spinach, kale, or even sweet potatoes can enhance your soup's flavor and color. To get that perfect creamy texture, follow these tips: - Tips on blending: Use an immersion blender for a smooth finish. Blend until you reach your desired consistency. If you want some chunks, blend just half of the soup. - Adjustments with coconut milk or cream: Coconut milk gives a nice tropical touch. Heavy cream can make it richer. Choose what fits your taste best. Pair your creamy soup with these tasty options: - Pairing with bread or crackers: A crusty bread or crunchy crackers can add a nice contrast. Dip the bread into the soup for a warm and comforting meal. - Ideal accompaniments for the soup: A fresh salad or cheese platter can round out your meal. They bring extra flavors that match well with the soup. These tips will help you create a soup that fits your taste perfectly. Enjoy the process of making this One Pot Creamy Vegetable Soup. For the complete guide, check the Full Recipe. {{image_2}} You can easily swap ingredients to fit your diet. For a vegan-friendly option, use coconut milk instead of cream. This keeps the soup creamy and rich. You can also add extra veggies like spinach or kale for more nutrients. For gluten-free needs, check your broth. Most vegetable broths are gluten-free, but always read the label. To spice things up, consider adding chilies or curry powder. A pinch of red pepper flakes gives a nice kick. If you prefer fresh herbs, try adding basil or cilantro. These herbs can brighten the soup and enhance the taste. Remember, fresh herbs should go in at the end for the best flavor. Using seasonal vegetables can elevate your soup. In spring, add peas and asparagus for freshness. Summer is perfect for zucchini and corn. In the fall, use squash or sweet potatoes. Winter calls for hearty vegetables like carrots and parsnips. If you can’t find a vegetable, feel free to swap it out. This soup is very adaptable. For the complete recipe, check the Full Recipe section. Let your soup cool before storing. This keeps the soup fresh and safe. Once it cools, pour it into airtight containers. Be sure to leave some space at the top for expansion. If you store the soup in the fridge, it can last up to 4 days. Just remember to check for freshness before using. To freeze the soup, use freezer-safe containers. Fill them to about ¾ full, so there’s room for expansion. You can also use freezer bags. Lay them flat in the freezer for easy stacking. When you want to eat it, take the soup out and let it thaw in the fridge overnight. For reheating, warm it on the stove or in the microwave. Add a little water or broth if it seems too thick. This will help get that perfect creamy texture again. Leftover soup is versatile! You can use it as a sauce over pasta or rice. Mix it with cooked grains for a hearty salad. You can also blend it with cooked lentils for an easy dip. Transform your leftover soup into a new meal and enjoy the flavors again. Making One Pot Creamy Vegetable Soup is quick! Here’s the breakdown: - Prep Time: 15 minutes - Cooking Time: 25 minutes - Total Time: 40 minutes This soup is perfect for a busy day. You can have a warm meal in under an hour. Yes, you can make this soup ahead of time. Here are some tips: - Storage: Let the soup cool completely before storing. Transfer it to airtight containers. It will last in the fridge for up to 3 days. - Reheating: When you’re ready to eat, heat it on the stove over low heat. Stir often to prevent sticking. You can also microwave it in a bowl, covered with a lid. This soup is flexible! Here are some great options: - Root Vegetables: Carrots and potatoes add sweetness. - Green Veggies: Zucchini and green beans keep it fresh and vibrant. - Others: Spinach or kale can add more nutrients. - Personal Touch: You can mix and match based on your taste. Use whatever veggies you have at home! Feel free to explore different combinations. The Full Recipe gives you a solid base, but your creativity can take it further! This blog post covered how to make a tasty One Pot Creamy Vegetable Soup. We explored the main and optional ingredients, cooking steps, and useful tips to customize your soup. You learned about storage options and variations to suit your diet. Remember, you can mix different veggies and spices to make it unique. Enjoy this simple, warm soup with bread or fresh herbs. It’s a comforting meal for any time of the year. Give it a try and make it your own!

One Pot Creamy Vegetable Soup Easy and Tasty Recipe

Are you ready to enjoy a warm bowl of comfort? This One Pot Creamy Vegetable Soup is easy to make

Older posts
Page1 Page2 … Page55 Next →

dsad

© 2025 savoryspiral • Built with GeneratePress

Our Policies

  • Copyright Policy
  • Cookie Policy
  • GDPR Policy
  • Privacy Policy
  • Disclaimer
  • Terms Of Use

More Information

  • Home
  • About
  • Contact
  • Appetizers
  • Dessert
  • Dinner
  • Drinks
©2025, savoryspiral About Back To Top