You’ll love making crispy coconut shrimp at home! This simple and flavorful recipe combines tender shrimp with a crunchy coconut coating. With just a few easy steps, you can serve up a plate that wows your family or guests. Whether you’re a cooking newbie or a kitchen pro, I’ll guide you through every part. Ready to dive into this delicious dish? Let’s get cooking!
Ingredients
Overview of Necessary Ingredients
To make crispy coconut shrimp, you need a few key items. Here’s what you will need:
– 1 pound large shrimp, peeled and deveined
– 1 cup all-purpose flour
– 1 teaspoon garlic powder
– 1 teaspoon paprika
– ½ teaspoon salt
– ½ teaspoon black pepper
– 2 large eggs
– 1 cup sweetened shredded coconut
– 1 cup panko breadcrumbs
– Oil for frying
These ingredients work together to give the shrimp a crunchy and sweet coating. The shrimp acts as the star, while the flour and eggs help the coating stick. The shredded coconut and panko add that delightful crunch.
Fresh vs. Frozen Shrimp
You can use either fresh or frozen shrimp for this recipe. Fresh shrimp often has a better taste and texture. However, frozen shrimp is convenient and still tasty. If you go for frozen shrimp, make sure to thaw it properly. You can place it in the fridge overnight or run it under cold water for quick thawing. Always pat it dry before using. This helps the coating stick well.
Optional Cooking Oils
For frying, you have some choices for oils. Common options include vegetable oil, canola oil, and peanut oil. Each oil has a high smoke point, which means they handle heat well. Peanut oil adds a nice flavor, while vegetable and canola oils are neutral. Choose the oil you prefer based on taste and availability. Just make sure to heat it to the right temperature, around 350°F (175°C) for best results.
Step-by-Step Instructions
Preparation of Shrimp
First, start with fresh shrimp. I like to use large shrimp for this recipe. Peel and devein them if needed. Dry the shrimp with paper towels. This step is key. Removing moisture helps the coating stick better. A dry surface means a crispy outcome.
Setting Up Your Breading Station
Next, set up your breading station. Grab three shallow dishes. In the first dish, mix together one cup of flour, one teaspoon of garlic powder, one teaspoon of paprika, half a teaspoon of salt, and half a teaspoon of black pepper. In the second dish, beat two large eggs. In the third dish, combine one cup of sweetened shredded coconut and one cup of panko breadcrumbs. Each dish has a role in making your shrimp crispy.
The Coating Process
Now, it’s time to coat the shrimp. Take one shrimp and dip it in the flour mix. Shake off the excess. Next, dip it into the beaten eggs. Let the extra egg drip off. Finally, roll the shrimp in the coconut-panko mix. Press lightly to help the coating stick. Repeat this for all the shrimp. When done, they’re ready for frying.
Tips & Tricks
Achieving the Perfect Crispiness
To get crispy coconut shrimp, start with dry shrimp. Moisture makes the coating soggy. Pat each shrimp with paper towels before breading. This simple step helps the coating stick and stay crispy. When frying, maintain the oil temperature around 350°F (175°C). If the oil is too cold, the shrimp may absorb oil and become greasy. Fry in small batches to keep the oil hot. Watch for a golden color; it means they are perfectly crispy.
Recommended Cooking Temperatures
The ideal frying temperature is key for great coconut shrimp. Use a thermometer to check the oil. Aim for 350°F (175°C) for the best results. If you don’t have a thermometer, test with a small piece of bread. If it browns in about 60 seconds, the oil is ready. Remember, if the oil is too hot, the shrimp can burn. If too cool, they will not cook properly.
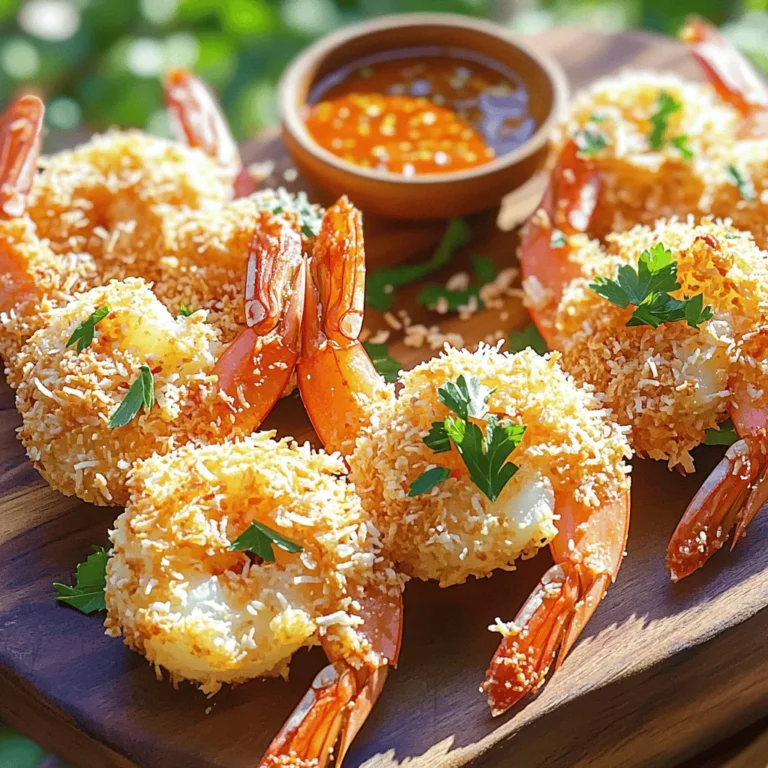
Choosing the Right Dipping Sauce
A good dipping sauce can elevate your crispy coconut shrimp. Sweet chili sauce is a popular choice. It adds a sweet, spicy kick. If you want something fresh, try mango salsa. Its fruity notes balance the coconut flavor well. You can also mix soy sauce with a bit of lime juice for a savory option. Experiment with different sauces to find your favorite match.

Variations
Spicy Coconut Shrimp Option
You can add some heat to your crispy coconut shrimp. Mix in cayenne pepper or chili powder with the flour for a spicy kick. Use about 1 teaspoon to start. Adjust it based on your taste. The spice balances well with the sweetness of the coconut. You will love the extra flavor!
Oven-Baked Coconut Shrimp Recipe
If you want a lighter option, try baking the shrimp. Preheat your oven to 400°F (200°C). Place the coated shrimp on a baking sheet lined with parchment paper. Spray them with cooking oil for better crispiness. Bake for 12-15 minutes, flipping them halfway through. This method gives you that crunch without frying!
Pairing with Side Dishes
Crispy coconut shrimp pairs well with many sides. Consider serving it with rice or a fresh salad. A mango salsa adds a fruity touch. You could also try it with coleslaw for a crunchy contrast. These sides enhance the shrimp’s flavor and make a complete meal.
Storage Info
Best Ways to Store Leftovers
To keep your crispy coconut shrimp fresh, first let them cool. Place them in an airtight container. You can store them in the fridge for up to three days. Make sure to layer them with paper towels to absorb moisture. This will help maintain their crispness.
Reheating Instructions for Optimal Crispiness
To reheat your shrimp, use an oven. Preheat it to 350°F (175°C). Place the shrimp on a baking sheet lined with parchment paper. Bake them for about 10 minutes. This method helps restore their crunch. Avoid using the microwave, as it can make them soggy.
Freezing for Future Use
If you want to save the shrimp for later, freeze them after cooking. Allow them to cool completely. Arrange the shrimp in a single layer on a baking sheet. Freeze them for about an hour. Once frozen, transfer them to a freezer bag. They can last up to three months. When ready to eat, you can reheat them directly from frozen in the oven. Enjoy your crispy coconut shrimp anytime!
FAQs
How do I know when the shrimp is fully cooked?
You can tell shrimp is fully cooked when it turns pink and opaque. The shrimp should curl slightly as it cooks. A good rule is to cook shrimp for 2-3 minutes on each side. If you have a thermometer, the inside should reach 120°F. Overcooked shrimp can become rubbery, so keep an eye on them!
Can I use coconut flour instead of all-purpose flour?
Yes, you can use coconut flour, but it will change the texture. Coconut flour absorbs more moisture than all-purpose flour. You may need to adjust the egg amount to help the coating stick. This change can also add a nice coconut flavor to your crispy coconut shrimp.
What are some popular restaurants that serve crispy coconut shrimp?
Many restaurants serve crispy coconut shrimp as an appetizer. Some popular chains include Red Lobster and Bahama Breeze. Local seafood spots often feature this dish too. If you love this shrimp, try visiting a restaurant that specializes in tropical or seafood cuisine for a tasty experience!
In this post, we covered the ingredients needed for crispy coconut shrimp, starting with shrimp types and oils. You learned how to prepare, bread, and cook your shrimp for the best texture. I shared tips for crispiness and proper cooking temps. We explored tasty variations and ideal side dishes. Finally, I explained how to store and reheat leftovers effectively. Use these insights to create delicious shrimp at home. Enjoy your cooking journey!