![To make this tasty dessert, gather these key items: - 1 ½ cups chocolate cookie crumbs - ½ cup unsalted butter, melted - 2 cups cream cheese, softened - 1 cup granulated sugar - 1 teaspoon vanilla extract - 3 large eggs - 1 cup sour cream - 1 ½ cups cherry pie filling (reserve some for topping) - ¼ cup cocoa powder - Whipped cream for garnish - Chocolate shavings for garnish These ingredients blend to create a rich and creamy cheesecake. The chocolate cookie crust gives it a sweet and crunchy base. The cream cheese and sugar form a smooth filling. The cherry pie filling adds a fruity twist and brings color to the dish. You can tweak the recipe for your taste. Here are some fun options: - Use Oreo cookies for the crust instead of chocolate cookie crumbs. - Add a splash of almond extract for a nutty flavor. - Swap the cherry pie filling for raspberry or strawberry filling. These options let you make the cheesecake your own. Experimenting can lead to new favorites! To create this cheesecake, you’ll need a few tools: - 9-inch springform pan - Mixing bowls - Electric mixer or whisk - Spatula - Measuring cups and spoons Having the right equipment makes the process easier. A springform pan helps you remove the cheesecake smoothly. Mixing bowls and a whisk or mixer blend the ingredients well. This setup ensures your cheesecake turns out perfect every time. For the full recipe, check out the [Full Recipe]. Start by preheating your oven to 325°F (160°C). Grab a 9-inch springform pan. You can grease it with non-stick spray or line the bottom with parchment paper. In a medium bowl, mix 1 ½ cups of chocolate cookie crumbs with ½ cup of melted unsalted butter. Stir until it forms a wet mixture. Press this mixture firmly into the bottom of the prepared pan to form the crust. Bake it for 10 minutes, then let it cool slightly. In a large mixing bowl, take 2 cups of softened cream cheese. Beat it with 1 cup of granulated sugar and 1 teaspoon of vanilla extract until it's smooth and creamy. This should take about 2-3 minutes. Next, add 3 large eggs one at a time. Mix well after each egg. Scrape down the sides of the bowl as needed. Now, mix in 1 cup of sour cream and ¼ cup of cocoa powder until everything is smooth. Finally, gently fold in 1 ½ cups of cherry pie filling. Make sure it's evenly spread throughout the batter. Pour the cheesecake batter over the cooled cookie crust in the springform pan. Use a spatula to smooth the top. Bake in the preheated oven for 55-60 minutes. The center should be set but still slightly jiggly. Once done, turn off the oven and crack the door open. Let the cheesecake cool in the oven for an extra hour. After that, refrigerate the cheesecake for at least 4 hours, but overnight is best. When you’re ready to serve, take off the sides of the springform pan. Top it with some reserved cherry pie filling, a big dollop of whipped cream, and sprinkle chocolate shavings on top for a beautiful finish. Check the full recipe for all the details! To get a creamy texture, start with softened cream cheese. This helps mix well. Beat it on low speed to avoid air bubbles. Too much air makes the cheesecake rise and crack. Use room temperature eggs for a smooth mix. Add them one at a time, mixing well each time. This makes sure they blend evenly into the batter. Mix in sour cream last for a rich taste. Cracks can ruin the look of your cheesecake. To avoid them, bake in a water bath. This adds moisture and keeps the oven steady. Wrap your springform pan in foil. Fill a larger pan with hot water and place the smaller pan inside. Another tip is to let your cheesecake cool slowly. After baking, turn off the oven, crack the door, and let it sit for an hour. When ready to serve, chill your cheesecake well. This makes cutting easier. Use a sharp knife and dip it in hot water. Wipe it dry before each slice. This keeps the edges clean. Top with cherry pie filling, whipped cream, and chocolate shavings. Each slice should look and taste amazing. For the full recipe, check out the provided details. {{image_2}} You can add a fun twist to your Black Forest cheesecake by swirling in some chocolate. To do this, melt ½ cup of dark chocolate. After mixing the cheesecake batter, take a spoonful of the melted chocolate. Gently swirl it into the batter. This adds a rich chocolate flavor and a pretty design. If you want a quick and easy version, try a no-bake cheesecake. For this, use the same ingredients but skip the baking step. Instead, once you mix the batter, pour it into the crust and chill it in the fridge for at least 4 hours. This gives you a creamy, delicious dessert without the oven. For a gluten-free Black Forest cheesecake, swap out the chocolate cookie crumbs for gluten-free cookies. You can also use almond flour or gluten-free graham crackers. Just check the labels to ensure they are gluten-free. This way, everyone can enjoy this tasty treat. For the full recipe, check out the detailed instructions above. To keep your Black Forest cheesecake fresh, wrap it tightly in plastic wrap. You can also place it in an airtight container. Make sure to store it in the fridge. It stays good for up to five days. If you have extra toppings, store them separately. This way, they stay fresh and do not make the cheesecake soggy. You can freeze your cheesecake for longer storage. First, let it cool completely in the fridge. Next, slice it into pieces for easier thawing. Wrap each slice in plastic wrap, then place them in a freezer bag. Make sure to remove as much air as possible. You can freeze it for up to three months. To enjoy your cheesecake again, take it out of the freezer. Place it in the fridge for several hours or overnight to thaw. This gentle thawing helps keep the texture nice. If you need it faster, you can leave it at room temperature for about an hour. Avoid using the microwave, as it can change the texture. Enjoy your decadent treat when it’s fully thawed! For the full recipe, check out the earlier section. Black Forest Cheesecake is a rich dessert that blends chocolate and cherries. It has a chocolate cookie crust, a creamy filling with cream cheese, and cherry pie filling. The cheesecake is often topped with whipped cream and chocolate shavings. This dessert is inspired by the classic Black Forest cake, which features layers of chocolate, cherries, and whipped cream. Making Black Forest Cheesecake takes about 20 minutes of prep time and 55-60 minutes of baking. After baking, you need to cool it for about an hour in the oven. It’s best to chill the cheesecake in the fridge for at least four hours or overnight. So, the total time from start to finish is around six hours. Patience is key, but the wait is worth it! Yes, you can use fresh cherries instead of pie filling. Just wash and pit the cherries first. You can slice them or leave them whole. If you want them sweeter, consider cooking them with a bit of sugar. This will create a syrupy sauce that adds flavor and moisture to your cheesecake. Using fresh cherries makes the dish taste even more vibrant! You can find Black Forest Cheesecake at many bakeries and dessert shops. Some grocery stores also carry it in their bakery sections. If you want a special treat, check local restaurants that offer desserts. For a homemade touch, try making it yourself using the Full Recipe. This way, you can enjoy a fresh slice right from your kitchen! Black Forest Cheesecake combines rich flavors and textures. This dessert starts with a cookie crust, then adds a creamy filling. You can customize it with optional ingredients for unique twists. Following the steps helps you bake it just right. Remember to prevent cracks and serve it well for the best results. Explore different variations and storage tips to enjoy every bite. Each cheesecake journey brings delicious joy. Make it yours and savor the experience!](https://savoryspiral.com/wp-content/uploads/2025/05/a5e2cae0-ba50-4544-b5a2-e08f3b3fc457-768x768.webp)
Are you ready to indulge in a dessert that combines rich chocolate, creamy cheesecake, and sweet cherries? The Black Forest Cheesecake is a delightfully decadent treat that will leave your taste buds dancing. In this post, I’ll share everything you need to know—from the ingredients and baking tips to tasty variations. Join me on this delightful journey and learn how to create this showstopper dessert in your own kitchen!
Ingredients
Necessary Ingredients for Black Forest Cheesecake
To make this tasty dessert, gather these key items:
– 1 ½ cups chocolate cookie crumbs
– ½ cup unsalted butter, melted
– 2 cups cream cheese, softened
– 1 cup granulated sugar
– 1 teaspoon vanilla extract
– 3 large eggs
– 1 cup sour cream
– 1 ½ cups cherry pie filling (reserve some for topping)
– ¼ cup cocoa powder
– Whipped cream for garnish
– Chocolate shavings for garnish
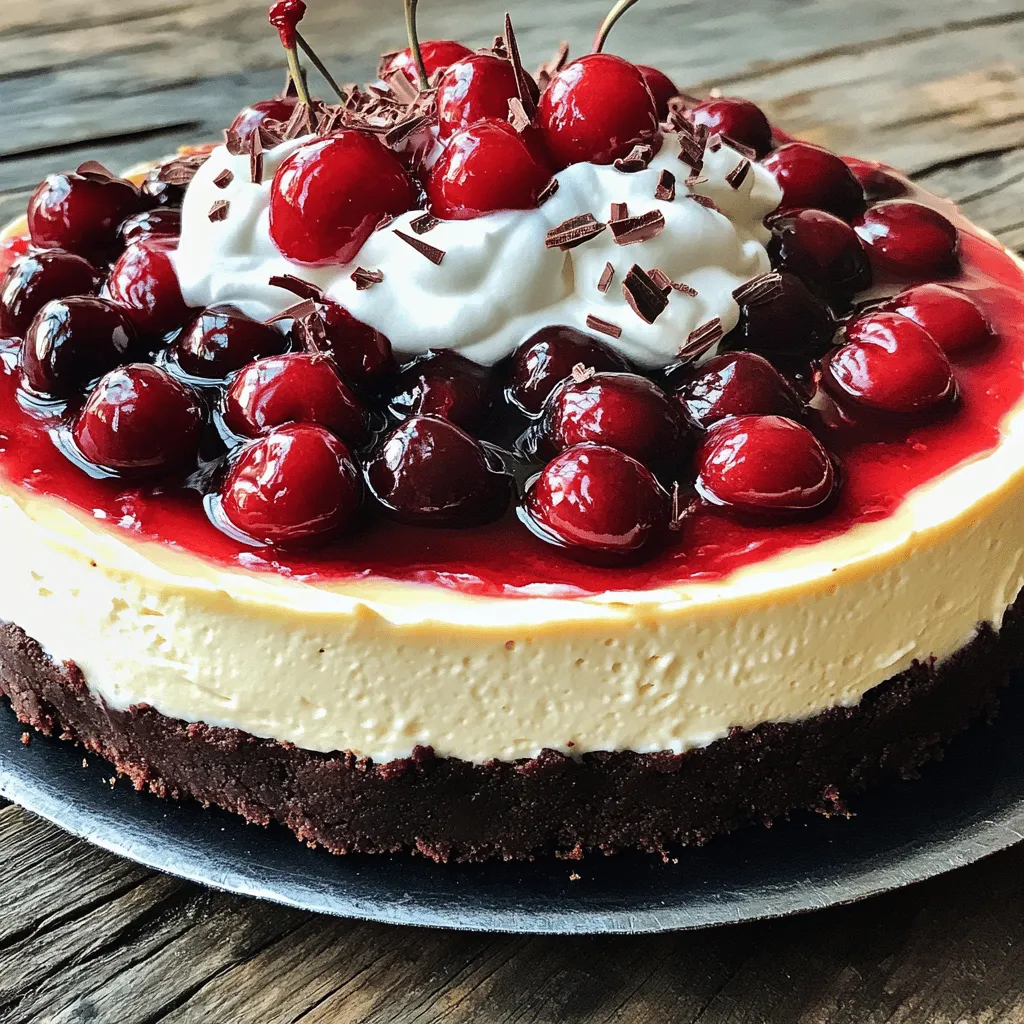
These ingredients blend to create a rich and creamy cheesecake. The chocolate cookie crust gives it a sweet and crunchy base. The cream cheese and sugar form a smooth filling. The cherry pie filling adds a fruity twist and brings color to the dish.
Optional Ingredients for Customization
You can tweak the recipe for your taste. Here are some fun options:
– Use Oreo cookies for the crust instead of chocolate cookie crumbs.
– Add a splash of almond extract for a nutty flavor.
– Swap the cherry pie filling for raspberry or strawberry filling.
These options let you make the cheesecake your own. Experimenting can lead to new favorites!
Equipment Needed
To create this cheesecake, you’ll need a few tools:
– 9-inch springform pan
– Mixing bowls
– Electric mixer or whisk
– Spatula
– Measuring cups and spoons
Having the right equipment makes the process easier. A springform pan helps you remove the cheesecake smoothly. Mixing bowls and a whisk or mixer blend the ingredients well. This setup ensures your cheesecake turns out perfect every time.
Step-by-Step Instructions
Preparing the Cookie Crust
Start by preheating your oven to 325°F (160°C). Grab a 9-inch springform pan. You can grease it with non-stick spray or line the bottom with parchment paper. In a medium bowl, mix 1 ½ cups of chocolate cookie crumbs with ½ cup of melted unsalted butter. Stir until it forms a wet mixture. Press this mixture firmly into the bottom of the prepared pan to form the crust. Bake it for 10 minutes, then let it cool slightly.
Making the Cheesecake Filling
In a large mixing bowl, take 2 cups of softened cream cheese. Beat it with 1 cup of granulated sugar and 1 teaspoon of vanilla extract until it’s smooth and creamy. This should take about 2-3 minutes. Next, add 3 large eggs one at a time. Mix well after each egg. Scrape down the sides of the bowl as needed. Now, mix in 1 cup of sour cream and ¼ cup of cocoa powder until everything is smooth. Finally, gently fold in 1 ½ cups of cherry pie filling. Make sure it’s evenly spread throughout the batter.
Baking the Cheesecake
Pour the cheesecake batter over the cooled cookie crust in the springform pan. Use a spatula to smooth the top. Bake in the preheated oven for 55-60 minutes. The center should be set but still slightly jiggly. Once done, turn off the oven and crack the door open. Let the cheesecake cool in the oven for an extra hour. After that, refrigerate the cheesecake for at least 4 hours, but overnight is best. When you’re ready to serve, take off the sides of the springform pan. Top it with some reserved cherry pie filling, a big dollop of whipped cream, and sprinkle chocolate shavings on top for a beautiful finish.
Tips & Tricks
Achieving the Perfect Texture
To get a creamy texture, start with softened cream cheese. This helps mix well. Beat it on low speed to avoid air bubbles. Too much air makes the cheesecake rise and crack. Use room temperature eggs for a smooth mix. Add them one at a time, mixing well each time. This makes sure they blend evenly into the batter. Mix in sour cream last for a rich taste.
Preventing Cracks on the Cheesecake
Cracks can ruin the look of your cheesecake. To avoid them, bake in a water bath. This adds moisture and keeps the oven steady. Wrap your springform pan in foil. Fill a larger pan with hot water and place the smaller pan inside. Another tip is to let your cheesecake cool slowly. After baking, turn off the oven, crack the door, and let it sit for an hour.
Best Practices for Serving
When ready to serve, chill your cheesecake well. This makes cutting easier. Use a sharp knife and dip it in hot water. Wipe it dry before each slice. This keeps the edges clean. Top with cherry pie filling, whipped cream, and chocolate shavings. Each slice should look and taste amazing.
Variations
Chocolate Cherry Swirl Variation
You can add a fun twist to your Black Forest cheesecake by swirling in some chocolate. To do this, melt ½ cup of dark chocolate. After mixing the cheesecake batter, take a spoonful of the melted chocolate. Gently swirl it into the batter. This adds a rich chocolate flavor and a pretty design.
No-Bake Black Forest Cheesecake
If you want a quick and easy version, try a no-bake cheesecake. For this, use the same ingredients but skip the baking step. Instead, once you mix the batter, pour it into the crust and chill it in the fridge for at least 4 hours. This gives you a creamy, delicious dessert without the oven.
Gluten-Free Option
For a gluten-free Black Forest cheesecake, swap out the chocolate cookie crumbs for gluten-free cookies. You can also use almond flour or gluten-free graham crackers. Just check the labels to ensure they are gluten-free. This way, everyone can enjoy this tasty treat.
Storage Info
How to Store Leftover Cheesecake
To keep your Black Forest cheesecake fresh, wrap it tightly in plastic wrap. You can also place it in an airtight container. Make sure to store it in the fridge. It stays good for up to five days. If you have extra toppings, store them separately. This way, they stay fresh and do not make the cheesecake soggy.
Freezing Black Forest Cheesecake
You can freeze your cheesecake for longer storage. First, let it cool completely in the fridge. Next, slice it into pieces for easier thawing. Wrap each slice in plastic wrap, then place them in a freezer bag. Make sure to remove as much air as possible. You can freeze it for up to three months.
Reheating or Thawing Instructions
To enjoy your cheesecake again, take it out of the freezer. Place it in the fridge for several hours or overnight to thaw. This gentle thawing helps keep the texture nice. If you need it faster, you can leave it at room temperature for about an hour. Avoid using the microwave, as it can change the texture. Enjoy your decadent treat when it’s fully thawed!
FAQs
What is Black Forest Cheesecake?
Black Forest Cheesecake is a rich dessert that blends chocolate and cherries. It has a chocolate cookie crust, a creamy filling with cream cheese, and cherry pie filling. The cheesecake is often topped with whipped cream and chocolate shavings. This dessert is inspired by the classic Black Forest cake, which features layers of chocolate, cherries, and whipped cream.
How long does it take to make Black Forest Cheesecake?
Making Black Forest Cheesecake takes about 20 minutes of prep time and 55-60 minutes of baking. After baking, you need to cool it for about an hour in the oven. It’s best to chill the cheesecake in the fridge for at least four hours or overnight. So, the total time from start to finish is around six hours. Patience is key, but the wait is worth it!
Can I use fresh cherries instead of pie filling?
Yes, you can use fresh cherries instead of pie filling. Just wash and pit the cherries first. You can slice them or leave them whole. If you want them sweeter, consider cooking them with a bit of sugar. This will create a syrupy sauce that adds flavor and moisture to your cheesecake. Using fresh cherries makes the dish taste even more vibrant!
Where can I order or buy Black Forest Cheesecake?
You can find Black Forest Cheesecake at many bakeries and dessert shops. Some grocery stores also carry it in their bakery sections. If you want a special treat, check local restaurants that offer desserts.This way, you can enjoy a fresh slice right from your kitchen!
Black Forest Cheesecake combines rich flavors and textures. This dessert starts with a cookie crust, then adds a creamy filling. You can customize it with optional ingredients for unique twists. Following the steps helps you bake it just right. Remember to prevent cracks and serve it well for the best results.
Explore different variations and storage tips to enjoy every bite. Each cheesecake journey brings delicious joy. Make it yours and savor the experience!
![To make this tasty dessert, gather these key items: - 1 ½ cups chocolate cookie crumbs - ½ cup unsalted butter, melted - 2 cups cream cheese, softened - 1 cup granulated sugar - 1 teaspoon vanilla extract - 3 large eggs - 1 cup sour cream - 1 ½ cups cherry pie filling (reserve some for topping) - ¼ cup cocoa powder - Whipped cream for garnish - Chocolate shavings for garnish These ingredients blend to create a rich and creamy cheesecake. The chocolate cookie crust gives it a sweet and crunchy base. The cream cheese and sugar form a smooth filling. The cherry pie filling adds a fruity twist and brings color to the dish. You can tweak the recipe for your taste. Here are some fun options: - Use Oreo cookies for the crust instead of chocolate cookie crumbs. - Add a splash of almond extract for a nutty flavor. - Swap the cherry pie filling for raspberry or strawberry filling. These options let you make the cheesecake your own. Experimenting can lead to new favorites! To create this cheesecake, you’ll need a few tools: - 9-inch springform pan - Mixing bowls - Electric mixer or whisk - Spatula - Measuring cups and spoons Having the right equipment makes the process easier. A springform pan helps you remove the cheesecake smoothly. Mixing bowls and a whisk or mixer blend the ingredients well. This setup ensures your cheesecake turns out perfect every time. For the full recipe, check out the [Full Recipe]. Start by preheating your oven to 325°F (160°C). Grab a 9-inch springform pan. You can grease it with non-stick spray or line the bottom with parchment paper. In a medium bowl, mix 1 ½ cups of chocolate cookie crumbs with ½ cup of melted unsalted butter. Stir until it forms a wet mixture. Press this mixture firmly into the bottom of the prepared pan to form the crust. Bake it for 10 minutes, then let it cool slightly. In a large mixing bowl, take 2 cups of softened cream cheese. Beat it with 1 cup of granulated sugar and 1 teaspoon of vanilla extract until it's smooth and creamy. This should take about 2-3 minutes. Next, add 3 large eggs one at a time. Mix well after each egg. Scrape down the sides of the bowl as needed. Now, mix in 1 cup of sour cream and ¼ cup of cocoa powder until everything is smooth. Finally, gently fold in 1 ½ cups of cherry pie filling. Make sure it's evenly spread throughout the batter. Pour the cheesecake batter over the cooled cookie crust in the springform pan. Use a spatula to smooth the top. Bake in the preheated oven for 55-60 minutes. The center should be set but still slightly jiggly. Once done, turn off the oven and crack the door open. Let the cheesecake cool in the oven for an extra hour. After that, refrigerate the cheesecake for at least 4 hours, but overnight is best. When you’re ready to serve, take off the sides of the springform pan. Top it with some reserved cherry pie filling, a big dollop of whipped cream, and sprinkle chocolate shavings on top for a beautiful finish. Check the full recipe for all the details! To get a creamy texture, start with softened cream cheese. This helps mix well. Beat it on low speed to avoid air bubbles. Too much air makes the cheesecake rise and crack. Use room temperature eggs for a smooth mix. Add them one at a time, mixing well each time. This makes sure they blend evenly into the batter. Mix in sour cream last for a rich taste. Cracks can ruin the look of your cheesecake. To avoid them, bake in a water bath. This adds moisture and keeps the oven steady. Wrap your springform pan in foil. Fill a larger pan with hot water and place the smaller pan inside. Another tip is to let your cheesecake cool slowly. After baking, turn off the oven, crack the door, and let it sit for an hour. When ready to serve, chill your cheesecake well. This makes cutting easier. Use a sharp knife and dip it in hot water. Wipe it dry before each slice. This keeps the edges clean. Top with cherry pie filling, whipped cream, and chocolate shavings. Each slice should look and taste amazing. For the full recipe, check out the provided details. {{image_2}} You can add a fun twist to your Black Forest cheesecake by swirling in some chocolate. To do this, melt ½ cup of dark chocolate. After mixing the cheesecake batter, take a spoonful of the melted chocolate. Gently swirl it into the batter. This adds a rich chocolate flavor and a pretty design. If you want a quick and easy version, try a no-bake cheesecake. For this, use the same ingredients but skip the baking step. Instead, once you mix the batter, pour it into the crust and chill it in the fridge for at least 4 hours. This gives you a creamy, delicious dessert without the oven. For a gluten-free Black Forest cheesecake, swap out the chocolate cookie crumbs for gluten-free cookies. You can also use almond flour or gluten-free graham crackers. Just check the labels to ensure they are gluten-free. This way, everyone can enjoy this tasty treat. For the full recipe, check out the detailed instructions above. To keep your Black Forest cheesecake fresh, wrap it tightly in plastic wrap. You can also place it in an airtight container. Make sure to store it in the fridge. It stays good for up to five days. If you have extra toppings, store them separately. This way, they stay fresh and do not make the cheesecake soggy. You can freeze your cheesecake for longer storage. First, let it cool completely in the fridge. Next, slice it into pieces for easier thawing. Wrap each slice in plastic wrap, then place them in a freezer bag. Make sure to remove as much air as possible. You can freeze it for up to three months. To enjoy your cheesecake again, take it out of the freezer. Place it in the fridge for several hours or overnight to thaw. This gentle thawing helps keep the texture nice. If you need it faster, you can leave it at room temperature for about an hour. Avoid using the microwave, as it can change the texture. Enjoy your decadent treat when it’s fully thawed! For the full recipe, check out the earlier section. Black Forest Cheesecake is a rich dessert that blends chocolate and cherries. It has a chocolate cookie crust, a creamy filling with cream cheese, and cherry pie filling. The cheesecake is often topped with whipped cream and chocolate shavings. This dessert is inspired by the classic Black Forest cake, which features layers of chocolate, cherries, and whipped cream. Making Black Forest Cheesecake takes about 20 minutes of prep time and 55-60 minutes of baking. After baking, you need to cool it for about an hour in the oven. It’s best to chill the cheesecake in the fridge for at least four hours or overnight. So, the total time from start to finish is around six hours. Patience is key, but the wait is worth it! Yes, you can use fresh cherries instead of pie filling. Just wash and pit the cherries first. You can slice them or leave them whole. If you want them sweeter, consider cooking them with a bit of sugar. This will create a syrupy sauce that adds flavor and moisture to your cheesecake. Using fresh cherries makes the dish taste even more vibrant! You can find Black Forest Cheesecake at many bakeries and dessert shops. Some grocery stores also carry it in their bakery sections. If you want a special treat, check local restaurants that offer desserts. For a homemade touch, try making it yourself using the Full Recipe. This way, you can enjoy a fresh slice right from your kitchen! Black Forest Cheesecake combines rich flavors and textures. This dessert starts with a cookie crust, then adds a creamy filling. You can customize it with optional ingredients for unique twists. Following the steps helps you bake it just right. Remember to prevent cracks and serve it well for the best results. Explore different variations and storage tips to enjoy every bite. Each cheesecake journey brings delicious joy. Make it yours and savor the experience!](https://savoryspiral.com/wp-content/uploads/2025/05/a5e2cae0-ba50-4544-b5a2-e08f3b3fc457-250x250.webp)
